Processing Deliveries Using the PeopleSoft Fluid User Interface on Mobile Devices
This topic discusses how to process deliveries using mobile devices.
Use these pages to process mobile deliveries.
|
Page Name |
Usage |
|---|---|
|
our repository Search for items to add to a delivery. |
|
|
Search for and add more Items for delivery. |
|
|
Perform or attempt delivery of items. |
Use the Delivery - Fluid Search page to search for items to add to a delivery.
Navigation:
This example illustrates the fields and controls on the Delivery - Fluid Search page. You can find definitions for the fields and controls later on this page.
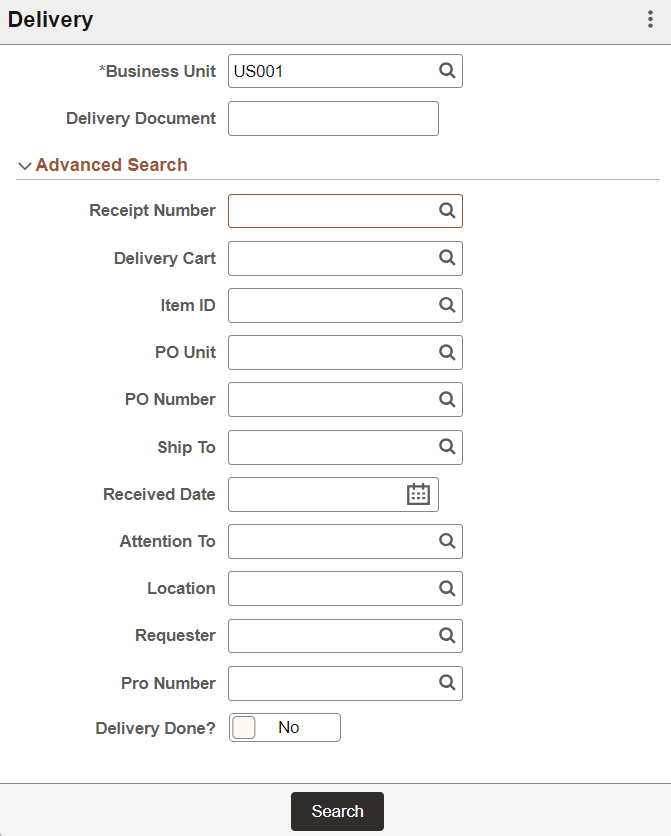
Note: You must select the business unit and it is recommended that you select at least one other search option to retrieve receipt lines for delivery. When searching for only a business unit, it might result in slow performance and result in returning more than 300 rows of data.
Field or Control |
Description |
|---|---|
Business Unit |
Displays the user's default business unit. Depending on the search criteria that you entered, the unit could be the receiving or purchasing business unit. |
Delivery Document |
Enter a delivery document on which to base the search. The document could be, for example, a receipt number, purchase order number, a pro number, such as a tracking number, or a delivery cart number. You can enter a receipt or purchase order without the leading zeros and the system can find the value; for example, to find the receipt number 000000115 you can enter 115. If the Save Delivery Document check box is selected on the Installation Options - Mobile Inventory page, or the User Preferences - Mobile Inventory page, for the task flow, then this field remains populated after clicking the Save button. |
Search |
Click to search for items matching the criteria that you enter. The system displays the matching receipt distribution lines Receipts in a Closed or Cancelled status are not included in the returned lines. |
Advanced Search |
Click to enter advanced search criteria for receipt lines. For example you can define specific item IDs, receipt dates, and requesters. Note: Searches are not case sensitive and partial searches are possible for all of the advanced search fields, except for the Unit and PO Unit (purchase order business unit) fields, which must be exact, and the Receipt Date field. If the system does not find results based on the advanced search criteria, the Advanced Search area remains expanded. |
Receipt Number |
Enter a receipt number on which to base a search for receipts. A receipt must exist in order to deliver items. You can enter a receipt without the leading zeros and the system can find the value; for example, to find the receipt number 000000115 you can enter 115. |
Delivery Cart |
Select a delivery cart on which to base the search. On searching, the system displays all active delivery carts for the receiving business unit. Note: You can define the default delivery cart on the Setup Delivery Cart page to display on this page. |
Item ID |
Select a PeopleSoft system item ID on which to base the receipt search. You can use the lookup icon to locate and select an item ID. Note: This field also supports barcode scanning. After entering an alternate identifier in this field, the system may change the value depending on the option selected in the Alternate Item Display field on the Options page for the task flow. |
PO Unit (purchase order unit) |
Enter a purchase order business unit on which to base a receipt search. The business unit and purchase order business unit must be setup as matching. You can use the Lookup icon to locate and select a business unit. |
PO Number |
Select a purchase order on which to base a search for receipts. The search result will include receipts for the purchase order that you enter. You can enter a purchase order without the leading zeros and the system can find the value; for example, to find the purchase order 000000115 you can enter 115. A purchase order unit is required for the PO Number Lookup icon to work. You can use the Lookup icon to locate and select a purchase order number. |
Ship To |
Select a ship to location to reduce the search to just that location and any other selection criteria that you enter. You can use the Lookup icon to locate and select a ship to location. |
Received Date |
Enter a specific receipt date on which to base the item search. The date must be entered in the correct format. The system only displays the receipts created on or before the date that you enter. |
Attention To |
Enter the person on which to base your search for items to deliver. The system retrieves the purchase order receipt lines that match the attention to person you enter. You can also use the Lookup icon to locate and select the attention to user |
Location |
Select the location for which you want to search for receipt lines to deliver. You can use the Lookup icon. |
Requester |
Select the requester for whom you want to search for receipt lines to deliver. You can use the Lookup icon. |
Pro Number (progressive number) |
Select the progressive number on which to base the search for receipt lines to deliver. The system provides the receipt line with that progressive number. It's possible to have multiple Pro numbers on a receipt. If you perform a search based on the Pro number, the Mobile Delivery component retrieves all the receipt distribution lines that have a parent line with that Pro number associated to it. |
|
Delivery Done? |
Set this toggle button to Yes or No to search for items by their delivery status. If Delivery Done? is yes, the search result displays the items that were delivered. If No is selected, the search result displays the items that were not delivered. |
Use the Delivery - Fluid Add Item to Delivery page to search for and add more Items for delivery.
Navigation:
This example illustrates the fields and controls on the Delivery - Fluid Add Item to Delivery page. You can find definitions for the fields and controls later on this page.
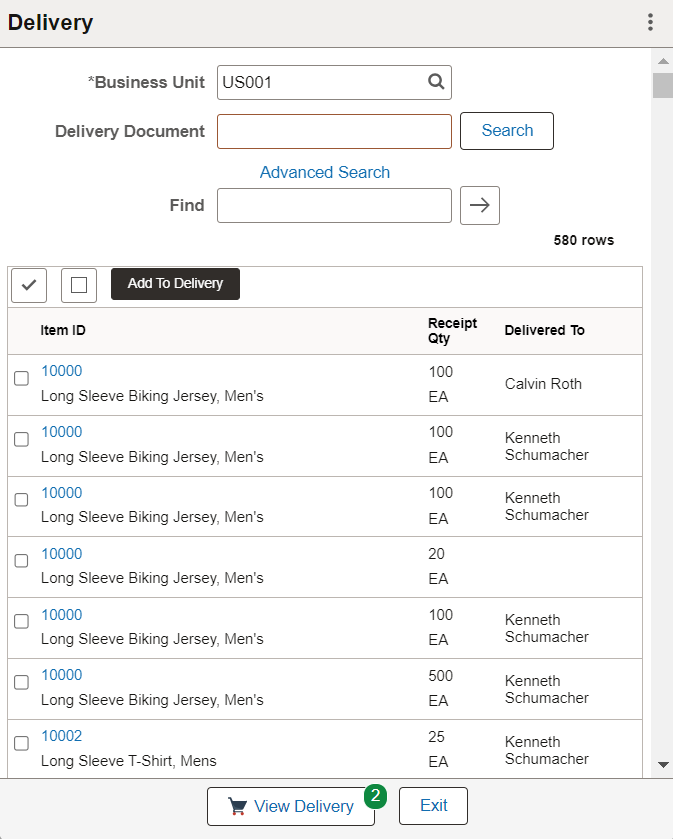
Note: If no matching search results is found, the Find function is not available and the field is not displayed.
Field or Control |
Description |
|---|---|
|
Click to select all of the items in the list. The system adds all selected items to the delivery when you click the Add to Delivery button. |
|
Click to deselect all of the items in the list. |
 |
Click to add the selected items to deliver and disable them in the search results. When you add items to the delivery, the system displays the View Delivery button with the number of items added to the delivery, and then resets the Delivery page. Note: If you sign on the Delivery page to add or delete an item, a pop up message seeks confirmation of changes. |
View Delivery |
Click to open the Delivery — Fluid Perform Delivery page. |
Exit |
Click to discard changes and exit to the Delivery — Fluid Search page. |


Use the Delivery Cart - Fluid Perform Delivery page to perform or attempt delivery of items.
Navigation:
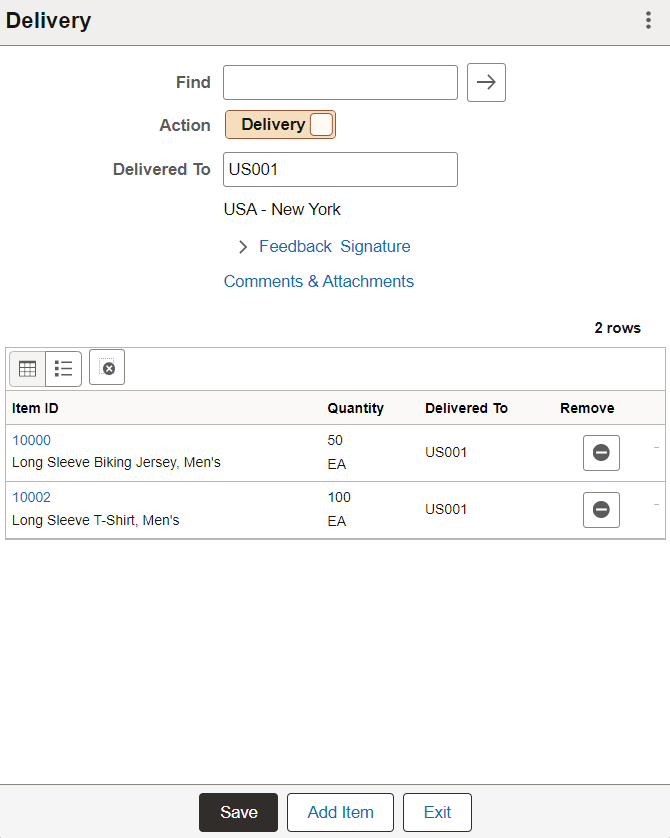
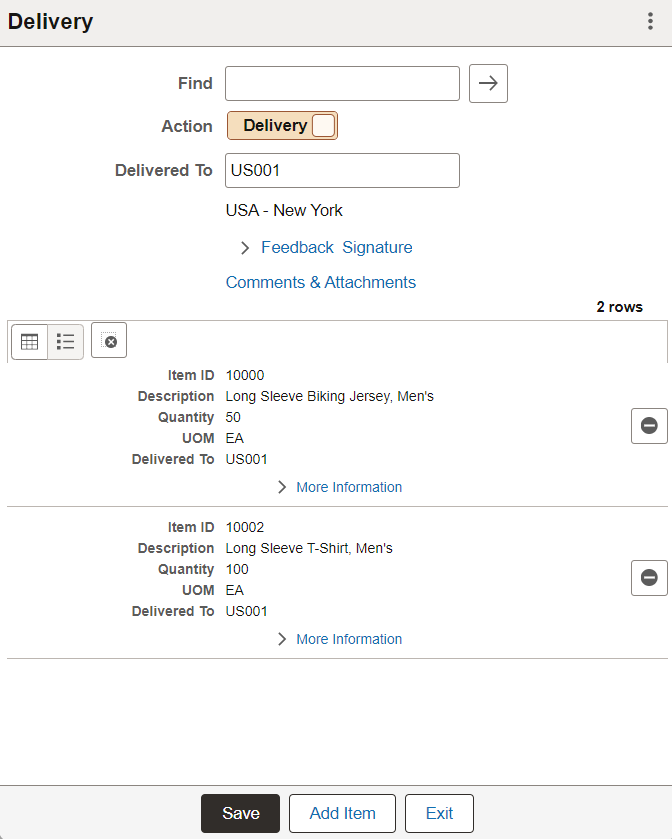
This example illustrates the fields and controls on the Delivery - Fluid Perform Delivery Grid Mode page. You can find definitions for the fields and controls later on this page.
This example illustrates the fields and controls on the Delivery - Fluid Perform Delivery List Mode page. You can find definitions for the fields and controls later on this page.
Field or Control |
Description |
|---|---|
Find |
Enter data to filter by. |
Action |
Use the toggle the switch to modify the option. The available actions are :
Note: Delivery is the system assigned default value. Also if Attempt Delivery is selected, Delivered To and Signature functions are not available and the associated fields do not display. |
Delivered To |
Enter the employee name. The employee information needs to be entered manually, since the MIN_ATTN_TO table searches for only the Employee ID and Badge details. You can also scan a bar code, such as an employee badge number or a location bar code. If you change this value all lines in the delivery change accordingly. Note: The system populates the Delivered To field if the Default Delivered To check box is selected and the lines added to the delivery meet the necessary criteria, such as having the same attention to, requester or location. The description of the Delivered To field is displayed below if it is in the system. Note: Mobile Inventory Delivery has not integrated the Deliver To field with HR tables directly. It only searches for the Employee ID and Employee Badge Number in the MIN_ATTN_TO table. You must manually populate the table with the employee information. |
Code |
Select a code that automatically updates the Feedback field. Codes are defined in the PeopleSoft system Delivery Feedback component. |
Feedback |
If you selected a feedback code for the attempted delivery, the text appears in this field. You can also enter additional comments that you have related to the attempted delivery. The Code field is not required to enter free-form text into the Feedback field. |
Signature |
Click to open the signature area where you can capture and record a signature for the delivery. Note: If you sign using this option to add or delete an item, a pop up message also seeks confirmation of changes. |
|
Comments & Attachments |
Click this link to enter delivery comments and upload attachments. For more details, see Delivery Comments & Attachments - Fluid Page. |
Add Item |
Click to add one or more items to the delivery. |
Save |
Click to deliver the items that appear in the list at the bottom of this page. As part of saving the delivery, the current date, time, and user ID of the person performing the delivery are recorded in the delivery transaction history table. When the delivery is complete, the system displays the Delivery Saved page. |
Exit |
Click to discard changes and exit to the Delivery search page. |
Use the Delivery Comments & Attachments - Fluid Page to enter comments and upload the attachments.
Navigation:
This example illustrates the fields and controls on the Delivery - Comments & Attachments Page.
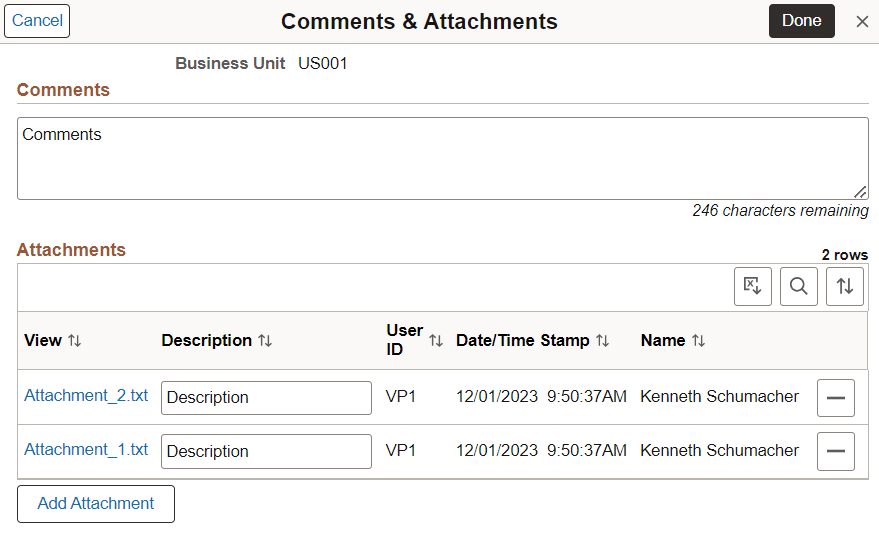
For fields and definitions, see Comments & Attachments - Fluid Page.
To configure attachment upload limit, see Installation Options - Multiple Attachments Page.
Comments & Attachments for Delivered Items
If the items are delivered with comments and attachments, search for them by selecting the Delivery Done? toggle button Yes. Click the Comments & Attachments link on the Delivery - Fluid Perform Delivery Page to only view the added comments and attachments for the delivered items.
For multiple line items, comments and attachments appear in sequence one after another with the Item ID.
This example illustrates the fields and controls on the Delivery - Comments & Attachments Page for Delivered Items.

Note: You can only view the comments and attachments on this page. You cannot modify or delete it.
To delete the comments and attachments, deselect the Delivered check box for that specific line item ID on the Maintain Delivery Information - Delivery Location Page. It will delete the comments and attachments and make the line item undelivered. If the same comments and attachments are added for multiple items, then deselecting the Delivered check box will delete the comments and attachments only for the selected line item. Other items will contain the same comments and attachments.