Receiving Purchase Order Receipt Items Using the PeopleSoft Fluid User Interface on Mobile Devices
This topic discusses how to receive purchase order receipt items using a mobile device.
|
Page Name |
Usage |
|---|---|
|
Search for purchase order items to receive. |
|
|
Select purchase order schedules to receive and define the quantity to receive. |
|
|
Enter purchase order receipt line information. |
|
|
View distribution line detail information of a receipt line. |
Use the Receiving PO - Fluid Search page to search for purchase order items to receive.
Navigation:
Mobile Inventory, Receiving PO
This example illustrates the fields and controls on the Receiving PO - Fluid Search page. You can find definitions for the fields and controls later on this page.
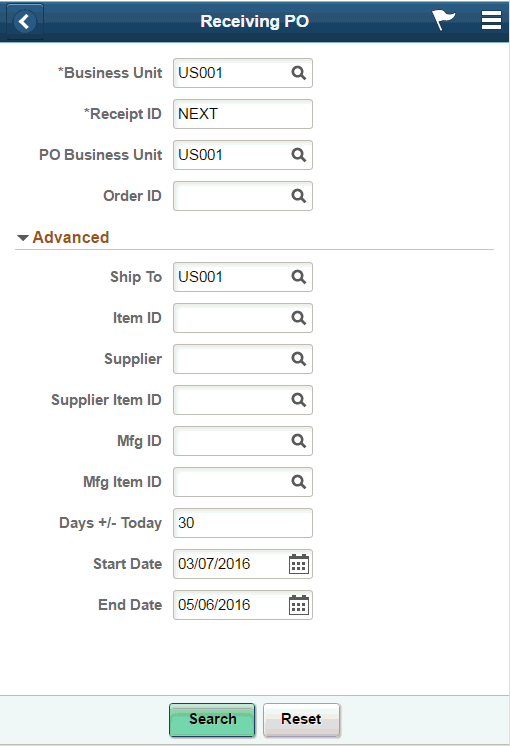
When you access the Receiving PO page, the system provides default values from the PeopleSoft system Purchasing set up pages, including user preferences setup. To view all of the default settings, click the Advanced Search and the Options links.
You can change the values which will become the default values on the mobile device until you exit the transaction. The changes that you make are only recognized by the receiving transaction and not recognized by other mobile transactions. The changes do not update the user preferences settings in the PeopleSoft system.
Expand the Advanced section to view and update additional search criteria for purchase orders. Values in these fields are used to qualify the list of purchase orders.
Field or Control |
Description |
|---|---|
Business Unit |
Displays the receiving business unit from the user's default business unit. You can change the business unit. The field is required. |
Receipt ID |
Enter the receipt ID that you want to use to create the receipt. The system assigns the ID or number when you save the receipt. The default value for the field is Next. You do not have to enter a number if you use the default value. The assigned number is based on the autonumbering sequence defined in the PeopleSoft system for receipts. This field is required. |
PO Business Unit (purchase order unit) |
Enter a purchase order business unit. The system defaults the value from user preferences. You can also use the Receipts page in the PeopleSoft system to record the receipt. |
Order ID |
Enter the purchase order number or purchasing contract number. Entering a contract ID retrieves all of the purchase order schedules associated with the contract. If you enter a value in this field and tab out of the field, the system immediately initiates the search to find the purchase orders that matched the value. If there is at least one row that matches the search, the system displays the Receive Lines page. |
Advanced |
Click to expand the Advanced table where you can define additional purchase order search criteria. |
Ship To |
Enter the ship to location for the purchase order schedules. This field defaults from the User Preferences - Procurement setting for the Ship To Location field. You can override the value. The business unit and ship to unit do not need to have the same value. |
Item ID |
Enter an item ID to which you want to limit the purchase order search. After entering an alternate identifier in this field, the system may change the value depending on the option selected in the Alternate Item Display field on the Options page for the task flow. See Setting Up Alternative Item Identifiers. Note: Barcode scanning is supported if the corresponding switch is enabled. |
Supplier |
Enter a supplier short name to which you want to limit the purchase order search. When you perform the search, the system retrieves only those purchase orders for the supplier short name that you enter. |
Supplier Item ID |
Enter a supplier item ID to which you want to limit the purchase order search. When you perform the search, the system retrieves only those purchase orders for the supplier item that you enter. When entering a value in the Supplier Item ID field, a supplier is required in the Supplier field. |
Mfg ID (manufacturer ID) |
Enter a manufacturer's ID to limit the purchase order search results to only those purchase orders with that manufacturer's ID. |
Mfg Item ID (manufacturer item ID) |
Enter the manufacturer's item ID to limit the search to just that item ID for the manufacturer. |
Days +/- Today |
Enter the number of days plus or minus from the current date. The system searches for purchase orders that have a due date within this range of days. This value defaults from the Receiver Setup page in the User Preference - Receiver Setup component. You might need to change this value if an older purchase order is being received and the initial default value is too small so that the purchase order lines to be received do not appear. By increasing the number of days, you can find the lines and receive them. You enter a value to further restrict or expand the number of purchase order schedules that appear within the start date and end date range. This value is added or subtracted from the current date to calculate the start date and end date values. The default value appears from the User Preferences - Procurement: Receiver Setup page. You can also enter the start date and end date. The system selects all schedules with due dates that are on or within the two dates you enter. |
Start Date |
Enter the start day used as a comparison against the purchase order due date to determine which schedules to retrieve. If you change the start or end date values, the system does not change the Days +/- Todayfield value. Note: If an Order ID is entered, this field is disabled. |
End Date |
Enter the end day used as a comparison against the purchase order due date to determine which schedules to retrieve. If you change the start or end date values, the system does not change the Days +/- Todayfield value. Note: If an Order ID is entered, this field is disabled. |
Search |
Click to initiate the search for an order ID. The system searches for a purchase order ID or purchase order IDs that have the entered contract ID on the purchase order schedule. The returned search displays the purchase order schedules that can be received. You can receive one or all of the schedules. The search results include the values that match the selection criteria of the advanced search. The values included in the Advanced search table are included when the search is initiated. |
Reset |
Click to reset the Ship To and Days +/- Today field search values in the Advanced Search table to the default values. The system also clears other input fields such as Item, Supplier, Supplier Item ID, Mfg ID and Mfg Item because these fields do not have default values. |
Use the Receiving PO - Receive Lines page to receive and define the quantity to receive.
Navigation:
Mobile Inventory, Receiving PO. Click the Search button on the Receiving page
This example illustrates the fields and controls on the Receiving PO - Fluid Receipt Main page. You can find definitions for the fields and controls later on this page.
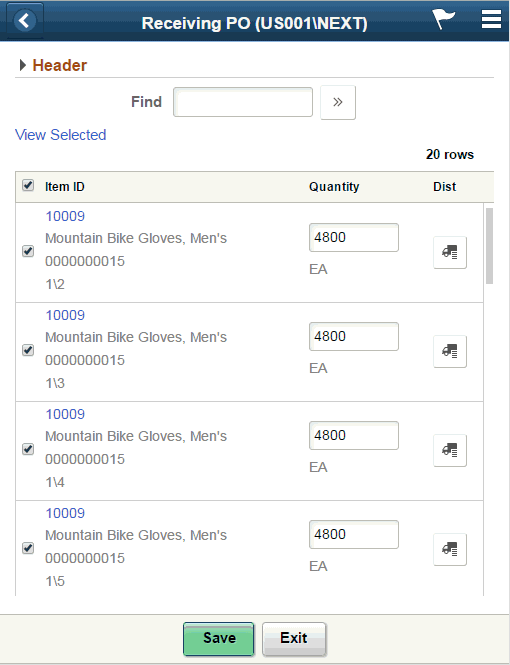
The Receiving PO - Fluid Receipt Main page provides a list of the purchase order items that met the purchase order search and Advanced Search that you entered. Use this page to select all or individual items to receive, and view or define shipping information for the purchase order receipt.
Note: You can select multiple purchase order lines to add to the receipt as long as the supplier is the same for each purchase order. You cannot select multiple purchase order lines if the suppliers are different.
The business unit and the receipt number appear at the top of the page. If you did not assign a receipt number, Next appears in the header, and the system assigns the next receipt number when you save the receipt.
The system retrieves purchase orders lines that have open purchase order schedules. The search results are sorted in descending order by:
Purchase order business unit.
Purchase order ID.
Purchase order line.
Purchase order line schedule.
Field or Control |
Description |
|---|---|
Carrier ID |
Enter or select the freight carrier identification that delivered the shipment |
Pro Number (progressive number) |
Enter the tracking number assigned to the shipment in which the material arrived and click the Apply button to apply changes to all receipt lines, if empty. Note: If you enter a Pro number in the Header page, that value displays on this page. |
Packing Slip |
Enter the packing slip. This value is typically listed on the packing slip provided by the supplier. Click the Apply button to apply changes to all receipt lines, if empty. |
Invoice |
Enter the invoice ID. If this receipt is processed through a supplier's Evaluated Receipts Settlement process, this field value may be the same as the Packing Slip field value. Click the Apply button to apply changes to all receipt lines, if empty. |
Find |
Enter data to filter by. |
Header |
Click to view and maintain header information for the purchase order receipt. |
View Selected and View All |
Click the View Selected link to display the receipt rows that have been selected to be received. Click the View All link to view all rows from the original purchase order line selections. When you click either link, the system toggles to the other button. For example, when you initially access the Receiving PO — Fluid Receipt Main page, the system displays all purchase order rows and makes the View Selected link available. Then, after selecting or deselecting rows to include on the receipt, you can click the View Selected button to display just the rows that you've selected. When you access the list, the system displays the View All link that you can click to return to the original list. This feature is useful when the purchase order receiving quantity option is set to blind receiving or there is not a default quantity. In this case, as you enter receipt quantities, you can use the View Selected link to view the selected rows immediately. Note: If the Set Select Checkbox is selected, all receipt rows on the search results page are also selected. |
Save |
Click to receive the items that you selected on this page. When you save the selections, the system performs similar logic as it does for the PeopleSoft system's online Receiving page to process the receipt. If the save is successful, the system displays the receipt number that it generated. See Understanding the Receiving Business Process. Note: If an error prevents the receipt from saving, the system provides an error message with information about the error. When an error occurs, the Receive Lines page displays only the lines that are being received. Lines with the Set Select Checkbox deselected will not be displayed. You can use the View All button to see all lines for the original selection. Note: After saving the items, the receipt processed fetches the UPN Type and UPN ID in purchasing. |
Exit |
Click to discard changes and exit to the Delivery search page. |
Use the Receiving PO - Fluid Receipt Line Details page to enter purchase order receipt line information
Navigation:
Mobile Inventory, Receiving PO, and click the Item ID link.
This example illustrates the fields and controls on the Receiving PO - Fluid Receipt Line Details page. You can find definitions for the fields and controls later on this page.
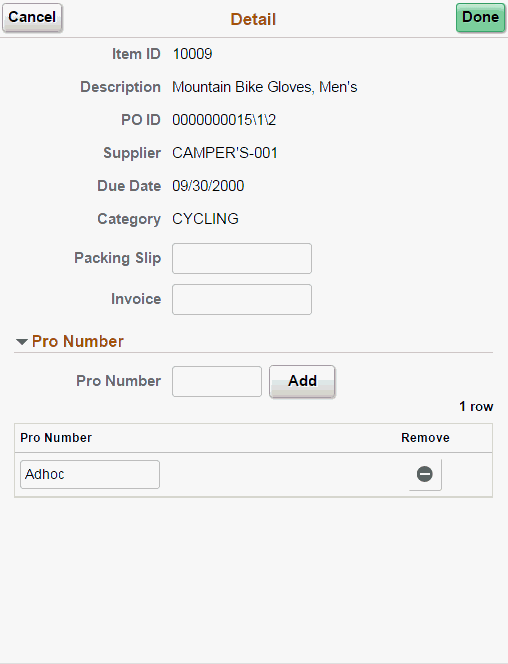
Note: Comments in a purchase order are displayed in a grid on the Receiving PO - Fluid Receipt Line Details page.
Use this page to enter multiple pro numbers for a purchase order receipt line.
To enter multiple pro numbers for a purchase order receipt line:
Enter a pro number in the Pro Number field.
Click the Add button.
The system displays the pro number as an open field. A delete icon is available to the right of the pro number.
Click the Apply button to apply the pro numbers to the receipt line.
Note: Duplicate Pro Numbers are not permitted.
Use this page to enter line details for the purchase order receiving line.
Note: When PO receiving is made for items that are marked for inspection in the item purchasing attributes, there will be a warning message on save, if the inspection is not completed for such items. The user will not be stopped from completing the receipt.
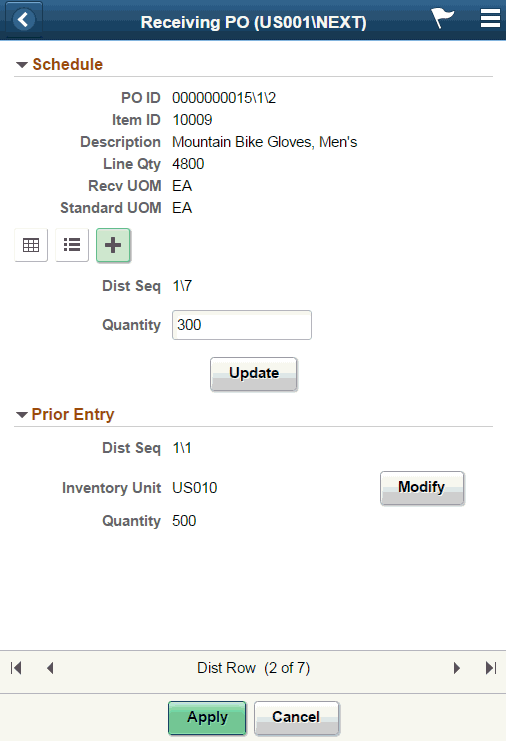
Use the Receiving PO - Fluid Receipt Distribution page to view distribution line detail information of a receipt line.
Navigation:
Mobile Inventory, Receiving PO, and click the distribution icon on the receipt main page.
This example illustrates the fields and controls on the Receiving PO - Fluid Distribution Lines Grid Mode page. You can find definitions for the fields and controls later on this page.
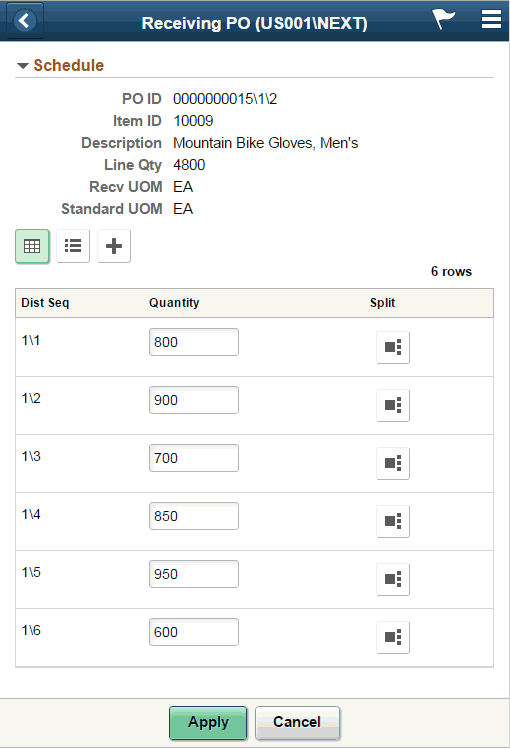
The distribution button displays if one of the following conditions are met:
An Inventory BU is defined in a PO distribution line.
An Asset BU is defined in a PO distribution line.
The item is a device tracking one.
This example illustrates the fields and controls on the Receiving PO - Fluid Distribution Lines List Mode page. You can find definitions for the fields and controls later on this page.

This example illustrates the fields and controls on the Receiving PO - Fluid Distribution Lines Single Entry page. You can find definitions for the fields and controls later on this page.
Field or Control |
Description |
|---|---|
Split, Update and Modify |
Enter a quantity and click Split to break into smaller distribution sequences. Enter a value and click Update for single entry and click Modify to change the value for a Prior Entry. |
Apply |
Click to finalize the changes made on page. |
Cancel |
Click to cancel any changes that you made to this page and return to the Receiving PO - Fluid Receipt Main page. |