Understanding How to Receive Stock in PeopleSoft Inventory Using Mobile Receiving
The Mobile Receiving task flow integrates with the PeopleSoft Purchasing system to receive and put away received goods. Receiving rules are defined in the PeopleSoft system business processes leading up to the actual receipt. These processes include setting up items and creating requisitions and purchase orders. Mobile Receiving leverages this base information, and makes the process of receiving goods more efficient and accurate and moves data into the PeopleSoft system in real time.
Note: To make changes to a receipt after an item has been received, you need to use the PeopleSoft system online Receiving pages.
When stock arrives at the receiving location, you receive it using a mobile device with the Mobile Receiving task flow. You can receive inventory or non-inventory items, with or without associated purchase orders. Receipts with a purchase order can be for items that will be stocked in inventory, for items that will go directly to par locations, or for items that will go directly to various departments. A receipt without a purchase order (ad hoc receipt) can be interfaced to the same products as a purchase order receipt. Only non-inventory items can be received without a purchase order.
If the source of a receipt is not a current supplier the PeopleSoft system, then you can enter it during Mobile Inventory Receiving.
If the attention to or location information for delivery is not in the PeopleSoft system, then you can enter it during Mobile Inventory Delivery.
This diagram illustrates the flow of information through the Mobile Receiving process beginning with when the shipment arrives at the ship to location:

When a shipment arrives at the receiving location, it typically arrives with a bill of lading or packing slip. These documents can be used to gather information needed to record the receipt. Using a mobile device at the receiving location, you can enter shipment information. You select items to be received and determine if there are additional items in the shipment that need to be received. After determining all of the items that have been received, you can create and print a receipt. The information is relayed back to the PeopleSoft system where you can perform the downstream receipt processes.
Note: Entering shipment information is optional.
You can also select to print delivery documents. Delivery information becomes available only after the item has been received. When you select to print delivery documents, the system uses the receipt information and initiates the RECV_DEL multi-process job. The job gathers receiving data for the Receipt Delivery Detail report.
See Understanding How to Record Deliveries in PeopleSoft Purchasing Using Mobile Inventory Management.
Simple and Advanced Selection of Items for Receipt
The difference between a simple and an advanced search for receipt items is the number of input fields that you can use. After you enter information in the selection fields, the rest of the search is the same. The search produces a list of purchase order lines and you select the lines to include in the receipt.
You use a simple search when the shipment is for one purchase order ID. You enter the purchase order ID and the mobile device displays a list of items for that purchase order that match the default ship to location and the due dates that are in the date range selection. You select the purchase order lines and schedules that are in the shipment and enter or adjust the quantity received.
An advanced search is used if you need to refine the selection criteria beyond just the purchase order and default ship to. Some examples include receiving a past due purchase order in which the due date is prior to the Days +/- field value.
Another example might be when a shipment includes items from multiple purchase orders. In this case you have several options. First, you can create one receipt for each purchase order using a simple search. Second, you can use the advanced selection to create a list of purchase order lines that you can receive in one shipment. To do this, you enter selection criteria to find matches in the shipment's purchase order lines.
A final example might be when a packing slip does not include the purchase order ID. In this case you can search for the purchase order by entering a supplier, manufacturing item ID and so on.
To take advantage of the purchasing authorizations established during the requisition and purchasing process, goods and services that you receive need to be referenced against a purchase order. With Mobile Receiving, the purchase order must exist; however, lines and schedules might not be known by the person recording the receipt.
The system provides default receiving and purchase order business units, derived from User Preferences, but you can override the values. The Mobile Receiving application automatically assigns a number to the receipt, but you can override the number. A component interface built on top of the Add/Update Receiving page processes the transaction from Mobile Receiving. Component interfaces for Mobile Receiving include MIN_PO_RECV_CI and PO_RECEIPT_CI.
See Understanding Mobile Inventory Management Setup in PeopleSoft.
This diagram illustrates the flow for how a purchase order shipment is received and a receipt is created for the transaction. It also highlights the Mobile Receiving part of the flow:
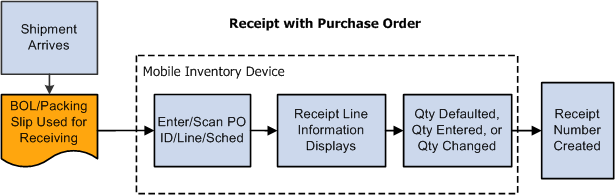
When a purchase order is defined and the shipment arrives at the receiving location, you use a mobile device to enter or scan the purchase order ID, if the purchase order ID is bar coded on the packing slip. Upon reading the purchase order, the mobile device displays the purchase order receipt line information including the supplier item description ID and default quantity, if it exists.
A setup option is available to control which item ID displays on the mobile page. You can select to display the item by:
Purchase order line item.
Supplier item.
Manufacturing item.
If your user preferences are set to provide a default purchase order quantity or quantity remaining for receiving, the mobile device displays the quantity for you. However, if your user preferences are set for blind receiving or not to provide default quantities, then the system does not provide a quantity.
These user preferences are defined on the Receiver Setup page. To access the page, select: Select the Blind Receiving Only check box to not display a quantity. Or, select the No Order Qty button to not display the purchase order quantity.
You can view additional details about individual items by clicking the Show link. Select the lines included in this receipt, enter or change the receipt quantity and save. When saving the receipt, you can trigger the RECV_DEL multi-process job to create the Receipt Delivery Detail report. Repeat the receiving process to receive more purchase order lines. After receiving the items, you can then use the mobile device with Mobile Delivery to complete the delivery verification of the items. When you save the receipt, the system provides the option to close short purchase order lines that are being received.
Other processes that the system can trigger are based on user preferences. For example: interface receipts and streamline subcontract. However, the ability to change these triggers are not always provided but receive default values from user preferences.
Note: You can add receipts for lot-controlled and serial-controlled items, device tracked items, and asset items. You cannot enter values for the receipt until you access the PeopleSoft system's Receiving page to enter the values after you save the mobile receipt.
Ad hoc receipts are receipts without a purchase order and provide you the capability to track a package from receipt to delivery. For example, if a salesperson ships samples to a doctor's office, a purchase order or accounts payable transaction is not generated, but the samples are received and delivered.
Another example might be when a department orders supplies using a credit card. In this case, there is not a purchase order and an invoice is not sent to accounts payable. When these items arrive, the receipt needs to be recorded and the items delivered to the appropriate person or department.
Note: To use the ad hoc receipt transaction, ensure that the Change Non PO Receipt Price check box is selected on the Receive Setup page for your user preferences. To access the check box, select:
This diagram illustrates the process flow to receive an item and create an ad hoc receipt. It highlights the part of the flow where you use Mobile Receiving:

Using ad hoc receipts, you can provide basic information about the receipt, add multiple items to the receipt, and save the receipt into the PeopleSoft system where you can review and update the receipt. The receipt is also available to a mobile device so that Mobile Delivery can complete the delivery of the received items.