Viewing Order, Customer, and Product Information with the Message Board
During order entry, use the Message Board to view notes and messages attached to the order, customer, or product. Messages apply only to customers and products, but notes apply to all three areas. The Message Board appears on the left-hand frame underneath the portal menu of the sales order.
Messages and notes automatically appear. Product messages and notes appear for the line that is selected using the option or for the active row.
Note: Notes added to a new order do not appear until the order is saved.
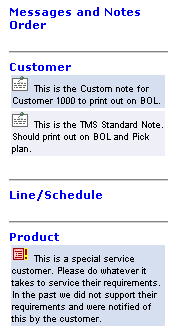
The Message Board uses client-side JavaScript to determine when to display messages and notes. The Message Board JavaScript tracks specific fields. As the field values change, the Message Board loads the related messages and notes. The Message Board tracks the order number, customer, and product fields. The Message Board attempts to load the appropriate messages and notes when any values in these fields are modified. The following example shows a sample message board displaying messages and notes.
This example illustrates the fields and controls on the Message Board section of the Order Entry form. You can find definitions for the fields and controls later on this page.
Field or Control |
Description |
|---|---|
|
Click to display a message. |
|
Click to display a note. You can use the rollover text to determine whether the order note is for the header, line, or schedule. |


Deactivating the Message Board
If you do not want to display the Message Board, you will need to remove the template from the content reference definition for the sales order, quote, and counter sales components.
Complete these steps:
Navigate to PeopleTools, Portal, Structure and Content.
Click Order Management in the Label column.
Click Quotes and Orders in the Label column.
In the Content Reference group box, click the Edit button for Create/Update Order.
Remove the EP_OMTICKER_TEMPLATE template from the Template Name field.
Click the Save button.
Repeat steps 3 through 6 for both entries for Create/Update Quotes and Create/Update Counter Sale.
Note: Remember to update both entries for Create/Update Order, Create/Update Quote, and Create/Update Counter Sale.