Understanding the Quality Data Collection Process
Operator interaction is part of the data-collection methodology. Quality provides you with a comprehensive data-collection environment that combines operator data entry with online analysis and immediate feedback. You record sample information against a control plan and then view analysis results to make improvements or corrections to the process.
You can enter, maintain, and edit quality data against variable, defect, or defective characteristics within a control plan. The system creates a data-entry session for each new sampling, based on the inspection frequency, as a container for the related measurement, cause, and action information that you entered.
To access data-entry pages:
Select a control plan from a list of often-used plans (access list).
Enter the specific hierarchy fields associated with the control plan.
Each method accesses the same set of pages that you use to create a new data-entry session or complete a pending session.
This diagram illustrates the process flow when creating a new data-entry session against a control plan. Choose to access the control plans using the access list mode or the hierarch fields mode. For the new session, enter data using the subgroup method or the sample method and then the session ID is created. Next, submit the readings for analysis. Review and diagnose any system-generated alarms and review the results in graphic form:
This diagram illustrates the process flow.

This diagram illustrates the process flow.

Use the following procedures to initiate a quality session and record sampling data.
To enter quality data:
Determine how you want to access the control plans.
If you choose the access list mode, perform the steps in the "To choose the access list mode" procedure.
If you choose the hierarchy field mode, perform the steps in "To choose the hierarchy field mode" procedure.
To choose the access list mode:
Create an access list by using the Define Operator Access List page and associate control plans with the access list using the Control Plan Selections page.
Enter the data entry access ID and then select the control plan on the Data Entry From Access List page with which you want to work.
Click the New Session button.
Enter data associated with the characteristics on the control plan on the Subgroup Method - Data Entry page or the Sample Method - Data Entry page.
The system invokes the appropriate page depending on the data-entry method defined for the control plan. While entering data you can view:
Instructions for the control plan on the Instructions page.
Current results for a sampling on the Review page.
Submit the readings for analysis.
Review and diagnose the alarms that the system generated.
If the system generates alarms, you can:
View the alarm notifications for each characteristic.
Enter the causes for the alarms on the Probable Causes page.
Enter the corrective actions taken to correct the alarm condition on the Corrective Actions page.
(Optional) Enter causes for potential problems and corrective actions on the Probable Causes and Corrective Actions pages even if the system does not generate alarms.
View the results as a graphic.
The working control chart that you assigned to the characteristic appears on the Graph Display page.
To choose the hierarchy field mode:
Select the quality function and then enter the hierarchy fields associated with the control plan using the Data Entry By Control Plan page.
Click the New Session button on the Data Entry By Control Plan page.
Enter data associated with the characteristics for the control plan on the Subgroup Method - Data Entry page or the Sample Method - Data Entry page.
The system invokes the appropriate data-entry page depending on the data-entry method that you defined for the control plan.
While entering data you can:
Complete the data-entry readings for one or more characteristics on the control plan.
View the instructions for the complete control plan on the Instructions page.
View the current results for a sampling on the Review page.
Submit the readings for analysis.
Review and diagnose the alarms that the system generated.
If the system generates alarms, you can:
View the alarm notifications for each characteristic.
Enter the causes for the alarms on the Probable Causes page.
Enter the corrective actions taken to correct the alarm condition on the Corrective Actions page.
(Optional) Enter causes for potential problems and corrective actions on the Probable Causes and Corrective Actions pages even if the system does not generate alarms.
View the results in a graphic.
The working control chart that you assigned to the characteristic appears on the Graph Display page.
This graphic illustrates the process flow when recalling a pending data-entry session for completion. For the pending session that needs to be completed, choose to access the control plan using the access list mode or the hierarch fields mode. Select the data entry method of subgroup method or sample method and then complete the session. Next, the Quality system analyzes the data to generate any alarms, and display the results in graphic form:
This graphic illustrates the process flow.

This graphic illustrates the process flow.

To recall a pending session:
Determine whether you have pending sessions that need to be completed and how you want to access the control plans.
If you choose the access list mode, perform the steps in the "To choose the access list mode" procedure.
If you choose the hierarchy field mode, perform the steps in the "To choose the hierarchy field mode" procedure.
To choose the access list mode:
Enter the data entry access list ID and select the control plan with which you want to work on the Data Entry From Access List page.
Click the Pending Sessions button on the Data Entry From Access List page.
Select the pending session that you want to complete, by clicking the Recall Session button on the Select Pending Session page.
Enter data associated with the characteristics for the control plan on the Subgroup Method - Data Entry page or the Sample Method - Data Entry page.
The appropriate data-entry page appears depending on the data-entry method that you defined for the control plan.
As you enter data for a session, you can:
Complete the data-entry readings for the incomplete characteristics.
View the instructions for the entire control plan on the Instructions page.
View the current results for a sampling on the Review page.
Submit the readings for analysis.
Review and diagnose the alarms that the system generated.
If the system generates alarms, you can:
View the alarm notifications for each characteristic.
Enter the causes for the alarms on the Probable Causes page.
Enter the corrective actions taken to correct the alarm condition on the Corrective Actions page.
(Optional) Enter causes for potential problems and corrective actions on the Probable Causes and Corrective Actions pages even if the system does not generate alarms.
View the results in a graphic.
The working control chart that you assigned to the characteristic appears on the Graph Display page.
To choose the hierarchy field mode:
Select the quality function and then enter the hierarchy fields associated with the control plan, using the Data Entry by Control Plan page.
Click the Pending Sessions button on the Data Entry by Control Plan page.
Select the pending session that you want to complete, by clicking the Recall Session button on the Select Pending Session page.
Enter data associated with the characteristics for the control plan on either the Subgroup Method - Data Entry page or the Sample Method - Data Entry page.
The system invokes the appropriate data-entry page depending on the data-entry method that you defined for the control plan. While you enter data for a session you can:
Complete the data-entry readings for the incomplete characteristics.
View the instructions for the entire control plan on the Instructions page.
View the current results for a sampling on the Review page.
Submit the readings for analysis.
Review and diagnose the alarms that the system generated.
If the system generates alarms, you can:
View the alarm notifications for each characteristic.
Enter the causes for the alarms on the Probable Causes page.
Enter the corrective actions taken to correct the alarm condition on the Corrective Actions page.
(Optional) Enter causes for potential problems and corrective actions on the Probable Causes and Corrective Actions pages even if the system does not generate alarms.
View the results as a graphic.
The working control chart that you assigned to the characteristic appears on the Graph Display page.
This graphic illustrates the process flow for editing a completed session. The steps are explained below the graphic:
This graphic illustrates the process flow.
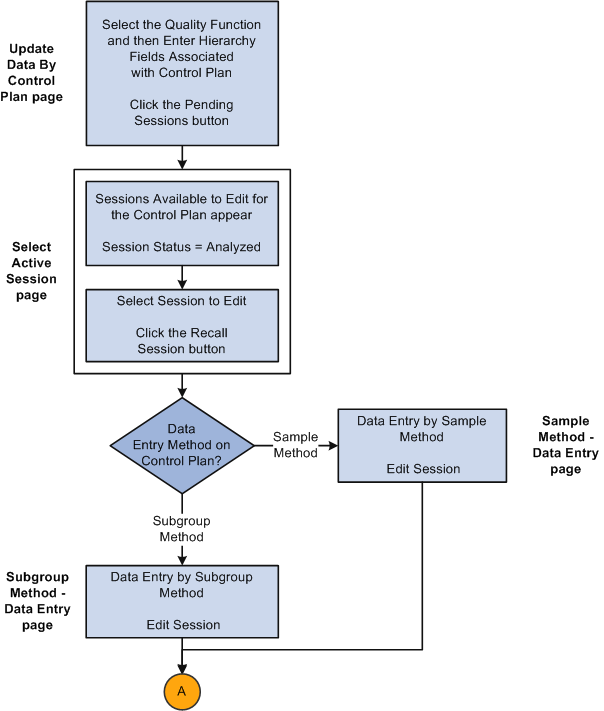
This graphic illustrates the process flow.

To edit data on a session that is completed:
Determine whether you have sessions that need to be edited, such as data that was entered incorrectly for the session.
Enter the hierarchy fields associated with the control plan on the Update Data By Control Plan page and click the Pending Sessions button.
Select the completed session that you want to edit, by clicking the Recall Session button on the Select Active Session page.
Edit data associated with the characteristics that are completed for the session by using the Subgroup Method - Data Entry page or the Sample Method - Data Entry page.
The system invokes the appropriate data-entry page depending on the data-entry method that you defined for the control plan. While editing data, you can:
Edit the data-entry readings for completed characteristics.
View the instructions for the complete control plan on the Instructions page.
View the results for a sampling on the Review page.
Save the edited readings.
After you edit and save readings, the system does not generate new or cancel existing alarms; however, it does check acceptance limits (if defined). Plus, the system selects and displays the Subgroup Was Edited check box for each edited characteristic subgroup.
View the results as a graphic.
The working chart appears on the Graph Display page.