5. Importing Bulk Client Information
The AMC may need to import information relating to investor accounts and investor transactions from an external source or client, into its database. The volume of information that is imported in such cases is usually very large.
The external source or client, in such cases, is called a bulk client. The information is usually handed off in flat files, ASCII text or any other text format. The ‘import’ of this information means updation of the AMC database (with the information that is found in the hand-off files) so that the AMC database may reflect the import information. All necessary validations for the successful updating the database with the imported information are performed during the import.
The Oracle FLEXCUBE Investor Servicing (FCIS) system enables the AMC to import information in bulk, from an external client, relating to any of the following:
l Unit holder information (setting up of new accounts and changing unit holder information on existing accounts)
l Transactions for unit holders (only new subscription, redemption, transfer and conversion transactions, and amended transactions if indicated for the bulk client)
l Policy transactions for unit holders
l Income distribution setup for unit holders
l Standing instructions for unit holders
l Overrides of loads on transactions, for unit holders
l Fund prices for transactions
l Unit Holder Deal uploads
l Broker details
l Check Book requests
l Fund Rules
l Redemption Checks
The import can be performed using the generic interface or bulk interface facility.
This chapter contains the following sections:
l Section 5.1, "Process of Importing Bulk Client Information"
l Section 5.2, "Bulk Import Clients Setup"
l Section 5.3, "Interfaces for Import Setup"
l Section 5.4, "Import Interfaces Schedule"
l Section 5.5, "Imported Bulk Information"
l Section 5.6, "Errors during Import or Processing of Client Information"
l Section 5.7, "Bulk Account Clients Maintenance"
l Section 5.8, "Bulk Clients Defaults Maintenance"
l Section 5.9, "Default Information for Bulk Client Imports"
l Section 5.10, "Default Information for Fund Rules Imports"
l Section 5.12, "Default Information for Fund Price Imports"
l Section 5.14, "Default Information for Income Distribution Setup Imports"
l Section 5.16, "Default Information for Redemption Check Imports"
l Section 5.18, "Default Information for Standing Instructions Imports"
l Section 5.20, "Default Information for Transactions Imports"
l Section 5.22, "Default Information for Transaction Load Override Imports"
l Section 5.24, "Default Information for Unit Holder Accounts Imports"
l Section 5.26, "Default Information for Check Book Requests Imports"
l Section 5.28, "Default Information for Policy Transactions"
l Section 5.30, "Default Information for Broker"
l Section 5.32, "Default Information for UH Deal Upload"
l Section 5.34, "Bulk Clients Defaults Summary Screen"
5.1 Process of Importing Bulk Client Information
To import information from bulk clients and process the same in the FC-IS system, you must:
l Set up the bulk client in the system and maintain default information for the client.
l Set up interfaces that will actually perform the uploading (the import) of information from the hand-off files to the system database.
l Schedule the interfaces to be run whenever necessary, without manual intervention.
For a fuller discussion of each of the steps, refer the following sections under the appropriate heads in this chapter:
l Setting up the bulk import clients
l Setting up the interfaces for the import
l Scheduling the interfaces to be executed
You can understand the process from the following illustration:
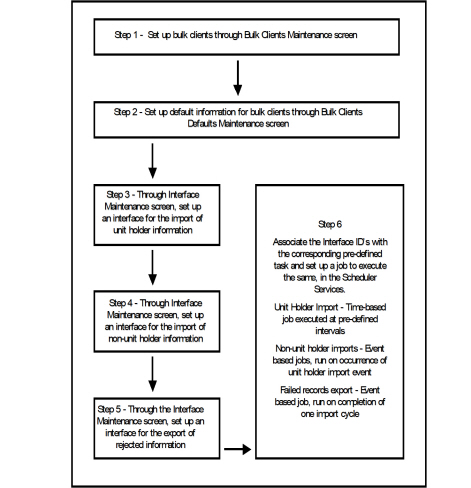
The client from whom bulk information needs to be imported must be introduced into the FC-IS system. You can do so as follows:
1. Identify the external client (called the bulk client) in the system by providing a profile for the same. You can do this using the Bulk Clients Maintenance screen. Access this screen through the Bulk Clients Defaults menu Browser.
2. Set up the information that would be used as default for import of any information from the bulk client. If the import information files from the client do not contain the required data, then the default information maintained for the bulk client in the FC-IS system is used to furnish the same.
To set up the default information for a bulk client, use the Bulk Clients Defaults Maintenance screen. Access this screen through the Bulk Clients Defaults option in the Browser. Click new icon to enter the details.
The following considerations must be borne in mind when you set up the default information for a bulk client in the Bulk Client Default Maintenance screen:
Note
– If any mandatory information required in the FC-IS system is not found either in the import hand off file, or the defaults maintained for the client, the entire import fails and the import records are rejected.
– Each file that needs to be imported from the bulk client into the system for all the information set has a specified format. If the file is formatted in any other way than prescribed in the required format, then the import will fail and all the import records will be rejected.
The prescribed formats for the hand-off files from the bulk client that are to be uploaded are found in the chapter ‘Appendix B – Upload File Formats B’ of the ‘Upload Format’ User Manual. Refer the same for complete information about the file formats.
Note
– The default information that you maintain for a SMDPARAM’ bulk client in the Bulk Clients Defaults Maintenance screen contains the defaults for all the different types of data imports – unit holder new accounts, information change, transactions, unit holder income distribution setup, standing instructions, transaction load overrides, fund prices, Unit Holder Deal uploads, broker details, check book requests, fund rules and redemption checks.
– When the import of data is performed by the system, the validations for the imported data are performed in the same manner, as they are applicable when you set up the default information for the bulk client in the Bulk Client Defaults Maintenance screen.
5.3 Interfaces for Import Setup
After you have set up the client from whom the bulk information is being imported, you must set up the interfaces in the system that will actually drive the import according to the frequency at which it is required to run.
Note
– Initially, on the first instance that the interfaces are to be set up, the implementers at the installation will do so. Subsequently, the administrator at the installation would perform any change to the interface.
You need to set up the following interfaces:
l One interface to drive the import of all unit holder account-related information. This interface will facilitate the uploading of new unit holder accounts as well as those for which an information change must occur.
l One interface for the import of the following information:
l New and amended transactions
l Unit holder income distribution setup
l Standing instructions
l Load overrides for transactions
l Fund prices for transactions
l One interface for the export of all records that fail to be imported (that is, those that are rejected by the import process for any reason)
l Through the Interface Definition (Summary) screen in the Maintenance menu category of the Fund Manager component, authorize the interfaces you have created.
l Uploads for Unit Holder deals
l Broker details
l Check Book requests
l Fund Rules for transactions
l Redemption Checks
You can set up all the interfaces through the Interface Maintenance screen that is invoked by clicking the Interface Maintenance menu item in the Maintenance menu item of the Fund Manager component.
5.4 Import Interfaces Schedule
This section contains the following topics:
l Section 5.4.1, "Scheduling Import Interfaces to be Executed"
l Section 5.4.2, "Setting up Jobs for Interface-related Tasks"
5.4.1 Scheduling Import Interfaces to be Executed
After you have set up the interfaces that will drive the import of information from an external client, you must schedule their execution, so that the imports can occur according to a pre-defined frequency, without manual intervention.
You must schedule all the three interfaces that have been set up for the import of bulk information. You can do this as follows:
l For each interface, through the Task Maintenance screen, set up the corresponding interface ID as a parameter for the pre-defined task set up for the interface.
Note
Initially, at the first instance when the interfaces are scheduled, they are associated with the pre-defined tasks in the Scheduler Services Task Maintenance facility. The implementers at the installation will perform this activity. Subsequently, the administrator at the installation would perform any change to the task.
l Through the Job Maintenance screen in the Maintenance menu category in the Fund Manager component, set up each of the tasks as jobs in the system. These jobs can be scheduled as follows:
l The import of unit holder new accounts and information changes must be set up as a time-based job, with a specific, desired frequency.
l For the import of all the information sets apart from unit holder information, you must set up an event-based job.
l For the export of rejected records, set up an event-based job.
Refer the section ‘Setting up jobs for interface-related tasks’ in this chapter to understand how to set up the jobs in the Job Maintenance screen.
l Through the Authorize Job screen in the Authorization menu category of the Fund Manager component, authorize the jobs you have created.
l The system uses the Scheduler Services to actually automatically perform both the import operations and the export of rejected records, based on the authorized jobs that you have maintained.
5.4.2 Setting up Jobs for Interface-related Tasks
Setting up a job for the import of unit holder information
To set up a job for the import of new unit holder accounts and information change accounts,
l Access the Job Maintenance screen in the Maintenance menu category of the Fund Manager component.
l In the Task ID field, select the UHIMPORT task ID.
l In the Frequency Basis field, select the Time-based option.
l Check the Enabled check box so that the job is enabled.
l In the Schedule section, select the Recurring option
l In the Recurring section, specify the frequency at which the import of unit holder information from the bulk client is required to be executed by the job.
l In the Occurs section, specify whether the import is to be executed on a daily, weekly or monthly basis. If daily, then specify the number of days apart that the import must be executed, in the Daily section.
l In the Duration section, specify the start and end dates that will signify the period during which the import is required to be executed. If the import is to run without an end date, then check the No End Date check box.
l In the Time tab, specify the start and end times for the first and last occurrence of the execution on the day of occurrence, and the frequency of occurrence between. If it is to be executed only once during the day of occurrence, specify the time of occurrence in the Occurs Once At field.
l Save the job. The Job ID is displayed by the system.
Note
Whenever this job is executed, the system creates an event for the execution and inserts it into the event log. Now, the system is ready to perform the other imports, using this one as a trigger for the execution of all the other import as well.
Setting up a job for the import of all information other than unit holder information
To set up a job for the import of new or amended transactions, income distribution setups and standing instructions for unit holders, load overrides for transactions and fund prices for transactions, proceed in the manner described below.
l Access the Job Maintenance screen in the Maintenance menu category of the Fund Manager component.
l In the Task ID field, select the TXNIMPORT task ID
l In the Frequency Basis field, select the Event-based option
l Check the Enabled check box so that the job is enabled
l In the Schedule section, select the Recurring option. If the unit holder import job is scheduled as a recurring job, then this import must also be scheduled the same.
l In the Recurring section, specify the frequency at which the import of transactions and other information from the bulk client is required to be executed by the job. It is important that you specify the same frequency as for the unit holder import.
l In the Occurs section, specify whether the import is to be executed on a daily, weekly or monthly basis. If daily, then specify the number of days apart that the import must be executed, in the Daily section.
l In the Duration section, specify the start and end dates that will signify the period during which the import is required to be executed. If the import is to run without an end date, then check the No End Date check box.
l In the Event Code field in the Event tab, select the Bulk UH option
l Save the job. The Job ID is displayed by the system
Note
Typically, the import of any information other than unit holder information is performed after the successful import of unit holder information. Accordingly, when the unit holder import job is executed, the system creates an event (‘BulkUH’) for the execution and inserts it into the event log. Now, the system is ready to perform the other imports, using this as a trigger for the execution of all the other imports.
Setting up a job for the export of records rejected during import
To set up a job for the export of records that are rejected during import, proceed in the manner described below.
l Access the Job Maintenance screen in the Maintenance menu category of the Fund Manager component.
l In the Task ID field, select the FAILEDRECS task ID.
l In the Frequency Basis field, select the Event-based option
l Check the Enabled check box so that the job is enabled
l In the Schedule section, select the Recurring option. If the unit holder and the transactions import jobs are scheduled as recurring jobs, then this export must also be scheduled the same.
l In the Recurring section, specify the frequency at which the export of rejected records must be executed by the job. It is important that you specify the same frequency as for the unit holder and the transaction imports.
l In the Occurs section, specify whether the export is to be executed on a daily, weekly or monthly basis. If daily, then specify the number of days apart that the export must be executed, in the Daily section.
l In the Duration section, specify the start and end dates that will signify the period during which the export is required to be executed. If the export is to run indefinitely without an end date, then check the No End Date check box.
l In the Event Code field in the Event tab, select the FAILEDRECS option
l Save the job. The Job ID is displayed by the system
Note
Typically, the import of any information other than unit holder information is performed after the successful import of unit holder information. Accordingly, when both the import jobs have been executed, the system creates an event (‘FAILEDRECS’) for the execution and inserts it into the event log. All records that have failed the imports are also identified and stored in the database, for the purpose of exporting. The system is now ready to perform the export, using the completion of the two imports as a trigger for the execution of the export.
Refer the Interfaces User Manual in FC-IS system for a fuller discussion of the Job Maintenance screen.
This section contains the following topics:
l Section 5.5.1, "Processing Imported Bulk Information"
l Section 5.5.2, "Bulk Import Processing Workflow"
5.5.1 Processing Imported Bulk Information
After you have set up the Scheduler Services to automatically perform the upload of bulk client information, the import and processing of data will proceed according to the defined frequencies.
The import of each file containing bulk client information is given a unique Process ID. The export of rejected records corresponding to the import is likewise is given a unique Process ID. Therefore, the Process ID is unique for each file that is imported or exported.
The job that you have set up for the automatic execution of the imports will trigger processes that:
l Perform all system and business validations for the data that is being imported.
l Update the system database with the imported data.
Note
The validations for the imported data are performed in the same manner, as they are applicable when you set up the default information for the bulk client in the Bulk Client Defaults Maintenance screen.
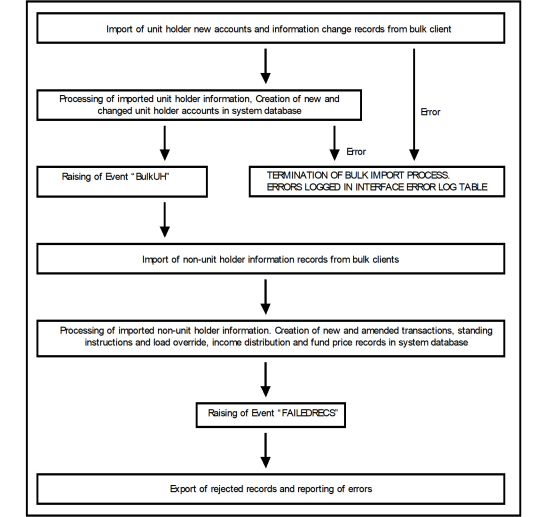
5.5.2 Bulk Import Processing Workflow
After you have set up the import interfaces and scheduled the imports, the system automatically performs the import and the processing of imported information in the following sequence:
l Import of unit holder new accounts and information change. If errors occur during this import, all subsequent processes are terminated. The details of the errors are logged into the interface error log table.
l Processing of the imported unit holder information. This results in updating the system database with the new unit holder accounts and the information change accounts. Again, if errors occur during this processing, all subsequent processes are terminated. The details of the errors are logged into the interface error log table.
l Upon successful completion of the unit holder information import and processing, the event ‘Bulk UH’ is raised by the system, and the subsequent bulk imports are triggered.
l Import and processing of new and amended transactions and standing instructions, load overrides, income distribution setup records and fund prices. The system database is updated with the new records created.
l Upon successful completion of all the non-unit holder imports and processing of the same, the event ‘FAILEDRECS’ is raised by the system.
l The FAILEDRECS event triggers the export of rejected records and reports the errors encountered during the processing.
l The entire import and processing cycle is now complete. It will begin again according to the frequency defined for the unit holder import interface.
Note
Sequences 1 and 2 are performed by the execution of interface definition you have set up for the unit holder import. Sequence 4 is performed by the execution of the interface definition you have set up for the non-unit holder information import. Sequence 6 is performed by the execution of the interface definition you have set up for the export of rejected records.
The flow of sequences is illustrated in the following diagram:
5.6 Errors during Import or Processing of Client Information
If any error occurs during the import of unit holder information or the processing of the same, then the ‘BulkUH’ event is not raised by the system. Since this event is the trigger for all remaining bulk import processes, all subsequently scheduled imports and processing will terminate.
Errors occurring during import of bulk information or processing of the bulk interfaces could be due to:
l The import information failing to meet system or business validations
l The import or hand off file not being in the prescribed format
l Abnormal termination of an interface process
The errors are logged into the interface error log tables. The interface log will display the success or failure of the interface process, and the detail log displays the details of the errors.
When the export of rejected records are triggered by the raising of the ‘FAILEDRECS’ events the reporting of logged errors are also triggered. The details of the errors can be obtained in an Excel worksheet for printing.
When a bulk interface process is terminated abnormally for reasons other than errors relating to imported data, the system maintains the status of the terminated processes as ‘In-process’ or ‘Running’. The End of Day process checks for the completion of these processes, and they can be cleared manually.
5.7 Bulk Account Clients Maintenance
This section contains the following topics:
l Section 5.7.1, "Invoking Single Entity Maintenance Detail Screen"
5.7.1 Invoking Single Entity Maintenance Detail Screen
You can enter the record of a client for whom the bulk import facility would be used, into the system, by creating it as an entity.
You can set up a bulk client in the ‘Single Entity Maintenance Detail’ screen. You can invoke this screen by typing ‘UTDENTMN’ in the field at the top right corner of the Application tool bar and clicking on the adjoining arrow button.
To set up a bulk client, select the Bulk Client option from the option list in the Entity Type field in the General Information section, and then proceed to enter the details for the bulk client. You must specify all information such as the common information, basic information and contact details for any bulk client that you set up.
You must also capture the following additional details specifically for a bulk client:
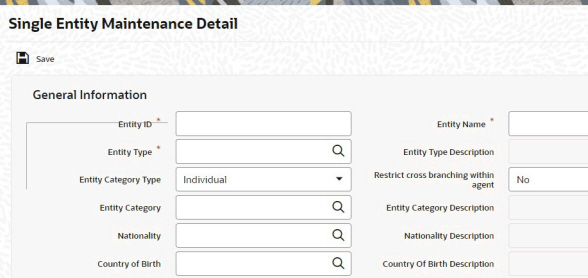
Only those fields specific to bulk clients are detailed here.
Refer the chapter ‘Maintaining Reference Information’ of FC-IS system for a discussion of the other fields common to all entity type.
Other Information Section
Customer Interface Key
Optional
This facility is to be used if customer information from an installation of Oracle FLEXCUBE Corporate (FCC) is to be imported into the FCIS system using the bulk interface facility, for the creation of unit holder accounts. The drop-down list displays the following values:
l Customer
l Account
The customer interface key determines the level at which unit holder account creation must take place in the FC-IS system, for a given Customer Information File (CIF) in Oracle FLEXCUBE Corporate – either at CIF level or at a customer account level. Accordingly, you can indicate either of the following two options:
l For each CIF, a corresponding unit holder may be created in the FC-IS system. For this option, choose CIF from the drop down list in this field.
l For each CASA (Customer Access System Account) account in a CIF, a corresponding unit holder may be created in the FC-IS system. For this option, choose Account from the drop down list in this field.
The FC-IS system will create corresponding unit holder accounts when the customer information is imported from FCC, according to option you exercise in this field.
Note
If you select either FCR or FCC as the Bulk Client Type, then you must specify the Customer Interface Key as mandatory information.
Bulk Client Type
Optional
Select the type of client from which information is to be imported using the bulk interface. This could be any of the following:
l FCC (Oracle FLEXCUBE Corporate)
l FCR (Oracle FLEXCUBE Retail)
Online Interface
Optional
This facility is also available for imports of customer information from FCC. It allows you to control the uploading of customer information from FCC into the data stores in FC-IS.
l To indicate to the system that the back end data stores in FC-IS will be uploaded with the customer information (i.e., the interface would be online), check this box.
l To indicate that the uploading will take place on a batch or tanked basis, without an online interface, leave this box unchecked.
Print Rejected Imports Report
Mandatory
Select ‘Yes’ if a report consisting of a list of rejected imports along with the reason for rejection must be printed by the system. If not, select ‘No’. By default, this field contains a ’Yes’ value.
Print Successful Imports Report
Mandatory
Select ‘Yes’ if a report consisting of a list of successful imports along with the other details must be printed by the system. If not, select ‘No’. By default, this field contains a ’Yes’ value.
5.8 Bulk Clients Defaults Maintenance
This section contains the following topics:
l Section 5.8.1, "Maintaining Bulk Client Default Information"
5.8.1 Maintaining Bulk Client Default Information
You can use this screen to map the default values for all information that must be applicable during bulk information import for a particular bulk client, for a particular AMC or Distributor.
For any import from any bulk client, the information specified in the hand-off file will be accepted and imported as part of the imported record, even if a specification exists in this screen for the same field or column name. Any information that is not specified in the hand-off file will be picked up from the specifications you make in this screen.
You can maintain default information for bulk imports relating to:
l Fund rules
l Fund price
l Check book requests
l Income distribution setup
l Redemption checks
l Standing instructions
l Transactions
l Load override for transactions
l Unit holder accounts
l Uploads for Unit Holder deals
l Broker details
You can invoke this screen by clicking the Detail option under the Bulk Client Defaults menu in the Browser. Click new icon to enter the details.
5.9 Default Information for Bulk Client Imports
This section contains the following topics:
l Section 5.9.1, "Maintaining Default Information for Bulk Client Imports"
5.9.1 Maintaining Default Information for Bulk Client Imports
In the Bulk Client Defaults Maintenance screen, you can maintain default information for bulk imports from a bulk client, to be applicable for a distributor institution. The specifications you make in any of the fields here, for each upload type, are accepted as the default values for the corresponding field or column name, for all bulk imports where the hand off files from the bulk client do not contain the corresponding information.
Accordingly, you must select the ID of the bulk client for whom the default information is applicable, in the Bulk Account Client Code field, and the AMC / distributor entity in the AMC / Distributor ID field.
For some of the upload types, the default information consists of fields from the corresponding maintenance in the system; therefore, the default information is very similar to a maintenance template or blueprint. For instance, when you define the defaults for fund rules import, you specify all the fund rules in the Bulk Clients Defaults screen. This is just like filling in the fund rules in the system for a new fund; validations for all fields are similar to those made in the Fund Rules screens when a new fund is entered.
The default information for each upload type is listed in this chapter; for field level information, you must refer the chapters in the user manual where the corresponding entry screen in the system is discussed.
5.9.1.1 Note on Scheme/ Cross Reference Number
The Bulk Client would wish to export, in the hand off files, a unique identifying number for each upload type that might be different from that of the Oracle FLEXCUBE generated identification. In such cases it is possible to set a reference between the Oracle FLEXCUBE identification and the unique identifying number given by the bulk client. To specify such a request, use the Scheme/Cross Reference Number field; for transaction and unit holder related data imports, and the Fund Scheme / Cross Reference Number for fund information related imports.
Effect of applying Scheme / Cross Reference Number
For example, the Credit Card Number of investors can be a uniquely identifiable value. In such cases the credit card number can be setup as an additional information and this field can be referred to here as a unique value by making it the Scheme/Cross Reference number column in the Bulk Client -AMC default maintenance. This means that when the unit holder import file upload is performed, the relevant Scheme/Cross Reference Number field will be populated with the value given in the import file.
Note
The Scheme/Cross Reference Number value should be given in the appropriate field position in the import file. This is not applicable where the Scheme/Cross Reference Number is, itself, the Unit Holder ID (for transaction and unit holder related imports) or the Fund ID (for fund information related imports).
When the transaction import file upload is performed for the Bulk Client - AMC combination, the Unit Holder ID field value should contain the Scheme/Cross Reference Number value.
Note
The system will not validate for uniqueness if the same field is populated with duplicate values through the Unit Holder Additional Information Maintenance screen. It is assumed that such cross-reference numbers are populated only through import file uploads.
Scheme / Cross Reference Numbers for Transactions and Unit Holder Related Imports
Scheme / Cross Reference Number from additional information
The specification made in the scheme/cross reference number field will pertain to any one of the fields mentioned below and should be properly specified (in the relevant field position) in the import file given for unit holder new accounts. For example, if the Scheme/Cross Reference Number has been specified as the third additional information set, this information should correspond to being the AdditionalInformation3 field in the import file.
l AdditionalInformation1
l AdditionalInformation2
l AdditionalInformation3
l AdditionalInformation4
l AdditionalInformation5
l AdditionalInformation6
l AdditionalInformation7
l AdditionalInformation8
l AdditionalInformation9
l AdditionalInformation10
All the above fields are additional information that can be optionally set to capture additional data relating to the investor.
It is possible to set a restrictive list of values to be captured in the additional information value fields.
All additional information setup through the additional information master where the restrictive clause is not applied are considered to be free-format fields. These fields will be the candidates to be set as the scheme/cross reference numbers.
Scheme / Cross Reference Number as Unit Holder ID
If the Scheme/Cross Reference Number value is set the same as the Unit Holder ID, this means that the bulk client would supply the Unit Holder ID in all the file imports. If the Scheme/Cross Reference Number is another uniquely identifiable value then the relevant value should be specified in the import file. In such cases the system will map the Scheme/Cross Reference Number to Unit Holder ID and the transaction will be tagged to the relevant unit holder.
Scheme / Cross Reference Number as Unit Holder Reference Number
If the Scheme/Cross Reference Number value is set the same as the Unit Holder Reference Number, this means that the bulk client would supply the Unit Holder Reference Number in all the file imports. If the Scheme/Cross Reference Number is another uniquely identifiable value then the relevant value should be specified in the import file. In such cases the system will map the Scheme/Cross Reference Number to Unit Holder Reference Number and the transaction will be tagged to the relevant unit holder.
Scheme / Cross Reference Numbers for Fund Information Related Imports
For fund information related imports, the scheme / cross-reference number can be set as any of the following:
l Fund ID
l Fund Identification Number
l Fund Ticker Symbol
5.9.1.2 Specifying Generation of System Reference Numbers
It is required in the FC-IS system that the reference numbers be mentioned along with the unit holder new account details and the transaction details. If this option is specified, the system will generate reference numbers wherever the reference number field in the import file is empty.
5.9.1.3 Specifying Checking of Duplicates during Imports
You can choose this indicate that all the records that have duplicate Scheme/Cross Reference Number values should be rejected when the transaction or unit holder import file up-loads are performed. If this option is not chosen, the following processes would occur:
l The system ignores the duplicates in the case of unit holder uploads, and creates unit holders in the system.
l For transaction uploads, the system goes ahead and creates the transaction on behalf of the first Unit Holder ID occurrence found in the system.
5.9.1.4 Specifying Generation of Authorized Data during Import
This option, if chosen, signifies which imported information sets would generate authorized records – fund rules, transactions, unit holder accounts, income distribution setup, standing instructions, fund price or transaction load override.
Redemption Payouts to Unit Holder Bank Accounts Only?
Optional
Check this box to indicate that, by default, it must be designated that for all unit holder accounts imported, redemption payouts are to be made to the unit holder bank account only.
5.10 Default Information for Fund Rules Imports
This section contains the following topics:
l Section 5.10.1, "Invoking Default Information for Fund Rules Imports"
l Section 5.10.2, "Bulk Client Tab"
l Section 5.10.3, "Fund Account Details Tab"
l Section 5.10.4, "Fund Agency Back Dating Tab"
l Section 5.10.5, "Fund Agent Mapping Tab"
5.10.1 Invoking Default Information for Fund Rules Imports
You can invoke the FCIS Bulk Clients Defaults (Fund Rule) Detail screen by typing ‘UTDBLKFR’ in the field at the top right corner of the Application tool bar and clicking on the adjoining arrow button.

Click ‘Bulk Client’ tab in ‘FCIS Bulk Clients Defaults - Fund Rule - Detail’ screen.

You must maintain the following default information for fund rules imports:
Bulk Clients
Bulk Account Client Code
Alphanumeric; 12 Characters; Mandatory
Specify the bulk account client code.
Bulk Client Name
Display
The system displays the name of the selected bulk client code.
Distributor ID
Alphanumeric; 12 Characters; Mandatory
Specify the AMC or distributor ID.
Distributor
Display
The system displays the name of the selected AMC or Distributor ID.
Client Defaults
Fund Base Currency
Alphanumeric; 3 Characters; Mandatory
Specify the fund base currency.
Fund Country
Alphanumeric; 3 Characters; Mandatory
Specify the fund country code.
Fund Family
Alphanumeric; 6 Characters; Mandatory
Specify the fund family details.
Fund Type
Alphanumeric; 38 Characters; Mandatory
Specify the type of fund.
Minimum Holding Period
Numeric; 22 Characters; Mandatory
Specify the minimum holding period.
AMC/Distributor Id
Alphanumeric; 255 Characters; Mandatory
Specify the AMC or distributor ID.
Shares Characteristics Defaults
Scrip Based
Mandatory
Select the scrip based fund from the drop-down list. The list displays the following values:
l Certificate-Option
l ScripBased
l ScripLess
Account statement frequency
Alphanumeric; 1 Character; Mandatory
Specify the account statement frequency.
General Operating Rules Defaults
Post Priced?
Optional
Select if the fund is post priced or not from the drop-down list. The list displays the following values:
l Yes
l No
Price Declare Frequency
Alphanumeric; 1 Character; Optional
Specify the price date frequency.
Ageing Policy
Optional
Select the ageing policy for the fund from the drop-down list. The list displays the following values:
l FIFO
l Txn-Receipts
NAV Lot
Numeric; 6 Characters; Mandatory
Specify the NAV lot
No of Decimals for NAV
Numeric; 22 Characters; Mandatory
specify the number of decimal points to be used for NAV.
Roundin of NAV
Mandatory
Select the rounding option of NAV from the drop-down list. The list displays the following values:
l Round Off
l Round Down
l Round Up
Minimum Holding Period Violation
Mandatory
Select if the value of Enforce Minimum Holding Period or Not from the drop-down list. The list displays the following values:
l Yes
l No
Income Distribution Rules Defaults
Default Distribution Mode
Optional
Select default distribution mode from the drop-down list. The list displays the following values:
l Payout-A/C Transfer
l Payout-Cheque
l Full Reinvestment
EPU Lot
Numeric; 6 Characters; Mandatory
Specify the EOU lot value.
Look Ahead Processing?
Optional
Select if fund will be marked for Look Ahead Processing or not during dividend process from the drop-down list. The list displays the following values:
l Yes
l No
Fund Level Holiday Defaults
Holiday Rule
Mandatory
Select the holiday rule from the drop-down list. The list displays the following values:
l After
l Prior
Click ‘Default Holiday Maintenance’ button to view calendar.
5.10.3 Fund Account Details Tab
Click ‘Fund Account Details’ tab in ‘FCIS Bulk Clients Defaults - Fund Rule - Detail’ screen.
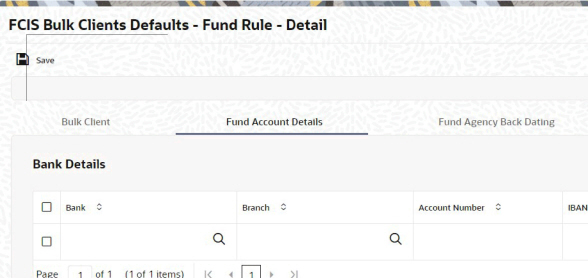
You can specify the following details:
Bank
Alphanumeric; 12 Characters; Optional
Specify the bank name.
Branch
Alphanumeric; 50 Characters; Optional
Specify the branch name.
Account Number
Alphanumeric; 34 Characters; Optional
Specify the account number.
IBAN
Alphanumeric; 40 Characters; Optional
Specify the IBAN details.
Account Currency
Alphanumeric; 3 Characters; Optional
Specify the account currency code.
Account Name
Alphanumeric; 50 Characters; Optional
Specify the account holder name.
5.10.4 Fund Agency Back Dating Tab
Click ‘Fund Agency Back Dating’ tab in ‘FCIS Bulk Clients Defaults - Fund Rule - Detail’ screen.
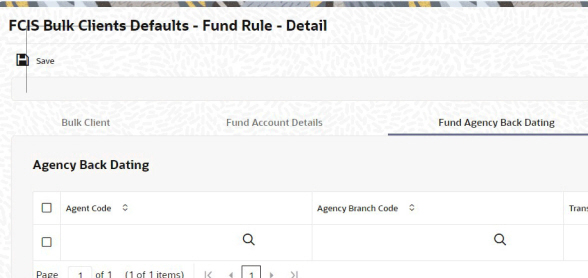
You can specify the following details:
Agent Code
Alphanumeric; 12 Characters; Optional
Specify the agent code.
Agency Branch Code
Alphanumeric; 12 Characters; Optional
Specify the agency branch code.
Transaction Type
Alphanumeric; 2 Characters; Optional
Specify the type of transaction.
Backdating Period
Numeric; 22 Characters; Optional
Specify the backdating period.
Transaction Processing Rules Tab
Click ‘Transaction Processing Rules’ tab in ‘FCIS Bulk Clients Defaults - Fund Rule - Detail’ screen.
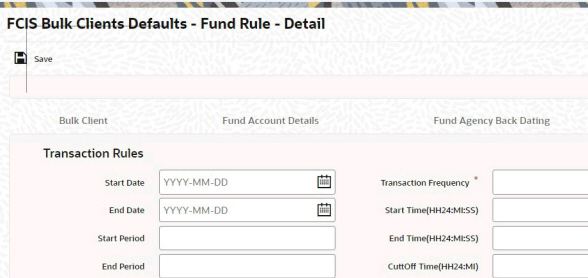
You can specify the following details:
Transaction Rules
Start Date
Date Format; Mandatory
Select the start date from the adjoining calendar.
End Date
Date Format; Mandatory
Select the end date from the adjoining calendar.
Start Period
Numeric; 22 Characters; Mandatory
Specify the transaction start period.
End Period
Numeric; 22 Characters; Mandatory
Specify the transaction end period.
Transaction Frequency
Alphanumeric; 1 Character; Mandatory
Specify the transaction frequency.
Start Time(HH24:MI:SS)
Alphanumeric; 15 Characters; Mandatory
Specify the transaction start time for a day. By default, the system displays 00:00:01. However, you can amend the value accordingly.
End Time(HH24:MI:SS)
Alphanumeric; 15 Characters; Mandatory
Specify the transaction end time for a day. By default, the system displays 23:59:00. However, you can amend the value accordingly.
CutOff Time(HH24:MI)
Alphanumeric; 15 Characters; Mandatory
Specify the transaction cut-off time for a day. By default, the system displays 23:59:00. However, you can amend the value accordingly.
Transaction Limits
Minimum Amount
Numeric; 30 Characters; Mandatory
Specify the minimum transaction amount.
Maximum Amount
Numeric; 30 Characters; Mandatory
Specify the maximum transaction amount.
Minimum Units
Numeric; 27 Characters; Mandatory
Specify the minimum transaction units.
Maximum Units
Numeric; 27 Characters; Mandatory
Specify the maximum transaction units.
Step Amount
Numeric; 30 Characters; Mandatory
Specify the step amount for the transaction amount.
Step Units
Numeric; 27 Characters; Mandatory
Specify the step units for the transaction unit.
Pricing
Back-Dating Allowed?
Mandatory
Select if back dating is allowed or not from the drop-down list. The list displays the following values:
l Yes
l No
Rounding Precision For Unit Price
Numeric; 22 Characters; Optional
Specify the rounding precision for unit price.
Rounding Options For Unit Price
Optional
Select the rounding options for unit price from the drop-down list. the list displays the following values:
l Round Off
l Round Down
l Round Up
Price Lag
Numeric; 22 Characters; Mandatory
Specify the price lag details.
Back-Dating Limit
Numeric; 22 Characters; Optional
Specify the back-dating limit.
Rounding Options For Units
Optional
Select the rounding options for units from the drop-down list. the list displays the following values:
l Round Off
l Round Down
l Round Up
Policies
Allocation Lag
Numeric; 22 Characters; Mandatory
Specify the allocation lag.
Confirmation Lag
Numeric; 22 Characters; Mandatory
Specify the confirmation lag.
Check On Par With Cash?
Mandatory
Select if the check on par with cash is required or not from the drop-down list. The list displays the following values:
l Yes
l No
Credit Card On Par With Cash?
Mandatory
Select if the credit on par with cash is required or not from the drop-down list. The list displays the following values:
l Yes
l No
Transfer On Par With Cash?
Mandatory
Select if the transfer on par with cash is required or not from the drop-down list. The list displays the following values:
l Yes
l No
Select ‘Fund Agent Mapping’ tab in ‘FCIS Bulk Clients Defaults - Fund Rule - Detail’ screen.
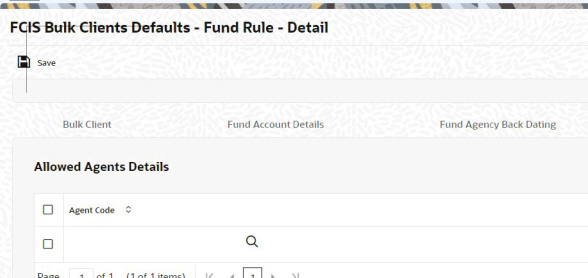
You can specify the following details:
Allowed Agents Details
Agent Code
Alphanumeric; 255 Characters; Optional
Specify the agent code.
5.11 FCIS Bulk Clients Defaults - Fund Rule - Summary
This section contains the following topics:
l Section 5.11.1, "Retrieving Bulk Clients Defaults - Fund Rule in Summary Screen"
l Section 5.11.2, "Editing Bulk Clients Defaults - Fund Rule Details"
l Section 5.11.3, "Viewing Bulk Clients Defaults - Fund Rule Details"
l Section 5.11.4, "Deleting Bulk Clients Defaults - Fund Rule Details"
l Section 5.11.5, "Authorizing Bulk Clients Defaults - Fund Rule Details"
l Section 5.11.6, "Amending Bulk Clients Defaults - Fund Rule Details"
l Section 5.11.7, "Authorizing Amended Bulk Clients Defaults - Fund Rule Details"
5.11.1 Retrieving Bulk Clients Defaults - Fund Rule in Summary Screen
You can invoke the ‘FCIS Bulk Clients Defaults - Fund Rule - Summary’ screen by typing ‘UTSBLKFR’ in the field at the top right corner of the Application tool bar and clicking on the adjoining arrow button.
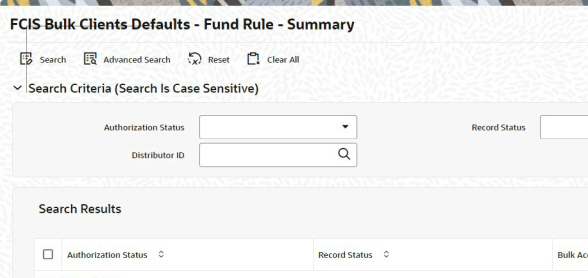
You can retrieve a previously entered record in the Summary screen, as follows:
l Invoke the FCIS Bulk Clients Defaults - Fund Rule - Summary screen and specify the following:
– The status of the record in the Authorized field. If you choose the “Blank Space” option, then all the fund types are retrieved.
– The status of the fund type in the Record Status field. If you choose the “Blank Space” option, then all the records are retrieved.
– Bulk Account Client Code
– Distributor ID
l After you have specified the required details, click ‘Search’ button. All records with the specified details are retrieved and displayed in the lower portion of the screen.
You can also retrieve the record from the detail screen by doing query in the following manner:-
l Press F7
l Input the Bulk Account Client Code
l Press F8
You can perform Edit, Delete, Amend, Authorize, operation by selecting from the Action list.
5.11.2 Editing Bulk Clients Defaults - Fund Rule Details
You can modify the record that you have already entered into the system, provided it has not been subsequently authorized. You can perform this operation as follows:
l Invoke the FCIS Bulk Clients Defaults - Fund Rule - Summary screen from the Browser.
l Select the status that you want to retrieve for modification in the Authorized field. You can only modify records that are unauthorized. Accordingly, choose the Unauthorized option from the drop-down list.
l Specify any or all of the details in the corresponding fields on the screen to retrieve the record that is to be modified.
l Click ‘Search’ button. All unauthorized records with the specified details are retrieved and displayed in the lower portion of the screen.
l Double click the record that you want to modify. The FFCIS Bulk Clients Defaults - Fund Rule - Detail screen is displayed.
l Select Unlock Operation from Action list to modify the record. Modify the necessary information.
l Click Save to save the changes. The FCIS Bulk Clients Defaults - Fund Rule - Detail screen is closed and the changes made are reflected in the FCIS Bulk Clients Defaults - Fund Rule - Summary screen.
5.11.3 Viewing Bulk Clients Defaults - Fund Rule Details
To view a record that you have previously entered:
l Invoke FCIS Bulk Clients Defaults - Fund Rule - Summary Screen from the Browser.
l Select the status of the record that you want to retrieve for viewing in the Authorized field. You can also view all records that are either unauthorized or authorized only, by choosing the Unauthorized/ Authorized option.
l Specify any or all of the details in the corresponding fields on the screen.
l Click ‘Search’ button. All records with the specified details are retrieved and displayed in the lower portion of the screen.
l Double click the record that you want to view in the list of displayed records. The FCIS Bulk Clients Defaults - Fund Rule - Summary screen is opened in view mode.
5.11.4 Deleting Bulk Clients Defaults - Fund Rule Details
You can delete only unauthorized records in the system.
l Invoke the FCIS Bulk Clients Defaults - Fund Rule - Summary screen from the Browser.
l Select the status of the record that you want to retrieve for deletion.
l Specify any or all of the details in the corresponding fields on the screen.
l Click ‘Search’ button. All records with the specified details are retrieved and displayed in the lower portion of the screen.
l Double click the record that you want to delete. The FCIS Bulk Clients Defaults - Fund Rule - Detail screen is displayed.
l Select Delete operation from the Action list. The system prompts you to confirm the deletion, and the record is deleted physically from the system database.
5.11.5 Authorizing Bulk Clients Defaults - Fund Rule Details
An unauthorized record must be authorized in the system for it to be processed. To authorize a record:
l Invoke the FCIS Bulk Clients Defaults - Fund Rule - Summary screen from the Browser.
l Select the status of the record that you want to retrieve for authorization. Typically, choose the Unauthorized option from the drop-down list.
l Specify any or all of the details in the corresponding fields on the screen.
l Click ‘Search’ button. All the records with the specified details that are pending for authorization are retrieved and displayed in the lower portion of the screen.
l Double click the record that you wish to authorize. The FCIS Bulk Clients Defaults - Fund Rule - Detail screen displayed. Select Authorize operation from Action.
5.11.6 Amending Bulk Clients Defaults - Fund Rule Details
After a Bulk Clients Defaults - Fund Rule is authorized, it can be modified using the Unlock operation from Action list. To make changes to a Bulk Clients Defaults - Fund Rule after authorization, you must invoke the Unlock operation which is termed as Amend Operation.
l Invoke the FCIS Bulk Clients Defaults - Fund Rule - Summary screen from the Browser.
l Select the status that you wish to retrieve for amendment. You can only amend records that are authorized.
l Specify any or all of the details in the corresponding fields on the screen.
l Click ‘Search’ button. All the records with specified details are retrieved and displayed in the lower portion of the screen.
l Double click the record that you want to amend. The FCIS Bulk Clients Defaults - Fund Rule - Detail screen is displayed in Amendment mode.
l Click the Unlock operation from the Action list to amend the record.
l Amend the necessary information. Click the Save button to save the changes.
5.11.7 Authorizing Amended Bulk Clients Defaults - Fund Rule Details
An amended Bulk Clients Defaults - Fund Rule must be authorized for the amendment to be made effective in the system. The process of authorization is subsequently the same as that for normal transactions.
5.12 Default Information for Fund Price Imports
This section contains the following topics:
l Section 5.12.1, "Invoking Default Information for Fund Price Imports"
5.12.1 Invoking Default Information for Fund Price Imports
The only default information to be maintained for fund price import is whether authorized fund prices must be generated for the fund.
Specify this in the Generate Authorized Fund Price field. You must also specify the Fund Scheme / Cross Reference Number.
You can invoke the FCIS Bulk Clients Defaults (Fund Price) Detail screen by typing ‘UTDCDFP’ in the field at the top right corner of the Application tool bar and clicking on the adjoining arrow button.

You can specify the following details:
Bulk Clients Details
Bulk Client Code
Alphanumeric; 12 Characters; Mandatory
Specify the bulk client code.
Bulk Client Name
Display
The system displays the bulk client name for the selected bulk client code.
Distributor ID
Alphanumeric; 12 Characters; Mandatory
Specify the distributor ID.
Distributor
Display
The system displays name of the distributor for the selected distributor ID.
Client Defaults
Generate Authorized Fund Price
Mandatory
Select ‘Yes’ from drop-down list if authorized fund price has to be generated. The options available in the drop-down are as follows:
l Yes
l No
Other Details
Fund Scheme/Cross Reference Number
Alphanumeric; 60 Characters; Mandatory
Specify the fund scheme or cross reference number.
Check Fund Price Fluctuation
Optional
Select ‘Yes’ from drop-down list to check fund price fluctuation. The options available in the drop-down are as follows:
l Yes
l No
5.13 FCIS Bulk Clients Defaults - Fund Price - Summary
This section contains the following topics:
l Section 5.13.1, "Retrieving a Bulk Clients Defaults - Fund Price Record"
l Section 5.13.2, "Editing Bulk Clients Defaults - Fund Price Record"
l Section 5.13.3, "Viewing Bulk Clients Defaults - Fund Price Record"
l Section 5.13.4, "Deleting Bulk Clients Defaults - Fund Price Record"
l Section 5.13.5, "Authorizing Bulk Clients Defaults - Fund Price Record"
l Section 5.13.6, "Amending Bulk Clients Defaults - Fund Price Record"
l Section 5.13.7, "Authorizing Amended Bulk Clients Defaults - Fund Price Record"
5.13.1 Retrieving a Bulk Clients Defaults - Fund Price Record
You can retrieve a previously entered record in the Summary Screen, as follows:

You can invoke ‘FCIS Bulk Clients Defaults - Fund Price - Summary’ screen by typing ‘UTSCDFP’ in the field at the top right corner of the Application tool bar and clicking on the adjoining arrow button.
l The status of the record in the Authorization Status field. If you choose the ‘Blank Space’ option, then all the records are retrieved.
l The status of the record in the Record Status field. If you choose the ‘Blank Space’ option, then all records are retrieved
l Bulk Account Code
l Distributor ID
Click ‘Search’ button to view the records. All the records with the specified details are retrieved and displayed in the lower portion of the screen.
Note
You can also retrieve the individual record detail from the detail screen by querying in the following manner:
– Press F7
– Input the Distributor ID
– Press F8
You can perform Edit, Delete, Amend, Authorize, operations by selecting the operation from the Action list. You can also search a record by using a combination of % and alphanumeric value.
5.13.2 Editing Bulk Clients Defaults - Fund Price Record
You can modify the details of FCIS Bulk Clients Defaults - Fund Price record that you have already entered into the system, provided it has not subsequently authorized. You can perform this operation as follows:
l Invoke the FCIS Bulk Clients Defaults - Fund Price - Summary screen from the Browser.
l Select the status of the record that you want to retrieve for modification in the Authorization Status field. You can only modify records that are unauthorized. Accordingly, choose the Unauthorized option.
l Specify any or all of the details in the corresponding fields to retrieve the record that is to be modified.
l Click ‘Search’ button. All unauthorized records with the specified details are retrieved and displayed in the lower portion of the screen.
l Double click the record that you want to modify in the list of displayed records. The FCIS Bulk Clients Defaults - Fund Price - Detail screen is displayed.
l Select Unlock Operation from the Action list to modify the record. Modify the necessary information.
Click Save to save your changes. The FCIS Bulk Clients Defaults - Fund Price - Detail screen is closed and the changes made are reflected in the FCIS Bulk Clients Defaults - Fund Price - Summary screen.
5.13.3 Viewing Bulk Clients Defaults - Fund Price Record
To view a record that you have previously input, you must retrieve the same in the FCIS Bulk Clients Defaults - Fund Price - Summary screen as follows:
l Invoke the FCIS Bulk Clients Defaults - Fund Price - Summary screen from the Browser.
l Select the status of the record that you want to retrieve for viewing in the Authorization Status field. You can also view all records that are either unauthorized or authorized only, by choosing the unauthorized / Authorized option.
l Specify any or all of the details of the record in the corresponding fields on the screen.
l Click ‘Search’ button. All records with the specified fields are retrieved and displayed in the lower portion of the screen.
l Double click the record that you want to view in the list of displayed records. The FCIS Bulk Clients Defaults - Fund Price - Detail screen is displayed in View mode.
5.13.4 Deleting Bulk Clients Defaults - Fund Price Record
You can delete only unauthorized records in the system. To delete a record that you have previously entered:
l Invoke the FCIS Bulk Clients Defaults - Fund Price - Summary screen from the Browser.
l Select the status of the record that you want to retrieve for deletion.
l Specify any or all of the details in the corresponding fields on the screen.
l Click ‘Search’ button. All records with the specified fields are retrieved and displayed in the lower portion of the screen.
l Double click the record that you want to delete in the list of displayed records. The FCIS Bulk Clients Defaults - Fund Price - Detail screen is displayed.
l Select Delete Operation from the Action list. The system prompts you to confirm the deletion and the record is physically deleted from the system database.
5.13.5 Authorizing Bulk Clients Defaults - Fund Price Record
l An unauthorized FCIS Bulk Clients Defaults - Fund Price record must be authorized in the system for it to be processed. To authorize a record:
l Invoke the FCIS Bulk Clients Defaults - Fund Price - Summary screen from the Browser.
l Select the status of the record that you want to retrieve for authorization. Typically, choose the unauthorized option.
l Specify any or all of the details in the corresponding fields on the screen.
l Click ‘Search’ button. All records with the specified details that are pending authorization are retrieved and displayed in the lower portion of the screen.
l Double click the record that you wish to authorize. The FCIS Bulk Clients Defaults - Fund Price - Detail screen is displayed. Select Authorize operation from the Action List.
When a checker authorizes a record, details of validation, if any, that were overridden by the maker of the record during the Save operation are displayed. If any of these overrides results in an error, the checker must reject the record.
5.13.6 Amending Bulk Clients Defaults - Fund Price Record
After a Bulk Clients Defaults - Fund Price record is authorized, it can be modified using the Unlock operation from the Action List. To make changes to a record after authorization:
l Invoke the FCIS Bulk Clients Defaults - Fund Price - Summary screen from the Browser.
l Select the status of the record that you want to retrieve for authorization. You can only amend authorized records.
l Specify any or all of the details in the corresponding fields on the screen.
l Click ‘Search’ button. All records with the specified details that are pending authorization are retrieved and displayed in the lower portion of the screen.
l Double click the record that you wish to authorize. The FCIS Bulk Clients Defaults - Fund Price - Detail screen is displayed in amendment mode. Select Unlock operation from the Action List to amend the record.
l Amend the necessary information and click on Save to save the changes
5.13.7 Authorizing Amended Bulk Clients Defaults - Fund Price Record
An amended Bulk Clients Defaults - Fund Price record must be authorized for the amendment to be made effective in the system. The authorization of amended records can be done only from Fund Manager Module and Agency Branch module.
5.14 Default Information for Income Distribution Setup Imports
This section contains the following topics:
l Section 5.14.1, "Invoking Default Information for Income Distribution Setup Imports"
5.14.1 Invoking Default Information for Income Distribution Setup Imports
You can invoke the FCIS Bulk Clients Defaults (Income Distribution Rule) screen by typing ‘UTDCDIDS’ in the field at the top right corner of the Application tool bar and clicking on the adjoining arrow button.

For income distribution setup import, you must maintain:
l Whether authorized income distribution setup records are to be generated in the system
l Scheme/ Cross Reference Number
l Fund Scheme/ Cross Reference Number
l Whether checking for duplicates must be done
Bulk Clients Details
Bulk Account Client Code
Alphanumeric; 12 Characters; Mandatory
Specify the bulk account client code.
Bulk Client Name
Display
The system displays the bulk client name for the selected bulk account client code.
Distributor ID
Alphanumeric; 12 Characters; Mandatory
Specify the distributor ID.
Distributor
Display
The system displays the name of the distributor for the selected distributor ID.
Client Defaults
Generate Authorized IDS
Mandatory
Select ‘Yes’ from the drop-down list if authorized IDS has to be generated. The options available in the drop-down are as follows:
l Yes
l No
Other Details
Scheme/Cross Reference Number
Alphanumeric; 12 Characters; Mandatory
Specify the scheme or cross reference number.
Fund Scheme/Cross Reference Number
Alphanumeric; 60 Characters; Mandatory
Specify the fund scheme or cross reference number.
Check Duplicates
Mandatory
Select ‘Yes’ from drop-down list if check duplicates are available. The options available in the drop-down are as follows:
l Yes
l No
5.15 FCIS Bulk Clients Defaults - Income Distribution Setup - Summary
This section contains the following topics:
l Section 5.15.1, "Retrieving a Bulk Clients Defaults - Income Distribution Setup Record"
l Section 5.15.2, "Editing Bulk Clients Defaults - Income Distribution Setup Record"
l Section 5.15.3, "Viewing Bulk Clients Defaults - Income Distribution Setup Record"
l Section 5.15.4, "Deleting Bulk Clients Defaults - Income Distribution Setup Record"
l Section 5.15.5, "Authorizing Bulk Clients Defaults - Income Distribution Setup Record"
l Section 5.15.6, "Amending Bulk Clients Defaults - Income Distribution Setup Record"
l Section 5.15.7, "Authorizing Amended Bulk Clients Defaults - Income Distribution Setup Record"
5.15.1 Retrieving a Bulk Clients Defaults - Income Distribution Setup Record
You can retrieve a previously entered record in the Summary Screen, as follows:
You can invoke ‘FCIS Bulk Clients Defaults - Income Distribution Setup - Summary’ screen by typing ‘UTSCDIDS’ in the field at the top right corner of the Application tool bar and clicking on the adjoining arrow button.
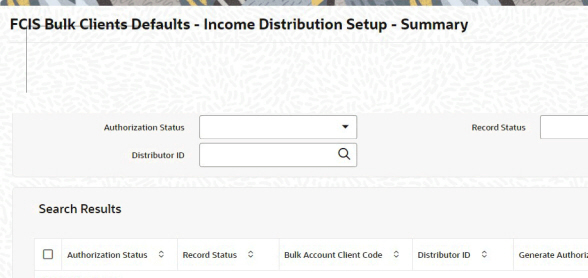
l The status of the record in the Authorization Status field. If you choose the ‘Blank Space’ option, then all the records are retrieved.
l The status of the record in the Record Status field. If you choose the ‘Blank Space’ option, then all records are retrieved
l Bulk Account Client Code
l Distributor ID
Click ‘Search’ button to view the records. All the records with the specified details are retrieved and displayed in the lower portion of the screen.
Note
You can also retrieve the individual record detail from the detail screen by querying in the following manner:
– Press F7
– Input the Distributor ID
– Press F8
You can perform Edit, Delete, Amend, Authorize, operations by selecting the operation from the Action list. You can also search a record by using a combination of % and alphanumeric value.
5.15.2 Editing Bulk Clients Defaults - Income Distribution Setup Record
You can modify the details of Bulk Clients Defaults - Income Distribution Setup record that you have already entered into the system, provided it has not subsequently authorized. You can perform this operation as follows:
l Invoke the FCIS Bulk Clients Defaults - Income Distribution Setup - Summary screen from the Browser.
l Select the status of the record that you want to retrieve for modification in the Authorization Status field. You can only modify records that are unauthorized. Accordingly, choose the Unauthorized option.
l Specify any or all of the details in the corresponding fields to retrieve the record that is to be modified.
l Click ‘Search’ button. All unauthorized records with the specified details are retrieved and displayed in the lower portion of the screen.
l Double click the record that you want to modify in the list of displayed records. The FCIS Bulk Clients Defaults - Income Distribution Setup - Detail screen is displayed.
l Select Unlock Operation from the Action list to modify the record. Modify the necessary information.
Click Save to save your changes. The FCIS Bulk Clients Defaults - Income Distribution Setup - Detail screen is closed and the changes made are reflected in the FCIS Bulk Clients Defaults - Income Distribution Setup - Summary screen.
5.15.3 Viewing Bulk Clients Defaults - Income Distribution Setup Record
To view a record that you have previously input, you must retrieve the same in the FCIS Bulk Clients Defaults - Income Distribution Setup - Summary screen as follows:
l Invoke the FCIS Bulk Clients Defaults - Income Distribution Setup - Summary screen from the Browser.
l Select the status of the record that you want to retrieve for viewing in the Authorization Status field. You can also view all records that are either unauthorized or authorized only, by choosing the unauthorized / Authorized option.
l Specify any or all of the details of the record in the corresponding fields on the screen.
l Click ‘Search’ button. All records with the specified fields are retrieved and displayed in the lower portion of the screen.
l Double click the record that you want to view in the list of displayed records. The FCIS Bulk Clients Defaults - Income Distribution Setup - Detail screen is displayed in View mode.
5.15.4 Deleting Bulk Clients Defaults - Income Distribution Setup Record
You can delete only unauthorized records in the system. To delete a record that you have previously entered:
l Invoke the FCIS Bulk Clients Defaults - Income Distribution Setup - Summary screen from the Browser.
l Select the status of the record that you want to retrieve for deletion.
l Specify any or all of the details in the corresponding fields on the screen.
l Click ‘Search’ button. All records with the specified fields are retrieved and displayed in the lower portion of the screen.
l Double click the record that you want to delete in the list of displayed records. The FCIS Bulk Clients Defaults - Income Distribution Setup - Detail screen is displayed.
l Select Delete Operation from the Action list. The system prompts you to confirm the deletion and the record is physically deleted from the system database.
5.15.5 Authorizing Bulk Clients Defaults - Income Distribution Setup Record
l An unauthorized Bulk Clients Defaults - Income Distribution Setup record must be authorized in the system for it to be processed. To authorize a record:
l Invoke the FCIS Bulk Clients Defaults - Income Distribution Setup - Summary screen from the Browser.
l Select the status of the record that you want to retrieve for authorization. Typically, choose the unauthorized option.
l Specify any or all of the details in the corresponding fields on the screen.
l Click ‘Search’ button. All records with the specified details that are pending authorization are retrieved and displayed in the lower portion of the screen.
l Double click the record that you wish to authorize. The FCIS Bulk Clients Defaults - Income Distribution Setup - Summary Detail screen is displayed. Select Authorize operation from the Action List.
When a checker authorizes a record, details of validation, if any, that were overridden by the maker of the record during the Save operation are displayed. If any of these overrides results in an error, the checker must reject the record.
5.15.6 Amending Bulk Clients Defaults - Income Distribution Setup Record
After a Bulk Clients Defaults - Income Distribution Setup record is authorized, it can be modified using the Unlock operation from the Action List. To make changes to a record after authorization:
l Invoke the FCIS Bulk Clients Defaults - Income Distribution Setup - Summary screen from the Browser.
l Select the status of the record that you want to retrieve for authorization. You can only amend authorized records.
l Specify any or all of the details in the corresponding fields on the screen.
l Click ‘Search’ button. All records with the specified details that are pending authorization are retrieved and displayed in the lower portion of the screen.
l Double click the record that you wish to authorize. The FCIS Bulk Clients Defaults - Income Distribution Setup - Detail screen is displayed in amendment mode. Select Unlock operation from the Action List to amend the record.
l Amend the necessary information and click on Save to save the changes
5.15.7 Authorizing Amended Bulk Clients Defaults - Income Distribution Setup Record
An amended Bulk Clients Defaults - Income Distribution Setup record must be authorized for the amendment to be made effective in the system. The authorization of amended records can be done only from Fund Manager Module and Agency Branch module.
5.16 Default Information for Redemption Check Imports
This section contains the following topics:
l Section 5.16.1, "Invoking Default Information for Redemption Check Imports"
5.16.1 Invoking Default Information for Redemption Check Imports
You can invoke the FCIS Bulk Clients Defaults (Redemption Check) screen by typing ‘UTDBLKRC’ in the field at the top right corner of the Application tool bar and clicking on the adjoining arrow button.
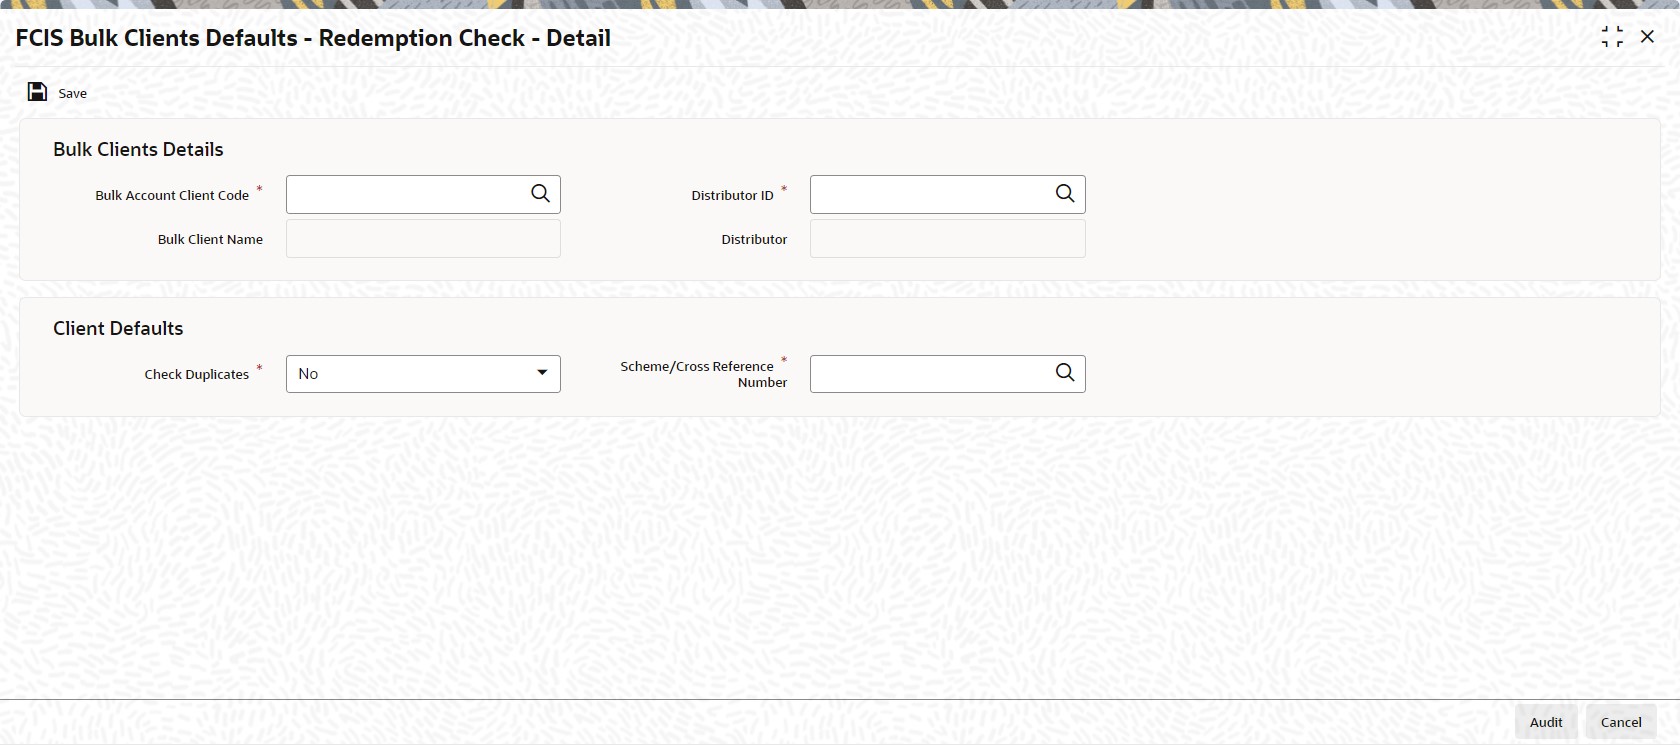
For redemption check imports, you must maintain:
l Whether checking for duplicates must be done
l Scheme/ Cross Reference Number
Bulk Clients Details
Bulk Account Client Code
Alphanumeric; 12 Characters; Mandatory
Specify the bulk account client code.
Bulk Client Name
Display
The system displays the bulk client name for the selected bulk account client code.
Distributor ID
Alphanumeric; 12 Characters; Mandatory
Specify the AMC or distributor ID.
Distributor
Display
The system displays the name of the AMC or distributor for the selected AMC or distributor ID.
Client Defaults
Check Duplicates
Mandatory
Select ‘Yes’ from drop-down list if check duplicates are available. The options available in the drop-down are as follows:
l Yes
l No
Scheme/Cross Reference Number
Alphanumeric; 12 Characters; Mandatory
Specify the scheme or cross reference number. Alternatively, you can select scheme or cross reference number from the option list. This option list will fetch the add info details for the entity add info for Unit holder as well as unit holder ID and UH reference number.
5.17 FCIS Bulk Clients Defaults - Redemption Check - Summary
This section contains the following topics:
l Section 5.17.1, "Retrieving a Bulk Clients Defaults - Redemption Check Record"
l Section 5.17.2, "Editing Bulk Clients Defaults - Redemption Check - Record"
l Section 5.17.3, "Viewing Bulk Clients Defaults - Redemption Check Record"
l Section 5.17.4, "Deleting Bulk Clients Defaults - Redemption Check Record"
l Section 5.17.5, "Authorizing Bulk Clients Defaults - Redemption Check Record"
l Section 5.17.6, "Amending Bulk Clients Defaults - Redemption Check Record"
l Section 5.17.7, "Authorizing Amended Bulk Clients Defaults - Redemption Check Record"
5.17.1 Retrieving a Bulk Clients Defaults - Redemption Check Record
You can retrieve a previously entered record in the Summary Screen, as follows:
You can invoke ‘FCIS Bulk Clients Defaults - Redemption Check - Summary’ screen by typing ‘UTSBLKRC’ in the field at the top right corner of the Application tool bar and clicking on the adjoining arrow button.
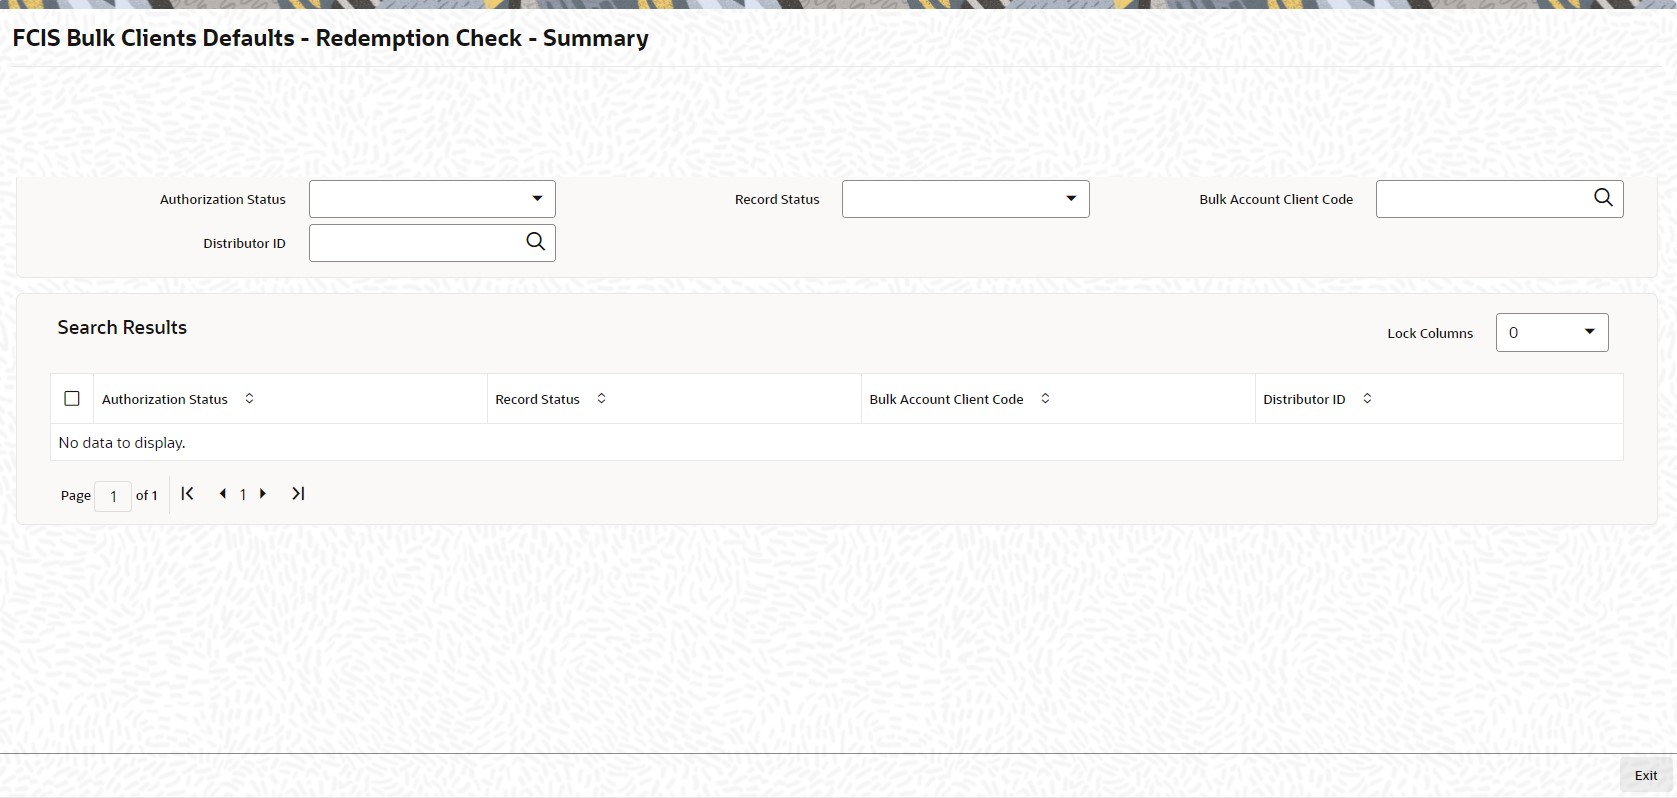
l The status of the record in the Authorization Status field. If you choose the ‘Blank Space’ option, then all the records are retrieved.
l The status of the record in the Record Status field. If you choose the ‘Blank Space’ option, then all records are retrieved
l Bulk Account Client Code
l Distributor ID
Click ‘Search’ button to view the records. All the records with the specified details are retrieved and displayed in the lower portion of the screen.
Note
You can also retrieve the individual record detail from the detail screen by querying in the following manner:
– Press F7
– Input the Distributor ID
– Press F8
You can perform Edit, Delete, Amend, Authorize, operations by selecting the operation from the Action list. You can also search a record by using a combination of % and alphanumeric value.
5.17.2 Editing Bulk Clients Defaults - Redemption Check - Record
You can modify the details of Bulk Clients Defaults - Redemption Check record that you have already entered into the system, provided it has not subsequently authorized. You can perform this operation as follows:
l Invoke the FCIS Bulk Clients Defaults - Redemption Check - Summary screen from the Browser.
l Select the status of the record that you want to retrieve for modification in the Authorization Status field. You can only modify records that are unauthorized. Accordingly, choose the Unauthorized option.
l Specify any or all of the details in the corresponding fields to retrieve the record that is to be modified.
l Click ‘Search’ button. All unauthorized records with the specified details are retrieved and displayed in the lower portion of the screen.
l Double click the record that you want to modify in the list of displayed records. The FCIS Bulk Clients Defaults - Redemption Check - Detail screen is displayed.
l Select Unlock Operation from the Action list to modify the record. Modify the necessary information.
Click Save to save your changes. The FCIS Bulk Clients Defaults - Redemption Check - Detail screen is closed and the changes made are reflected in the Bulk Clients Defaults - Redemption Check - Summary screen.
5.17.3 Viewing Bulk Clients Defaults - Redemption Check Record
To view a record that you have previously input, you must retrieve the same in the FCIS Bulk Clients Defaults - Redemption Check - Summary screen as follows:
l Invoke the FCIS Bulk Clients Defaults - Redemption Check - Summary screen from the Browser.
l Select the status of the record that you want to retrieve for viewing in the Authorization Status field. You can also view all records that are either unauthorized or authorized only, by choosing the unauthorized / Authorized option.
l Specify any or all of the details of the record in the corresponding fields on the screen.
l Click ‘Search’ button. All records with the specified fields are retrieved and displayed in the lower portion of the screen.
l Double click the record that you want to view in the list of displayed records. The FCIS Bulk Clients Defaults - Redemption Check - Detail screen is displayed in View mode.
5.17.4 Deleting Bulk Clients Defaults - Redemption Check Record
You can delete only unauthorized records in the system. To delete a record that you have previously entered:
l Invoke the FCIS Bulk Clients Defaults - Redemption Check - Summary screen from the Browser.
l Select the status of the record that you want to retrieve for deletion.
l Specify any or all of the details in the corresponding fields on the screen.
l Click ‘Search’ button. All records with the specified fields are retrieved and displayed in the lower portion of the screen.
l Double click the record that you want to delete in the list of displayed records. The FCIS Bulk Clients Defaults - Redemption Check - Detail screen is displayed.
Select Delete Operation from the Action list. The system prompts you to confirm the deletion and the record is physically deleted from the system database.
5.17.5 Authorizing Bulk Clients Defaults - Redemption Check Record
l An unauthorized Bulk Clients Defaults - Redemption Check record must be authorized in the system for it to be processed. To authorize a record:
l Invoke the FCIS Bulk Clients Defaults - Redemption Check - Summary screen from the Browser.
l Select the status of the record that you want to retrieve for authorization. Typically, choose the unauthorized option.
l Specify any or all of the details in the corresponding fields on the screen.
l Click ‘Search’ button. All records with the specified details that are pending authorization are retrieved and displayed in the lower portion of the screen.
l Double click the record that you wish to authorize. The FCIS Bulk Clients Defaults - Redemption Check - Detail screen is displayed. Select Authorize operation from the Action List.
When a checker authorizes a record, details of validation, if any, that were overridden by the maker of the record during the Save operation are displayed. If any of these overrides results in an error, the checker must reject the record.
5.17.6 Amending Bulk Clients Defaults - Redemption Check Record
After a Bulk Clients Defaults - Redemption Check record is authorized, it can be modified using the Unlock operation from the Action List. To make changes to a record after authorization:
l Invoke the FCIS Bulk Clients Defaults - Redemption Check - Summary screen from the Browser.
l Select the status of the record that you want to retrieve for authorization. You can only amend authorized records.
l Specify any or all of the details in the corresponding fields on the screen.
l Click ‘Search’ button. All records with the specified details that are pending authorization are retrieved and displayed in the lower portion of the screen.
l Double click the record that you wish to authorize. The FCIS Bulk Clients Defaults - Redemption Check - Detail screen is displayed in amendment mode. Select Unlock operation from the Action List to amend the record.
l Amend the necessary information and click on Save to save the changes
5.17.7 Authorizing Amended Bulk Clients Defaults - Redemption Check Record
An amended Bulk Clients Defaults - Redemption Check record must be authorized for the amendment to be made effective in the system. The authorization of amended records can be done only from Fund Manager Module and Agency Branch module.
5.18 Default Information for Standing Instructions Imports
This section contains the following topics:
l Section 5.18.1, "Invoking Default Information for Standing Instructions Imports"
5.18.1 Invoking Default Information for Standing Instructions Imports
You can invoke the FCIS Bulk Clients Defaults (Standing Instruction) screen by typing ‘UTDBLKSI’ in the field at the top right corner of the Application tool bar and clicking on the adjoining arrow button.
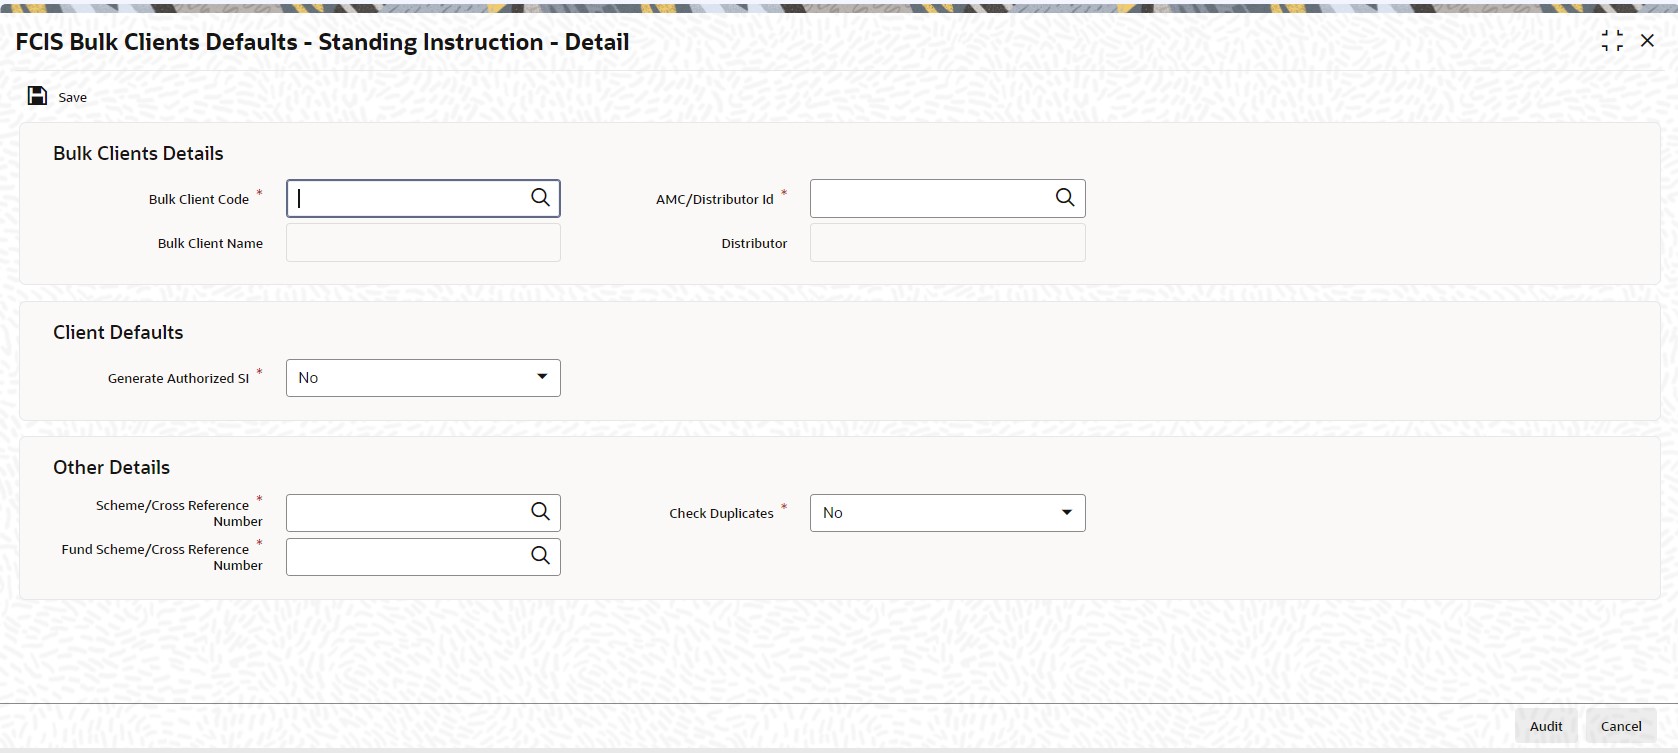
For standing instructions imports, you must maintain:
l Whether authorized standing instruction records are to be generated in the system
l Scheme / Cross Reference Number
l Fund Scheme / Cross Reference Number
l Whether checking for duplicates must be done
Bulk Clients Details
Bulk Client Code
Alphanumeric; 12 Characters; Mandatory
Specify the bulk account client code.
Bulk Client Name
Display
The system displays the bulk client name for the selected bulk account client code.
AMC/Distributor ID
Alphanumeric; 12 Characters; Mandatory
Specify the AMC or distributor ID.
Distributor
Display
The system displays the name of the AMC or distributor for the selected AMC or distributor ID.
Client Defaults
Generate Authorized SI
Mandatory
Select ‘Yes’ from the drop-down list if authorized SI has to be generated. The options available in the drop-down are as follows:
l Yes
l No
Other Details
Scheme/Cross Reference Number
Alphanumeric; 12 Characters; Mandatory
Specify the scheme or cross reference number. Alternatively, you can select scheme or cross reference number from the option list. This option list will fetch the add info details for the entity add info for Unit holder as well as unit holder ID and UH reference number.
Fund Scheme/Cross Reference Number
Alphanumeric; 60 Characters; Mandatory
Indicates the param value for the param code FUNDSCHEMECROSSREFTYPES.
Check Duplicates
Mandatory
Select ‘Yes’ from drop-down list if check duplicates are available. The options available in the drop-down are as follows:
l Yes
l No
5.19 Bulk Clients Defaults - Standing Instruction Summary
This section contains the following topics:
l Section 5.19.1, "Retrieving a Bulk Clients Defaults - Standing Instruction Record"
l Section 5.19.2, "Editing Bulk Clients Defaults - Standing Instruction Record"
l Section 5.19.3, "Viewing Bulk Clients Defaults - Standing Instruction Record"
l Section 5.19.4, "Deleting Bulk Clients Defaults - Standing Instruction Record"
l Section 5.19.5, "Authorizing Bulk Clients Defaults - Standing Instruction Record"
l Section 5.19.6, "Amending Bulk Clients Defaults - Standing Instruction Record"
l Section 5.19.7, "Authorizing Amended Bulk Clients Defaults - Standing Instruction Record"
5.19.1 Retrieving a Bulk Clients Defaults - Standing Instruction Record
You can retrieve a previously entered record in the Summary Screen, as follows:
You can invoke ‘FCIS Bulk Clients Defaults - Standing Instruction - Summary’ screen by typing ‘UTSBLKSI’ in the field at the top right corner of the Application tool bar and clicking on the adjoining arrow button.
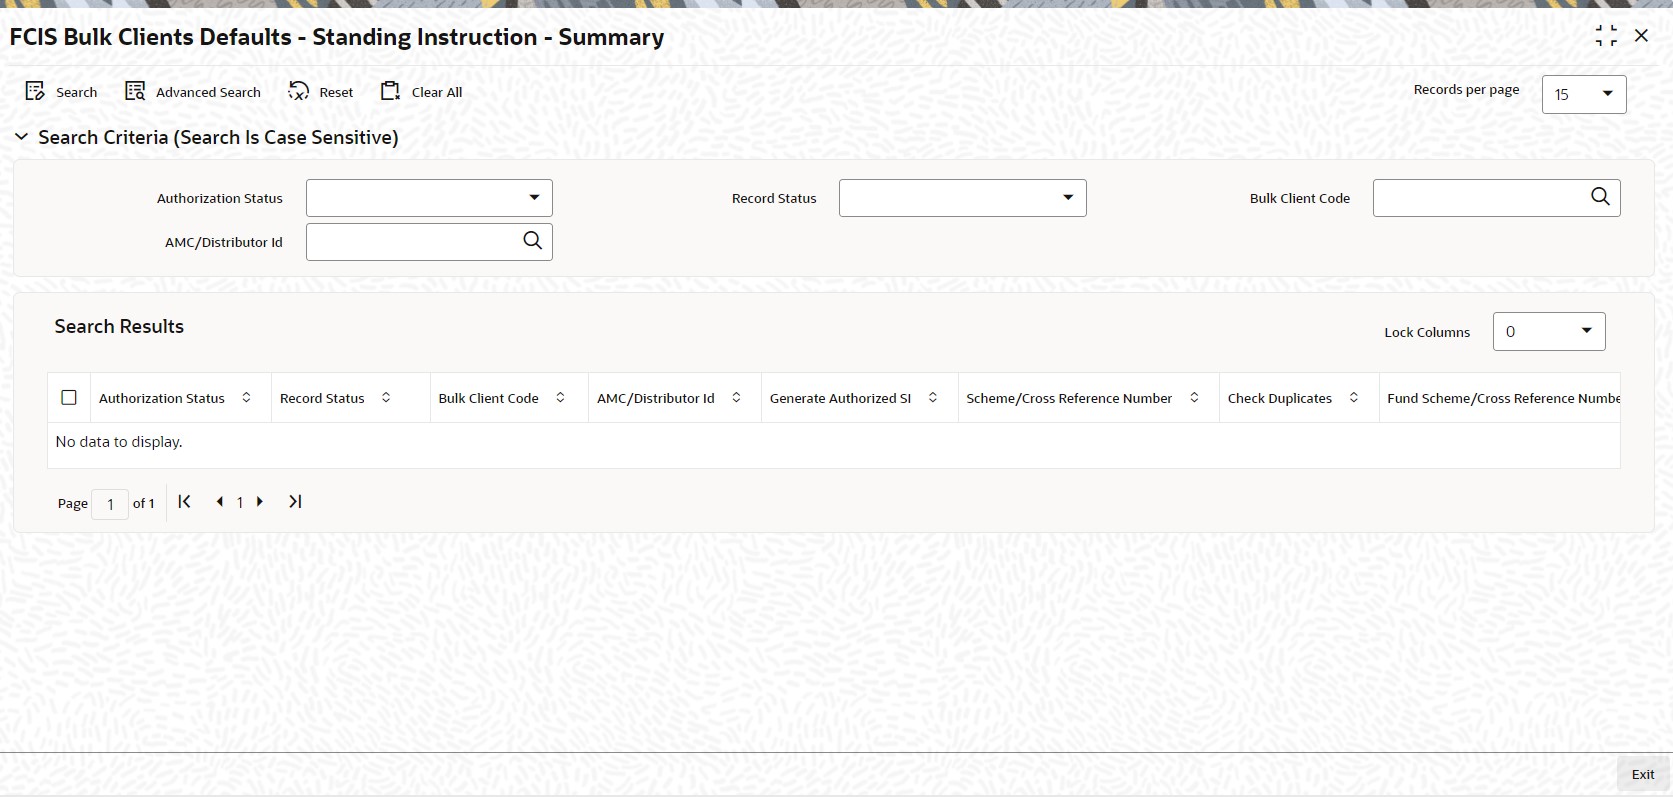
l The status of the record in the Authorization Status field. If you choose the ‘Blank Space’ option, then all the records are retrieved.
l The status of the record in the Record Status field. If you choose the ‘Blank Space’ option, then all records are retrieved
l Bulk Client Code
l AMC/Distributor ID
Click ‘Search’ button to view the records. All the records with the specified details are retrieved and displayed in the lower portion of the screen.
Note
You can also retrieve the individual record detail from the detail screen by querying in the following manner:
– Press F7
– Input the Bulk Client Code
– Press F8
You can perform Edit, Delete, Amend, Authorize, operations by selecting the operation from the Action list. You can also search a record by using a combination of % and alphanumeric value.
5.19.2 Editing Bulk Clients Defaults - Standing Instruction Record
You can modify the details of Bulk Clients Defaults - Standing Instruction record that you have already entered into the system, provided it has not subsequently authorized. You can perform this operation as follows:
l Invoke the FCIS Bulk Clients Defaults - Standing Instruction - Summary screen from the Browser.
l Select the status of the record that you want to retrieve for modification in the Authorization Status field. You can only modify records that are unauthorized. Accordingly, choose the Unauthorized option.
l Specify any or all of the details in the corresponding fields to retrieve the record that is to be modified.
l Click ‘Search’ button. All unauthorized records with the specified details are retrieved and displayed in the lower portion of the screen.
l Double click the record that you want to modify in the list of displayed records. The FCIS Bulk Clients Defaults - Standing Instruction - Detail screen is displayed.
l Select Unlock Operation from the Action list to modify the record. Modify the necessary information.
Click Save to save your changes. The FCIS Bulk Clients Defaults - Standing Instruction - Detail screen is closed and the changes made are reflected in the FCIS Bulk Clients Defaults - Standing Instruction - Summary screen.
5.19.3 Viewing Bulk Clients Defaults - Standing Instruction Record
To view a record that you have previously input, you must retrieve the same in the FCIS Bulk Clients Defaults - Standing Instruction - Summary screen as follows:
l Invoke the FCIS Bulk Clients Defaults - Standing Instruction - Summary screen from the Browser.
l Select the status of the record that you want to retrieve for viewing in the Authorization Status field. You can also view all records that are either unauthorized or authorized only, by choosing the unauthorized / Authorized option.
l Specify any or all of the details of the record in the corresponding fields on the screen.
l Click ‘Search’ button. All records with the specified fields are retrieved and displayed in the lower portion of the screen.
l Double click the record that you want to view in the list of displayed records. The Bulk Clients Defaults - Standing Instruction - Detail screen is displayed in View mode.
5.19.4 Deleting Bulk Clients Defaults - Standing Instruction Record
You can delete only unauthorized records in the system. To delete a record that you have previously entered:
l Invoke the FCIS Bulk Clients Defaults - Standing Instruction - Summary screen from the Browser.
l Select the status of the record that you want to retrieve for deletion.
l Specify any or all of the details in the corresponding fields on the screen.
l Click ‘Search’ button. All records with the specified fields are retrieved and displayed in the lower portion of the screen.
l Double click the record that you want to delete in the list of displayed records. The FCIS Bulk Clients Defaults - Standing Instruction - Detail screen is displayed.
l Select Delete Operation from the Action list. The system prompts you to confirm the deletion and the record is physically deleted from the system database.
5.19.5 Authorizing Bulk Clients Defaults - Standing Instruction Record
l An unauthorized Bulk Clients Defaults - Standing Instruction record must be authorized in the system for it to be processed. To authorize a record:
l Invoke the FCIS Bulk Clients Defaults - Standing Instruction - Summary screen from the Browser.
l Select the status of the record that you want to retrieve for authorization. Typically, choose the unauthorized option.
l Specify any or all of the details in the corresponding fields on the screen.
l Click ‘Search’ button. All records with the specified details that are pending authorization are retrieved and displayed in the lower portion of the screen.
l Double click the record that you wish to authorize. The FCIS Bulk Clients Defaults - Standing Instruction - Detail screen is displayed. Select Authorize operation from the Action List.
When a checker authorizes a record, details of validation, if any, that were overridden by the maker of the record during the Save operation are displayed. If any of these overrides results in an error, the checker must reject the record.
5.19.6 Amending Bulk Clients Defaults - Standing Instruction Record
After a Bulk Clients Defaults - Standing Instruction record is authorized, it can be modified using the Unlock operation from the Action List. To make changes to a record after authorization:
l Invoke the FCIS Bulk Clients Defaults - Standing Instruction - Summary screen from the Browser.
l Select the status of the record that you want to retrieve for authorization. You can only amend authorized records.
l Specify any or all of the details in the corresponding fields on the screen.
l Click ‘Search’ button. All records with the specified details that are pending authorization are retrieved and displayed in the lower portion of the screen.
l Double click the record that you wish to authorize. The FCIS Bulk Clients Defaults - Standing Instruction - Detail screen is displayed in amendment mode. Select Unlock operation from the Action List to amend the record.
l Amend the necessary information and click on Save to save the changes
5.19.7 Authorizing Amended Bulk Clients Defaults - Standing Instruction Record
An amended Bulk Clients Defaults - Standing Instruction record must be authorized for the amendment to be made effective in the system. The authorization of amended records can be done only from Fund Manager Module and Agency Branch module.
5.20 Default Information for Transactions Imports
This section contains the following topics:
l Section 5.20.1, "Invoking Default Information for Transactions Imports"
5.20.1 Invoking Default Information for Transactions Imports
You can invoke the FCIS Bulk Clients Defaults (Transaction) screen by typing ‘UTDBLTXN’ in the field at the top right corner of the Application tool bar and clicking on the adjoining arrow button.
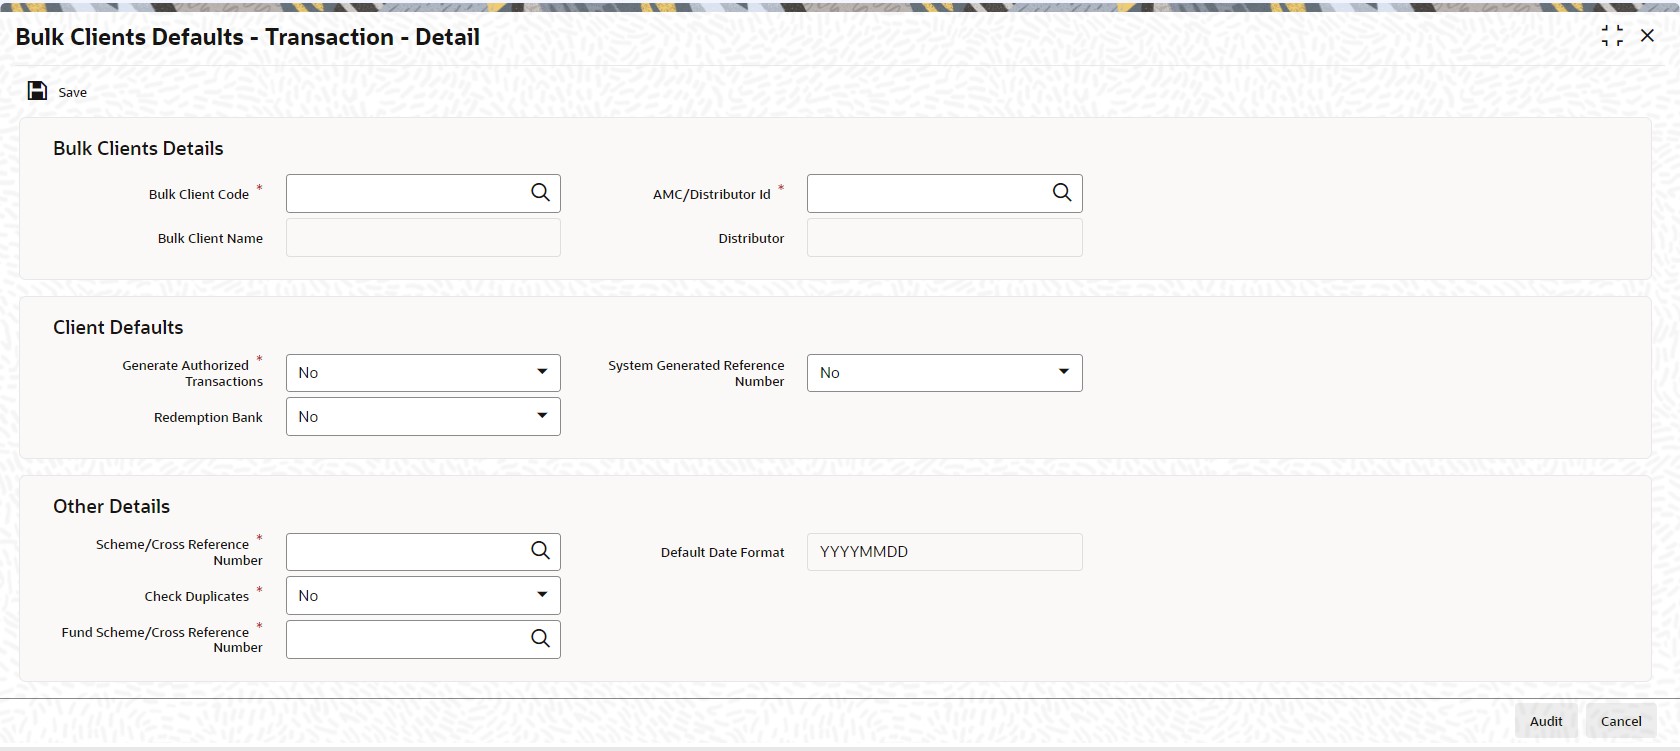
For imports of new subscription, redemption, transfer and conversion transactions, and amended transactions if indicated for the bulk client, you must maintain:
l Whether authorized transaction records are to be generated in the system
l Whether it must be designated by default that payouts must be made to the unit holder bank account only
l Whether a system generated reference number is indicated
l Scheme / Cross Reference Number
l Fund Scheme / Cross Reference Number
l Whether checking for duplicates must be done
l Default date format
l Communication mode
l Sub payment mode
l Letter of Intent (LOI) applicable
l Whether translation is required
l Whether amended transactions must be uploaded
Note
If you wish to disallow upload of amended transactions for a particular client, select the ‘No’ option in the Allow Amendment field, when you are setting up the default information for the bulk client. During bulk upload of transactions from a bulk client, amended orders are not imported if disallowed in the Bulk Clients Defaults Maintenance for the bulk client, but errors are logged in respect of them.
Bulk Clients Details
Bulk Account Client Code
Alphanumeric; 12 Characters; Mandatory
Specify the bulk account client code.
Bulk Client Name
Display
The system displays the bulk client name for the selected bulk account client code.
AMC/Distributor ID
Alphanumeric; 12 Characters; Mandatory
Specify the distributor ID.
Distributor
Display
The system displays the name of the distributor for the selected distributor ID.
Client Defaults
Generate Authorized Transactions
Mandatory
Select ‘Yes’ from the drop-down list if authorized transactions has to be generated. The options available in the drop-down are as follows:
l Yes
l No
Redemption Bank
Optional
Select if redemption bank has to be selected or not from the drop-down list. The list displays the following values:
l Yes
l No
System Generated Reference Number
Optional
Select if reference number has to be system generated or not from the drop-down list. The list displays the following values:
l Yes
l No
Other Details
Scheme/Cross Reference Number
Alphanumeric; 12 Characters; Mandatory
Specify the scheme or cross reference number.
Check Duplicates
Mandatory
Select ‘Yes’ from drop-down list if check duplicates are available. The options available in the drop-down are as follows:
l Yes
l No
Fund Scheme/Cross Reference Number
Alphanumeric; 60 Characters; Mandatory
Specify the fund scheme or cross reference number.
Default Date Format
Display
The system displays the date format.
Communication Mode
Alphanumeric; 2 Characters; Mandatory
Specify the communication mode.
Sub Payment Mode
Alphanumeric; 2 Characters; Mandatory
Specify the sub payment mode.
LOI Transaction
Optional
Select LOI transaction status from the drop-down list. The list displays the following values:
l Yes
l No
Translation Required
Optional
Select transaction required or not from the drop-down list. The list displays the following values:
l Yes
l No
Amendment Allowed
Optional
Select if amendment is allowed or not from the drop-down list. The list displays the following values:
l Yes
l No
5.21 Bulk Clients Defaults Summary Screen
This section contains the following topics:
l Section 5.21.1, "Retrieving a Bulk Clients Defaults Record"
l Section 5.21.2, "Editing Bulk Clients Defaults Record"
l Section 5.21.3, "Viewing Bulk Clients Defaults Record"
l Section 5.21.4, "Deleting Bulk Clients Defaults Record"
l Section 5.21.5, "Authorizing Bulk Clients Defaults Record"
l Section 5.21.6, "Amending Bulk Clients Defaults Record"
l Section 5.21.7, "Authorizing Amended Bulk Clients Defaults Record"
5.21.1 Retrieving a Bulk Clients Defaults Record
You can retrieve a previously entered record in the Summary Screen, as follows:
You can invoke ‘Bulk Clients Defaults Summary screen’ by typing ‘UTSBLTXN’ in the field at the top right corner of the Application tool bar and clicking on the adjoining arrow button.
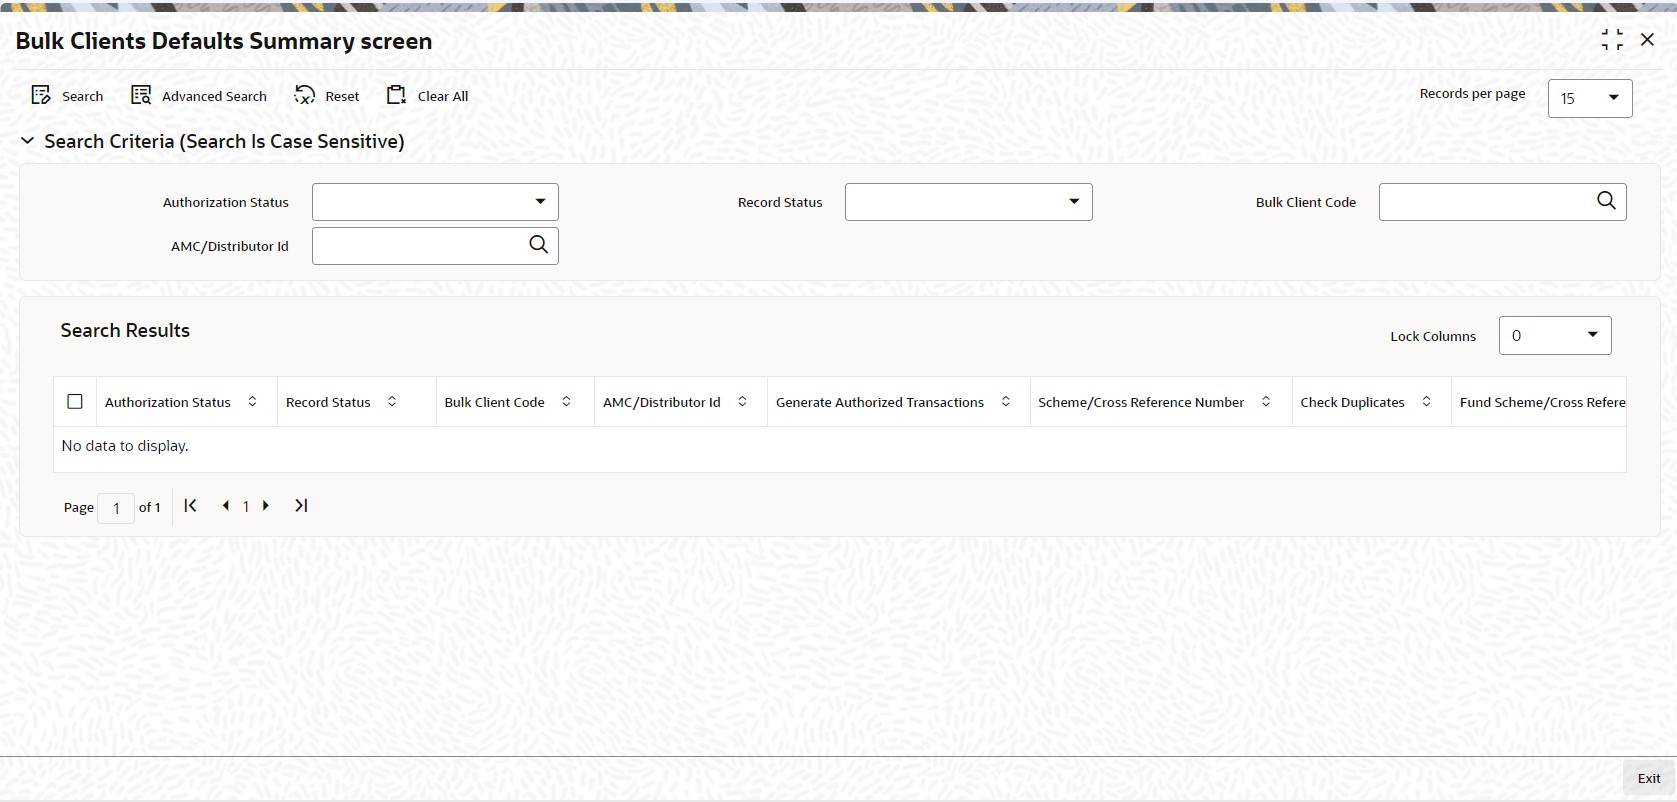
l The status of the record in the Authorization Status field. If you choose the ‘Blank Space’ option, then all the records are retrieved.
l The status of the record in the Record Status field. If you choose the ‘Blank Space’ option, then all records are retrieved
l Bulk Client Code
l AMC/ Distributor ID
Click ‘Search’ button to view the records. All the records with the specified details are retrieved and displayed in the lower portion of the screen.
Note
You can also retrieve the individual record detail from the detail screen by querying in the following manner:
– Press F7
– Input the Distributor ID
– Press F8
You can perform Edit, Delete, Amend, Authorize, operations by selecting the operation from the Action list. You can also search a record by using a combination of % and alphanumeric value.
5.21.2 Editing Bulk Clients Defaults Record
You can modify the details of Bulk Clients Defaults record that you have already entered into the system, provided it has not subsequently authorized. You can perform this operation as follows:
l Invoke the Bulk Clients Defaults Summary screen from the Browser.
l Select the status of the record that you want to retrieve for modification in the Authorization Status field. You can only modify records that are unauthorized. Accordingly, choose the Unauthorized option.
l Specify any or all of the details in the corresponding fields to retrieve the record that is to be modified.
l Click ‘Search’ button. All unauthorized records with the specified details are retrieved and displayed in the lower portion of the screen.
l Double click the record that you want to modify in the list of displayed records. The Bulk Clients Defaults Detail screen is displayed.
l Select Unlock Operation from the Action list to modify the record. Modify the necessary information.
Click Save to save your changes. The Bulk Clients Defaults Detail screen is closed and the changes made are reflected in the Bulk Clients Defaults Summary screen.
5.21.3 Viewing Bulk Clients Defaults Record
To view a record that you have previously input, you must retrieve the same in the Bulk Clients Defaults Summary screen as follows:
l Invoke the Bulk Clients Defaults Summary screen from the Browser.
l Select the status of the record that you want to retrieve for viewing in the Authorization Status field. You can also view all records that are either unauthorized or authorized only, by choosing the unauthorized / Authorized option.
l Specify any or all of the details of the record in the corresponding fields on the screen.
l Click ‘Search’ button. All records with the specified fields are retrieved and displayed in the lower portion of the screen.
l Double click the record that you want to view in the list of displayed records. The Bulk Clients Defaults Detail screen is displayed in View mode.
5.21.4 Deleting Bulk Clients Defaults Record
You can delete only unauthorized records in the system. To delete a record that you have previously entered:
l Invoke the Bulk Clients Defaults Summary screen from the Browser.
l Select the status of the record that you want to retrieve for deletion.
l Specify any or all of the details in the corresponding fields on the screen.
l Click ‘Search’ button. All records with the specified fields are retrieved and displayed in the lower portion of the screen.
l Double click the record that you want to delete in the list of displayed records. The Bulk Clients Defaults Detail screen is displayed.
l Select Delete Operation from the Action list. The system prompts you to confirm the deletion and the record is physically deleted from the system database.
5.21.5 Authorizing Bulk Clients Defaults Record
l An unauthorized Bulk Clients Defaults record must be authorized in the system for it to be processed. To authorize a record:
l Invoke the Bulk Clients Defaults Summary screen from the Browser.
l Select the status of the record that you want to retrieve for authorization. Typically, choose the unauthorized option.
l Specify any or all of the details in the corresponding fields on the screen.
l Click ‘Search’ button. All records with the specified details that are pending authorization are retrieved and displayed in the lower portion of the screen.
l Double click the record that you wish to authorize. The Bulk Clients Defaults Detail screen is displayed. Select Authorize operation from the Action List.
When a checker authorizes a record, details of validation, if any, that were overridden by the maker of the record during the Save operation are displayed. If any of these overrides results in an error, the checker must reject the record.
5.21.6 Amending Bulk Clients Defaults Record
After a Bulk Clients Defaults Summary record is authorized, it can be modified using the Unlock operation from the Action List. To make changes to a record after authorization:
l Invoke the Bulk Clients Defaults Summary screen from the Browser.
l Select the status of the record that you want to retrieve for authorization. You can only amend authorized records.
l Specify any or all of the details in the corresponding fields on the screen.
l Click ‘Search’ button. All records with the specified details that are pending authorization are retrieved and displayed in the lower portion of the screen.
l Double click the record that you wish to authorize. The Bulk Clients Defaults Detail screen is displayed in amendment mode. Select Unlock operation from the Action List to amend the record.
l Amend the necessary information and click on Save to save the changes
5.21.7 Authorizing Amended Bulk Clients Defaults Record
An amended Bulk Clients Defaults record must be authorized for the amendment to be made effective in the system. The authorization of amended records can be done only from Fund Manager Module and Agency Branch module.
5.22 Default Information for Transaction Load Override Imports
This section contains the following topics:
l Section 5.22.1, "Invoking Default Information for Transaction Load Override Imports"
5.22.1 Invoking Default Information for Transaction Load Override Imports
For load override imports, you must maintain whether authorized load override records must be generated in the system.
You can invoke the FCIS Bulk Clients Defaults (Transaction Load Override) screen by typing ‘UTDBLTLO’ in the field at the top right corner of the Application tool bar and clicking on the adjoining arrow button.
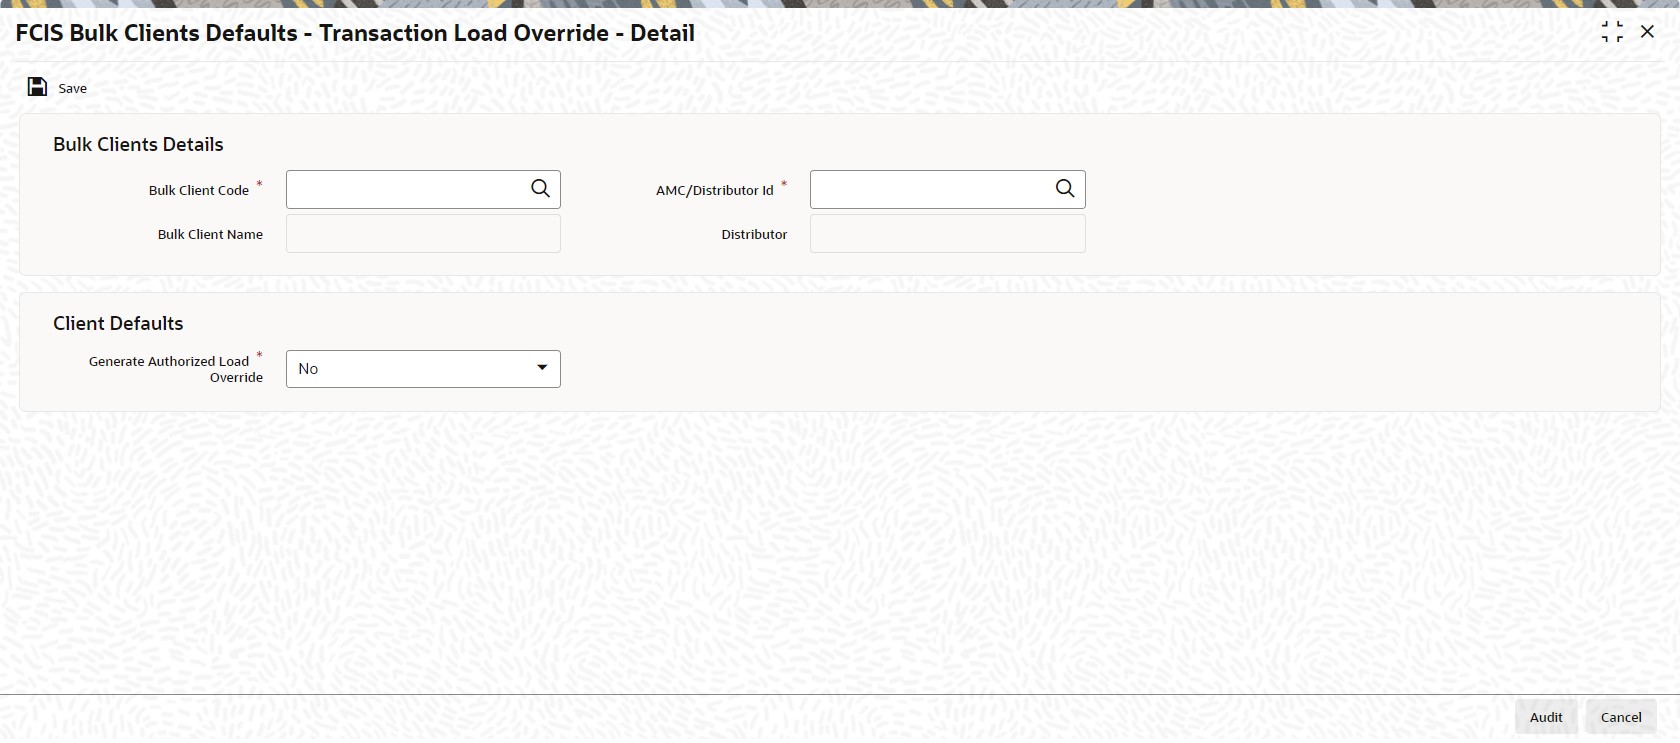
You can specify the following details:
Bulk Clients Details
Bulk Client Code
Alphanumeric; 12 Characters; Mandatory
Specify the bulk account client code.
Bulk Client Name
Display
The system displays the bulk client name for the selected bulk account client code.
AMC/Distributor ID
Alphanumeric; 12 Characters; Mandatory
Specify the AMC or distributor ID.
Distributor
Display
The system displays the name of the AMC or distributor for the selected AMC or distributor ID.
Client Defaults
Generate Authorized Load Override
Mandatory
Select ‘Yes’ from the drop-down list if authorized load override has to be generated. The options available in the drop-down are as follows:
l Yes
l No
5.23 FCIS Bulk Clients Defaults - Transaction Load Override - Summary
This section contains the following topics:
l Section 5.23.1, "Retrieving a Bulk Clients Defaults - Transaction Load Override Record"
l Section 5.23.2, "Editing Bulk Clients Defaults - Transaction Load Override Record"
l Section 5.23.3, "Viewing Bulk Clients Defaults - Transaction Load Override Record"
l Section 5.23.4, "Deleting Bulk Clients Defaults - Transaction Load Override Record"
l Section 5.23.5, "Authorizing Bulk Clients Defaults - Transaction Load Override Record"
l Section 5.23.6, "Amending Bulk Clients Defaults - Transaction Load Override Record"
l Section 5.23.7, "Authorizing Amended Bulk Clients Defaults - Transaction Load Override Record"
5.23.1 Retrieving a Bulk Clients Defaults - Transaction Load Override Record
You can retrieve a previously entered record in the Summary Screen, as follows:
You can invoke ‘FCIS Bulk Clients Defaults - Transaction Load Override - Summary’ screen by typing ‘UTSBLTLO’ in the field at the top right corner of the Application tool bar and clicking on the adjoining arrow button.
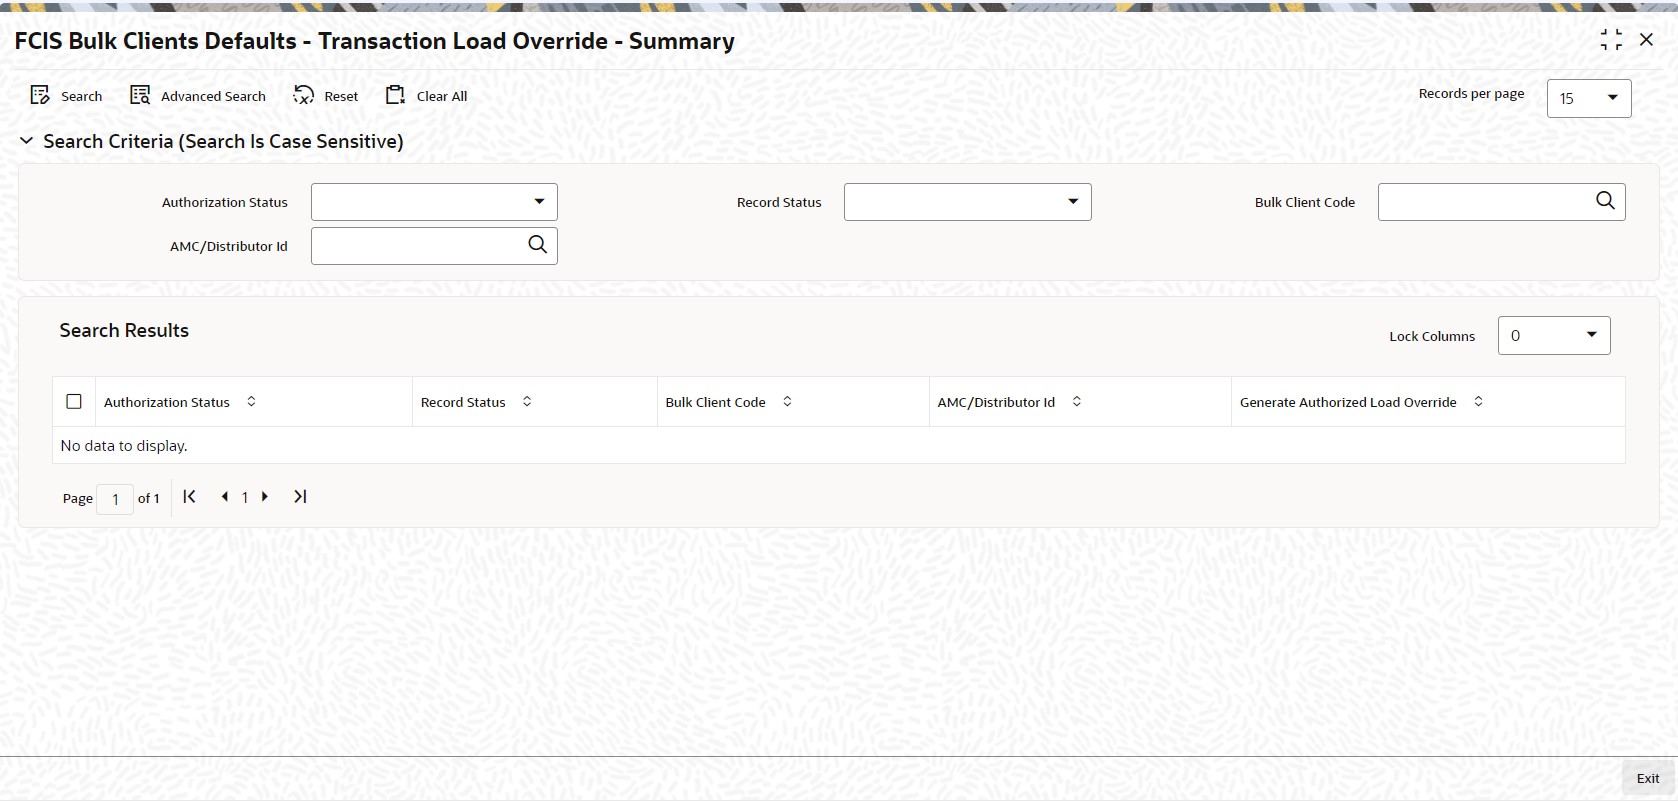
l The status of the record in the Authorization Status field. If you choose the ‘Blank Space’ option, then all the records are retrieved.
l The status of the record in the Record Status field. If you choose the ‘Blank Space’ option, then all records are retrieved
l Bulk Account Client Code
l Distributor ID
Click ‘Search’ button to view the records. All the records with the specified details are retrieved and displayed in the lower portion of the screen.
Note
You can also retrieve the individual record detail from the detail screen by querying in the following manner:
– Press F7
– Input the Distributor ID
– Press F8
You can perform Edit, Delete, Amend, Authorize, operations by selecting the operation from the Action list. You can also search a record by using a combination of % and alphanumeric value.
5.23.2 Editing Bulk Clients Defaults - Transaction Load Override Record
You can modify the details of Bulk Clients Defaults - Transaction Load Override record that you have already entered into the system, provided it has not subsequently authorized. You can perform this operation as follows:
l Invoke the FCIS Bulk Clients Defaults - Transaction Load Override - Summary screen from the Browser.
l Select the status of the record that you want to retrieve for modification in the Authorization Status field. You can only modify records that are unauthorized. Accordingly, choose the Unauthorized option.
l Specify any or all of the details in the corresponding fields to retrieve the record that is to be modified.
l Click ‘Search’ button. All unauthorized records with the specified details are retrieved and displayed in the lower portion of the screen.
l Double click the record that you want to modify in the list of displayed records. The FCIS Bulk Clients Defaults - Transaction Load Override - Detail screen is displayed.
l Select Unlock Operation from the Action list to modify the record. Modify the necessary information.
Click Save to save your changes. The FCIS Bulk Clients Defaults - Transaction Load Override - Detail screen is closed and the changes made are reflected in the FCIS Bulk Clients Defaults - Transaction Load Override - Summary screen.
5.23.3 Viewing Bulk Clients Defaults - Transaction Load Override Record
To view a record that you have previously input, you must retrieve the same in the FCIS Bulk Clients Defaults - Transaction Load Override - Summary screen as follows:
l Invoke the FCIS Bulk Clients Defaults - Transaction Load Override - Summary screen from the Browser.
l Select the status of the record that you want to retrieve for viewing in the Authorization Status field. You can also view all records that are either unauthorized or authorized only, by choosing the unauthorized / Authorized option.
l Specify any or all of the details of the record in the corresponding fields on the screen.
l Click ‘Search’ button. All records with the specified fields are retrieved and displayed in the lower portion of the screen.
l Double click the record that you want to view in the list of displayed records. The FCIS Bulk Clients Defaults - Transaction Load Override - Detail screen is displayed in View mode.
5.23.4 Deleting Bulk Clients Defaults - Transaction Load Override Record
You can delete only unauthorized records in the system. To delete a record that you have previously entered:
l Invoke the FCIS Bulk Clients Defaults - Transaction Load Override - Summary screen from the Browser.
l Select the status of the record that you want to retrieve for deletion.
l Specify any or all of the details in the corresponding fields on the screen.
l Click ‘Search’ button. All records with the specified fields are retrieved and displayed in the lower portion of the screen.
l Double click the record that you want to delete in the list of displayed records. The FCIS Bulk Clients Defaults - Transaction Load Override - Detail screen is displayed.
l Select Delete Operation from the Action list. The system prompts you to confirm the deletion and the record is physically deleted from the system database.
5.23.5 Authorizing Bulk Clients Defaults - Transaction Load Override Record
l An unauthorized Bulk Clients Defaults - Transaction Load Override record must be authorized in the system for it to be processed. To authorize a record:
l Invoke the FCIS Bulk Clients Defaults - Transaction Load Override - Summary screen from the Browser.
l Select the status of the record that you want to retrieve for authorization. Typically, choose the unauthorized option.
l Specify any or all of the details in the corresponding fields on the screen.
l Click ‘Search’ button. All records with the specified details that are pending authorization are retrieved and displayed in the lower portion of the screen.
l Double click the record that you wish to authorize. The FCIS Bulk Clients Defaults - Transaction Load Override - Detail screen is displayed. Select Authorize operation from the Action List.
When a checker authorizes a record, details of validation, if any, that were overridden by the maker of the record during the Save operation are displayed. If any of these overrides results in an error, the checker must reject the record.
5.23.6 Amending Bulk Clients Defaults - Transaction Load Override Record
After a FCIS Bulk Clients Defaults - Transaction Load Override - Summary record is authorized, it can be modified using the Unlock operation from the Action List. To make changes to a record after authorization:
l Invoke the FCIS Bulk Clients Defaults - Transaction Load Override - Summary screen from the Browser.
l Select the status of the record that you want to retrieve for authorization. You can only amend authorized records.
l Specify any or all of the details in the corresponding fields on the screen.
l Click ‘Search’ button. All records with the specified details that are pending authorization are retrieved and displayed in the lower portion of the screen.
l Double click the record that you wish to authorize. The FCIS Bulk Clients Defaults - Transaction Load Override - Detail screen is displayed in amendment mode. Select Unlock operation from the Action List to amend the record.
l Amend the necessary information and click on Save to save the changes
5.23.7 Authorizing Amended Bulk Clients Defaults - Transaction Load Override Record
An amended Bulk Clients Defaults - Transaction Load Override record must be authorized for the amendment to be made effective in the system. The authorization of amended records can be done only from Fund Manager Module and Agency Branch module.
5.24 Default Information for Unit Holder Accounts Imports
This section contains the following topics:
l Section 5.24.1, "Invoking Default Information for Unit Holder Accounts Imports"
l Section 5.24.2, "Bulk Clients Tab"
l Section 5.24.3, "Additional Info Tab"
l Section 5.24.4, "Other Details Tab"
5.24.1 Invoking Default Information for Unit Holder Accounts Imports
You can invoke the FCIS Bulk Clients Defaults (Unit Holder) screen by typing ‘UTDBLKUH’ in the field at the top right corner of the Application tool bar and clicking on the adjoining arrow button.
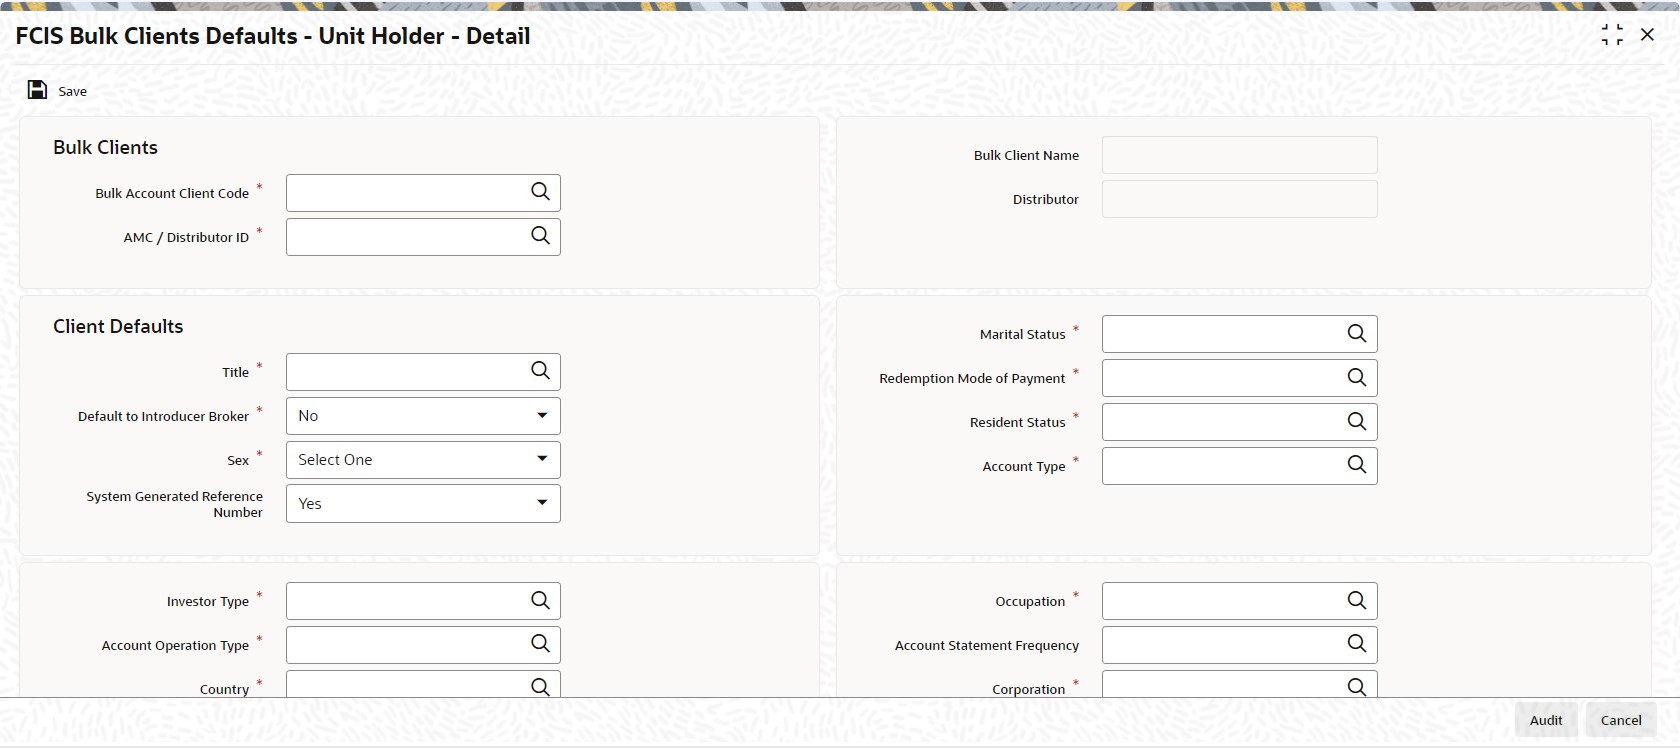
Click ‘Bulk Clients’ tab in ‘FCIS Bulk Clients Defaults - Unit Holder - Detail’ screen.
You can specify the following details:
Bulk Clients
Bulk Account Client Code
Alphanumeric; 12 Characters; Mandatory
Specify the bulk account client code.
Bulk Client Name
Display
The system displays the bulk client name for the selected bulk account client code.
Distributor ID
Alphanumeric; 12 Characters; Mandatory
Specify the AMC or distributor ID.
Distributor
Display
The system displays the name of the AMC or distributor for the selected AMC or distributor ID.
Client Defaults
Title
Alphanumeric; 15 Characters; Mandatory
Specify the customer title.
Default to Introducer Broker
Mandatory
Select if the client details has to be defaulted to introducer broker or not from the drop-down list. The list displays the following values:
l Yes
l No
Sex
Mandatory
Select the options from the drop-down list. The list displays the following values:
l Male
l Female
l Not Available
System Generated Reference Number
Optional
Select if reference number has to be system generated or not from the drop-down list. The list displays the following values:
l Yes
l No
Marital Status
Alphanumeric; 1 Character; Mandatory
Specify the marital status.
Redemption Mode of Payment
Alphanumeric; 1 Character; Mandatory
Specify the redemption mode of payment.
Resident Status
Alphanumeric; 1 Character; Mandatory
Specify the resident status.
Account Type
Alphanumeric; 1 Character; Mandatory
Specify the type of account.
Investor Type
Alphanumeric; 1 Character; Mandatory
Specify the type of investor.
Account Operation Type
Alphanumeric; 1 Character; Mandatory
Specify the account operation type of the customer.
Country
Alphanumeric; 3 Characters; Mandatory
Specify the country code of the customer.
Identification Type
Alphanumeric; 3 Characters; Mandatory
Specify the identification type.
Occupation
Alphanumeric; 3 Characters; Mandatory
Specify the occupation of the customer.
Account Statement Frequency
Alphanumeric; 1 Character; Optional
Specify the account statement frequency.
Corporation
Alphanumeric; 3 Characters; Mandatory
Specify the corporation details.
Introducer Broker
Alphanumeric; 12 Characters; Mandatory
Specify the introducer broker details of the unit holder.
Language
Alphanumeric; 12 Characters; Mandatory
Specify the language code.
Unit Holder Base Currency
Alphanumeric; 3 Characters; Mandatory
Specify the unit holder base currency code.
Nationality
Alphanumeric; 3 Characters; Mandatory
Specify the nationality of the customer.
Bank Account Currency
Alphanumeric; 3 Characters; Mandatory
Specify the bank account currency code.
Category (Individual)
Alphanumeric; 2 Characters; Optional
Specify the individual category code.
Account Statement Currency
Alphanumeric; 3 Characters; Mandatory
Specify the account statement currency code.
Category (Corporate)
Alphanumeric; 2 Characters; Optional
Specify the corporate category code.
Template ID
Alphanumeric; 6 Characters; Optional
Specify the template ID.
Place of Issue
Alphanumeric; 3 Characters; Optional
Specify the place of issue details.
Preferred Fund ID for Redemption
Alphanumeric; 6 Characters; Optional
Specify the preferred fund ID for redemption.
Click ‘Additional Info’ tab in ‘FCIS Bulk Clients Defaults - Unit Holder - Detail’ screen.
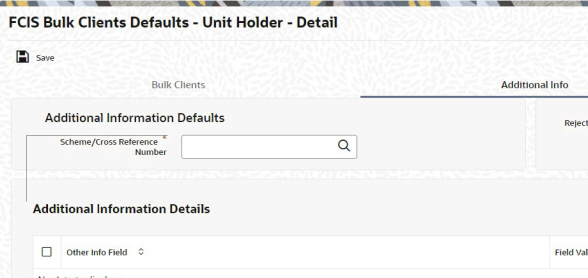
You can specify the following details:
Additional Information Defaults
Scheme/Cross Reference Number
Alphanumeric; 12 Characters; Mandatory
Specify the scheme/ cross reference number.
Reject duplicates during Imports
Optional
Select if duplicate records needs to be deleted during import or not from the drop-down list. The list displays the following values:
l Yes
l No
Additional Information Details
Other Info Field
Alphanumeric; 100 Characters; Optional
Specify the other additional information.
Field Value
Alphanumeric; 100 Characters; Optional
Based on the Other Info Field, specify the field value.
Other Details
UH Account Type
Alphanumeric; 2 Characters; Optional
Specify the unit holder account type.
IRS Notification on A/C
Alphanumeric; 10 Characters; Optional
Specify the IRS notification on account.
RPO Code
Alphanumeric; 10 Characters; Optional
Specify the RPO code.
Telephone Redemption
Mandatory
Select if redemption request by telephone is allowed or not from the drop-down list. The list displays the following values:
l Yes
l No
Telephone Switch
Mandatory
Select if switch request by telephone is allowed or not from the drop-down list. The list displays the following values:
l Yes
l No
Registration Type
Alphanumeric; 2 Characters; Optional
Specify the type of registration.
Preferred Mailing Mode
Alphanumeric; 2 Characters; Optional
Specify the preferred mailing mode.
Write Check for MMF
Mandatory
Select ‘Yes’ option from drop-down list if system allows check writing.
Fee Category (Individual)
Alphanumeric; 3 Characters; Optional
Specify the fee category for an individual.
Fee Sub Category (Individual)
Alphanumeric; 6 Characters; Optional
Specify the fee sub category for an individual.
Fee Category (Corporate)
Alphanumeric; 3 Characters; Optional
Specify the fee category for corporate.
Fee Sub Category (Corporate)
Alphanumeric; 6 Characters; Optional
Specify the fee sub category for corporate.
Pay by FEDWIRE / ACH
Mandatory
Select ‘Yes’ option from drop-down list if paid by FEDWIRE/ ACH.
5.24.4.1 Choosing Template for Automatic Replication
Modifications made to a unit holder account under a CIF, through an Information Change operation, might require to be replicated to all unit holder accounts under the CIF. Oracle FLEXCUBE Investor Servicing provides the facility of configuring the system so that automatic replication could be achieved, through automatic replication templates.
For each bulk client, you can define the template to be used for automatic replication, as part of the client default information. The automatic replication template you select here is used for replication of changes made to a unit holder account through Information Change, to all unit holder accounts belonging to the CIF.
How the template is used
Any changes that have been made through Information Change, to any of the fields defined in the template, are replicated to all unit holder accounts belonging to the CIF, when the Information Change is authorized. The replication occurs at the level defined for the template – CIF level (changes made to CIF fields are replicated) or Identification Type level (changes made to Identification Type fields are replicated)
Additional Information Defaults
For the additional information defaults, the list shown is the additional information for which the valid values (restrictive list) are maintained as part of Additional Information Master Setup and Additional Information Valid Values Setup.
5.25 FCIS Bulk Clients Defaults - Unit Holder - Summary
This section contains the following topics:
l Section 5.25.1, "Retrieving a Bulk Clients Defaults - Unit Holder Record"
l Section 5.25.2, "Editing Bulk Clients Defaults - Unit Holder Record"
l Section 5.25.3, "Viewing Bulk Clients Defaults - Unit Holder Record"
l Section 5.25.4, "Deleting Bulk Clients Defaults - Unit Holder Record"
l Section 5.25.5, "Authorizing Bulk Clients Defaults - Unit Holder Record"
l Section 5.25.6, "Amending Bulk Clients Defaults - Unit Holder Record"
l Section 5.25.7, "Authorizing Amended Bulk Clients Defaults - Unit Holder Record"
5.25.1 Retrieving a Bulk Clients Defaults - Unit Holder Record
You can retrieve a previously entered record in the Summary Screen, as follows:
You can invoke ‘FCIS Bulk Clients Defaults - Unit Holder - Summary’ screen by typing ‘UTSBLKUH’ in the field at the top right corner of the Application tool bar and clicking on the adjoining arrow button.
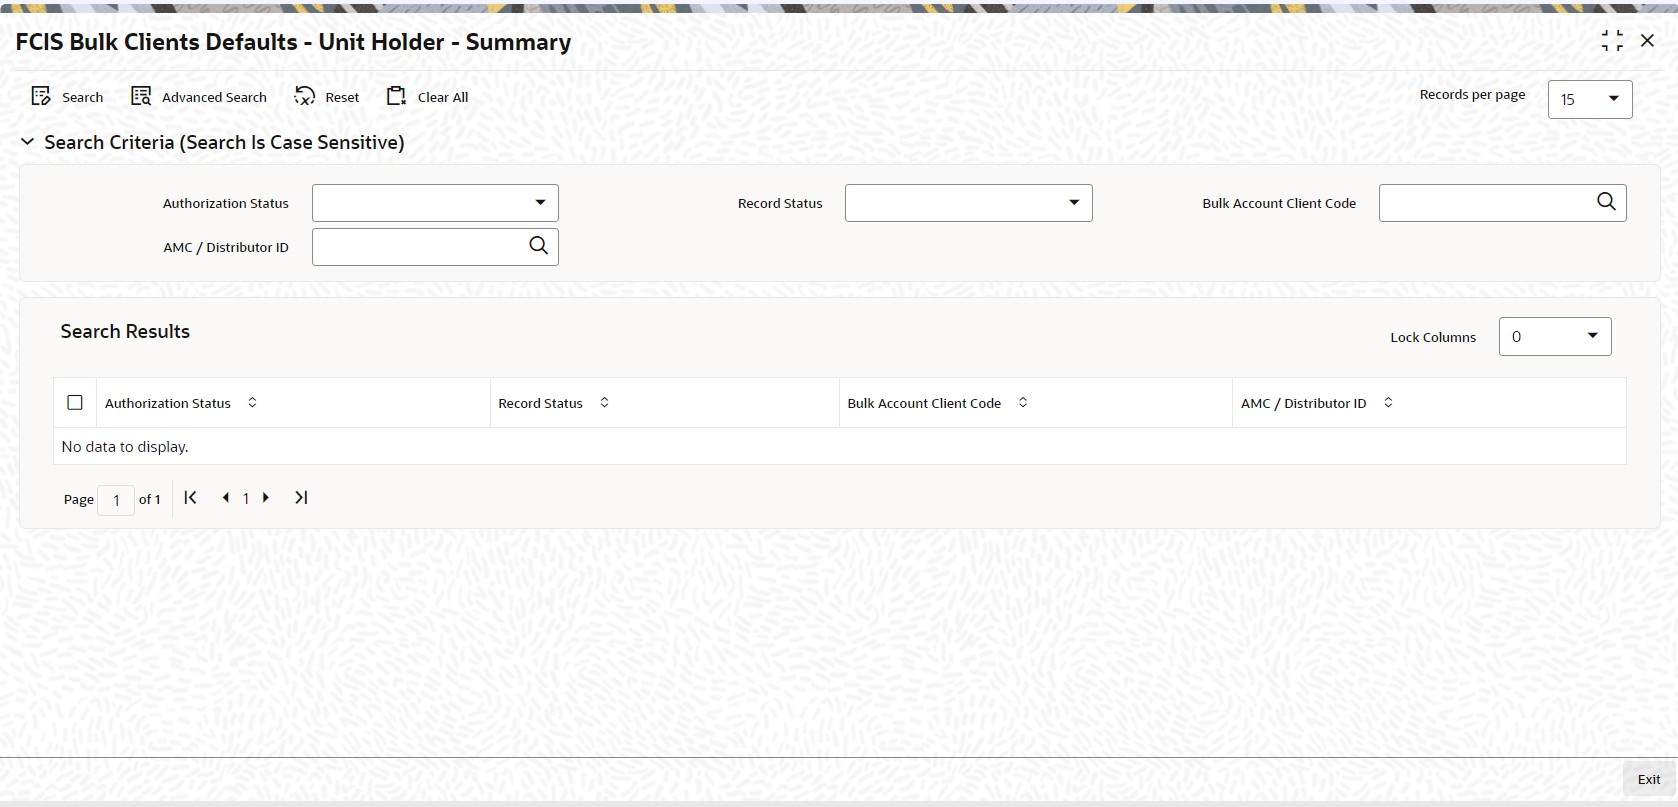
l The status of the record in the Authorization Status field. If you choose the ‘Blank Space’ option, then all the records are retrieved.
l The status of the record in the Record Status field. If you choose the ‘Blank Space’ option, then all records are retrieved
l Bulk Account Client Code
l Distributor ID
Click ‘Search’ button to view the records. All the records with the specified details are retrieved and displayed in the lower portion of the screen.
Note
You can also retrieve the individual record detail from the detail screen by querying in the following manner:
– Press F7
– Input the Distributor ID
– Press F8
You can perform Edit, Delete, Amend, Authorize, operations by selecting the operation from the Action list. You can also search a record by using a combination of % and alphanumeric value.
5.25.2 Editing Bulk Clients Defaults - Unit Holder Record
You can modify the details of Bulk Clients Defaults - Unit Holder record that you have already entered into the system, provided it has not subsequently authorized. You can perform this operation as follows:
l Invoke the FCIS Bulk Clients Defaults - Unit Holder - Summary screen from the Browser.
l Select the status of the record that you want to retrieve for modification in the Authorization Status field. You can only modify records that are unauthorized. Accordingly, choose the Unauthorized option.
l Specify any or all of the details in the corresponding fields to retrieve the record that is to be modified.
l Click ‘Search’ button. All unauthorized records with the specified details are retrieved and displayed in the lower portion of the screen.
l Double click the record that you want to modify in the list of displayed records. The FCIS Bulk Clients Defaults - Unit Holder - Detail screen is displayed.
l Select Unlock Operation from the Action list to modify the record. Modify the necessary information.
Click Save to save your changes. The FCIS Bulk Clients Defaults - Unit Holder - Detail screen is closed and the changes made are reflected in the FCIS Bulk Clients Defaults - Unit Holder - Summary screen.
5.25.3 Viewing Bulk Clients Defaults - Unit Holder Record
To view a record that you have previously input, you must retrieve the same in the FCIS Bulk Clients Defaults - Unit Holder - Summary screen as follows:
l Invoke the FCIS Bulk Clients Defaults - Unit Holder - Summary screen from the Browser.
l Select the status of the record that you want to retrieve for viewing in the Authorization Status field. You can also view all records that are either unauthorized or authorized only, by choosing the unauthorized / Authorized option.
l Specify any or all of the details of the record in the corresponding fields on the screen.
l Click ‘Search’ button. All records with the specified fields are retrieved and displayed in the lower portion of the screen.
l Double click the record that you want to view in the list of displayed records. The FCIS Bulk Clients Defaults - Unit Holder - Detail screen is displayed in View mode.
5.25.4 Deleting Bulk Clients Defaults - Unit Holder Record
You can delete only unauthorized records in the system. To delete a record that you have previously entered:
l Invoke the FCIS Bulk Clients Defaults - Unit Holder - Summary screen from the Browser.
l Select the status of the record that you want to retrieve for deletion.
l Specify any or all of the details in the corresponding fields on the screen.
l Click ‘Search’ button. All records with the specified fields are retrieved and displayed in the lower portion of the screen.
l Double click the record that you want to delete in the list of displayed records. The FCIS Bulk Clients Defaults - Unit Holder - Detail screen is displayed.
l Select Delete Operation from the Action list. The system prompts you to confirm the deletion and the record is physically deleted from the system database.
5.25.5 Authorizing Bulk Clients Defaults - Unit Holder Record
l An unauthorized Bulk Clients Defaults - Unit Holder record must be authorized in the system for it to be processed. To authorize a record:
l Invoke the FCIS Bulk Clients Defaults - Unit Holder - Summary screen from the Browser.
l Select the status of the record that you want to retrieve for authorization. Typically, choose the unauthorized option.
l Specify any or all of the details in the corresponding fields on the screen.
l Click ‘Search’ button. All records with the specified details that are pending authorization are retrieved and displayed in the lower portion of the screen.
l Double click the record that you wish to authorize. The FCIS Bulk Clients Defaults - Unit Holder - Detail screen is displayed. Select Authorize operation from the Action List.
When a checker authorizes a record, details of validation, if any, that were overridden by the maker of the record during the Save operation are displayed. If any of these overrides results in an error, the checker must reject the record.
5.25.6 Amending Bulk Clients Defaults - Unit Holder Record
After a Bulk Clients Defaults - Unit Holder record is authorized, it can be modified using the Unlock operation from the Action List. To make changes to a record after authorization:
l Invoke the FCIS Bulk Clients Defaults - Unit Holder - Summary screen from the Browser.
l Select the status of the record that you want to retrieve for authorization. You can only amend authorized records.
l Specify any or all of the details in the corresponding fields on the screen.
l Click ‘Search’ button. All records with the specified details that are pending authorization are retrieved and displayed in the lower portion of the screen.
l Double click the record that you wish to authorize. The FCIS Bulk Clients Defaults - Unit Holder - Detail screen is displayed in amendment mode. Select Unlock operation from the Action List to amend the record.
l Amend the necessary information and click on Save to save the changes
5.25.7 Authorizing Amended Bulk Clients Defaults - Unit Holder Record
An amended Bulk Clients Defaults - Unit Holder record must be authorized for the amendment to be made effective in the system. The authorization of amended records can be done only from Fund Manager Module and Agency Branch module.
5.26 Default Information for Check Book Requests Imports
This section contains the following topics:
l Section 5.26.1, "Invoking Default Information for Check Book Requests Imports"
5.26.1 Invoking Default Information for Check Book Requests Imports
For check book request imports, you must maintain whether check book requests are mandatory.
You can invoke the FCIS Bulk Clients Defaults (Cheque Book Request) screen by typing ‘UTDBLCBR’ in the field at the top right corner of the Application tool bar and clicking on the adjoining arrow button.
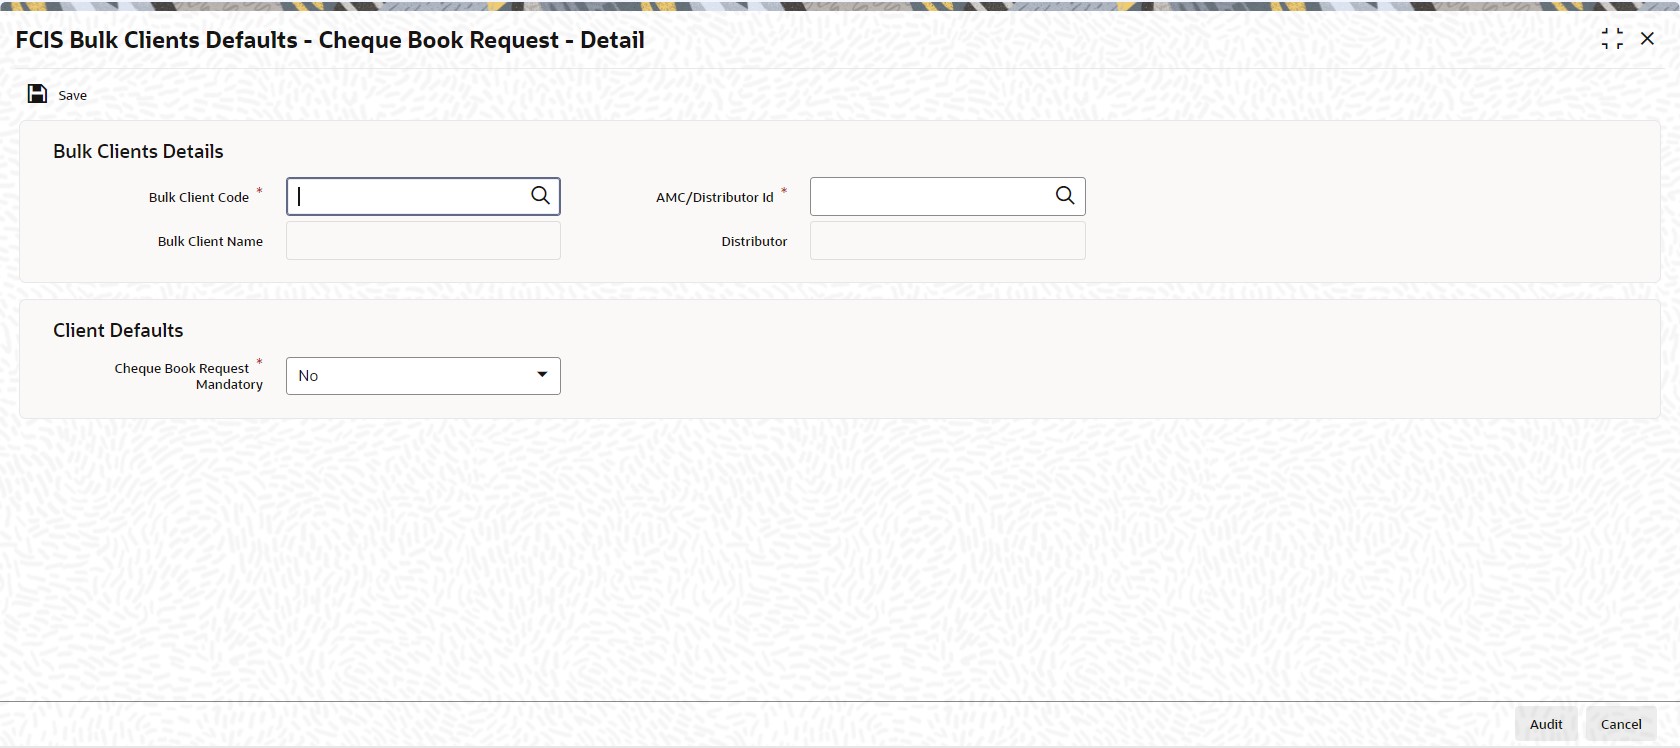
You can specify the following details:
Bulk Clients Details
Bulk Account Client Code
Alphanumeric; 12 Characters; Mandatory
Specify the bulk account client code.
Bulk Client Name
Display
The system displays the bulk client name for the selected bulk account client code.
AMC/Distributor ID
Alphanumeric; 12 Characters; Mandatory
Specify the AMC/ distributor ID.
Distributor
Display
The system displays the name of the distributor for the selected AMC/ distributor ID.
Client Defaults
Cheque Book Request Mandatory
Mandatory
Select if check book request is mandatory or not from the drop-down list. The list displays the following values:
l Yes
l No
5.27 FCIS Bulk Clients Defaults - Cheque Book Request - Summary
This section contains the following topics:
l Section 5.27.1, "Retrieving Bulk Clients Defaults - Cheque Book Request in Summary Screen"
l Section 5.27.2, "Editing Bulk Clients Defaults - Cheque Book Request Details"
l Section 5.27.3, "Viewing Bulk Clients Defaults - Cheque Book Request Details"
l Section 5.27.4, "Deleting Bulk Clients Defaults - Cheque Book Request Details"
l Section 5.27.5, "Authorizing Bulk Clients Defaults - Cheque Book Request Details"
l Section 5.27.6, "Amending Bulk Clients Defaults - Cheque Book Request Details"
l Section 5.27.7, "Authorizing Amended Bulk Clients Defaults - Cheque Book Request Details"
5.27.1 Retrieving Bulk Clients Defaults - Cheque Book Request in Summary Screen
You can invoke the ‘FCIS Bulk Clients Defaults - Cheque Book Request - Summary’ screen by typing ‘UTSBLCBR’ in the field at the top right corner of the Application tool bar and clicking on the adjoining arrow button.
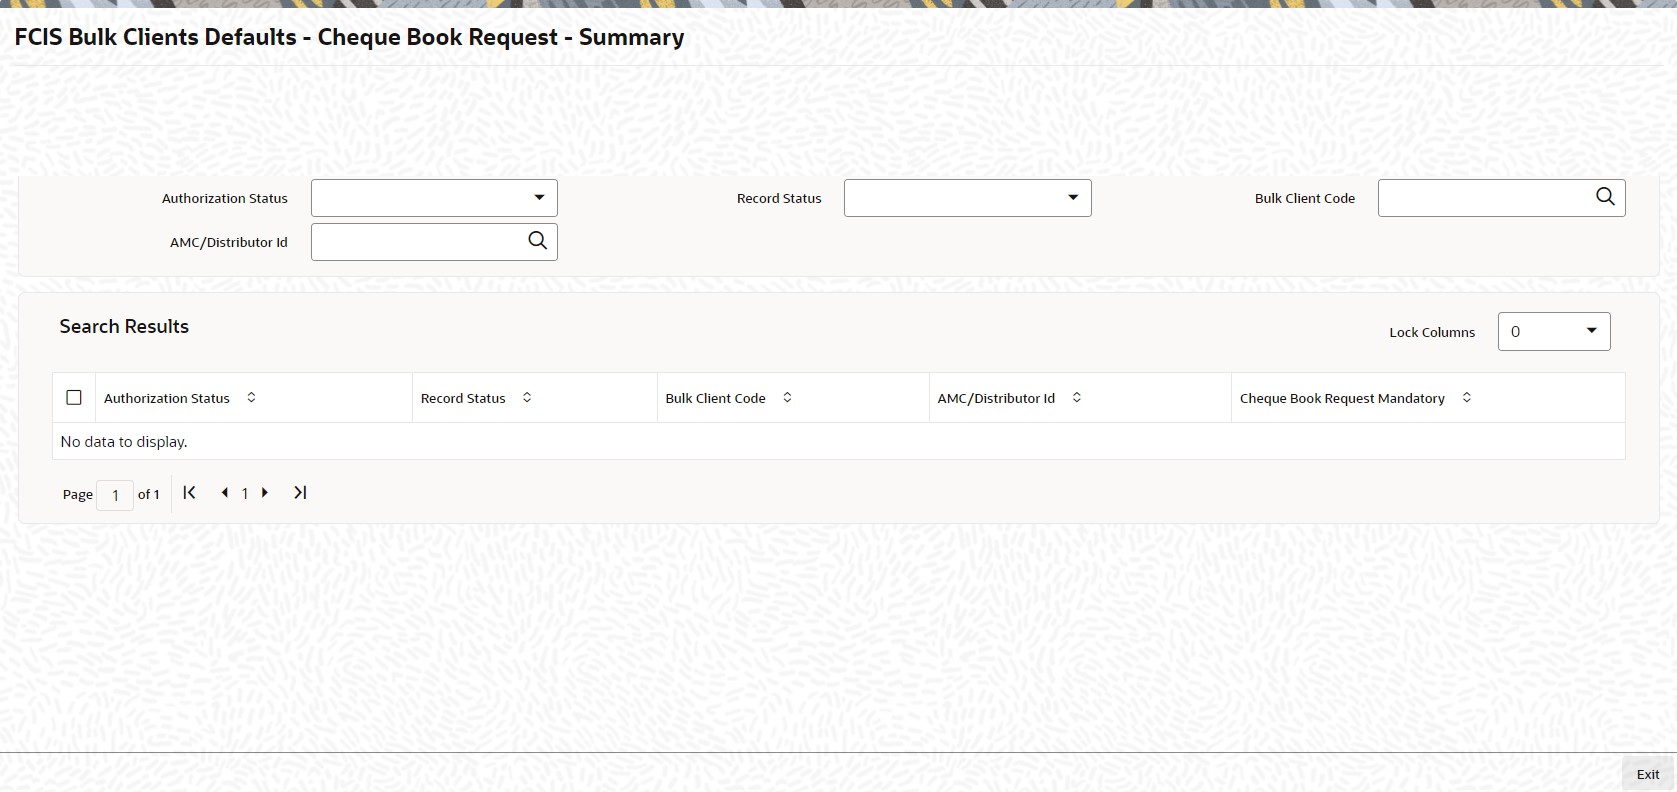
You can retrieve a previously entered record in the Summary screen, as follows:
l Invoke the FCIS Bulk Clients Defaults - Cheque Book Request - Summary screen and specify the following:
– The status of the record in the Authorized field. If you choose the “Blank Space” option, then all the fund types are retrieved.
– The status of the fund type in the Record Status field. If you choose the “Blank Space” option, then all the records are retrieved.
– Bulk Client Code
– AMC/ Distributor ID
l After you have specified the required details, click ‘Search’ button. All records with the specified details are retrieved and displayed in the lower portion of the screen.
You can also retrieve the record from the detail screen by doing query in the following manner:-
l Press F7
l Input the Bulk Client Code
l Press F8
You can perform Edit, Delete, Amend, Authorize, operation by selecting from the Action list.
5.27.2 Editing Bulk Clients Defaults - Cheque Book Request Details
You can modify the record that you have already entered into the system, provided it has not been subsequently authorized. You can perform this operation as follows:
l Invoke the FCIS Bulk Clients Defaults - Cheque Book Request - Summary screen from the Browser.
l Select the status that you want to retrieve for modification in the Authorized field. You can only modify records that are unauthorized. Accordingly, choose the Unauthorized option from the drop-down list.
l Specify any or all of the details in the corresponding fields on the screen to retrieve the record that is to be modified.
l Click ‘Search’ button. All unauthorized records with the specified details are retrieved and displayed in the lower portion of the screen.
l Double click the record that you want to modify. The FCIS Bulk Clients Defaults - Cheque Book Request - Detail screen is displayed.
l Select Unlock Operation from Action list to modify the record. Modify the necessary information.
l Click Save to save the changes. The FCIS Bulk Clients Defaults - Cheque Book Request - Detail screen is closed and the changes made are reflected in the FCIS Bulk Clients Defaults - Cheque Book Request - Summary screen.
5.27.3 Viewing Bulk Clients Defaults - Cheque Book Request Details
To view a record that you have previously entered:
l Invoke FCIS Bulk Clients Defaults - Cheque Book Request - Summary Screen from the Browser.
l Select the status of the record that you want to retrieve for viewing in the Authorized field. You can also view all records that are either unauthorized or authorized only, by choosing the Unauthorized/ Authorized option.
l Specify any or all of the details in the corresponding fields on the screen.
l Click ‘Search’ button. All records with the specified details are retrieved and displayed in the lower portion of the screen.
l Double click the record that you want to view in the list of displayed records. The FCIS Bulk Clients Defaults - Cheque Book Request - Summary screen is opened in view mode.
5.27.4 Deleting Bulk Clients Defaults - Cheque Book Request Details
You can delete only unauthorized records in the system.
l Invoke the FCIS Bulk Clients Defaults - Cheque Book Request - Summary screen from the Browser.
l Select the status of the record that you want to retrieve for deletion.
l Specify any or all of the details in the corresponding fields on the screen.
l Click ‘Search’ button. All records with the specified details are retrieved and displayed in the lower portion of the screen.
l Double click the record that you want to delete. The FCIS Bulk Clients Defaults - Cheque Book Request - Detail screen is displayed.
l Select Delete operation from the Action list. The system prompts you to confirm the deletion, and the record is deleted physically from the system database.
5.27.5 Authorizing Bulk Clients Defaults - Cheque Book Request Details
An unauthorized record must be authorized in the system for it to be processed. To authorize a record:
l Invoke the FCIS Bulk Clients Defaults - Cheque Book Request - Summary screen from the Browser.
l Select the status of the record that you want to retrieve for authorization. Typically, choose the Unauthorized option from the drop-down list.
l Specify any or all of the details in the corresponding fields on the screen.
l Click ‘Search’ button. All the records with the specified details that are pending for authorization are retrieved and displayed in the lower portion of the screen.
l Double click the record that you wish to authorize. The FCIS Bulk Clients Defaults - Cheque Book Request - Detail screen displayed. Select Authorize operation from Action.
5.27.6 Amending Bulk Clients Defaults - Cheque Book Request Details
After a Bulk Clients Defaults - Cheque Book Request is authorized, it can be modified using the Unlock operation from Action list. To make changes to a Bulk Clients Defaults - Cheque Book Request after authorization, you must invoke the Unlock operation which is termed as Amend Operation.
l Invoke the FCIS Bulk Clients Defaults - Cheque Book Request - Summary screen from the Browser.
l Select the status that you wish to retrieve for amendment. You can only amend records that are authorized.
l Specify any or all of the details in the corresponding fields on the screen.
l Click ‘Search’ button. All the records with specified details are retrieved and displayed in the lower portion of the screen.
l Double click the record that you want to amend. The FCIS Bulk Clients Defaults - Cheque Book Request - Detail screen is displayed in Amendment mode.
l Click the Unlock operation from the Action list to amend the record.
l Amend the necessary information. Click the Save button to save the changes.
5.27.7 Authorizing Amended Bulk Clients Defaults - Cheque Book Request Details
An amended Bulk Clients Defaults - Cheque Book Request must be authorized for the amendment to be made effective in the system. The process of authorization is subsequently the same as that for normal transactions.
5.28 Default Information for Policy Transactions
This section contains the following topics:
l Section 5.28.1, "Invoking Default Information for Policy Transactions"
5.28.1 Invoking Default Information for Policy Transactions
You can invoke the FCIS Bulk Clients Defaults (Policy Transaction) screen by typing ‘UTDBLKPT’ in the field at the top right corner of the Application tool bar and clicking on the adjoining arrow button.
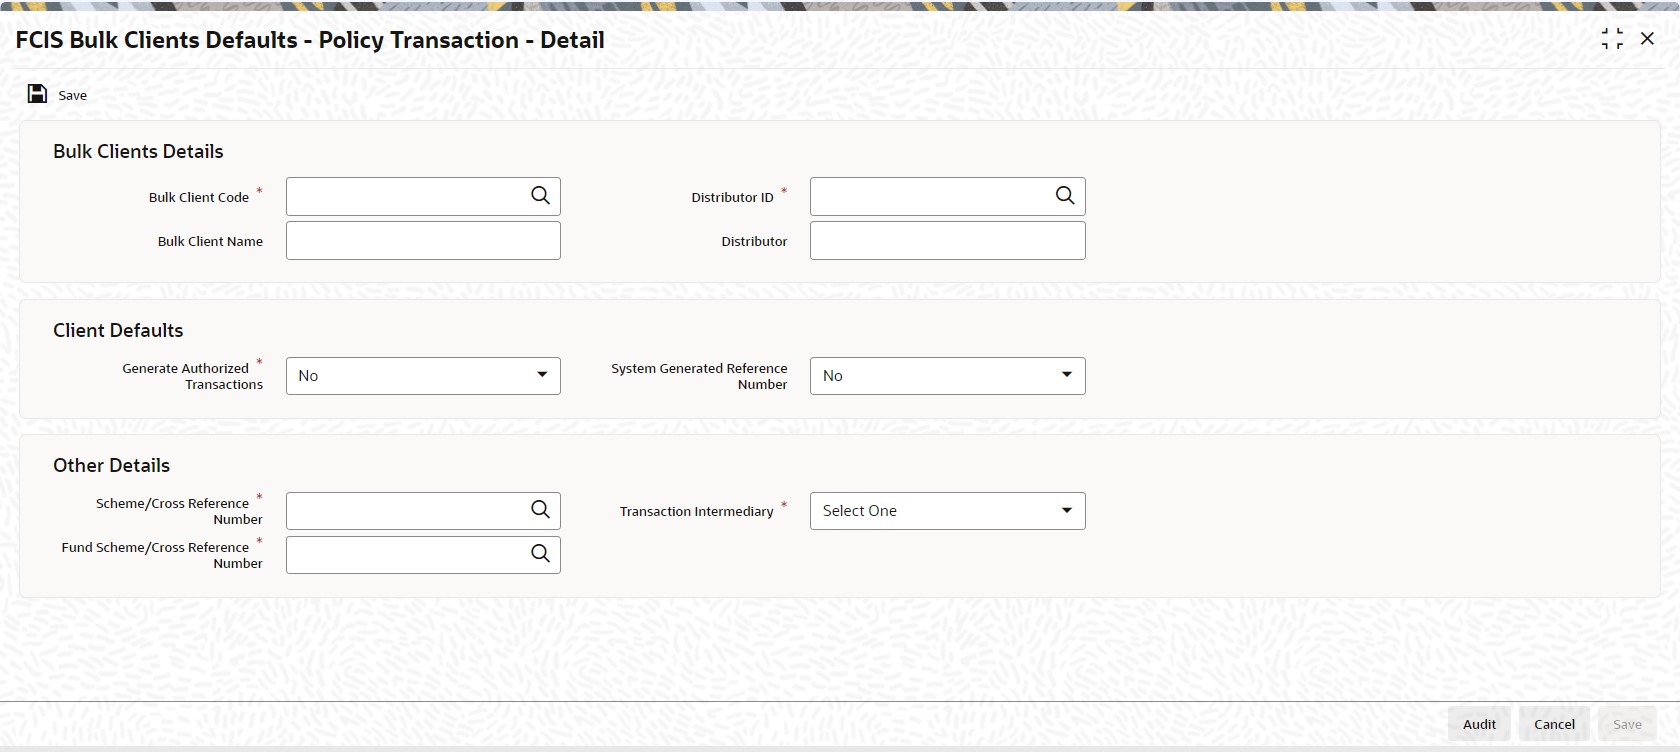
For policy transactions import, you must maintain:
l Whether authorized transaction records are to be generated in the system
l Whether a system generated reference number is indicated
l Scheme / Cross Reference Number
l Fund Scheme / Cross Reference Number
l Whether the broker associated in policy creation or the default broker details of the unit holder are to be defaulted if intermediary details are not provided.
You can specify the following details:
Bulk Clients Details
Bulk Client Code
Alphanumeric; 12 Characters; Mandatory
Specify the bulk account client code.
Bulk Client Name
Display
The system displays the bulk client name for the selected bulk account client code.
AMC/Distributor ID
Alphanumeric; 12 Characters; Mandatory
Specify the AMC or distributor ID.
Distributor
Display
The system displays the name of the AMC or distributor for the selected AMC or distributor ID.
Client Defaults
Generate Authorized Transactions
Mandatory
Select if authorized transactions needs to be generated or not from the drop-down list. The list displays the following values:
l Yes
l No
System Generated Reference Number
Optional
Select if reference number needs to be system generated or not from the drop-down list. The list displays the following values:
l Yes
l No
Other Details
Scheme/Cross Reference Number
Alphanumeric; 12 Characters; Mandatory
Specify the scheme/cross reference number. Alternatively, you can select scheme or cross reference number from the option list. This option list will fetch the add info details for the entity add info for Unit holder as well as unit holder ID and UH reference number.
Fund Scheme/Cross Reference Number
Alphanumeric; 60 Characters; Mandatory
Indicates the param value for the param code FUNDSCHEMECROSSREFTYPES.
Transaction Intermediary
Mandatory
Select the transaction intermediary option from the drop-down list. The list displays the following values:
l Unit Holder
l Policy
5.29 FCIS Bulk Clients Defaults - Policy Transaction Summary
This section contains the following topics:
l Section 5.29.1, "Retrieving a Bulk Clients Defaults - Policy Transaction Record"
l Section 5.29.2, "Editing Bulk Clients Defaults - Policy Transaction Record"
l Section 5.29.3, "Viewing Bulk Clients Defaults - Policy Transaction Record"
l Section 5.29.4, "Deleting Bulk Clients Defaults - Policy Transaction Record"
l Section 5.29.5, "Authorizing Bulk Clients Defaults - Policy Transaction Record"
l Section 5.29.6, "Amending Bulk Clients Defaults - Policy Transaction Record"
l Section 5.29.7, "Authorizing Amended Bulk Clients Defaults - Policy Transaction Record"
5.29.1 Retrieving a Bulk Clients Defaults - Policy Transaction Record
You can retrieve a previously entered record in the Summary Screen, as follows:
You can invoke ‘FCIS Bulk Clients Defaults - Policy Transaction - Summary’ screen by typing ‘UTSBLKPT’ in the field at the top right corner of the Application tool bar and clicking on the adjoining arrow button.

l The status of the record in the Authorization Status field. If you choose the ‘Blank Space’ option, then all the records are retrieved.
l The status of the record in the Record Status field. If you choose the ‘Blank Space’ option, then all records are retrieved
l Bulk Client Code
l Distributor ID
Click ‘Search’ button to view the records. All the records with the specified details are retrieved and displayed in the lower portion of the screen.
Note
You can also retrieve the individual record detail from the detail screen by querying in the following manner:
– Press F7
– Input the Distributor ID
– Press F8
You can perform Edit, Delete, Amend, Authorize, operations by selecting the operation from the Action list. You can also search a record by using a combination of % and alphanumeric value.
5.29.2 Editing Bulk Clients Defaults - Policy Transaction Record
You can modify the details of Bulk Clients Defaults - Policy Transaction record that you have already entered into the system, provided it has not subsequently authorized. You can perform this operation as follows:
l Invoke the FCIS Bulk Clients Defaults - Policy Transaction - Summary screen from the Browser.
l Select the status of the record that you want to retrieve for modification in the Authorization Status field. You can only modify records that are unauthorized. Accordingly, choose the Unauthorized option.
l Specify any or all of the details in the corresponding fields to retrieve the record that is to be modified.
l Click ‘Search’ button. All unauthorized records with the specified details are retrieved and displayed in the lower portion of the screen.
l Double click the record that you want to modify in the list of displayed records. The FCIS Bulk Clients Defaults - Policy Transaction - Detail screen is displayed.
l Select Unlock Operation from the Action list to modify the record. Modify the necessary information.
Click Save to save your changes. The FCIS Bulk Clients Defaults - Policy Transaction - Summary Detail screen is closed and the changes made are reflected in the FCIS Bulk Clients Defaults - Policy Transaction - Summary screen.
5.29.3 Viewing Bulk Clients Defaults - Policy Transaction Record
To view a record that you have previously input, you must retrieve the same in the FCIS Bulk Clients Defaults - Policy Transaction - Summary screen as follows:
l Invoke the FCIS Bulk Clients Defaults - Policy Transaction - Summary screen from the Browser.
l Select the status of the record that you want to retrieve for viewing in the Authorization Status field. You can also view all records that are either unauthorized or authorized only, by choosing the unauthorized / Authorized option.
l Specify any or all of the details of the record in the corresponding fields on the screen.
l Click ‘Search’ button. All records with the specified fields are retrieved and displayed in the lower portion of the screen.
l Double click the record that you want to view in the list of displayed records. The FCIS Bulk Clients Defaults - Policy Transaction - Detail screen is displayed in View mode.
5.29.4 Deleting Bulk Clients Defaults - Policy Transaction Record
You can delete only unauthorized records in the system. To delete a record that you have previously entered:
l Invoke the FCIS Bulk Clients Defaults - Policy Transaction - Summary screen from the Browser.
l Select the status of the record that you want to retrieve for deletion.
l Specify any or all of the details in the corresponding fields on the screen.
l Click ‘Search’ button. All records with the specified fields are retrieved and displayed in the lower portion of the screen.
l Double click the record that you want to delete in the list of displayed records. The FCIS Bulk Clients Defaults - Policy Transaction - Detail screen is displayed.
l Select Delete Operation from the Action list. The system prompts you to confirm the deletion and the record is physically deleted from the system database.
5.29.5 Authorizing Bulk Clients Defaults - Policy Transaction Record
l An unauthorized Bulk Clients Defaults - Policy Transaction record must be authorized in the system for it to be processed. To authorize a record:
l Invoke the FCIS Bulk Clients Defaults - Policy Transaction - Summary screen from the Browser.
l Select the status of the record that you want to retrieve for authorization. Typically, choose the unauthorized option.
l Specify any or all of the details in the corresponding fields on the screen.
l Click ‘Search’ button. All records with the specified details that are pending authorization are retrieved and displayed in the lower portion of the screen.
l Double click the record that you wish to authorize. The FCIS Bulk Clients Defaults - Policy Transaction - Detail screen is displayed. Select Authorize operation from the Action List.
When a checker authorizes a record, details of validation, if any, that were overridden by the maker of the record during the Save operation are displayed. If any of these overrides results in an error, the checker must reject the record.
5.29.6 Amending Bulk Clients Defaults - Policy Transaction Record
After a Bulk Clients Defaults - Policy Transaction record is authorized, it can be modified using the Unlock operation from the Action List. To make changes to a record after authorization:
l Invoke the FCIS Bulk Clients Defaults - Policy Transaction - Summary screen from the Browser.
l Select the status of the record that you want to retrieve for authorization. You can only amend authorized records.
l Specify any or all of the details in the corresponding fields on the screen.
l Click ‘Search’ button. All records with the specified details that are pending authorization are retrieved and displayed in the lower portion of the screen.
l Double click the record that you wish to authorize. The FCIS Bulk Clients Defaults - Policy Transaction - Detail screen is displayed in amendment mode. Select Unlock operation from the Action List to amend the record.
l Amend the necessary information and click on Save to save the changes
5.29.7 Authorizing Amended Bulk Clients Defaults - Policy Transaction Record
An amended Bulk Clients Defaults - Policy Transaction record must be authorized for the amendment to be made effective in the system. The authorization of amended records can be done only from Fund Manager Module and Agency Branch module.
5.30 Default Information for Broker
This section contains the following topics:
l Section 5.30.1, "Invoking Default Information for Broker"
5.30.1 Invoking Default Information for Broker
You can invoke the FCIS Bulk Clients Defaults (Broker) screen by typing ‘UTDBLCBD’ in the field at the top right corner of the Application tool bar and clicking on the adjoining arrow button.
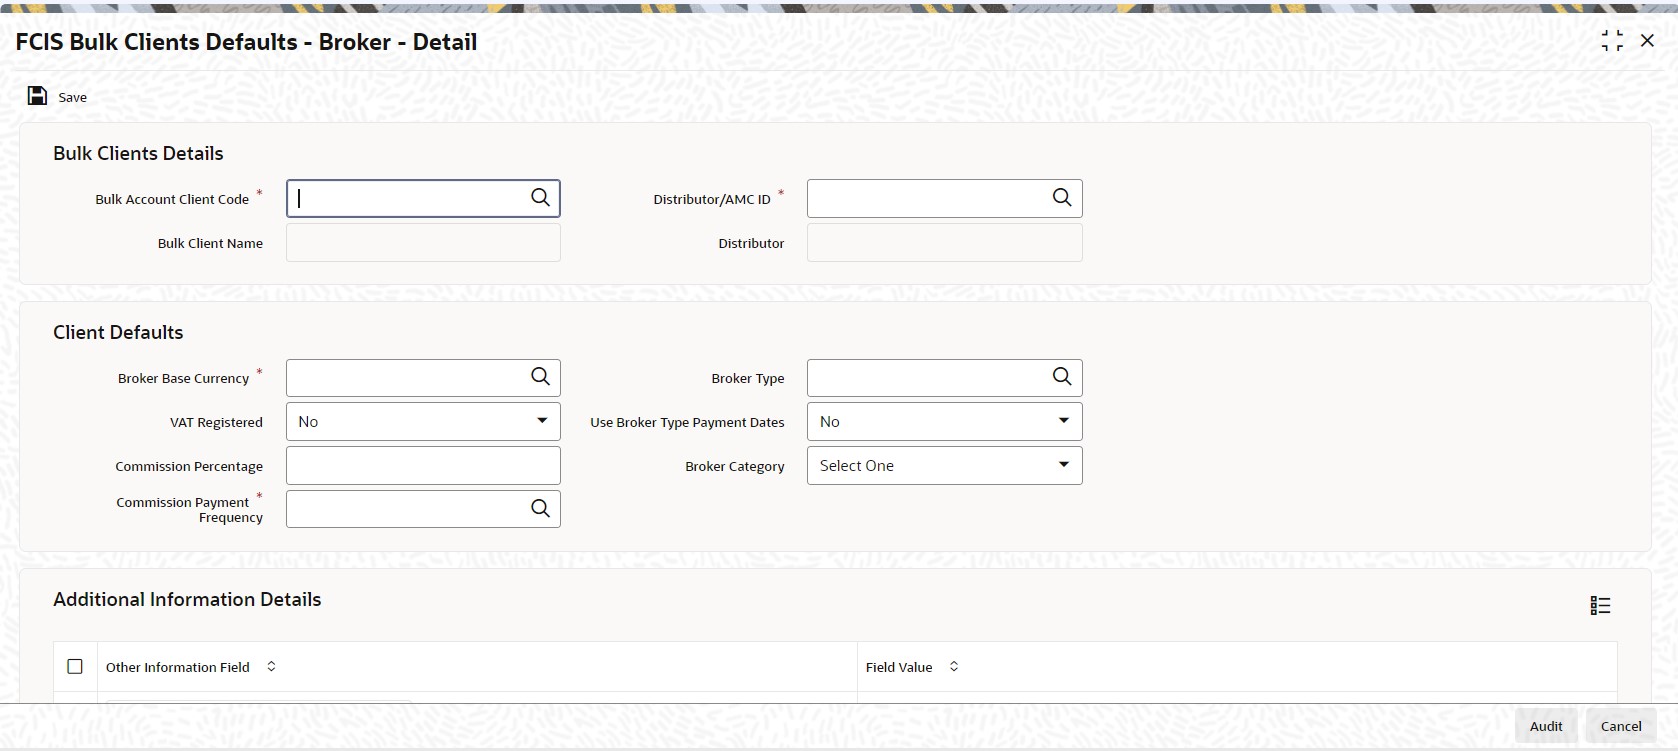
For Broker import, you must maintain:
l Broker Base Currency
l Commission Payment Frequency
l Commission Percentage
You can specify the following details:
Bulk Clients Details
Bulk Account Client Code
Alphanumeric; 12 Characters; Mandatory
Specify the bulk account client code.
Bulk Client Name
Display
The system displays the bulk client name for the selected bulk account client code.
Distributor/AMC ID
Alphanumeric; 12 Characters; Mandatory
Specify the distributor or AMC ID.
Distributor
Display
The system displays the name of the distributor or AMC ID for the selected distributor or AMC ID.
Client Defaults
Broker Base Currency
Alphanumeric; 3 Characters; Mandatory
Specify the broker base currency code.
VAT Registered
Optional
Select if VAT is registered or not from the drop-down list. The list displays the following values:
l Yes
l No
Commission Percentage
Numeric; 5 Characters; Mandatory
Specify the commission percentage.
Commission Payment Frequency
Alphanumeric; 1 Character; Mandatory
Specify the commission payment frequency.
Broker Type
Alphanumeric; 6 Characters; Optional
Specify the broker type.
Use Broker Type Payment Dates
Optional
Select if broker type payment dates can be used or not from the drop-down list. The list displays the following values:
l Yes
l No
Broker Category
Optional
Select broker category from the drop-down list. The list displays the following values:
l Individual
l Corporate
Additional Information Details
Other Information Field
Display
The system displays the mapped field against that function ID.
Field Value
Display
The system displays the field value based on other information field.
5.31 FCIS Bulk Clients Defaults Broker Summary
This section contains the following topics:
l Section 5.31.1, "Retrieving Amended Bulk Clients Defaults Broker Record"
l Section 5.31.2, "Editing Amended Bulk Clients Defaults Broker Record"
l Section 5.31.3, "Viewing Amended Bulk Clients Defaults Broker Record"
l Section 5.31.4, "Deleting Amended Bulk Clients Defaults Broker Record"
l Section 5.31.5, "Authorizing Amended Bulk Clients Defaults Broker Record"
l Section 5.31.6, "Amending Amended Bulk Clients Defaults Broker Record"
l Section 5.31.7, "Authorizing Amended Bulk Clients Defaults Broker Record"
5.31.1 Retrieving Amended Bulk Clients Defaults Broker Record
You can retrieve a previously entered record in the FCIS Bulk Clients Defaults Broker Summary screen, as follows:
Invoke the FCIS Bulk Clients Defaults Broker Summary screen by typing ‘UTSBLCBD’ in the field at the top right corner of the Application tool bar and clicking on the adjoining arrow button.

Specify any or all of the following details in the corresponding fields:
l The status of the transaction in the Authorized field. If you choose the “Blank Space” option, then all the records that involve the specified unit holder are retrieved.
l The status of the record in the Open field. If you choose the “Blank Space” option, then all the records that involve the specified unit holder are retrieved.
l Bulk Account Client Code
l Distributor/AMC ID
Click ‘Advanced Search’ button for advanced level of query where records can be retrieved based on specific fields. Click ‘Reset’ button, so that the entire search criteria will be cleared for a new level of search. Click ‘Search’ button to view the records. All records with the specified details are retrieved and displayed in the lower portion of the screen. Click ‘Refresh’ button, so that the search criteria will be refreshed based on existing criteria.
Note
You can also retrieve the individual record detail from the FCIS Bulk Clients Defaults Broker detail screen by doing query in the following manner:
– Press F7
– Input the Bulk Account Client Code
– Press F8
You can perform Edit, Delete, Amend, Authorize, Reverse, Confirm operation by selecting from the Action list. To edit and amend a record a user has to click unlock button under Action menu.
You can also search the record by using combination of % and alphanumeric value.
Example
You can search the record by using the combination of % and alphanumeric value as follows:-
l Search by A%: System will fetch all the records whose Bulk Account Client Code starts from Alphabet ‘A’. For Example: AGC17, AGVO6, AGC74 and so forth.
l Search by %7: System will fetch all the records whose Bulk Account Client Code ends by numeric value’ 7’. For Example: AGC17, GSD267, AGC77 and so forth.
l Search by %17%: System will fetch all the records whose Bulk Account Client Code contains the numeric value 17. For Example: GSD217, GSD172, AGC17 and so forth.
5.31.2 Editing Amended Bulk Clients Defaults Broker Record
You can modify the details of Bulk Clients Defaults Broker parameters that you have already entered into the system, provided it has not been subsequently authorized. You can perform this operation as follows:
l Invoke the FCIS Bulk Clients Defaults Broker Summary screen from the Browser.
l Select the status of the record that you want to retrieve for modification in the Authorized field. You can only modify records that are unauthorized. Accordingly, choose the Unauthorized option.
l Specify any or all of the details in the corresponding fields to retrieve the record that is to be modified. All unauthorized records with the specified details are retrieved and displayed in the lower portion of the screen.
l Double click the record that you want to modify in the list of displayed records. The FCIS Bulk Clients Defaults Broker Detail screen is displayed.
l Select Unlock Operation from Action list to modify the record. Modify the necessary information.
l Click Save to save your changes. The FCIS Bulk Clients Defaults Broker Detail screen is closed and the changes made are reflected in the FCIS Bulk Clients Defaults Broker Summary screen.
5.31.3 Viewing Amended Bulk Clients Defaults Broker Record
To view a record that you have previously entered, you must retrieve the same in the FCIS Bulk Clients Defaults Broker Summary screen, as follows:
l Invoke the FCIS Bulk Clients Defaults Broker Summary Screen from the Browser.
l Select the status of the record that you want to retrieve for viewing in the Authorized field. You can also view all records that are either unauthorized or authorized only, by choosing the Unauthorized / Authorized option.
l Specify any or all of the details of the record in the corresponding fields on the screen, and click ‘Search’ button. All records with the specified details are retrieved and displayed in the lower portion of the screen.
l Double click the record that you want to view in the list of displayed records. The FCIS Bulk Clients Defaults Broker Detail screen is displayed in View mode.
5.31.4 Deleting Amended Bulk Clients Defaults Broker Record
You can delete only unauthorized records in the system. To delete a record that you have previously entered:
l Invoke the FCIS Bulk Clients Defaults Broker Summary screen from the Browser.
l Select the status of the record that you want to retrieve for deletion.
l Specify any or all of the details and click ‘Search’ button. All records with the specified details are retrieved and displayed in the lower portion of the screen.
l Double click the record that you want to delete. The FCIS Bulk Clients Defaults Broker Detail screen is displayed.
l Select Delete operation from the Action list. The system prompts you to confirm the deletion, and the record is deleted physically from the system database.
5.31.5 Authorizing Amended Bulk Clients Defaults Broker Record
An unauthorized Bulk Clients Defaults Broker record must be authorized in the system for it to be processed. To authorize a record:
l Invoke the FCIS Bulk Clients Defaults Broker Summary screen from the Browser.
l Select the status of the record that you want to retrieve for authorization. Typically, choose the Unauthorized option.
l Specify any or all of the details of the record in the corresponding fields on the screen. Click ‘Search’ button. All records with the specified details that are pending authorization are retrieved and displayed in the lower portion of the screen.
l Double click the transaction that you wish to authorize. The FCIS Bulk Clients Defaults Broker Detail screen is displayed. Select Authorize operation from Action.
When the checker authorizes a transaction, details of validations, if any, that were overridden by the maker of the transaction during the Save operation, are displayed. If any of these overrides results in an error, the checker must reject the transaction.
5.31.6 Amending Amended Bulk Clients Defaults Broker Record
After a Bulk Clients Defaults Broker is authorized, it can be modified using the Unlock operation from Action list. To make changes to a transaction after authorization:
l Invoke the FCIS Bulk Clients Defaults Broker Summary screen from the Browser.
l Select the status of the record that you wish to retrieve for amendment. You can only amend only authorized records.
l Specify any or all of the details in the screen. All records with the specified details are retrieved and displayed in the lower portion of the screen.
l Double click the record that you want to amend. The FCIS Bulk Clients Defaults Broker Detail screen is displayed in Amendment mode. Click the Unlock operation from the Action list to amend the record.
l Amend the necessary information. Click the Save button to save the changes.
5.31.7 Authorizing Amended Bulk Clients Defaults Broker Record
An amended Bulk Clients Defaults Broker record must be authorized for the amendment to be made effective in the system. The authorization of amended records can only be done from Fund Manager Module and Agency branch Module.
The process of authorization is subsequently the same as that for normal transactions.
5.32 Default Information for UH Deal Upload
This section contains the following topics:
l Section 5.32.1, "Invoking Default Information for UH Deal Upload"
5.32.1 Invoking Default Information for UH Deal Upload
You can invoke the FCIS Bulk Clients Defaults (UH Deal Upload) screen by typing ‘UTDBLUHD’ in the field at the top right corner of the Application tool bar and clicking on the adjoining arrow button.
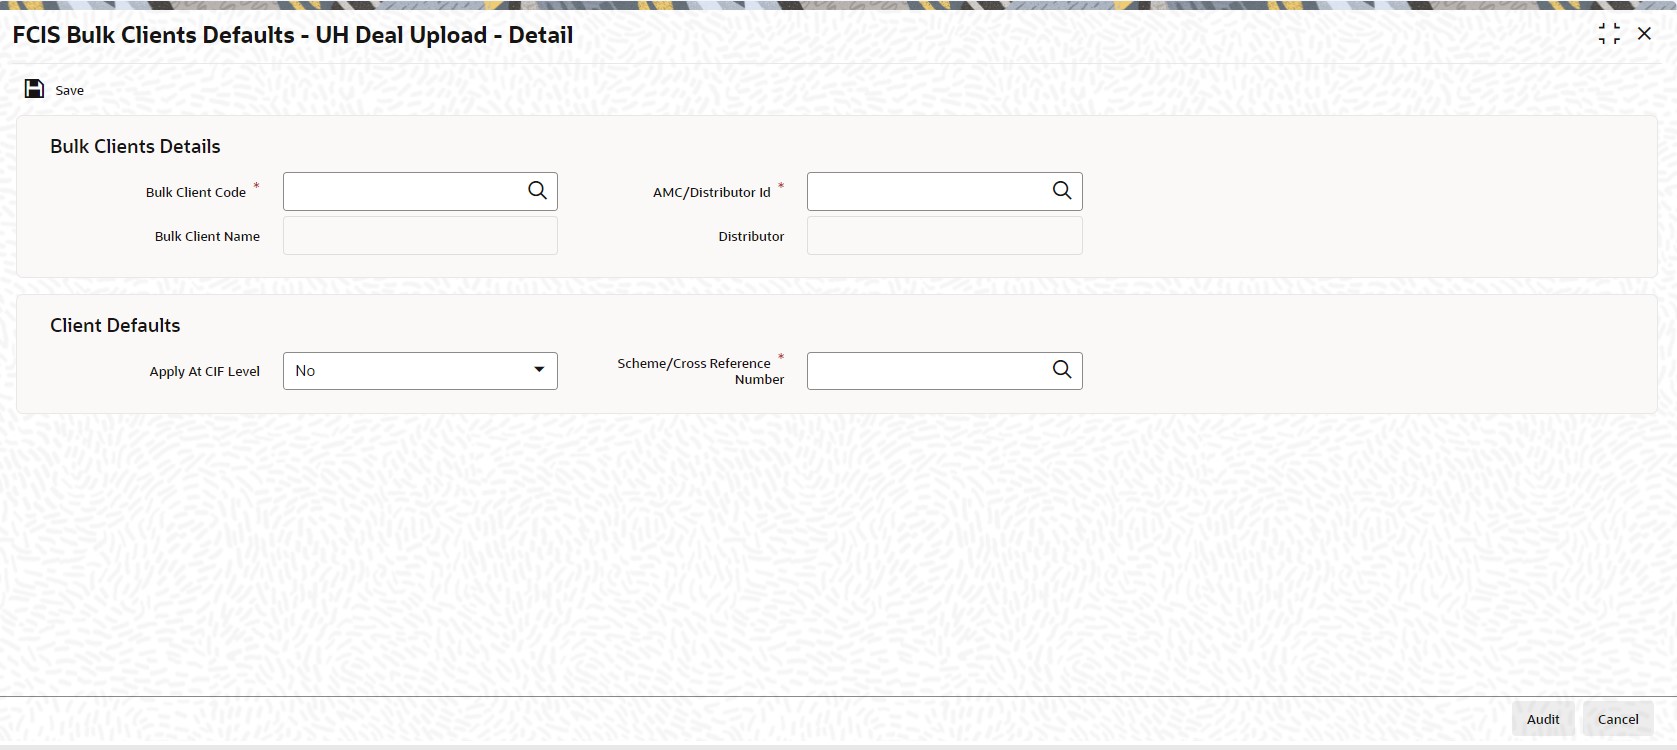
For UH deal import, you must maintain:
l Scheme Cross Reference Number.
Only those fields in the header portion of the screen are discussed here. For the other fields, depending upon the upload type, you must refer the user manual files for the corresponding maintenance in the system.
You can specify the following details:
Bulk Clients Details
Bulk Account Client Code
Alphanumeric; 12 Characters; Mandatory
Specify the bulk account client code.
Bulk Client Name
Display
The system displays the bulk client name for the selected bulk account client code.
AMC/Distributor ID
Alphanumeric; 12 Characters; Mandatory
Specify the distributor ID.
Distributor
Display
The system displays the name of the distributor for the selected distributor ID.
Client Defaults
Apply At CIF Level
Optional
Select if UH deal has to be applied at CIF level or not from the drop-down list. The list displays the following values:
l Yes
l No
Scheme/Cross Reference Number
Alphanumeric; 12 Characters; Mandatory
Specify the scheme/cross reference number.
5.33 FCIS Bulk Clients Defaults - UH Deal Upload - Summary
This section contains the following topics:
l Section 5.33.1, "Retrieving a FCIS Bulk Clients Defaults - UH Deal Upload Record"
l Section 5.33.2, "Editing Bulk Clients Defaults - UH Deal Upload Record"
l Section 5.33.3, "Viewing Bulk Clients Defaults - UH Deal Upload Record"
l Section 5.33.4, "Deleting Bulk Clients Defaults - UH Deal Upload Record"
l Section 5.33.6, "Amending Bulk Clients Defaults - UH Deal Upload Record"
l Section 5.33.6, "Amending Bulk Clients Defaults - UH Deal Upload Record"
l Section 5.33.7, "Authorizing Amended Bulk Clients Defaults - UH Deal Upload Record"
5.33.1 Retrieving a FCIS Bulk Clients Defaults - UH Deal Upload Record
You can retrieve a previously entered record in the Summary Screen, as follows:
You can invoke ‘FCIS Bulk Clients Defaults - UH Deal Upload - Summary’ screen by typing ‘UTSBLUHD’ in the field at the top right corner of the Application tool bar and clicking on the adjoining arrow button.

l The status of the record in the Authorization Status field. If you choose the ‘Blank Space’ option, then all the records are retrieved.
l The status of the record in the Record Status field. If you choose the ‘Blank Space’ option, then all records are retrieved
l Bulk Account Client Code
l Distributor ID
Click ‘Search’ button to view the records. All the records with the specified details are retrieved and displayed in the lower portion of the screen.
Note
You can also retrieve the individual record detail from the detail screen by querying in the following manner:
– Press F7
– Input the Distributor ID
– Press F8
You can perform Edit, Delete, Amend, Authorize, operations by selecting the operation from the Action list. You can also search a record by using a combination of % and alphanumeric value.
5.33.2 Editing Bulk Clients Defaults - UH Deal Upload Record
You can modify the details of Bulk Clients Defaults - UH Deal Upload record that you have already entered into the system, provided it has not subsequently authorized. You can perform this operation as follows:
l Invoke the FCIS Bulk Clients Defaults - UH Deal Upload - Summary screen from the Browser.
l Select the status of the record that you want to retrieve for modification in the Authorization Status field. You can only modify records that are unauthorized. Accordingly, choose the Unauthorized option.
l Specify any or all of the details in the corresponding fields to retrieve the record that is to be modified.
l Click ‘Search’ button. All unauthorized records with the specified details are retrieved and displayed in the lower portion of the screen.
l Double click the record that you want to modify in the list of displayed records. The FCIS Bulk Clients Defaults - UH Deal Upload - Detail screen is displayed.
l Select Unlock Operation from the Action list to modify the record. Modify the necessary information.
Click Save to save your changes. The FCIS Bulk Clients Defaults - UH Deal Upload - Detail screen is closed and the changes made are reflected in the FCIS Bulk Clients Defaults - UH Deal Upload - Summary screen.
5.33.3 Viewing Bulk Clients Defaults - UH Deal Upload Record
To view a record that you have previously input, you must retrieve the same in the FCIS Bulk Clients Defaults - UH Deal Upload - Summary screen as follows:
l Invoke the FCIS Bulk Clients Defaults - UH Deal Upload - Summary screen from the Browser.
l Select the status of the record that you want to retrieve for viewing in the Authorization Status field. You can also view all records that are either unauthorized or authorized only, by choosing the unauthorized / Authorized option.
l Specify any or all of the details of the record in the corresponding fields on the screen.
l Click ‘Search’ button. All records with the specified fields are retrieved and displayed in the lower portion of the screen.
l Double click the record that you want to view in the list of displayed records. The FCIS Bulk Clients Defaults - UH Deal Upload - Detail screen is displayed in View mode.
5.33.4 Deleting Bulk Clients Defaults - UH Deal Upload Record
You can delete only unauthorized records in the system. To delete a record that you have previously entered:
l Invoke the FCIS Bulk Clients Defaults - UH Deal Upload - Summary screen from the Browser.
l Select the status of the record that you want to retrieve for deletion.
l Specify any or all of the details in the corresponding fields on the screen.
l Click ‘Search’ button. All records with the specified fields are retrieved and displayed in the lower portion of the screen.
l Double click the record that you want to delete in the list of displayed records. The FCIS Bulk Clients Defaults - UH Deal Upload - Detail screen is displayed.
l Select Delete Operation from the Action list. The system prompts you to confirm the deletion and the record is physically deleted from the system database.
5.33.5 Authorizing Bulk Clients Defaults - UH Deal Upload Record
l An unauthorized Bulk Clients Defaults - UH Deal Upload record must be authorized in the system for it to be processed. To authorize a record:
l Invoke the FCIS Bulk Clients Defaults - UH Deal Upload - Summary screen from the Browser.
l Select the status of the record that you want to retrieve for authorization. Typically, choose the unauthorized option.
l Specify any or all of the details in the corresponding fields on the screen.
l Click ‘Search’ button. All records with the specified details that are pending authorization are retrieved and displayed in the lower portion of the screen.
l Double click the record that you wish to authorize. The FCIS Bulk Clients Defaults - UH Deal Upload - Detail screen is displayed. Select Authorize operation from the Action List.
When a checker authorizes a record, details of validation, if any, that were overridden by the maker of the record during the Save operation are displayed. If any of these overrides results in an error, the checker must reject the record.
5.33.6 Amending Bulk Clients Defaults - UH Deal Upload Record
After a Bulk Clients Defaults - UH Deal Upload record is authorized, it can be modified using the Unlock operation from the Action List. To make changes to a record after authorization:
l Invoke the FCIS Bulk Clients Defaults - UH Deal Upload - Summary screen from the Browser.
l Select the status of the record that you want to retrieve for authorization. You can only amend authorized records.
l Specify any or all of the details in the corresponding fields on the screen.
l Click ‘Search’ button. All records with the specified details that are pending authorization are retrieved and displayed in the lower portion of the screen.
l Double click the record that you wish to authorize. The FCIS Bulk Clients Defaults - UH Deal Upload - Detail screen is displayed in amendment mode. Select Unlock operation from the Action List to amend the record.
l Amend the necessary information and click on Save to save the changes
5.33.7 Authorizing Amended Bulk Clients Defaults - UH Deal Upload Record
An amended Bulk Clients Defaults - UH Deal Upload record must be authorized for the amendment to be made effective in the system. The authorization of amended records can be done only from Fund Manager Module and Agency Branch module.
5.34 Bulk Clients Defaults Summary Screen
This section contains the following topics:
l Section 5.34.1, "Viewing Bulk Clients Default Summary"
l Section 5.34.2, "Retrieving Default Specifications Record for Bulk Client"
l Section 5.34.3, "Editing Bulk Client Details"
l Section 5.34.4, "Viewing Bulk Client Details"
l Section 5.34.5, "Deleting Bulk Client Details"
l Section 5.34.6, "Authorizing Bulk Client Details Records"
l Section 5.34.7, "Amending Bulk Client Records"
l Section 5.34.8, "Authorizing Amended Bulk Client Details"
l Section 5.34.9, "Copying Attributes"
5.34.1 Viewing Bulk Clients Default Summary
After you have set up all the default specifications for a bulk client, you must have another user authorize the defaults so that they would be effective in the system database.
Before the default specifications are authorized, you can edit them as many times as necessary. You can also delete a default specification for a bulk client before it is authorized.
After authorization, you can only make changes to any of the specifications through an amendment.
The Bulk Client Summary screen can be used for the following operations on bulk client default specifications:
l Retrieving bulk client default specifications for viewing
l Editing unauthorized bulk client default specifications
l Deleting unauthorized bulk client default specifications
l Authorizing bulk client default specifications
l Amending authorized bulk client default specifications.
To invoke the Bulk Client Default Find screen, click on Summary under the Bulk Client Defaults menu in the Browser.
You can invoke the FCIS Bulk Clients Defaults (Broker) Summary screen by typing ‘UTSENTMN’ in the field at the top right corner of the Application tool bar and clicking on the adjoining arrow button.
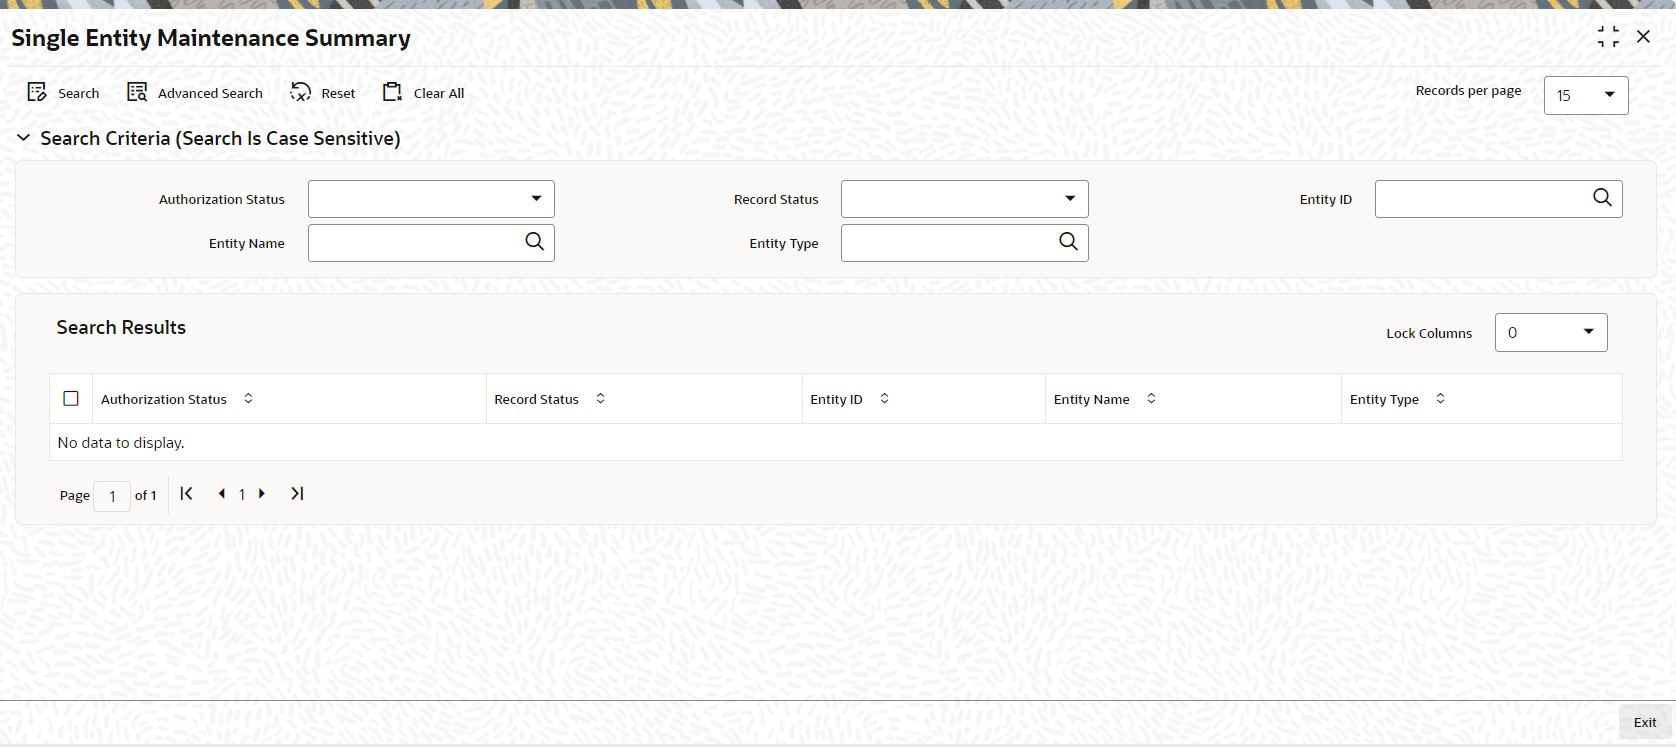
5.34.2 Retrieving Default Specifications Record for Bulk Client
To retrieve a previously entered default specifications record for a bulk client:
l Invoke the Bulk Clients Defaults Maintenance Summary screen and specify the following :
l The authorization status of the entity in the Authorization Status field. If you choose the “Blank Space” option, then all the records are retrieved.
l The status of the record in the Open field. If you choose the “Blank Space” option, then all the record are retrieved.
l Entity ID
l Entity Type
l Entity Name
l Click ‘Search’ button after you have specified the required details, all records with the specified details are retrieved and displayed in the lower portion of the screen.
Note
You can also retrieve an individual bulk client detail from the Detail screen by doing query in the following manner:
– Press F7
– Input any parameter in the screen
– Press F8
l You can perform Edit, Delete, Amend, Authorize operation by selecting from the Action list.
l You can also search the record by using combination of % and alphanumeric value.
Example
You can search the record for Bulk Account Client code by using the combination of % and alphanumeric value.
l Search by A%: The system will fetch all the records whose Entity Name starts from Alphabet ‘A’. For example, ACCB.
l Search by %7: The system will fetch all the records whose Entity Name has 7. For example: ACT7
5.34.3 Editing Bulk Client Details
You can modify the details of the bulk client details that you have already entered into the system, provided it has not been subsequently authorized. You can perform this operation as follows:
l Invoke the Bulk Clients Defaults Maintenance Summary screen from the Browser.
l Select the authorization status of the bulk client records that you want to retrieve for modification in the Authorization Status field. You can only modify records that are unauthorized. Accordingly, choose the Unauthorized option from the drop down list.
l Specify any or all of the search parameters of the bulk client in the corresponding fields.
l Click ‘Search’ button. All unauthorized bulk client records with the specified details are retrieved and displayed in the lower portion of the screen.
l Double click the record that you want to modify. The FCIS Bulk Clients Defaults Maintenance Detail screen is displayed.
l Select Unlock Operation from Action list to modify the record. Modify the necessary information.
l Click Save to save the changes. The FCIS Bulk Clients Defaults Maintenance screen is closed and the changes made are reflected in the Summary screen.
5.34.4 Viewing Bulk Client Details
To view the bulk client details that you have previously entered:
l Invoke the FCIS Bulk Clients Defaults Maintenance Summary Screen from the Browser.
l Select the authorization status of the bulk client records that you want to retrieve for viewing in the Authorization Status field. You can also view all bulk client records that are either unauthorized or authorized only, by choosing the Unauthorized/ Authorized option.
l Specify any or all of the search parameters.
l Click ‘Search’ button. All records with the specified details are retrieved and displayed in the lower portion of the screen.
l Double click the record that you want to view. The FCIS Bulk Clients Defaults Maintenance Detail is displayed in view mode.
5.34.5 Deleting Bulk Client Details
You can delete only unauthorized records in the system. To delete a bulk client record:
l Invoke the Bulk Clients Maintenance Summary screen from the Browser.
l Select the status of the bulk client records that you want to retrieve for deletion.
l Specify any or all of the search parameters.
l Click ‘Search’ button. All records with the specified details are retrieved and displayed in the lower portion of the screen.
l Double click the bulk client record that you want to delete. The FCIS Bulk Client Maintenance Detail screen is displayed.
l Select Delete operation from the Action list. The system prompts you to confirm the deletion, and the record is deleted physically from the system database.
5.34.6 Authorizing Bulk Client Details Records
An unauthorized bulk client record must be authorized in the system for it to be processed. To authorize a bulk client record:
l Invoke the Bulk Clients Maintenance Summary screen from the Browser.
l Select the status of the Bulk Clients Maintenance record that you want to retrieve for authorization. Typically, choose the unauthorized option from the drop down list.
l Specify any or all of the search parameters of the Bulk Clients Maintenance in the corresponding fields on the screen.
l Click ‘Search’ button. All records with the specified details that are pending authorization are retrieved and displayed in the lower portion of the screen.
l Double click the Bulk Clients Maintenance record that you wish to authorize. The FCIS Bulk Client Defaults Maintenance screen displayed. Select Authorize operation from Action.
When the checker authorizes an bulk client record, details of validations, if any, that were overridden by the maker of the record during the Save operation, are displayed. If any of these overrides results in an error, the checker must reject the bulk client record.
5.34.7 Amending Bulk Client Records
After a bulk client is authorized, it can be modified using the Unlock operation from Action list. To make changes to a bulk client record after authorization, you must invoke the Unlock operation which is termed as Amend Operation.
l Invoke the Bulk Client Maintenance Summary screen from the Browser.
l Select the status of the bulk client records that you wish to retrieve for amendment. You can only amend records of bulk clients that are authorized.
l Specify any or all of the search parameters.
l Click ‘Search’ button. All bulk client records with the specified details are retrieved and displayed in the lower portion of the screen.
l Double click the bulk client record that you want to amend. The FCIS Bulk Client Maintenance screen is displayed in Amendment mode.
l Click the Unlock operation from the Action list to amend the bulk client parameters.
l Amend the necessary information. Click the Save button to save the changes.
5.34.8 Authorizing Amended Bulk Client Details
An amended bulk client record must be authorized for the amendment to be made effective in the system.
The process of authorization is the same as that of normal authorization process.
If you want to create a bulk client record having the same attributes of an existing record:
l Retrieve the bulk client record whose attributes the new record should inherit. You can retrieve the record through the Summary screen or through the F7- F8 operation which is explained in the previous sections of this chapter.
l Click on ‘Copy’ in the Actions list.
l Indicate the new Bulk Client Code. You can however change the details if required.