Defining Formula Elements
To define formula elements, use the Formulas (GP_FORMULA) component.
|
Page Name |
Definition Name |
Usage |
|---|---|---|
|
GP_PIN |
Name the element and define its basic parameters. |
|
|
GP_FORMULA2_V2 |
Define formulas for use in calculations. View formula definitions. |
|
|
GP_FORMULA_F1_SEC |
Assign a rounding rule and element pointer selection to the field in your formula. |
|
|
GP_FORMULA2_V2 |
View your formula and confirm that it's correct. |
When you define a formula, the values of the elements that comprise it are likely to change. If you refer to an element's specific value at a given time, you have to change the formula every time a component element value changes. Rather than referring to the element's value, you can use an element pointer to refer to its system identifying number—its element number. When you do this, you are telling the system that during processing, it should return whatever value is stored in the element's array. Because the element number remains constant, a formula using the element remains useful indefinitely, because the element values are valid.
During batch processing, any variable defined with a Pointer field format has a value stored in the Element Pointer field in the PINV array. That is, only the element number is stored and the variable element isn't resolved to an actual character, numeric, or date value.
If the field format for the variable element used in a formula isn't equal to Pointer and you select the Use Element Value option on the Element Attributes page, the formula uses the element's value.
If the field format for the variable element used in a formula isn't equal to Pointer and you select the Use Element Number option on the Element Attributes page, the formula uses the element's number.
If the field format for the variable element used in a formula is equal to Pointer and you select the Use Element Value option on the Element Attributes page, the formula uses the value of the element to which the pointer element is pointing.
If the field format for the variable element in a formula equals Pointer and you select the Use Element Number option on the Element Attributes page, the formula uses the value of the pointer element. In other words, it uses the element number, because that's what elements with a field format equal to Pointer store.
This table summarizes which values are used with different configurations:
|
Field Format |
Use Element Value Option Selected |
Use Element Number Option Selected |
|---|---|---|
|
Field Format <> Pointer |
Element Value |
Element Number |
|
Field Format = Pointer |
Value of the element pointed to by Pointer Value |
Pointer Value (an element number) |
Example
Say that before a certain formula is used, the values for the elements are as follows:
|
Element Number |
Element Name |
Element Type |
Field Format |
Decimal Value |
Character Value |
Pointer Value |
|---|---|---|---|---|---|---|
|
1000 |
V1 |
Variable |
Decimal |
150 |
|
|
|
2000 |
V2 |
Variable |
Character |
|
ABC |
|
|
3000 |
V3 |
Variable |
Decimal |
250 |
|
|
|
4000 |
V4 |
Variable |
Pointer |
|
|
1000 |
You've selected the Use Element Value option on the Element Attributes page.
If an element's field format isn't Pointer, the formula uses the value of the element. So, if you're using the following statement in your formula:
V1 Assign to V3
then, after the resolution of the formula, V3 equals 150.
If an element's field format is Pointer, the formula uses the value of the element pointed to by the pointer. So, if you're using the following statement in your formula:
V4 Assign to V3
then, after the resolution of the formula, V3 equals 150.
If you want to use V4 in your formula, the formula checks whether the Use Element Value or Use Element Number option is selected. In this example, it's Use Element Value. The formula then checks whether the field format is Pointer In this example, it's Pointer. The pointer value is 1000. Because 1000 is an element number and this element number represents V1, the formula uses the value of V1 (150).
Assume also that you've selected the Use Element Number option on the Element Attributes page.
If the field formats for Element Name 1 and Element Name 2 aren't Pointer, the formula uses the element number. So, if you're using the following statement in your formula:
V2 Assign to V4
and you're using pointers, then, after resolution of the formula, V4 contains 2000 in the pointer value.
If the field formats for Element Name 1 and Element Name 2 are Pointer, the formula uses the pointer value. So, if you're using the following statement in your formula:
If V4 = 2000
then the condition is true, because the pointer value of V4 equals 2000.
If you want to use V2 in your formula, the formula checks whether the Use Element Value or the Use Element Number option is selected. In this example, it's Use Element Number. The formula then checks whether the field format is a Pointer. In this example, it isn't. This directs the formula to use the element number of V2, whose element number is 2000. So, 2000 will be assigned to the pointer value of V4.
Note: If you're using the element number V2, the Assign To element must be in Pointer field format and the Use Element Number option must be selected on the Element Attributes page for Element 1, Element 2, and Assign To Element.
Use the Formula Name page (GP_PIN) to name the element and define its basic parameters.
Navigation:
You name every element and define its basic parameters on an Element Name page. All element components in Absence Management share the same Element Name page (GP_PIN).
Use the Field-by-Field Definition page (GP_FORMULA2_V2) to define formulas for use in calculations.
View formula definitions.
Navigation:
This example illustrates the fields and controls on the Field-by-Field Definition page.
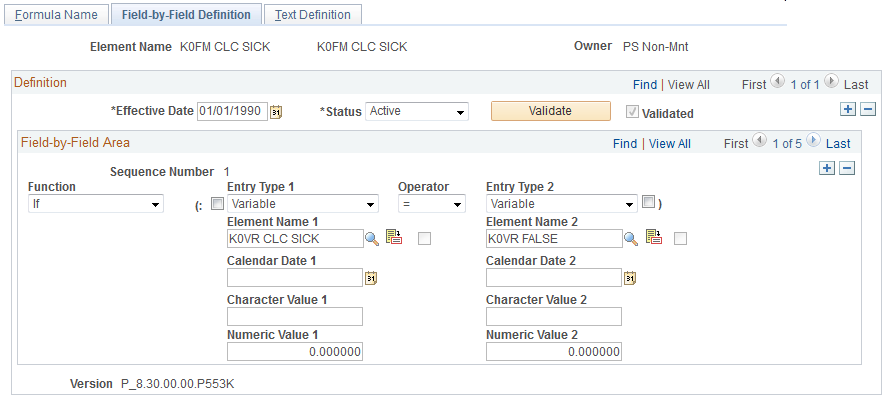
Building Your Formula
Build your formula in the Field-by-Field Area group box, specifying one operation or result in each row.
Field or Control |
Description |
|---|---|
Function |
Select the type of function or qualifier for the formula. Options include And, Average, Comment, Else, Endif, Exit, If, In, Maximum, Minimum, Or, Sum, and Then. |
( (left parenthesis) |
Select to group your formula calculations. Selecting this check box requires that you must select the ) check box. How you group your formula calculations with parentheses can affect the calculation sequence. |
Entry Type 1 or 2, Element 1 or 2, Calendar Date 1 or 2, Character Value 1 or 2, and Numeric Value 1 or 2 |
Select the entry type for the operation. If you select the Character, Cal Date, Date, or Numeric entry type, enter a value in the corresponding Date Value, Numeric Value, or Character Value field. If you select any other entry type, the system prompts for the correct element in the corresponding Element Name field. |
|
Click to access the Element Name Attributes page and assign a rounding rule, previous period rule, or element pointer selection to a field that you're using in your formula. The check box to the right of the entry type list is selected if additional information has been entered on the Formula - Field Details page. |
Operator |
Select the operator to perform on the operands that you entered. The following standard operators are available: (none), -, *, /, +, <, <=, <>, =, >, and >=. |
) (right parenthesis) |
Select to group your formula calculations. If you select this check box, you must select the ( check box. How you group your formula calculations with parentheses can affect the calculation sequence. |
Assign To Type and Assign To Element |
To assign a value to an element, first select the entry type and then select the element. For example, you are defining a formula named SICK LEAVE to calculate entitlement for absences due to sickness. To have the system assign the resolved value of the formula element to the SICK LEAVE formula, enter SICK LEAVE in Assign To Element field. Before you can select the formula in this field, you must save the formula definition with an effective date. |

Note: Under either parenthesis, you can enter multiple sets of parentheses. To do so, use multiple lines. You can enter only one ( or ) per row.
Validating Your Formula
After you define your formula, save it, then validate and edit the formula. Whenever you alter the formula, re-validate it.
Field or Control |
Description |
|---|---|
Validate |
Click this button to validate your formula. (Validating a formula automatically saves the formula.) |
Validated |
This check box is selected if you clicked the Validate button and the formula passed validation. |
Note: If you try to run a process using a formula that you've changed without validating, you get an error. Save the page before clicking the Validate button. You can save the page anytime, but no validation against the database occurs until you click the Validate button.
Example: Setting Up a Formula
Using the formula element, you can create elements using mathematical and logical operands, rules, and mathematical formulas.
In this example, you need a simple formula to forecast whether there is sufficient entitlement to cover an absence event. The requirements are as follows:
If the system element, DAY COUNT UNP (day count unpaid) is greater than zero, return a value of NOT ELIGIBLE.
Otherwise, return a value of ELIGIBLE.
Start by turning the calculation into a mathematical formula. In this example, K0FM PTO ELIGIBLE is the name of the formula that you are defining.
If DAY COUNT UNP > 0, then
  'NOT ELIGIBLE'   >>  K0FM PTO ELIGIBLE
else
  'ELIGIBLE'       >>  K0FM PTO ELIGIBLE
Endif
Formulas can often be expressed in multiple ways. To streamline processing, use the simplest version that requires the least processing.
After turning the calculation into a mathematical formula, you enter the formula into the system. If you haven't defined the element and entered the basic descriptions, do so on the Formula Name page. Then, on the Field-by-Field Definition page, define the formula, line by line.
This table shows how you enter your forecasting formula:
|
Sequence Number |
Function |
( |
Entry Type 1 / Element 1 or value |
Operator |
Entry Type 2 / Element 1 or value |
) |
Assign To Type/ Assign To Element |
|---|---|---|---|---|---|---|---|
|
1 |
If |
SystemElem /DAY COUNT UNP |
> |
Numeric / 0 |
|||
|
2 |
Then |
Character / NOT ELIGIBLE |
Formula / K0FM PTO ELIGIBLE |
||||
|
3 |
Else |
Character / ELIGIBLE |
Formula / K0FM PTO ELIGIBLE |
||||
|
4 |
Endif |
Note: Every If statement must end with an Endif.
Each element name must be associated with an appropriate entry type. For example, on the first line, Element Name 1 (DAY COUNT UNP) is associated with the entry type System Element.
You can view your formula by accessing the Text Definition page. When you have defined the formula, validate it by clicking the Validate button on the Field-by-Field Definition page.
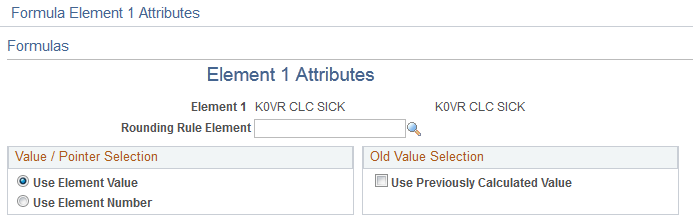
Use the Element Attributes page (GP_FORMULA_F1_SEC) to assign a rounding rule and element pointer selection to the field in your formula.
Navigation:
Click the Element 1 Attributes (or Element 2 Attributes) button on the Formulas - Field-by-Field Definition page.
This example illustrates the fields and controls on the Element Attributes page.
Field or Control |
Description |
|---|---|
Rounding Rule Element |
If the field format of the element that you selected on the Formula Name page is Decimal, Monetary, or Pointer, select a rounding rule from the list. This field is only visible for elements with these field formats. The rounding rule applies only to the operand for which you've entered it. The element itself isn't updated; only the calculation is affected. |
Value/Pointer Selection
Use these fields to define element pointers in your formula.
Field or Control |
Description |
|---|---|
Use Element Value |
Select to use an element's value in the calculation. |
Use Element Number |
The default value is Use Element Value in formulas. You can also build formulas that use elements by their element number. Select to reference an element by using its system identifying number (element number), not its current value. For example, you have written a formula to calculate garnishments, but different payees have different garnishments. If you use element pointers in your formula expression to point to an element using its identifying element number, then you won't have to rewrite the formula every time the number and type of garnishment changes for different payees. The formula will adapt its calculations because it is retrieving current values for the elements referenced by the element pointer. |
Old Value Selection
Field or Control |
Description |
|---|---|
Use Previously Calculated Value |
Select to use the previously calculated value. |
Use the Text Definition page (GP_FORMULA2_V2) to view your formula and confirm that it's correct.
Navigation:
This example illustrates the fields and controls on the Text Definition page.
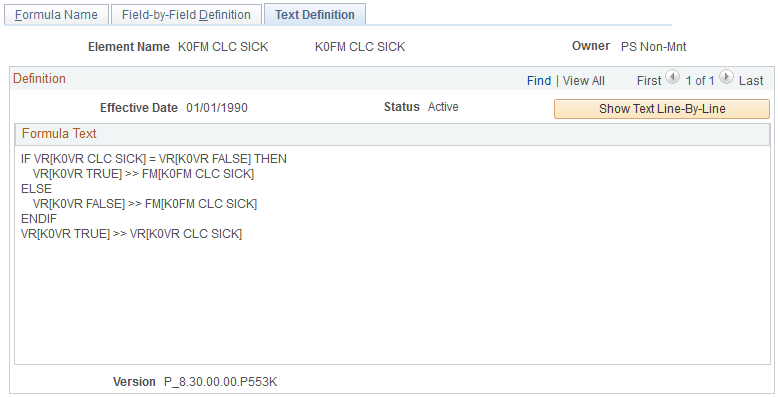
Use the Text Definition page to view the formula that you created on the Formula - Field-by-Field Definition page. If something isn't correct, return to the Field-by-Field Definition page and adjust the formula.
Field or Control |
Description |
|---|---|
Show Text Line-By-Line |
Click to view the text of the formula that you created on the Formula - Field-by-Field Definition page, as it was entered, line-by line. This view can be useful when troubleshooting a formula with errors. Any errors created by SaveEdit will be noted within the text as well as by an error message at the bottom of the page. Note: In the line-by-line view each line is prefixed by its row/line number and the error location is updated to reflect the number of the line displayed in the formula text. |