Using Self-Service Scheduling Features for Managers
Managers can use self-service pages in Absence Management to assign, view, change, and override work schedules. In addition to viewing coverage, assigned shifts, and total work hours, managers can find replacements, swap shifts, copy schedules, and make short- and long-term schedule changes.
|
Page Name |
Definition Name |
Usage |
|---|---|---|
|
SCH_MNG_DAILY SCH_MNG_WEEKLY SCH_MNG_DRANGE |
View a payees' schedule and access linked pages to update schedules. |
|
|
SCH_MNG_DAILY_DTL |
View details for a given shift and override shift information. |
|
|
SCH_MNG_OPTIONS |
Define default settings for the Manage Schedules page. |
|
|
Schedule Preferences Page |
SCH_EE_PREF |
View an employee's contact and schedule preferences. This page is used in additional ways. |
|
SCH_MNG_REPLACE |
Find a replacement for an employee. |
|
|
SCH_MNG_COPY |
Copy an employee schedule to be used by another employee. |
|
|
SCH_MNG_SWAP |
Swap two employees' schedules. |
|
|
SCH_ASSIGN |
Assign payees' long-term schedules or alternate schedules. |
Use the Weekly Schedules page (SCH_MNG_WEEKLY) to view a payees' schedule and access linked pages to update schedules.
Navigation:
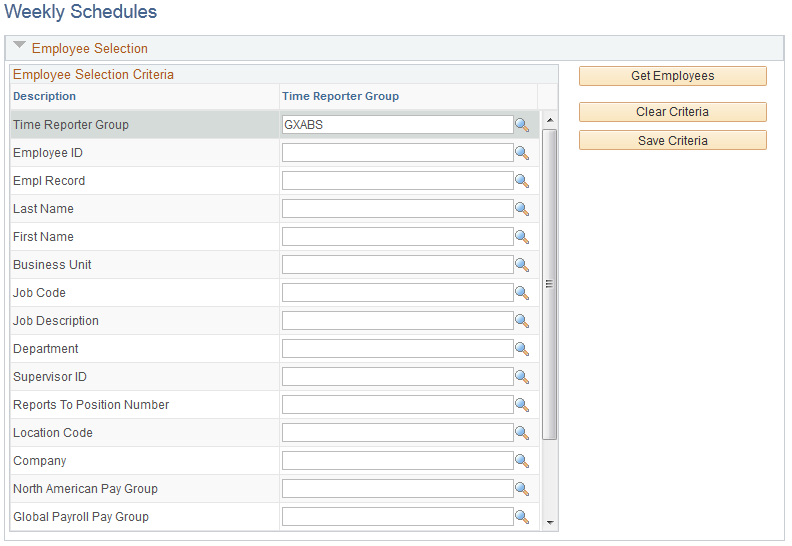
This example illustrates the fields and controls on the Weekly Schedules page (1 of 3).
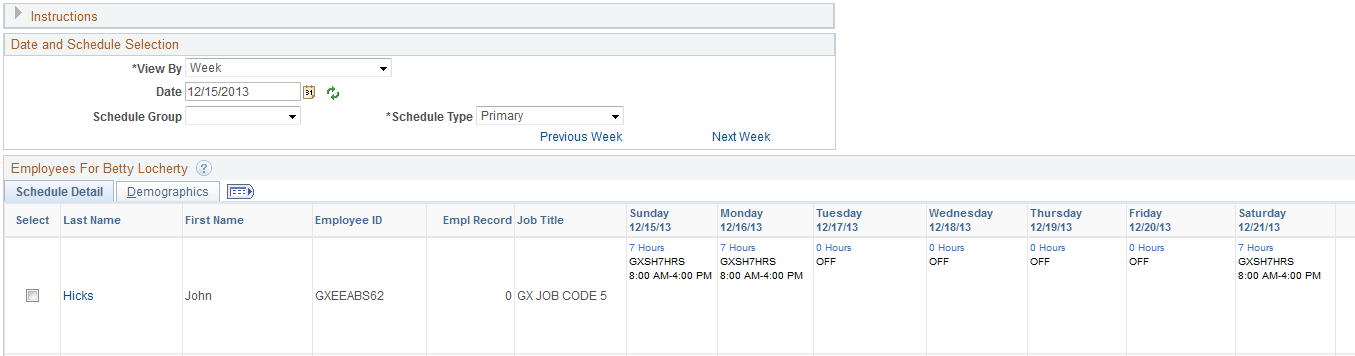
This example illustrates the fields and controls on the Weekly Schedules page (2 of 3).
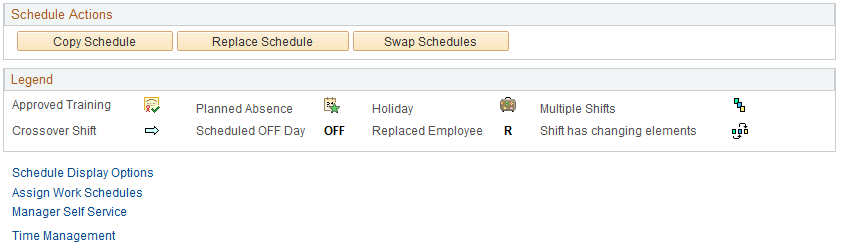
This example illustrates the fields and controls on the Weekly Schedules page (3 of 3).
When you access this page, the system displays either the Daily, Weekly, or Date Range Schedules pages, depending on the default set on the Manage Schedules View Options page.
Enter values in Employee Selection Criteria and click the Get Employees button to filter the list of payees that requires changes or review. Fields for Workgroup and Taskgroup apply only if Time and Labor is installed. The North American Pay Group field applies only if Payroll for North America is installed; the Global Payroll Pay Group field does not apply.
Field or Control |
Description |
|---|---|
View By |
Select Day, Week, or Date Range to view the listed payees and their schedules using the time period chosen. The value that you select here determines the labels that appear on various links and date fields.
|
Schedule Type |
Values are Primary or Alternate. |
Coverage |
This field appears only if you view by day. Options are Scheduled and Unscheduled. |
Refresh |
Click to refresh the page after selecting viewing preferences. |
Employees for <Manager Name>
The system lists the payees that meet your selection criteria.
Field or Control |
Description |
|---|---|
Select |
This field works with the schedule action fields. |
Last Name |
Click the employee's last name to access the Schedule Preferences page where you can view the employee's schedule preferences before making scheduling changes. |
<x Hours> |
Click this link to access the Daily Details page for a given shift to view the shift details or override the shift. |
Schedule Actions
The schedule actions of Schedule Replacements, Swap Schedules, and Copy Schedules are audited.
Field or Control |
Description |
|---|---|
Schedule Replacements |
To find a replacement for this payee, select the payee and click the Replacements button. |
Copy Schedules |
To copy this payee's schedule, select the payee and click the Copy Schedules button. The Copy Schedules page opens so that you can specify which payees are to inherit the copied schedule. |
Swap Schedules |
To swap two payees' schedules, select the two payees and click the Swap Schedules button. |
Legend
Events such as approved training, planned absence, and holiday are denoted on the schedule with buttons. A crossover shift indicates a shift that continues past midnight. Approved training can be designated only if Time and Labor is installed.
If a day has multiple shifts, the first shift information appears along with the multiple shifts button. The second shift and its details appear on the Daily Details for <date> page.
Note: To have the system display buttons for approved training, planned absences, holidays, and no shows, you must select these options on the Manage Schedules View Options page.
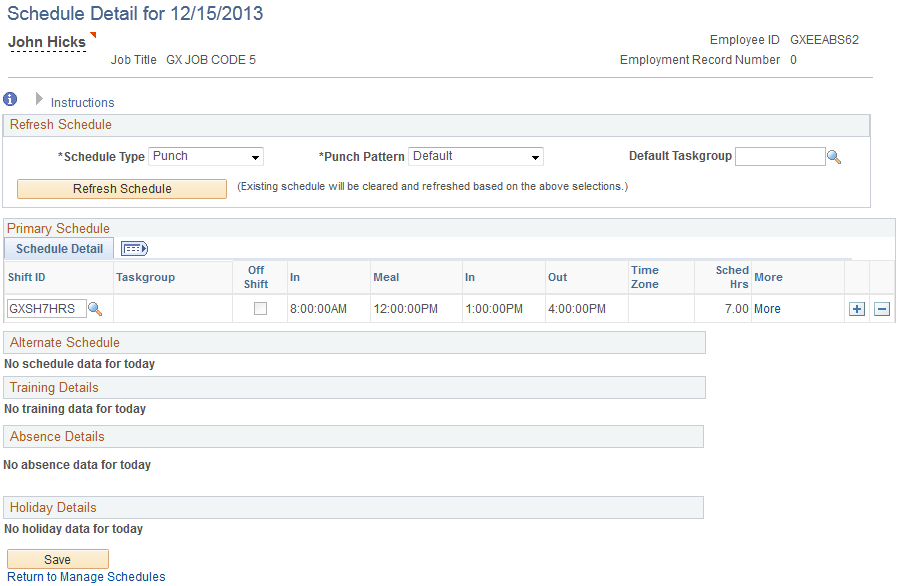
Use the Schedule Detail for <date> page (SCH_MNG_DAILY_DTL) to view details for a given shift and override shift information.
Navigation:
Click the <x> Hours link on the Manage Schedules page.
This example illustrates the fields and controls on the Schedule Detail for <date> page.
Use the Manage Schedule Options page (SCH_MNG_OPTIONS) to define default settings for the Manage Schedules page.
Navigation:
Click the Schedule Display Options link at the bottom of the page.
This example illustrates the fields and controls on the Manage Schedules Options page.
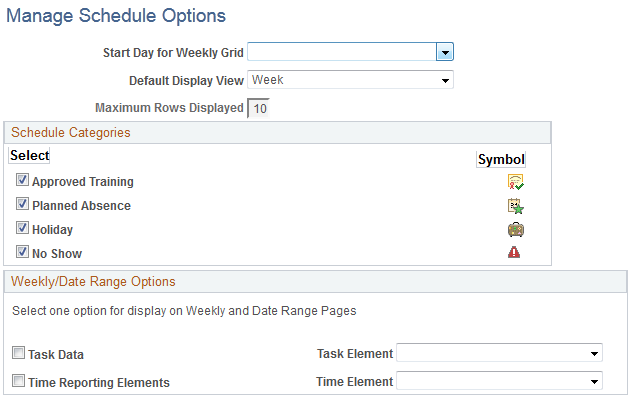
Use this page to define default settings for the Manage Schedules page.
Field or Control |
Description |
|---|---|
Start day for Weekly Grid |
Select the day of the week that is to appear first in the scheduling grid. |
Default Display View |
Select Date Range, Day, or Week to have the system display the daily, weekly, or date range pages when you access the Manage Schedules page. |
Maximum Rows Displayed |
Enter the maximum number of payees to display on each page. |
Schedule Categories
Select the types of events you want the system to mark on the schedule. The system displays the corresponding symbol on the relevant day.
Approved training applies only if Time and Labor is installed. In this case, the system can identify training days that are recorded in PeopleSoft Learning Management and HR: Manage Training.
Planned absences represent requested and approved absences (from the GP_ABS_EVENT table). If Time and Labor is installed, planned absences also include leaves of absence for Base Benefits customers.
No show information applies to payees with a punch schedule and can be reported only if Time and Labor is installed. The No Shows value only displays for the Daily Schedules page. No Shows information is stored, so any No Shows information from the past can be viewed.
Weekly/Date Range Options
If Time and Labor is installed, you can display one type of task data and one time reporting element on the weekly or date range pages.
Access the Find Replacements page (SCH_MNG_REPLACE) to find a replacement for an employee.
Navigation:
Select a payee and click the Find Replacements button.
This page lists all payees who are not scheduled for the shift or time range for which you need a replacement. It excludes payees for whom an absence has been entered. If Time and Labor is installed, it can also exclude payees who are scheduled for training.
Using the replacement feature is appropriate when you want to replace an absent payee with another payee who is not already scheduled to work during that time period.
Select the employee who will act as a replacement and click the Replace button. The system displays an R next to the replaced employee in the daily cell on the Manage Schedules pages (day, week or date range).
The person who is replacing the employee inherits the schedule. The replaced employee retains the original schedule for appropriate payment if the employee reports an absence for that day.
If you need to undo the replacement, click the View Daily Details link in the cell for the replaced employee (the cell that displays the R). Click the Undo Replacement button and then click OK.
Use the Copy Schedules page (SCH_MNG_COPY) to copy an employee schedule to be used by another employee.
Navigation:
Select a payee and click the Copy Schedules button.
Select one or more employees who are to receive the copied schedule and click the Copy button. The whole day is copied for the date or range of dates defined.
Note: If you selected Day as the View By option on the Manage Schedules page, the Date field is display only.
Use the Swap Schedules page (SCH_MNG_SWAP) to swap two employees' schedules.
Navigation:
Select a payee and click the Swap Schedules button.
Change the start date and end date if required and click the Swap button. The whole day's schedule is swapped between the two employees, or all the days listed if it is a range of dates.
Important! Avoid using the swap feature to replace an absent payee. If you use the swap feature, and the payee reports an absence, the payee may not be correctly compensated for the absence. This is because the absence process refers to the swapped schedule (which might be for an off shift or different shift), rather than the payee's actual schedule, to determine the amount of time off.
Note: If you selected the Day View By option, the Date field on this page is display only.
Use the Assign Work Schedule page (SCH_ASSIGN) assign long-term schedules or alternate schedules.
Navigation:
You can use this page to assign work schedules to a payee and to access pages for viewing assigned schedules and for creating a schedule for a particular payee. These pages are the same as the pages that administrators use to assign schedules and create personal schedules.