Creating Document Templates
To create document templates, use the Template Definition (EP_TMPL_DEFN) component.
This topic provides an overview of document template setup, prerequisites, and discusses how to create document templates.
|
Page Name |
Definition Name |
Usage |
|---|---|---|
|
EP_TMPL_DEFN1 |
Define general template information. The information that you specify on this page controls the sections that are available on other pages of the component. |
|
|
EP_TMPL_DEFN2 |
Define document processes. The information that you specify here determines the functions that employees, managers, and other participants can perform in each step of the review process. |
|
|
EP_TAB_DTL |
Define tab labels and display order for use, if the performance documents are configured to display in tabbed format. |
|
|
EP_TMPL_DEFN3 |
Define document structure, add appropriate sections to the template, define override default section settings, and define the way each role interacts with the document section. |
|
|
EP_TMPL_DEFN4 |
Add criteria to sections. |
|
|
EP_TMPL_DEFN5 |
Load content from profiles. Profiles can be used to load criteria into sections. |
|
|
EP_CLONE_TMPL |
Clone templates. |
Document templates are defined using these pages:
General
Process
Tabs
Structure
Content
General Page
The General page defines processing options. It also enables you to activate steps in the business process. Using roles you can define which type of employees can participant in the performance or development process. You can also designate that documents using this template are recognized by the system as the official review.
By selecting Official Review, you indicate that the overall rating from the manager's document generated with this template is to be used to update salary planning information.
By selecting Define Criteria, you activate the Define Criteria step in the business process. It appears as the first step to be completed in the evaluation. The system also creates a document for the step, which allows the manager, employee or both to update and possibly add items to the criteria definition step.
By selecting Track Progress, you activate two or more steps in the business process. Depending on the setup on the Process page, one or more Checkpoint <number> steps appear on the Steps and Tasks pagelet on the left, followed by the Finalize Criteria step. The system creates corresponding documents for the manager and employee to enter comments against the items and share comments with each other. The manager can also complete checkpoints (shared discussion on the employee’s progress) and save progress copies.
By selecting Nominate Participants, you activate another group of steps in the business process. Nominate Participants and Review Participant Evaluations appear as steps on the Steps and Tasks pagelet. The system also creates corresponding documents for each person that accepts their nomination.
On this page, you also specify the method used to determine various document due dates to be displayed when a document is created.
If all business processes are enabled, corresponding steps appear in this order:
Define Criteria
Checkpoint <1–11>
Finalize Criteria
Nominate Participants
Review Participant Evaluations
Complete (or Review) Self Evaluation
Complete (or Review) Manager Evaluation
Process Page
The Process page shows the processes that are required to complete the document based on the choices you made on the General page. You select the actions that each role or roles can perform for each process. You also specify:
Whether the ratings that are entered by persons having that role are anonymous.
Approval rules for the manager's document.
Overall document processing rules.
Due dates for steps.
Tabs page
The Tabs page sets up the tabs to be used in displaying the document, if the document is configured to be shown in the tabbed format. Each tab in the document contains one or more sections defined in the Structure page. For example, you can set up the template to display a Goals tab that contains the Goals Section, and a Competencies tab that contains the Core Competencies section and the Job Competencies section.
Structure Page
The Structure page defines the sections that are included on documents. You select one or more sections to include in the document. The section definition is copied into the document template. After the section definition is copied, you can override any of the section settings.
For each section that you include in the document, you select the tab that the section is listed under (if tabs format is enabled on the General page) and indicate if the section should be included in the Define Criteria and Track Progress documents.
You can set up how the document roles interact with that section, the actions that different roles can perform, the content that is visible to managers and employees, and the writing tools that managers and employees can use to enter ratings and comments.
You can add multiple sections that require ratings. These sections can be any content type defined in the Manage Profile business process; such as goals, objectives, and competencies sections. Sections can also be defined to pull content from nonperson profiles created in the Manage Profile business process.
Each section may have different calculation methods. Because you can add sections that have different calculation methods, the following table illustrates how the calculation method that you select for the overall rating (the Overall Summary section) determines which calculation methods the other sections of the document can use and whether the calculation method permits section weighting:
|
Calculation Method for Overall Summary Section |
Calculation Methods Allowed for Other Sections |
Section Weighting Allowed? |
Rating Calculations |
|---|---|---|---|
|
Average |
Average |
Yes |
To determine item ratings, the user enters the item rating. If sub-items exist, the system calculates the item rating by taking the average of the sub-items. To determine section ratings, for sections other than Overall Summary, the system checks if there are items that are rated. If there are no other rated items, the user enters the section ratings. If there are rated items, the system determines if any of the items are weighted. If there are weighted items, the system calculates the rating as a weighted average of all of the item ratings in the section, taking individual item weights into account. Unrated items and items that are not weighted are ignored. If there are no weighted items, the system calculates the simple average of all rated items. Unrated items are ignored. To determine overall ratings, the system checks to see if there are other sections that are rated. If there are no other rated sections, the user enters the section rating. If there are rated sections, the system determines if the sections are weighted. If there are weighted sections, the system calculates the rating as a weighted average of all of the section ratings in the document, taking individual section weights into account. Unrated items and items that are not weighted are ignored. If there are no weighted sections, the system calculates the simple average of all rated items. |
|
Summation |
Average and Summation You must define review points in addition to numeric ratings for these sections. The system converts section ratings to review points to determine the overall rating. |
No |
To determine section ratings, for sections other than the Overall Summary section, the system determines the rating and corresponding review points for each item in the section. Only items with review points are considered. It sums the points to determine the total points for the section. To determine overall ratings, the system determines the calculation method for the other sections. If the section rating is calculated using the average method, the system converts the section rating to the appropriate number of review points entered for that section, using the rating model associated with the section. If the section rating is calculated using the summation method, the total review points for the section are used as the section points. The points from each section are summed and converted to a document rating using the from and to point range on the rating model that is used for the Overall Summary section. |
|
Review Band |
Average and Summation You must define review points in addition to numeric ratings for these sections. The system converts section ratings to review points to determine the overall rating. |
No |
The review band is only available for the Overall Summary section. To use this method, the rating model that is associated with the Overall Summary section must include a performance document band and define review points as well as point ranges (from points and to points). The system uses the points in its calculations and:
|
See Defining Sections and Template Definition - Structure Page.
Content Page
The Content page defines the specific job attributes or content items by which an employee is to be measured. Only those sections that were included on the Structure page are available on the Content page.
Criteria on the Content page can come from three sources:
Content Catalog.
Items and sub-items from the Content Items Detail (JPM_CAT_ITEMS) table. The system adds the Content Type field to the Load Content From Profile (EP_TMPL_DEFN5) page to narrow down the search.
Note: You can define unique coded categories of performance criteria. To do so, use Application Designer to create tables that store the items for the new criteria type. The tables that you create are then referenced as prompt tables in document templates and evaluations. Include the following fields in the table that you define: EP_ITEM_ID (key), EP_TITLE, EFFDT (optional key), EFF_STATUS (optional), EP_DESCR254 (optional)
Free-Form Items.
Free-form items are criteria that are not stored in the EP_APPR_ITEM, EP_APPR_B_ITEM, EP_TMPL_ITEM tables. Free-form items enable you to fine-tune evaluations to an individual employee or a small group of employees. You can add free-form criteria to the templates you use to create performance documents. You can also enable managers, employees, or both types of workers to add free-form assessment items after the performance document is generated.
Download from the nonperson profile.
Items and sub-items can be added from nonperson profile defined in the Manage Profiles business process. The system uses the specified profile type to identify content and automatically adds it to the Template Definition - Content page.
The criteria defined on the Template Definition - Content page are automatically pulled into the document that is generated using the specified template.
Before you create templates, complete the following tasks:
Set up the content catalog.
(Optional) Define job profiles.
Set up rating models.
Define document types.
Define document roles.
(Optional) Define performance calendars.
Define section definitions.
(JPN) Create review identifiers.
Note: You cannot create a template without a document type. In addition, a template must contain at least one section with a manager role selected.
See Understanding the Content Catalog.
See Understanding Profile Comparisons.
See Defining Roles.
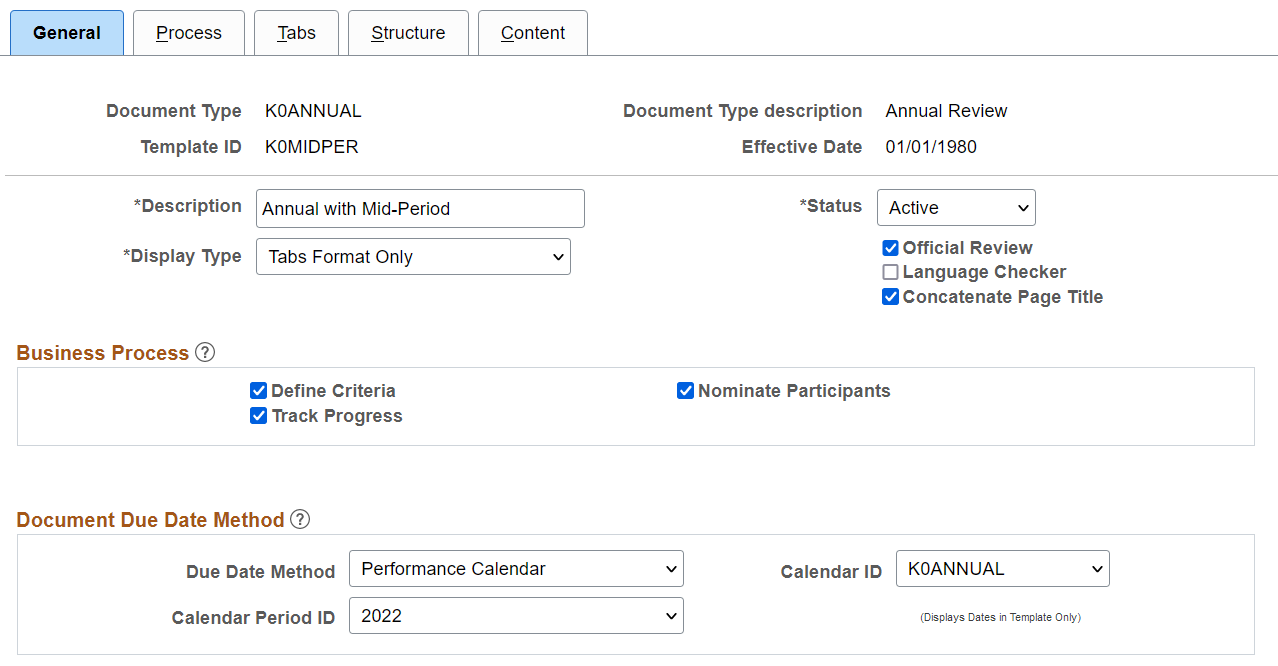
Use the Template Definition - General page (EP_TMPL_DEFN1) to define general template information.
The information that you specify on this page controls the sections that are available on other pages of the component.
Navigation:
(Fluid) Select the Talent Administrator home page and click the Performance Administration tile. On the left navigation, select .
(Classic)
This example illustrates the fields and controls on the Template Definition - General page (1 of 2).
This example illustrates the fields and controls on the Template Definition - General page (2 of 2).

Field or Control |
Description |
|---|---|
Description |
Enter a description of the document template. This description appears as a selection field when users create evaluations from the template. Therefore, each template within a document type should have a unique description. |
Display Type |
Select how the document should be displayed. Values are: Note: Fluid ePerformance only supports the Long Format Only option. Long Format Only: (default value) Document is displayed as one long document in sections and users need to scroll down to view the last section of the document. Tabs Format Only: Document is displayed in sections as represented by tabs. Toggle - Default Long: Document is displayed in long format by default and users can toggle between long and tabbed format. Toggle - Default Tabs: Document is displayed in tabbed format by default and users can toggle between long and tabbed format. Note: If the selected display type is not Long Format Only, make sure to define tabs for use (when users select to display documents in a tabbed format) on the Tabs page, and then specify a tab label for each section of the document on the Structure page. |
Official Review |
Select to designate that the overall rating from the manager's documents generated with this template is to be used to update salary planning information. If an employee has more than one official document, these processes use the results of the document with the latest period end date. The default value from the Document Type page appears here, but you can change it. |
Language Checker |
Select this check box to enable the use of the Language Checker tool when entering comments, for example, in the enabled Track Progress business process. Users can click a button on the document to have the system check for inappropriate language in the Comments and Results text boxes on the evaluation. |
Concatenate Page Title |
Select for the document page title to show both the step as well as the action to be performed for the step. For example, if the user is at the Define Criteria step and is supposed to update criteria on the page, the page title reads Define Criteria - Update if this option is selected. If this option is not selected, the page title reads Define Criteria instead. |
Business Process
Use this section to define, in addition to the evaluation steps (automatically included for manager and configurable for employee), additional business process steps to generate when this template is used to create performance documents. For each step selected here, the system displays a corresponding group box on the Process page where you can enter data to define the specifics of the step.
Field or Control |
Description |
|---|---|
Define Criteria |
Select to enable the Define Criteria step, which allows users to add goals and other content to the performance review. When you select this check box, the system displays:
|
Track Progress |
Select to enable the Track Progress step, where mid-period checkpoints can be created and criteria finalized. When you select this check box, the system displays:
|
Nominate Participants |
Select to enable the 360 degree feedback functionality where users can add and track participant nominations, provide peer reviews, and view participant feedback. When you select this check box, the system displays the Nominate Participants and Review Participant Feedback group boxes on the Process page. |
See Template Definition - Process Page and Template Definition - Structure Page to configure the business processes that are enabled in this section.
Document Due Date Method
Use this section to select the method used to determine due dates for various steps in the performance process. To use the Performance Calendar method, a performance calendar must exist for each performance period, and you must specify the Calendar ID and Calendar Period ID to use. The system uses the Calendar ID and Calendar Period ID that you selected to display the due dates in the due date fields on the Document Structure, General and Process pages. If you select the Template Setup method, then you must enter the number of days before or after the period end date for each due date on the Document Structure, General and Process pages.
Note: ePerformance integrates with Team Calendar to display performance document due dates. From the Team Calendar, you can view document due date reminders for your team members, and have the option to perform related actions, such as opening the document for update, or viewing other performance documents.
Field or Control |
Description |
|---|---|
Due Date Method |
Select the method used to calculate document due dates. Values are: Performance Calendar: Use the performance calendar defined in the system to determine the due dates when a document is created. Before selecting this option, make sure that a performance calendar already exists. Template Setup: Use the Document Due Days and Period Type fields specified by role in the Evaluations section to determine the due dates when a document is created. |
Calender ID and Calendar Period ID |
Enter the ID of a calendar and calendar period, if Performance Calendar is selected as the due date calculation method. When the calendar period ID is specified, the system populates potential due dates in the Calendar Period Due Date field in the Evaluations grid on this page, as well as the due dates that are displayed on the Process page. |
Comments Box Options
|
Field or Control |
Description |
|---|---|
|
Minimum Character Count |
Specify the minimum number of characters users must provide when they enter required review comments in documents. The system checks the character count on a document when:
Note: This option is Fluid ePerformance only. This value is required if at least one Comments Required option is selected for a role for the Evaluation step on the Template Definition - Structure Page. |
Evaluations - Participants
Field or Control |
Description |
|---|---|
Role |
Select one or more roles that can participate in evaluations that are generated using this document template. The manager and employee roles always appear in this list. You can add additional roles that you defined on the Roles page. To support peer reviews in evaluations, add a role (other than Manager or Employee) for which you can nominate participants and set up evaluation rules. |
Evaluation |
Select this check box to have the system create an evaluation for the role. For example, if this option is enabled for the employee, a self evaluation becomes available for the employee to provide evaluation feedback. The check box for the manager role is always selected and cannot be altered, because the system uses the manager evaluation as the central repository in which all the inputs and comments inserted for a review are captured and tracked. In other words, manager evaluation is required for all reviews. |
Allow Document Download |
Select to provide users of the corresponding role the ability to download documents locally and edit them offline. When a document is created from this document template, an icon becomes available on the document for users to view and download the document in rich text format (RTF). Note: (Fluid ePerformance only) When selected, the Export action becomes available in the document-level More Actions menu for users to view and download the document in RTF. |
Calendar Period Due Date |
Displays the evaluation due dates by role that are calculated using the calendar information entered in the Document Due Date Method group box. This field appears if the Performance Calendar is selected in the Due Date Method field. |
Document Due Days |
Enter the number of days that the document is due before or after the period end date. This field appears if the Template Setup is selected in the Due Date Method field. Documents always pertain to a specific period of time, defined by the period begin and period end dates. These dates are established when the document is created. The document due date appears on the Employee Performance pagelet that managers can use to monitor pending performance documents (if you have PeopleSoft Applications Portal). The due date is also used to generate the Late Reviews (EP_LATE_APPR) report and to run the Create Summary Data (EP_RPT_SNAP) process. To change the due date, the manager or the administrator must go into the employee evaluation and select the change due date button at the bottom of the evaluation. The evaluation must be In Progress to change the due date. Also managers can not change the due dates on their own documents. Only the administrator can do this. |
Period Type |
Select one of these values to indicate the period in which the number of days you entered should apply:
This field appears if the Template Setup is selected in the Due Date Method field. Note: If you entered 0 in the Document Due Days field, leave this field blank. |
Evaluations - Evaluation Document Header
If one or more Evaluation Document Header fields are selected, the system displays the information in the collapsible section located in the header area of the evaluation document for the corresponding role.
Field or Control |
Description |
|---|---|
Empl ID (employee ID) |
Select this check box to display the employe's ID in the document header. |
Step |
Select this check box to display the employee's step ID and description in the document header. You can locate the value for this field on the Salary Plan page. |
Grade |
Select this check box to display the employee's grade ID and description in the document header. You can locate the value for this field on the Salary Plan page. |
Dept ID (department ID) |
Select this check box to display the employee's department number and description in the document header. You can locate the value for this field on the Work Location page in Job Data component. |
Work Loc (work location) |
Select this check box to display the employee's location ID and name in the document header. You can locate the value for this field on the Work Location page in Job Data component. |
Yrs of Service (years of service) |
Select this check box to display the Years of Service field in the document header, showing the employee’s years of service in the company. When calculating years of service for this page, the system uses the current system date or the period end date. Note: If you access or print this document after the review period or the service period has ended, it reflects the service that was relevant as of the last day of the performance period. If you access or print this document prior to the period end date, it reflects the employee's service as of the current date. |
Yrs in Job (years in job) |
Select this check box to display the Years of Job field in the document header, showing the employee's years in the job. When calculating this value, the system uses the current system date or the period end date. Note: If you access or print this document after the review period or the service period has ended, it reflects the service that was relevant as of the last day of the performance period. If you access or print this document prior to the period end date, it reflects the employee's service as of the current date. |
Rating History |
Select this check box to display a link in the document header that takes the user to the Rating History page. Note: (Fluid ePerformance only) When selected, the Rating History action becomes available in the document-level More Actions menu. The Rating History page displays all of the past overall ratings of the employee for the document type on the template. |
Note: The Step, Grade, Department ID, and Work Location fields come from the Job table for the job code for which the document was created. The system selects the maximum effective-dated job record less than or equal to the period end date on the document.
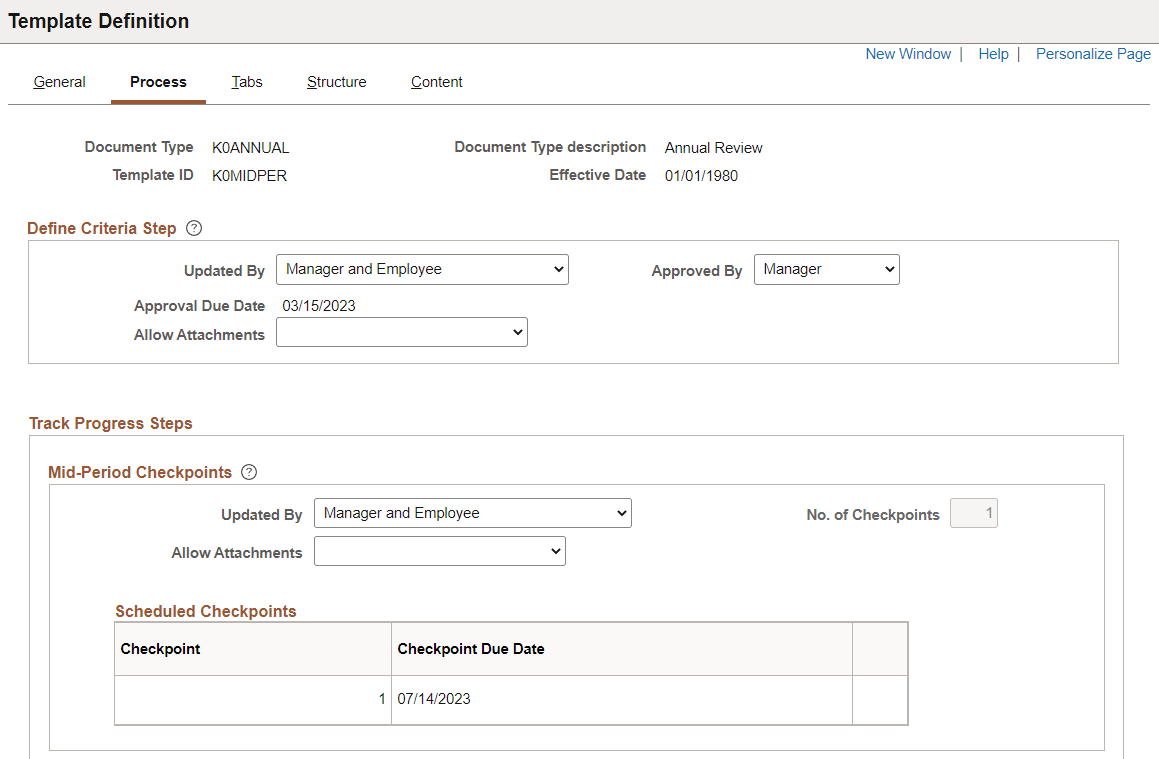
Use the Template Definition - Process page (EP_TMPL_DEFN2) to define document processes.
The information that you specify here determines the functions that employees, managers, and other participants can perform in each step of the review process.
Navigation:
(Fluid) Select the Talent Administrator home page and click the Performance Administration tile. On the left navigation, select .
(Classic)
This example illustrates the fields and controls on the Template Definition - Process page (1 of 3).
This example illustrates the fields and controls on the Template Definition - Process page (2 of 3).
This example illustrates the fields and controls on the Template Definition - Process page (3 of 3).
Note: The page sample shown here is for a performance document template. Pages for other document types may display different fields and sections.
Define Criteria Step
Use the fields in this section to establish the criteria by which the document will be updated and completed.
This section appears if the Define Criteria business process is selected on the General page.
Field or Control |
Description |
|---|---|
|
Updated By |
Select the user roles who can update criteria in documents created from this template. |
|
Approved By |
Select the user roles who can complete the Define Criteria step in documents created from this template. |
|
Approval Due in Days |
Enter the number of days After Period End Date or Before Period End Date to be the approval due date. This field appears if Template Setup is selected as the due date method. |
|
Approval Due Date |
Displays the calculated approval due date. This field appears if Performance Calendar is selected as the due date method. |
|
Allow Attachments |
Select to allow the manager, employee, or both to add attachments to documents in the Define Criteria step. Note: This option is Fluid ePerformance only. The system automatically selects:
|
Track Progress Steps
Use this section to define the number of checkpoint reviews to be available during the review period and specify roles of users who can add and update these reviews. Also, specify in this section the roles of users who can complete these steps and begin the evaluation.
This section appears if the Track Progress business process is selected on the General page and contains these sub-sections:
Mid-Period Checkpoints
Scheduled Checkpoints
Finalize Criteria
Mid-Period Checkpoints
Field or Control |
Description |
|---|---|
|
Updated By |
Select the user roles who can update the criteria in the Checkpoint <#> steps in documents. |
|
No. of Checkpoints (number of checkpoints) |
Enter the number (0 to 11) of checkpoints scheduled in documents. This field is available for entry only when the due date method is set to Template Setup on the Template Definition - General page. If the due date method is set to Performance Calendar, this field displays the number of checkpoints based on their due dates that are defined in the calendar. Note: The maximum number of checkpoints allowed is 11. |
|
Allow Attachments |
Select to allow the manager, employee, or both to add attachments to documents for the Checkpoint step. Note: This option is Fluid ePerformance only. The system automatically selects:
|
Scheduled Checkpoints
Depending on the number of checkpoints specified, the system populates the same number of rows in this grid.
Field or Control |
Description |
|---|---|
Checkpoint Due in Days and Checkpoint Period Basis |
Enter the number of days After Period End Date or Before Period End Date to be the checkpoint due date. These fields appear if Template Setup is selected as the due date method. |
Checkpoint Due Date |
Displays the calculated checkpoint due date. This field appears if Performance Calendar is selected as the due date method. |
Finalize Criteria
Field or Control |
Description |
|---|---|
|
Completed By |
Select the user roles who can complete the Finalize Criteria step in documents so the evaluation steps can begin. |
|
Copy Ratings to Evaluation |
Select for the system to copy the latest ratings from the Finalize Criteria step to the employee and manager evaluations. Only ratings entered by the employee will be copied to the employee's self evaluation and only ratings entered by the manager will be copied to the manager evaluation. Note: This option is Fluid ePerformance only. |
|
Copy Comments to Evaluation |
Select for the system to copy the latest comments from the Finalize Criteria step to the employee and manager evaluations. Only comments entered by the employee will be copied to the employee's self evaluation and only comments entered by the manager will be copied to the manager evaluation. |
|
Final Due in Days |
Enter the number of days After Period End Date or Before Period End Date to be the criteria completion due date. These fields appear if Template Setup is selected as the due date method. |
|
Final Due Date |
Displays the calculated criteria completion due date. This field appears if Performance Calendar is selected as the due date method. |
|
Allow Attachments |
Select to allow the manager, employee, or both to add attachments to documents for the Finalize Criteria step. Note: This option is Fluid ePerformance only. The system automatically selects:
|
Nominate Participants
Use the fields in this section to establish who can update and submit the names of people that should participate in the review.
This section appears if the Nominate Participants business process is selected on the General page.
Field or Control |
Description |
|---|---|
Added By |
Select the user roles who can add the name of people to participate in the review. |
Submitted By |
Select the user roles who can submit the names of nominees to participate in the review. |
|
Allow both Manager and Employee to submit |
Select this check box to allow both the manager and employee to submit participant nominations for the review. If selected, the system ignores the Submitted By field. It sets Manager as the default value if the field is blank. If this check box is cleared, the system uses the Submitted By field value to determine the role that can submit nominations. Note: This option is Fluid ePerformance only. |
Tracked By |
Select the user roles who can track the nomination process. |
Nominations in days |
Enter the number of days After Period End Date or Before Period End Date to be the due date for nominating review participants. |
Calendar Due Date |
Displays the calculated nomination due date. This field appears if Performance Calendar is selected as the due date method. |
Allow participant feedback at anytime |
Select to allow participants to start their evaluations of the employee anytime after documents are started. When this option is selected, authorized users can add, submit, and track nominations throughout the evaluation cycle - starting from the Define Criteria step (if enabled) until the substep to update manager evaluation is completed. Participants are able to accept and start their evaluations during the same period of time as well. If this option is not selected, authorized users can add nominations as soon as the first step is in progress but they can submit nominations only after the step to update manager evaluation has started (when the document status is changed to Evaluation in Progress). |
Employee can view before submit |
Select to allow employees to view the nominees that were added by the manager before the nominees are submitted. This field appears if the employee role is included in the Added By field. |
Employee can delete before submit |
Select to allow employees to delete the nominees that were added by the manager before the nominees are submitted. This field appears if the employee role is included in the Added By field. |
Nomination Role Rules
|
Field or Control |
Description |
|---|---|
|
Minimum Required and Maximum Required |
Specify the minimum and maximum nominations allowed for the corresponding non-manager or non-employee role that is added to the Evaluations section on the General page. (Fluid ePerformance only) If the Allow participant feedback at anytime option is selected, the Minimum Required field becomes uneditable. |
|
Anonymity for Employee and Anonymity for Manager |
Select if you want participants of the corresponding role to remain anonymous to the employee, the manager, or both, after nomination submission. Note: (Fluid ePerformance only) When selected, the system masks the participant identity after the nomination is submitted and is in the Pending, Declined, or Withdrawn status. The system uses the anonymity options in the Review Participant Evalutaions section to mask the participant identity for accepted nominations. It is recommended that both sets of anonymity options be identical. When selected, the system displays participant names in this format on the page when you select the Track Nominations link: <role name><sequence #>, for example, Peer1 and Peer2. Note: (Fluid ePerformance only) When selected, participant names for nominations that are Pending, Declined, or Withdrawn are displayed in the <role name><sequence #> format on the Add/Review Participants page. |
Review Participant Evaluations
Use this section to establish who can access and view the names of people that are participating in the evaluation.
This section appears if the Nominate Participants business process is selected on the Template Definition - General Page.
Field or Control |
Description |
|---|---|
Track Evaluations |
Select the user roles who can see the names of people who are participating in the review using the Track Nominations link of the Nominate Participants step. (Fluid ePerformance only) Users track participant evaluations on the
Add/Review Participants page.
|
View Evaluations |
Select the user roles who can drill down to view participants’ evaluations using the View link of the Review Participant Evaluations step. If you specify user roles in this field, you should do so in the Track Evaluations field as well. (Fluid ePerformance only) Users view participant evaluations on the
Add/Review Participants page.
|
Anonymity
The Anonymity group box allows you to indicate if the participants reviewing the evaluation (for roles that are added to the Evaluations section on the General page, except Manager and Employee) should be anonymous to the employee, manager, or both.
Field or Control |
Description |
|---|---|
Anonymity for Employee and Anonymity for Manager |
Select to hide the names of participants of the corresponding role from the employee, manager or both. The system masks the participant’s name using this format: <role name><sequence #>. For example, if you select the Anonymity for Employee field to hide the names of all participants of the Peer role from the employee, the system displays participants’ names as Peer1, Peer2 and so on when the employee reviews participants’ evaluations using the View link of the Review Participant Evaluations step, if enabled. Similarly, if the Anonymity for Manager option is enabled for the Peer role, the system displays participants’ names the same way when the manager views participants’ evaluations using View link of the Review Participant Evaluations step, or reviews participants’ feedback at the section level, item level, and sub-item level that appears in the manager document. Note: (Fluid ePerformance) When selected, participant names for nominations that are Accepted, In Progress, Canceled or Completed are displayed in the <role name><sequence #> format on the Add/Review Participants page and anywhere in the document where participant feedback is displayed. The participant's photo and project information (if available) are not shown. |
Display Names in Mgr Doc (display names in manager document) |
Select this check box to have the participants’ names and job titles appear in the Other Participants collapsible section below the header area of the manager document. The system enables this check box only when the Anonymity for Manager check box is deselected for the role. If the role is anonymous to the manager, then the system does not display the names on the manager document. |
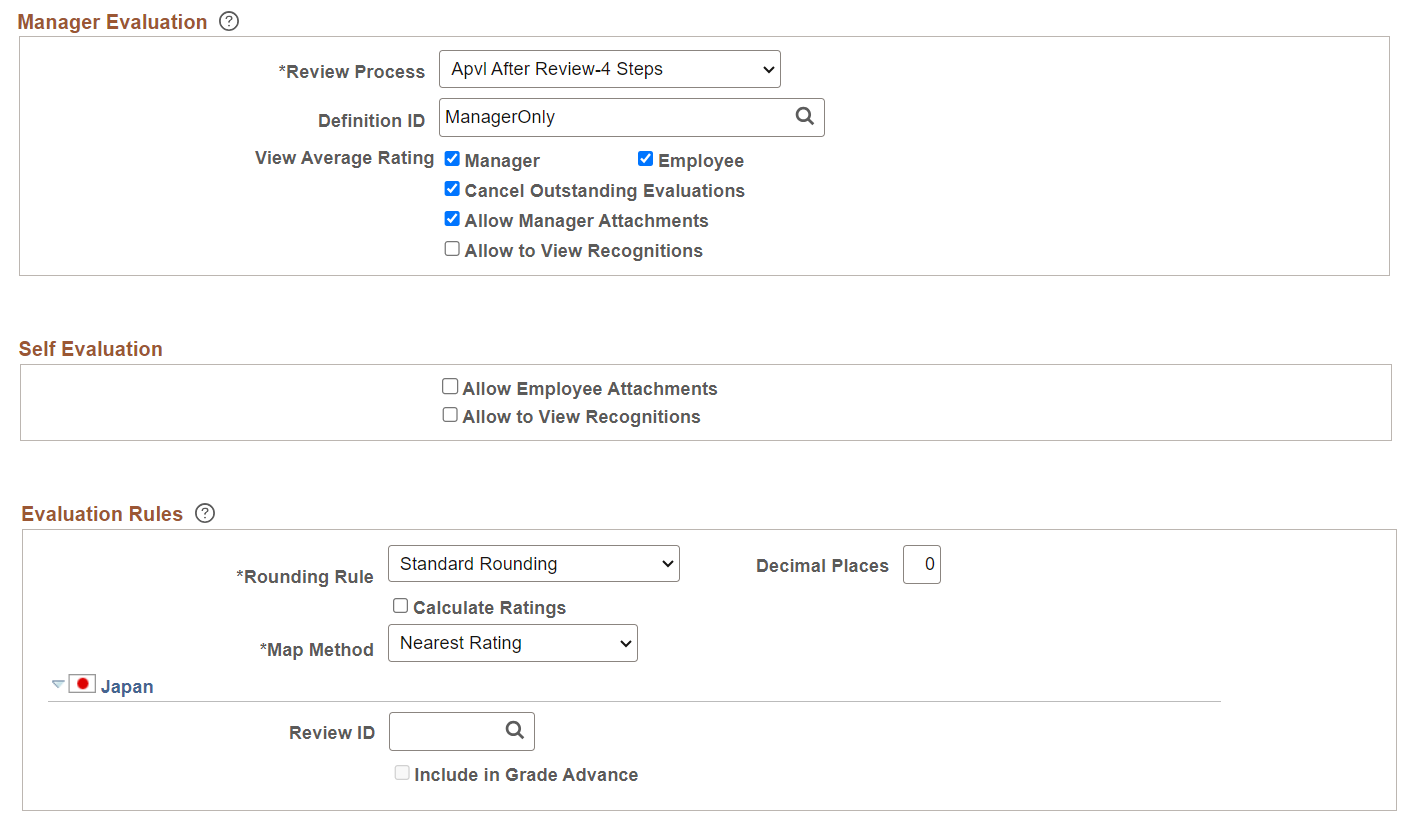
Manager Evaluation
Field or Control |
Description |
|---|---|
|
Review Process |
Select the sequence by which the review is completed. This field identifies the process for reviewing a document with the employee, and when this review takes place relative to a formal approval of the document. It also controls when actions such as Submit for Approval, Complete, Share with Employee, and Request Acknowledgement are available to the manager. Options are:
|
|
Definition ID |
Select the approval definition that determines the chain of approvals a document must go through when the manager clicks the Submit button on the performance document. The default value selected on the Document Type page appears here, but you can change it. This field applies only if the selected review process includes approval. Valid options are:
|
|
View Average Rating |
If you want to view a graphical representation of the ratings on the document for the manager or employee, select one or both check boxes. |
|
Cancel Outstanding Evaluations |
Select this check box for the system to automatically cancel the employee's self-evaluation that is not completed as well as the nominations that are not accepted when the manager evaluation moves past the Evaluation in Progress status. Note: Oracle recommends that you enable this option, which can be used to prevent late evaluations from coming in and altering the average ratings. |
|
Allow Manager Attachments |
This check box enables you to turn on the attachment capability for manager documents. When you select this check box, the system:
This allows the manager to attach documents and specify user access when the evaluation is in the Evaluation in Progress status. This check box is selected automatically, if the manager is allowed to add attachments in the Define Criteria, Checkpoint, or Finalize Criteria step. Note: This attachment section is visible in the manager document to users who have access to attachments that were uploaded to the manager document. However, only the document owner (manager) can add attachments to the document. The manager has the ability to add and delete one or more attachments when the manager document status is Evaluation in Progress. Once the document moves past the Evaluation in Progress status or is canceled, the system does not allow attachments to be added or deleted. They become read-only. |
|
Allow to View Recognitions |
Select this check box for managers to be able to view employees' recognition posts on performance documents in the Evaluation in Progress status. This check box appears if the Enable Recognition option is selected on the HCM Options Page. |
Self Evaluation
Field or Control |
Description |
|---|---|
|
Allow Employee Attachments |
This check box enables you to turn on the attachment capability for employee self-evaluations. When you select this check box, the system:
This allows the employee to attach documents and specify user access when the evaluation is in the Evaluation in Progress status. This check box is selected automatically, if the employee is allowed to add attachments in the Define Criteria, Checkpoint, or Finalize Criteria step. Note: This attachment section is visible in the self-evaluation to users who have access to attachments that were uploaded to the self-evaluation. However, only the document owner (employee) can add attachments to the document. The employee has the ability to add and delete one or more attachments when the document status is Evaluation in Progress. Once the document moves past the Evaluation in Progress status or is canceled, the system does not allow attachments to be added or deleted. They become read-only. |
|
Allow to View Recognitions |
Select this check box for employees to be able to view their own recognition posts on performance documents in the Evaluation in Progress status. This check box appears if the Enable Recognition option is selected on the HCM Options Page. |
Evaluation Rules
Use this section to define rules for calculating ratings that apply to the document as a whole.
Field or Control |
Description |
|---|---|
Rounding Rule |
Specify how the system should round calculated ratings whenever the system uses the Average calculation method. Values are Round Down Round Up Standard Rounding With standard rounding, the system rounds up on 5 and rounds down on 4. For example, 2.5 rounds to 3, while 2.4 rounds down to 2. This works in combination with the number of decimal places the system rounds to. For one decimal place, 2.45 rounds to 2.5, while 2.44 rounds to 2.4. |
Decimal Places |
If you select a rounding rule, enter the number of decimal places for rounding. No more than two decimal places are allowed. |
Calculate Ratings |
Select this check box if you want the system to automatically perform all roll-up calculations to calculate ratings for items (if sub-items exist), section summaries, and overall summaries. This feature is selected by default. When selected, the Calculate All Ratings option becomes available in the document, and the Calculate Rating button appears next to ratings fields where system calculation is available in the final evaluation. To have evaluators manually enter all ratings, deselect this check box. Note: (Fluid ePerformance only) The Calculate All Ratings option is not supported. |
Map Method |
If the Calculate Ratings check box is selected, select how the system should map numeric ratings to qualitative ratings when there is no exact match after the rounding rule is applied. For example, the calculated rating 2.7 falls between numeric ratings defined on the Rating Model Table page as 1, 2, 3, and 4; the mapping method defines the numeric rating to map to the value 2.7. Available values are: Nearest Rating Next Highest Rating Next Lowest Rating For example, assume the rating model has the following entries: A = Superior (numeric rating = 1) B = Good (numeric rating = 2) C = Average (numeric rating = 3) D = Needs improvement (numeric rating = 4) If the system calculates a rating of 2.7 (between Good and Average, but closer to Average), the mapping method tells the system which entry to pick:
|
(JPN) Review ID |
To enable the (JPN) Salary Planning process by review ID, select the ID. You define IDs on the Define Review JPN page. You can only select documents defined for the selected document type. |
(JPN) Include in Grade Advance (applicable for grade advance) |
Select this check box if the selected review ID is eligible for the Grade Advance feature of the Plan Salaries business process. It is selected automatically if theInclude in Grade Advance check box is selected on the Define Review JPN page. |
Use the Template Definition - Tabs page (EP_TAB_DTL) to define tab labels and display order for use, if the performance documents are configured to display in tabbed format.
Navigation:
(Fluid) Select the Talent Administrator home page and click the Performance Administration tile. On the left navigation, select
(Classic)
This example illustrates the fields and controls on the Template Definition - Tabs page.
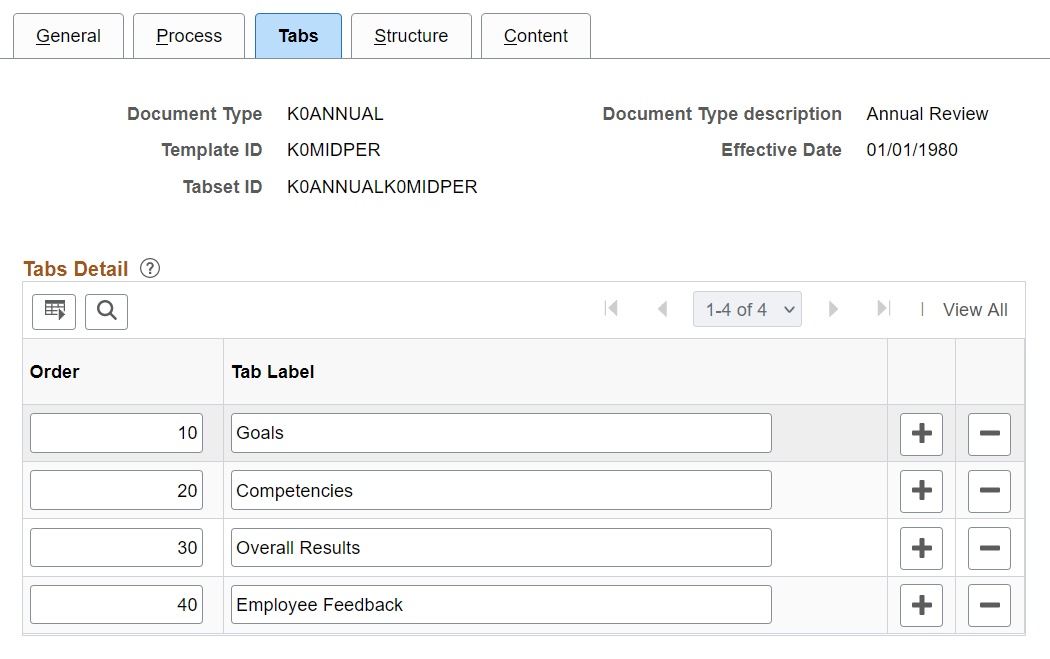
Use this section to define tab labels and display order for use when the performance documents are displayed in tabbed format.
To set up the tabbed display of document, you need to associate each section of the document template with a tab label. The association is established on the Template Definition - Structure page. When a user selects to view the document in a tabbed format at runtime, the tab with the lowest number appears first, followed by the second lowest, and so on.
When you remove a tab from this grid, the system performs a check and displays a warning message if the tab is currently associated with one or more sections.
The Tabs Detail section is unavailable for entry if the if the Display Type field on the General page is set to Long Format Only.
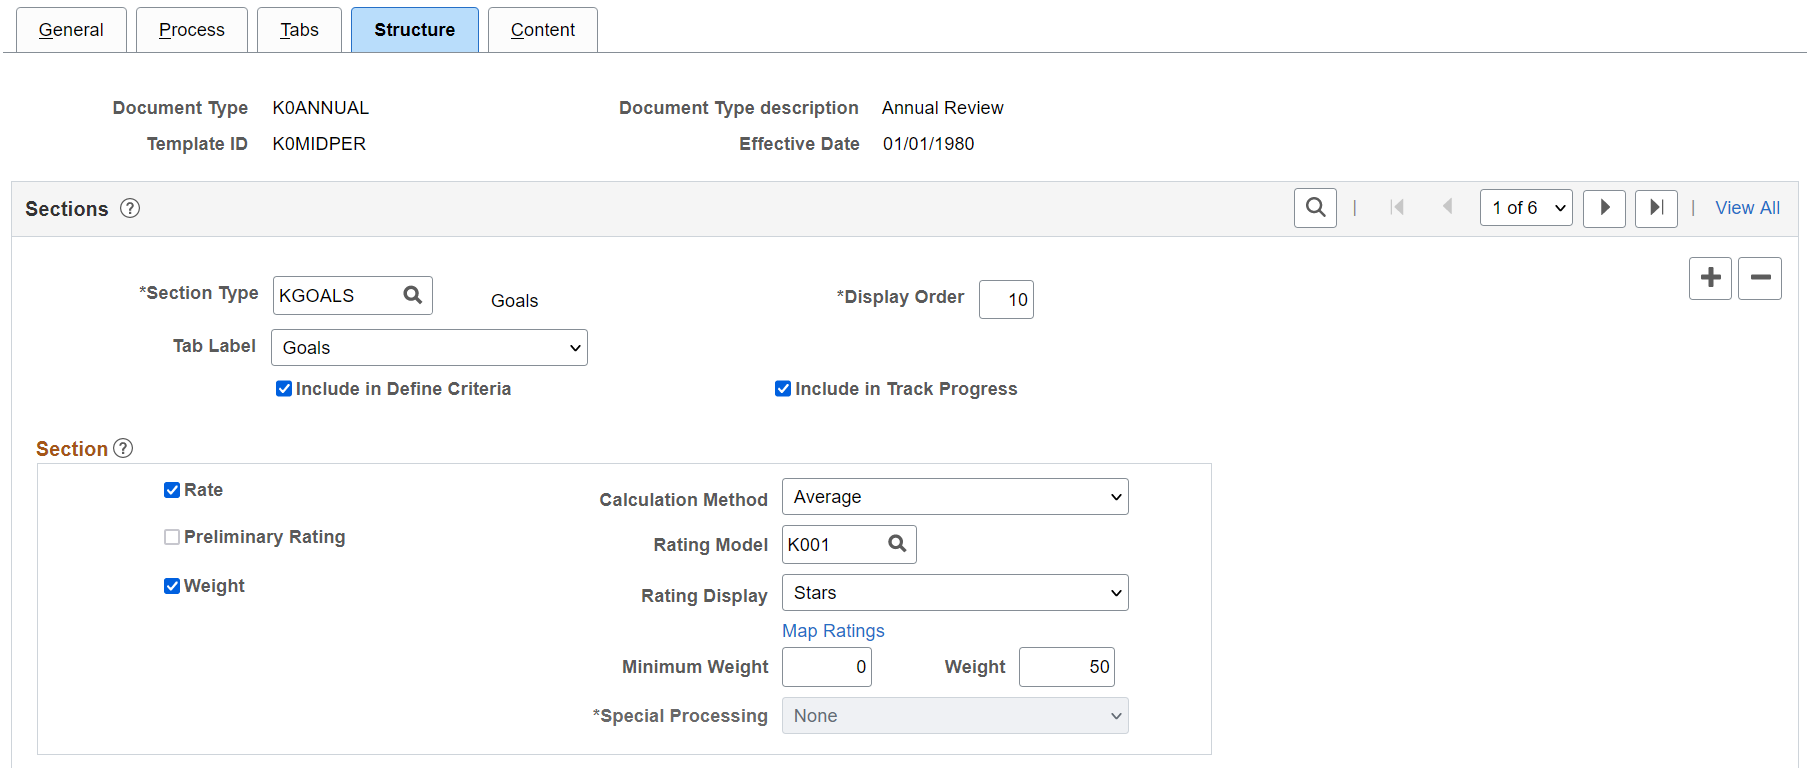
Use the Template Definition - Structure page (EP_TMPL_DEFN3) to define document structure, add appropriate sections to the template, define override default section settings, and define the way each role interacts with the document section.
Navigation:
(Fluid) Select the Talent Administrator home page and click the Performance Administration tile. On the left navigation, select .
(Classic)
This example illustrates the fields and controls on the Template Definition - Structure page (1 of 3).
This example illustrates the fields and controls on the Template Definition - Structure page (2 of 3).
This example illustrates the fields and controls on the Template Definition - Structure page (3 of 3).
Use this page to select sections (defined in the Section Definition page) to be included in documents that are generated from this template. For each selected document section, you specify information such as whether or not its content includes items and sub-items, and that these items and sub-items are rated. In addition, you identify properties that will be tracked for the document section, along with the rules and properties that should be available in the document for each user role that accesses the document section.
Note: Most of the fields on this page are similar to the Section Definition Page.
Field or Control |
Description |
|---|---|
Section Type |
Select a section to include in the documents that are generated from this template. The sections available for selection are those that were previously defined using the Section Definition page. When you select a section, the information defined for that section becomes the default information for this section on the Template Definition - Structure page. You can override any default value. Note: You can include only one Overall Summary section on each template. |
Tab Label |
Select a tab under which the section is displayed, when the document is set to displayed in tabbed format. Values that are available in this field are defined on the Template Definition - Tabs page. Each tab must contain at least one section. Every section, with the exception of the Signature and eSignature sections, needs to be included in a tab. |
Include in Define Criteria |
Select to include this section as part of the Define Criteria step. This check box appears if the Define Criteria business process is selected on the Template Definition - General page. When this option is selected, the Define Criteria Step - Role Rules group box appears on this page. |
Include in Track Progress |
Select to include this section as part of the Track Progress step. This check box appears if the Track Progress business process is selected on the Template Definition - General page. When this option is selected, the Track Progress Step - Role Rules group box appears on this page. |
Display Order |
Enter a unique sequence number to specify the relative order in which this section appears in the document. The default value for the first section is 10. The system increments the value for subsequent sections by ten. If, for example, you override a sequence number to 25, the system assigns 35 as the next sequence number. Note: If you enter sequence numbers out of order, the system automatically reorders them when you exit the Template Definition component and reopen it. |
Section, Items, Sub-Items, and Profile Management
The fields that appear in these group boxes default to the values you defined for this section on the Section Definition page. You can override these default values here in templates.
See the Section Definition Page topic for field definitions in these sections and an example on how profiles, when selected, are used to populate content items in new documents that are created for employees.
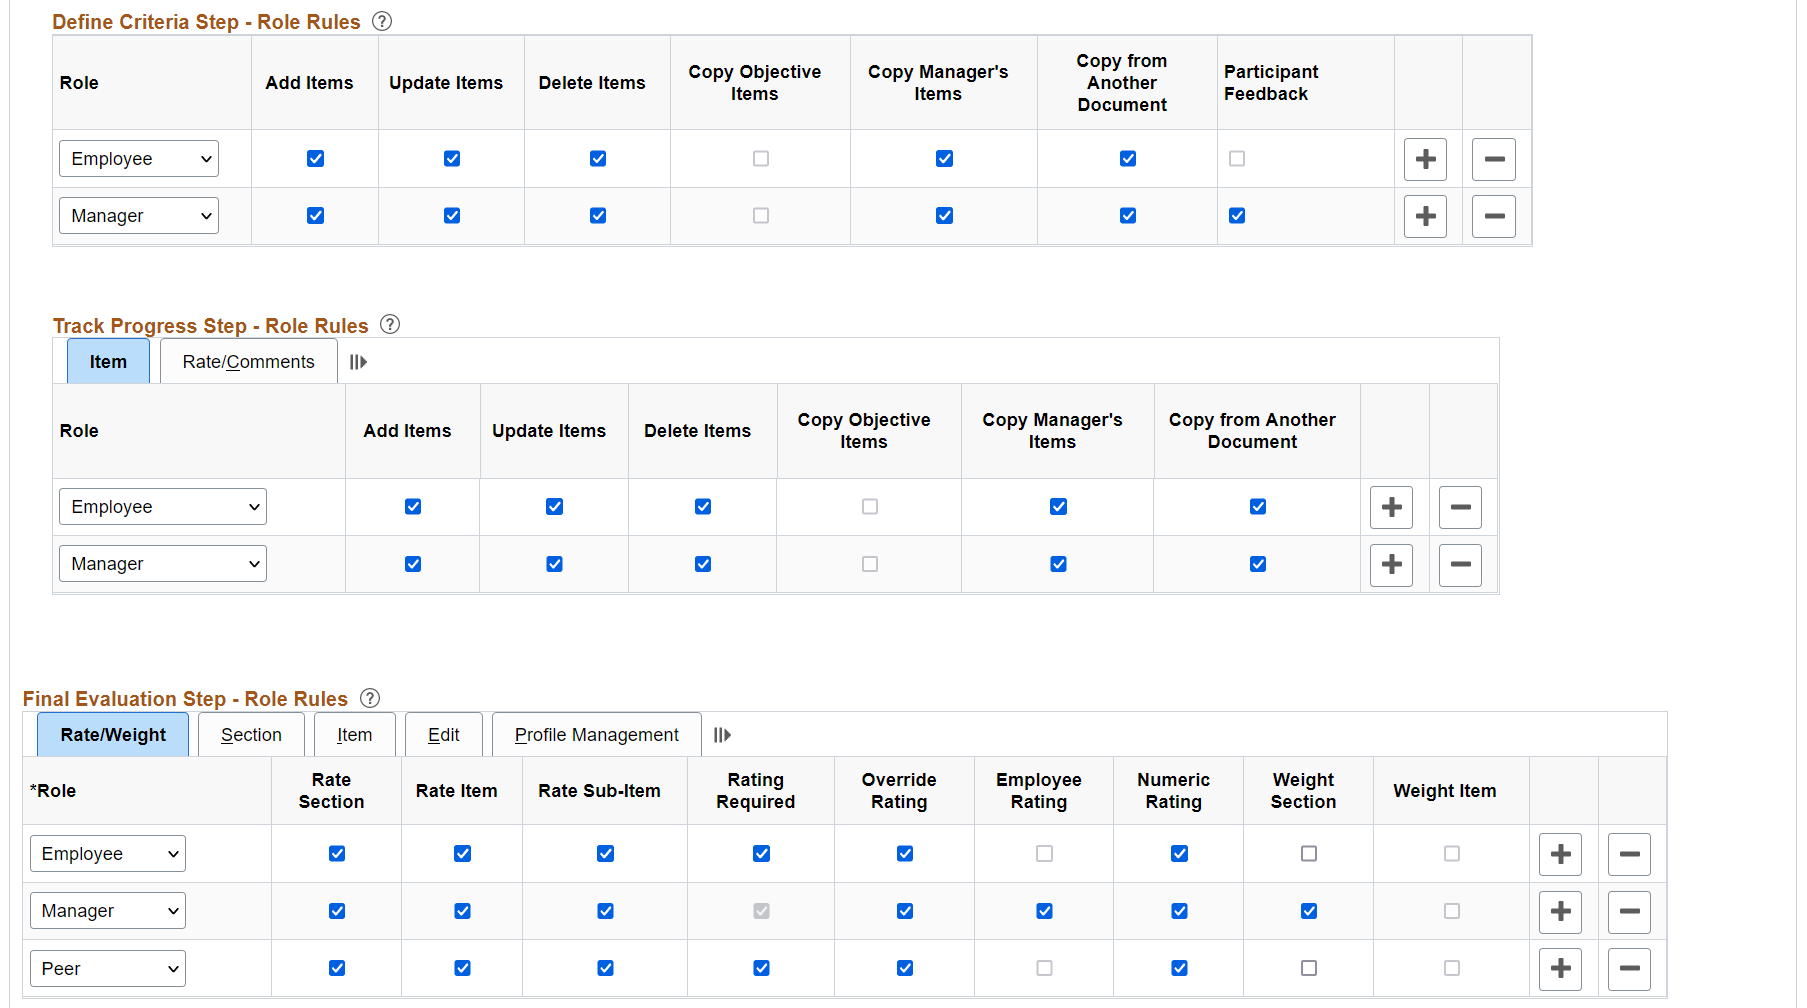
Define Criteria Step - Role Rules
Use the fields in this section to define what managers and employees can do with items in the Define Criteria step of the review process. Select the appropriate check boxes to grant the manager and employee permissions to add items, update items, delete items, copy objective items, copy manager's items, copy items from other documents and view participant feedback on the evaluation document when it's created.
This section appears if the Include in Define Criteria check box is selected.
(Overall Summary section only) All fields in this section are not editable. The Overall Summary section does not apply to the Defined Criteria step of the review process.
|
Field or Control |
Description |
|---|---|
|
Add Items |
Select this check box to enable the role to add items to this section during this step. If the role can add items, they can also update and delete items that they add. |
|
Update Items |
Select this check box to enable the role to update items in this section during this step that were added by a source other than themselves; for example, the manager, the profile, or the template. In addition, if the item was cascaded down to the document, they can also update it. Note: The Title, Description and Measurement fields are unavailable for entry if they come from the Content Catalog. |
|
Delete Items |
Select this check box to enable the role to delete items during this step that were added by a source other than themselves; for example, the manager, the profile, or the template. In addition, if the item was cascaded down to the document, they can also delete it. |
|
Copy Objective Items |
Select this check box to enable the role to copy business objective items into documents. This option is editable if the section's special processing is Business Objectives, and available only to the Manager and Employee roles. |
|
Copy Manager's Items |
Select this check box to enable the role to copy items into documents from the ones that were created for the manager listed, with matching document usage (performance or development), document type, section, content type and evaluation period. This option is available only to these two roles: Manager: the user of this role can copy items from documents where he or she is the person to be evaluated. Employee: the user of this role can copy items from documents where his or her manager is the person to be evaluated. |
|
Copy from Another Document |
Select this check box to enable the role to copy items into documents from the ones that he or she owns, with matching document usage, document type, section, and content type. This option is available only to these two roles: Manager: the user of this role can copy items from any documents that he or she owns as a manager, regardless of document status. Employee: the user of this role can copy items from any of his or her previous documents. See Select a Document Page and Copy <section item> from My Documents or Copy <section item> from My Team’s Documents Page. |
|
Participant Feedback |
Select this check box to enable managers to view completed participant (for example, users of Peer or Other roles) feedback directly on manager documents without any page transfer. This option is applicable to the Manager role only. It becomes available for editing if the Allow participant feedback at anytime option is enabled in the Nominate Participants section on the Template Definition - Process Page. |
Track Progress Step - Role Rules
Use the fields in this section to define what managers and employees can do with items in the Track Progress step of the evaluation process. Select the appropriate check boxes to grant the manager and employee permissions to add items, update items, delete items, copy objective items, copy manager's items, copy items from other documents, and view participant feedback on the evaluation document when it's created.
This section appears if the Track Progress business process is selected on the Template Definition - General page.
The Track Progress step shares a number of role rule options with the Define Criteria step.
(Overall Summary section only) The only editable field in this role rules section is Section Comments.
Field or Control |
Description |
|---|---|
|
Rate Section |
Select to enable the role to assign a section rating. This field is available if the Rate option in the Section region is selected for the section. This option is Fluid ePerformance only. |
|
Rate Item |
Select to enable the role to assign an item rating. This field is available if the Rate option in the Items region is selected for the section. This option is Fluid ePerformance only. |
|
Rate Sub-Item |
Select to enable the role to assign a sub-item rating. This field is available if the Rate option in the Items region is selected for the section. This option is Fluid ePerformance only. |
Item Comments |
Select to display the text field at the item level for role users to enter comments during the Track Progress step. The employee and manager can share comments as needed. Select to enable at least one Item Comments or Section Comments option in any section for the manager role. |
Section Comments |
Select to display the text field at the section level for role users to enter comments during the Track Progress step. The employee and manager can share comments as needed. Select to enable at least one Item Comments or Section Comments option in any section for the manager role. |
Final Evaluation Step - Role Rules
This section has several tabs that you can use to define how managers and employees can use different fields on the document you are creating to evaluate themselves or an employee.
Here are the five tabs:
Rate/Weight
Section
Item
Edit
Profile Management
Final Evaluation Step – Role Rules - Rate/Weight
Field or Control |
Description |
|---|---|
Role |
Select the role for which you are defining rules. |
Rate Section |
Select this check box to enable the role to assign a section rating. This field is available if the Rate option in the Section region is selected for the section. |
Rate Item |
Select this check box to enable the role to rate items in this section. This field is enabled if the Rate option in the Items region is selected for the section. |
Rate Sub-Item |
Select this check box to enable the role to rate sub-items in this section. This field is enabled if Rate is selected in the Items page region for the section. |
|
Rating Required |
If the role can rate sections, items, or sub-items in this step, select
this check box if you want to require the role to provide ratings at these levels.
This option is selected and not editable for the manager role. This option is Fluid ePerformance only. |
Override Rating |
Select this check box to have the Override Rating button appear next to the Calculate button on the evaluation. The role can click this button to modify the calculated rating. Note: (Fluid ePerformance only) Use the rating display (Drop-Down Box or Stars) to override current ratings. This option is enabled when the Calculate Ratings check box is selected on the Template Definition - Process page. Warning! Do not use this feature with the Summation calculation method. |
Employee Rating |
Select this check box to display the employee’s rating (from the completed self-evaluation) in the manager document for this section. Note: (Fluid ePerformance only) This option is not used. Employee rating, if shared, is always displayed in the manager document. |
Numeric Rating |
Select this check box to have the evaluation display both the rating and the numeric equivalent or points of the rating that you define on the Rating Model Definition page. This option is enabled if Rate option in the Section region is selected for the section. |
Weight Section |
Select this check box to enable the role to assign a section weighting. This option is enabled if Weight option in the Section region is selected for the section. The Weight option is available for editing if the Rate option is enabled at the section level. |
Weight Item |
Select this check box to enable the role to weight items in this section. This option is enabled if Weight option in the Items region is selected for the section. The Weight option is available for editing if the Rate option is enabled at the item level. |
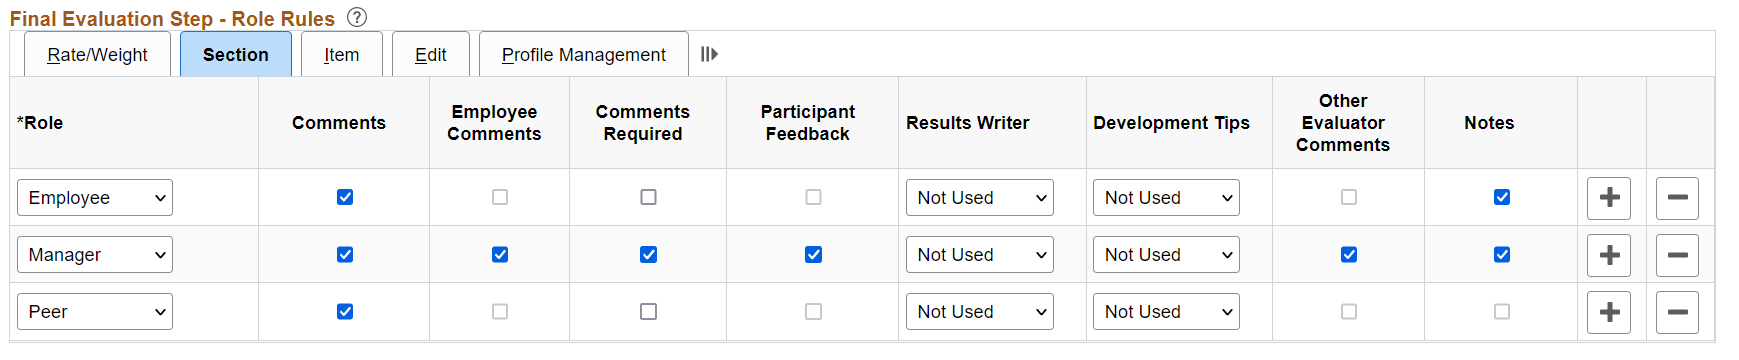
Final Evaluation Step – Role Rules - Section
This example illustrates the fields and controls on the Final Evaluation Step - Role Rules: Section on the Structure page.
Field or Control |
Description |
|---|---|
Comments |
Select this check box to have the section contain an area for users to add a free-form description of the employee's performance on the section. If you do not select this check box for a role, the other selections for the role are not available. |
Employee Comments |
Select this check box to display the employee’s comments (from the completed self evaluation) in the manager document for this section. This option is available to the Manager role only; it becomes editable if the Comments option is selected for the Employee role. Note: (Fluid ePerformance only) This option is not used. Employee comment, if shared, is always displayed in the manager document. |
|
Comments Required |
If the role can provide comments for sections in this step, select this
check box if you want to require the role to provide comments.
This option is Fluid ePerformance only. |
Participant Feedback |
Select this check box to enable managers to view completed participant (for example, users of Peer or Other roles) feedback directly on manager documents without any page transfer. Participant feedback, if available, can be displayed at the section, item and sub-item levels based on template setup. This option is available to the Manager role row only. If enabled, managers can view participant feedback when they edit or view manager documents; similarly, administrators and indirect managers can view participant feedback when they view manager documents. Video: Consolidated Participant Feedback Display in Manager Evaluations |
Results Writer |
Select an option to have text suggestions from the Results Writer tool appear on the Suggested Results page when the user clicks the Writing Tools link on an evaluation. Results Writer suggestions are predefined statements that describe the employee's proficiency level for the associated item. The Results Writer tool is designed for competency and sub-competency sections of an evaluation. This field is enabled only if the Comments check box is selected for the role The available options are:
|
Development Tips |
Select an option to have text suggestions from the Development Tips tool appear on the Suggested Results page when the user clicks the Writing Tools link on an evaluation. Development tips are predefined statements that suggest how employees can improve proficiency at the associated item and are designed primarily for competency and sub-competency sections of a evaluation. However, you can enable this feature for other sections of an evaluation as well. This field is enabled only if the Comments check box is selected for the role The available options are:
|
Other Evaluator Comments |
Select this check box to have comments that were entered by other evaluators appear on the Suggested Results page for the role. Only comments from completed evaluations that were entered for the same summary section appear on the list. This field is enabled only if the Comments check box is selected and the role is manager. |
Notes |
Select this check box to have performance notes that the employee or manager entered during the Define Criteria or Track Progress step appear on the Suggested Results page. Only notes that were entered for the same item by the same person appear on the list. In other words, the manager cannot see notes that were entered by the employee. The writing tool of the section summary displays all notes that you entered for items belonging to that section. The writing tool of an item only shows notes that you entered for that item. The Performance Notes icon appears in all items of this section when the Notes check box is selected. This field is enabled only if the Comments check box is selected for the role. |
Note: The Notepad functionality allows additional keys to be stored to support the retrieving of notes at the item level from the writing tools feature. The additional keys enable the Notepad to store the item ID for notes taken at the item level during the Define Criteria or Track Progress step. Capturing this information allows the system to display only the notes taken for an item when a user selects the writing tool feature at the item level within an evaluation.
When the writing tools link is selected at the item level on the evaluation, the system only displays the notes taken for that item. Therefore, when a user takes a note on an item, the system additionally stores the item ID in the Notepad. When the user later selects the Writing Tools link for a comments box at the item level the system only displays notes that were taken against that item.
If the user selects the writing tool at a section level, the system displays all notes for every item within that section.
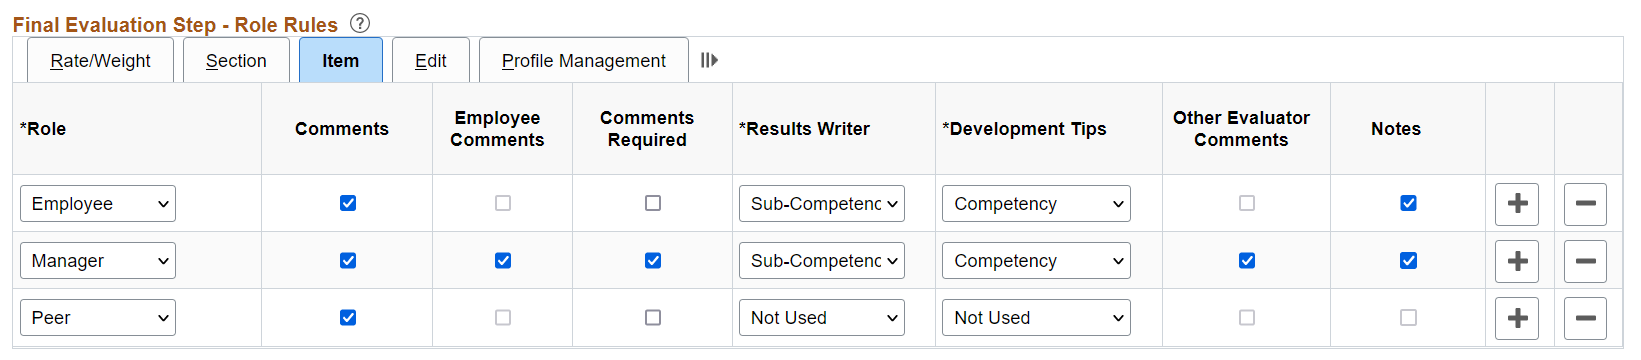
Final Evaluation Step – Role Rules - Item
This example illustrates the fields and controls on the Final Evaluation Step - Role Rules: Item tab on the Structure page.
Field or Control |
Description |
|---|---|
Comments |
Select this check box to have items in the section contain an area for users to add a free-form description of the employee's performance on the item. If this check box is selected, the Results Writer, Development Tips, Other Evaluator Comments, and Notes check boxes are enabled for the role. The use of these fields is analogous to the same fields under the Section tab. |
Employee Comments |
Select this check box to display the employee’s comments (from the completed self evaluation) in the manager document for each section item. Note: (Fluid ePerformance only) This option is not used. Employee comment, if shared, is always displayed in the manager document. |
|
Comments Required |
If the role can provide comments for items in this step, select this check
box if you want to require the role to provide comments.
This options is Fluid ePerformance only. |
Results Writer |
Same as Section tab. |
Development Tips |
Same as Section tab. |
Other Evaluator Comments |
Same as Section tab. |
Notes |
Same as Section tab. |
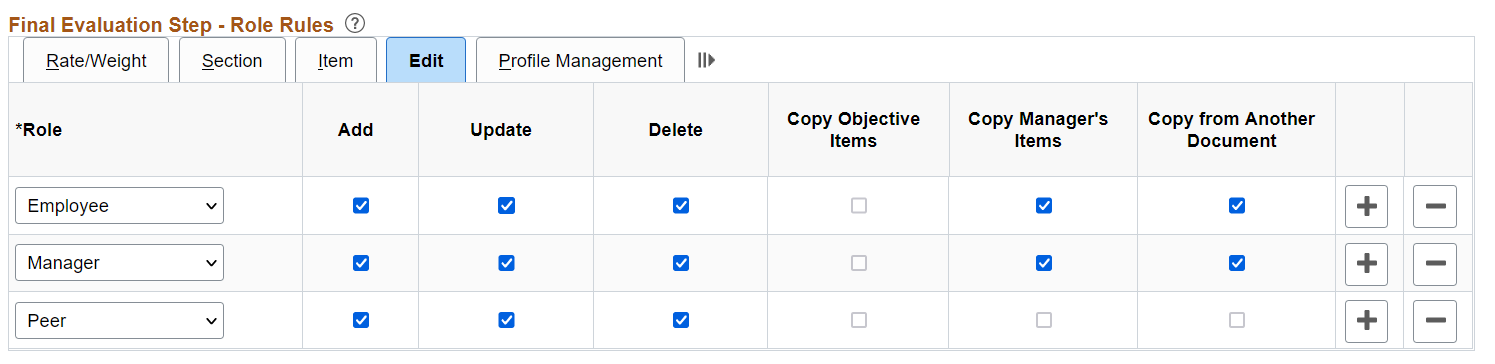
Final Evaluation Step – Role Rules - Edit
This example illustrates the fields and controls on the Final Evaluation Step - Role Rules: Edit on the Structure page.
Field or Control |
Description |
|---|---|
Add |
Select this check box to enable the role to add items to this section. If the role can add items, they can also update and delete items that they add. |
Update |
Select this check box to enable the role to update items in this section on the documents that are generated for the role that were added by a source other than themselves; for example, the manager, the profile, or the template. In addition, if the item was cascaded down to the document, they can also update it. Note: The Title, Description and Measurement fields are not available for editing if they come from the Content Catalog. |
Delete |
Select this check box to enable the role to delete items in this section on the documents that are generated for the role that were added by a source other than themselves (for example, manager, profile, template or cascaded). |
Copy Objective Items |
Select this check box to enable the role to copy business objective items into the documents that are generated for the role. This option is available only to the Manager and Employee roles. |
Copy Manager's Items |
Select this check box to enable the role to copy items from the manager's documents into the documents that are generated for the role. This option is available only to the Manager and Employee roles. Manager: if you add items to an employee's document as a manager, the Copy <item> from my Document option becomes available. Use this option to copy items from your own evaluations that match the criteria of the employee's document. Employee: if you add items to your own document as an employee, the Copy <item> from Manager Document option becomes available. Use this option to copy items from your manager's evaluation documents that match the criteria of your own document. |
Copy from Another Document |
Select this check box to enable the role to copy items from another document that he or she owns. This option is available only to these two roles: Manager: if you add items to an employee's document as a manager, the Copy <item> from My Team's Documents option becomes available. Use this option to copy items from your team members' documents in which you are listed as the manager. Employee: if you add items to your own document as an employee, the Copy <item> from My Documents option becomes available. Use this option to copy items from other evaluation documents of yours. |
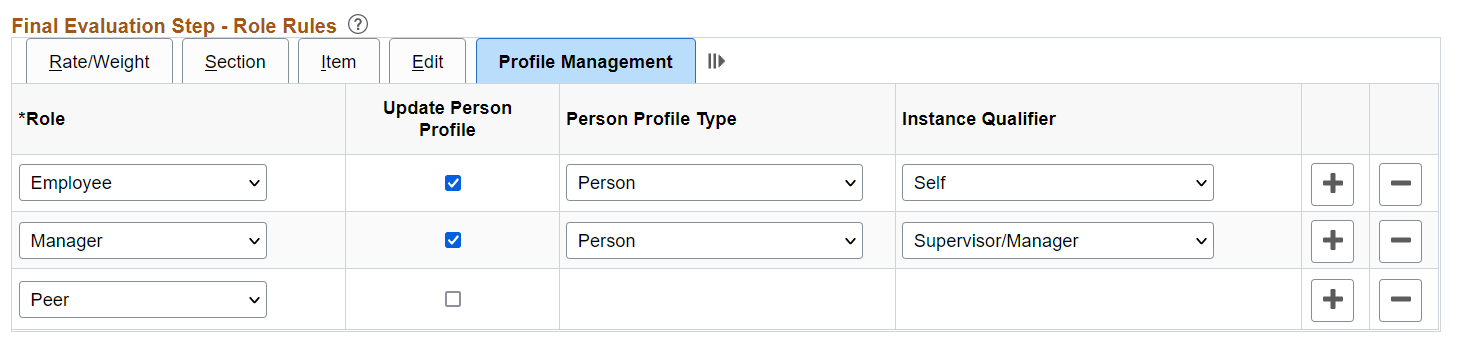
Final Evaluation Step – Role Rules - Profile Management
This example illustrates the fields and controls on the Final Evaluation Step - Role Rules: Profile Management tab on the Structure page.
Field or Control |
Description |
|---|---|
Update Person Profile |
Select this check box if you want the system to update the employee's profile in the Manage Profiles business process with this document. This field is enabled if all these conditions are met:
Note: No evaluations (peer, employee, manager, and so on) should be sent to Profile Management until the document status is Complete. Additionally, no items should be sent to Profile Management from any evaluation until the document has been approved. Since approvals are not required in ePerformance, this means that no items should be sent to Profile Management until the document status is Complete, meaning the manager evaluation status is in a Complete status and the document status at the header level is also Complete. |
Person Profile Type |
Select the profile type. These profile types are defined in the Manage Profiles business process with an Identity Option equal to Person. This field is available if the Update Person Profile check box is selected. |
Instance Qualifier |
Select an instance qualifier that distinguishes this evaluation from other evaluations in the Manage Profiles business process. ePerformance delivers instance qualifiers that allow the evaluations coming from ePerformance to be identified as Manager, Nominee, or Self. |
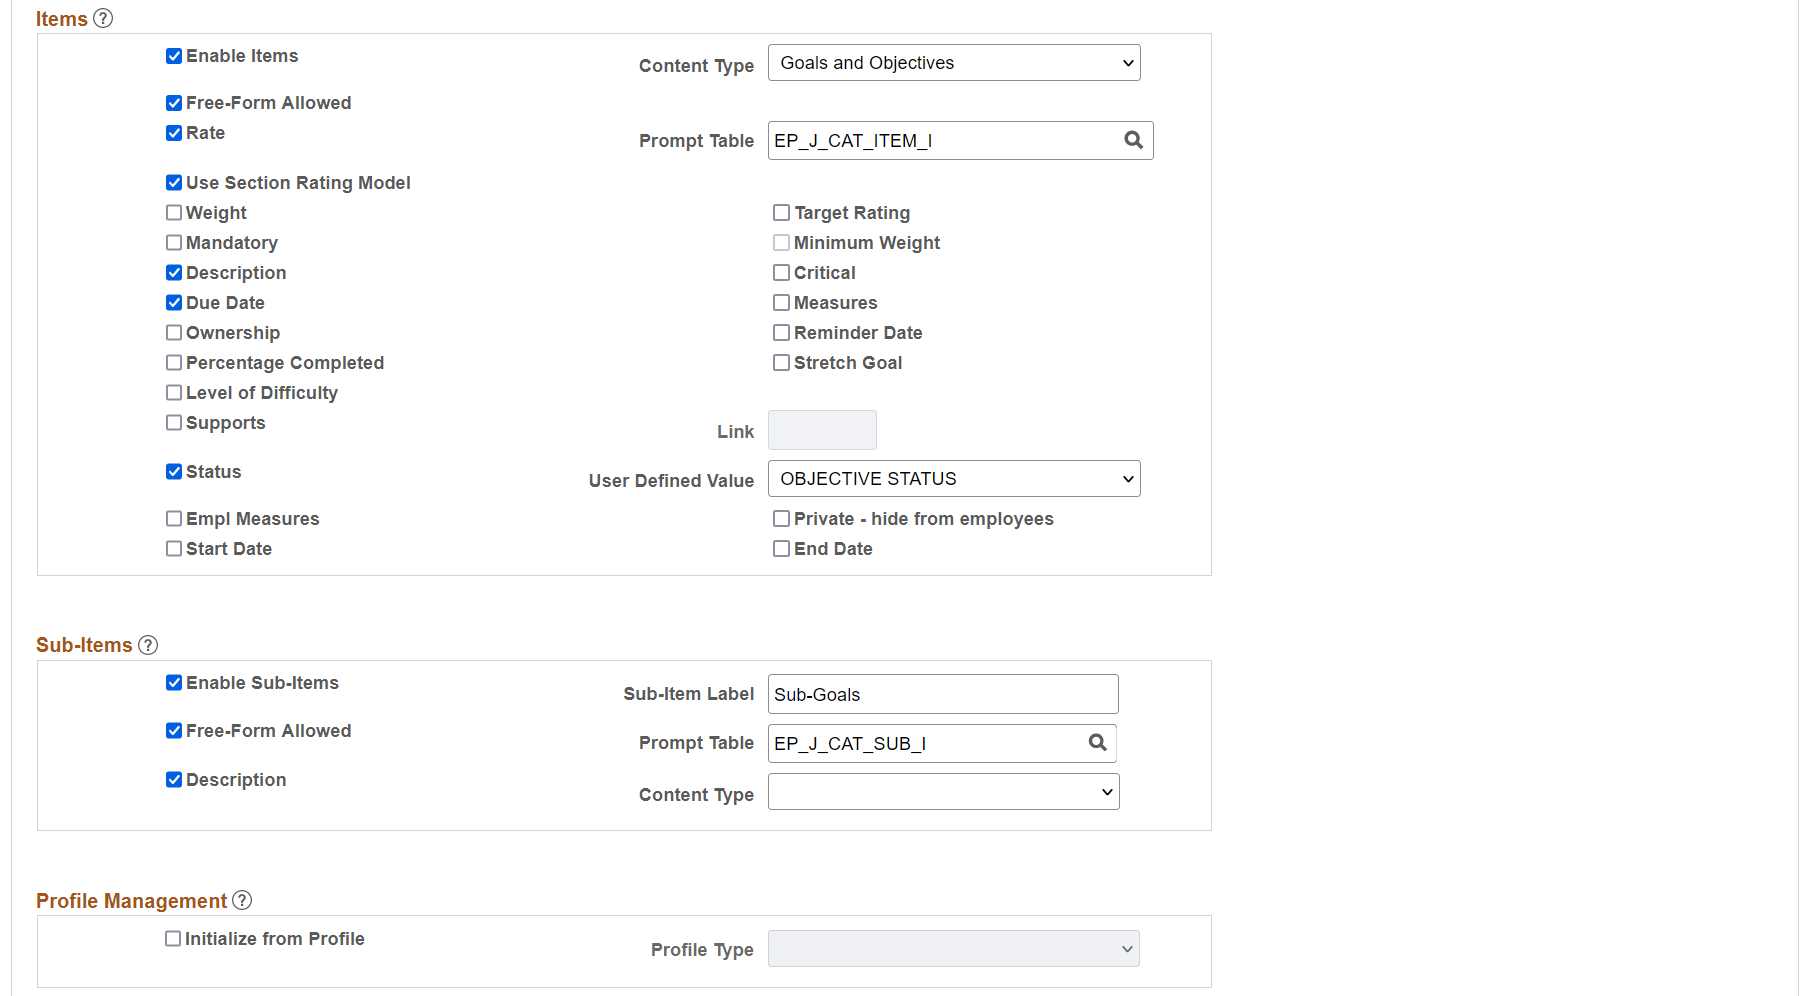
Use the Template Definition - Content page (EP_TMPL_DEFN4) to add criteria to sections.
Navigation:
(Fluid) Select the Talent Administrator home page and click the Performance Administration tile. On the left navigation, select .
(Classic)
This example illustrates the fields and controls on the Template Definition - Content page.
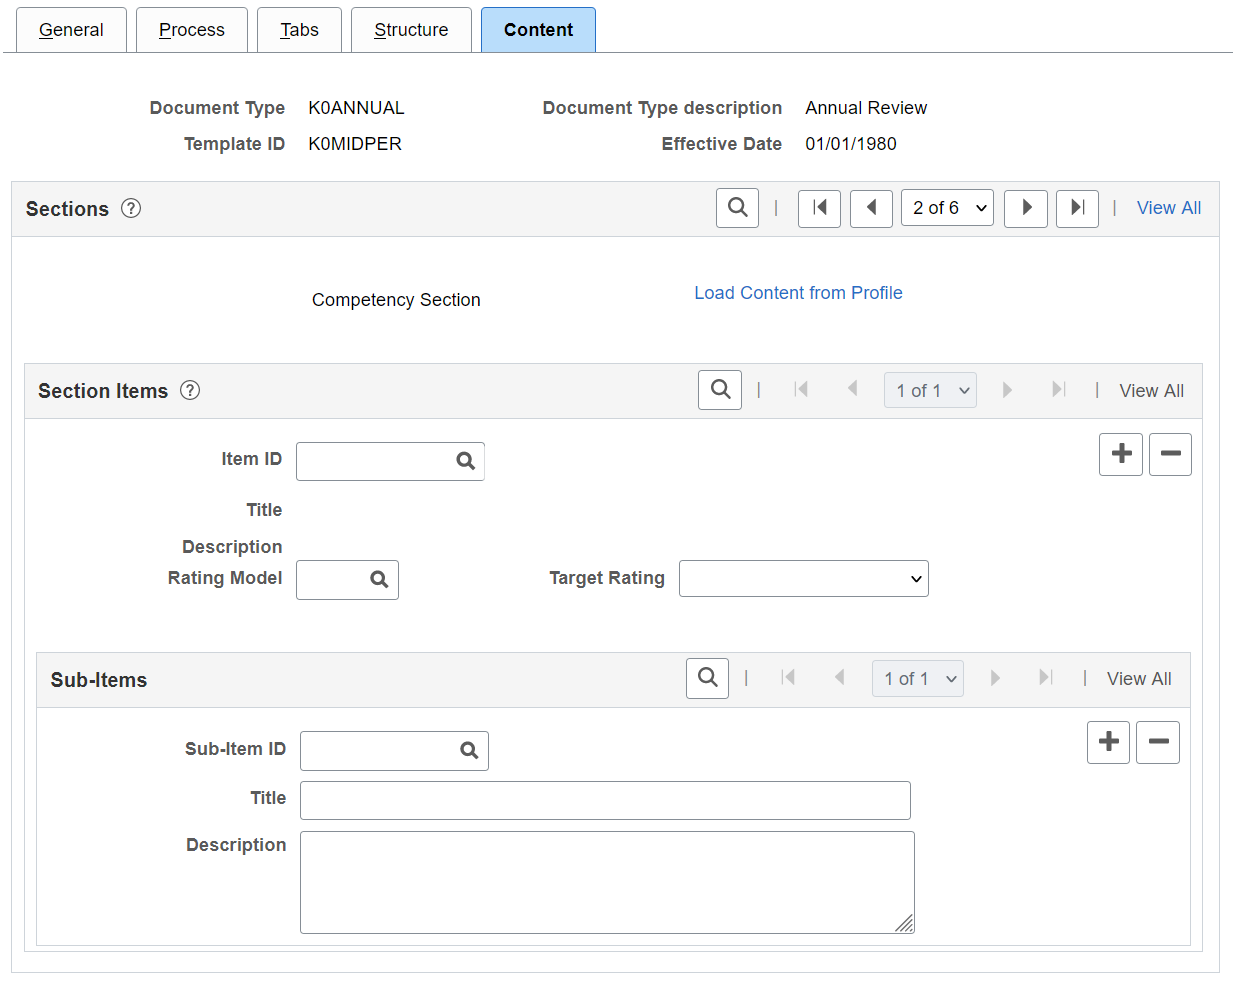
Only the sections entered on the Template Definition - Structure page are available on this page. To add more sections, go to the Template Definition - Structure page.
Field or Control |
Description |
|---|---|
Load Content from Profile |
Click this link to access the Load Content from Profile page. |
Section Items
The fields in this group box are available only if you select the Enable Items check box on the Template Definition - Structure page. Items automatically appear here when you click the Load Content from Profile link. You can view, add, edit, or delete items to track or rate on the document.
Add free-form items if the Free-Form Allowed check box for this section is selected on the Template Definition - Structure page.
Field or Control |
Description |
|---|---|
Item ID |
Select an item from the Content Item Detail (JPM_CAT_ITEM) table. You can only select content items that are linked to the content type entered in the Content Type field on the Template Definition - Structure page. This field does not apply to free-form items. |
Title |
Enter the title for a free-form item. You can only enter titles for free-form items. Otherwise, the system displays the text that was entered in the Description field on the Content Items - Items Details page. |
Description |
Enter the description for a free-form item that you are adding. You can only enter descriptions for free-form items. Otherwise, the system displays the text that was entered in the ePerformance Description field on the Content Items - Items Details page. This field is enabled only if you selected the Description check box in the Items group box on the Template Definition - Structure page. |
Measurement and Employee Measurement |
Enter text that clearly and objectively describes the standard by which this item is measured. This text appears on the performance or development document. The system displays these fields if the Measures check box is selected on the Template Definition - Structure page. |
Level of Difficulty |
Select either Advanced, Basic, or Intermediate. Since the values come from the Content Catalog, it follows the same rules as other evaluation criteria fields such as Description and Measurements. To edit the field, select the Edit icon on the document. Clicking the icon transfers you to the Edit Item page where you can update the criteria. The system displays this field if the Level of Difficulty check box is selected on the Template Definition - Structure page. |
Rating Model |
Select the rating model for this item. If you selected the Use Section Rating Model check box in the Items group box on the Template Definition - Structure page, the system display the rating model you entered in Rating Model field in the Section group box on the Template Definition - Structure page. The system displays this field if the Rate check box is selected on the Template Definition - Structure page. |
Target Rating |
Select the rating at which the employee should be performing for this section item. The system displays this field if the Target Rating check box is selected on the Template Definition - Structure page. |
Weight |
Enter the percentage amount that this section contributes to the overall weight. The system displays this field if the Weight check box is selected on the Template Definition - Structure page. |
Minimum Weight |
Enter the minimum percentage amount that you want this item to contribute to overall weight. The system displays this field if the Minimum Weight check box is selected on the Template Definition - Structure page. |
Supports |
Select one of the section items associated with the linked section. The system displays this field if you selected the Support check box and selected a section in the Link field on the Template Definition - Structure page. Note: When an ePerformance document is created with sections that support other sections in the document, the document does not recognize that there are content items in the other section if both sections are marked as free form. |
Due Date |
This field can be used to track the progress of an item and whether it was completed on time. The system displays this field if the Due Date check box is selected on the Template Definition - Structure page. |
Reminder Date |
This date is used only for informational purposes. The system displays this field if the Reminder Date check box is selected on the Template Definition - Structure page. |
Owned By |
Select whether the Employee or Manager is responsible for the completion of this item. The system displays this field if the Ownership check box is selected on the Template Definition - Structure page. |
Mandatory |
Select this check box to prevent anyone from editing or deleting this item on the document. The system displays this field if the Mandatory check box is selected on the Template Definition - Structure page. Note: This selection overrides the value in the Mandatory field on the job profile. If you specify that an item on the job profile is mandatory and do not select this check box, the item is not mandatory on the document. |
Critical |
Select this check box to have the word Critical appear in the detail area of the item on the document. The system displays this field if the Critical check box is selected on the Template Definition - Structure page. |
Sub-Items
Use this group box to add sub-items for each item. The system displays this group box only if you select sub-items on the Structure page.
Field or Control |
Description |
|---|---|
Sub-Item ID |
To include a sub-item from the prompt table (typically, a sub-competency) in this section of the document, select the sub-item ID. You can select from the items that belong to the sub-items table that is identified in the Prompt Table field on the Template Definition - Structure page. This field does not apply to free-form items. |
Title |
Displays the title of the selected sub-item. If you're adding a free-form sub-item, enter the title here. |
Description |
Displays the description of the sub-item. The system displays this field if you selected Descriptions in the Sub-items group box on the Structure page. |
Use the Load Content From Profile page (EP_TMPL_DEFN5) to load content from profiles.
Profiles can be used to load criteria into sections.
Navigation:
Click the Load Content from Profile link on the Template Definition - Content page.
This example illustrates the fields and controls on the Load Content From Profile page.
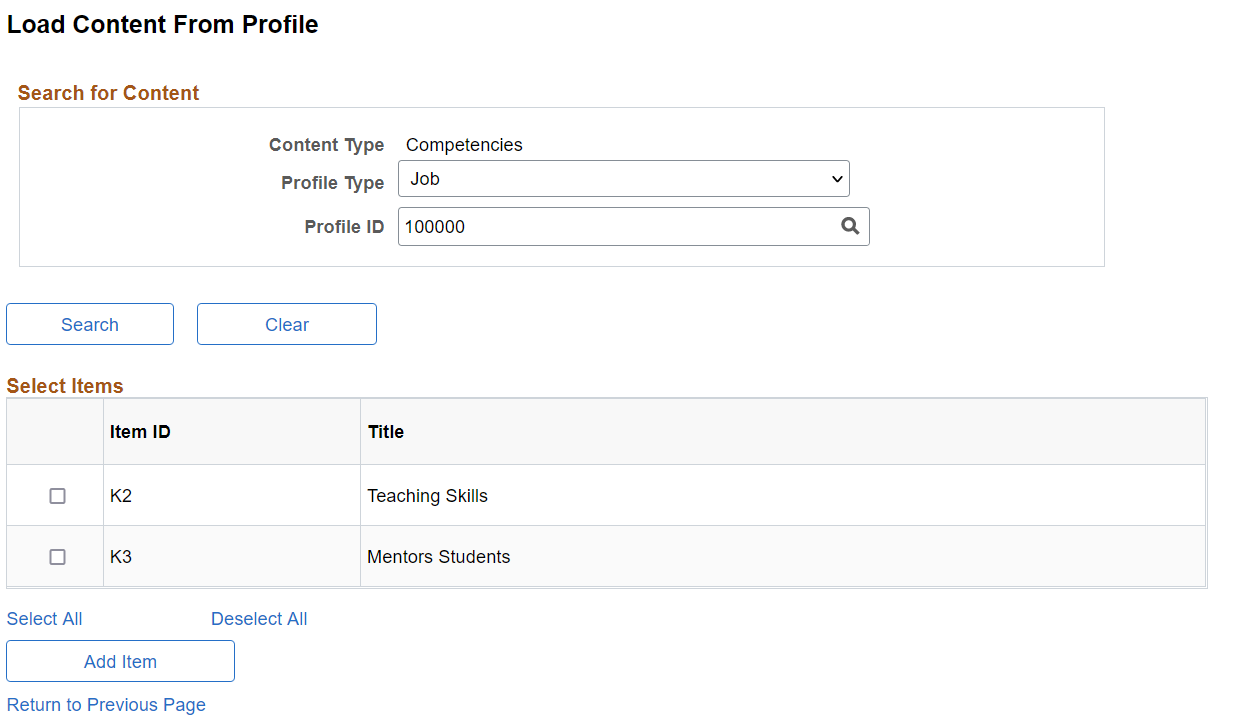
Enter search information for content criteria, click the Search button, and then select the items that you want added to the Section Items group box on the Template Definition - Content page.
Note: Remember that these items become part of the template. It is best to only have common items that fit all employees.
Use the Clone Template Definition page (EP_CLONE_TMPL) to clone templates.
Navigation:
This example illustrates the fields and controls on the Clone Template Definition page.
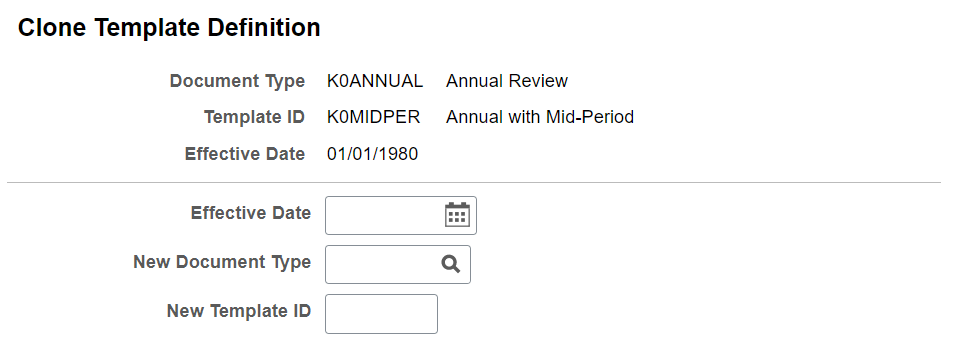
To clone a template:
On the search page, enter search criteria to look for and select the document template from which you want to clone.
The system displays the Clone Template Definition page.
Enter an effective date for the new template.
Enter a document type for the new template.
Enter an ID (up to eight alphanumeric characters) for the new template.
Click the Save button to clone the template.
Note: If the system finds a match in the template type and period end date for the same employee, it displays an error message: A document already exists for document type, and period dates nn/nn/nnnn - nn/nn/nnnn. If you think you have received this message in error, contact your system administrator.