Sending Correspondence and Recruitment Letters
This topic provides overviews of the Send Correspondence action and of context-specific recruitment letters. It then discusses how to send correspondence.
|
Page Name |
Definition Name |
Usage |
|---|---|---|
|
HRS_SEND_CRSP |
Send ad hoc letters and emails to applicants. Letters must be template-based; email can be freeform or template-based. |
|
|
HRS_FWRD_APP_PRVW |
Preview the content of a freeform email. You must return to the Send Correspondence page before sending the email. The default template that the system uses for freeform email adds text before and after the message that you create; use this page to see your message with the template text applied. |
|
|
HRS_FND_EMAIL_ADDR |
Search for and select employees to whom you want to forward applicants. |
|
|
HRS_RUN_LETTERS |
Run the process that generates letters from the recruiting letter queue. |
This overview describes the Send Correspondence action, which you use to produce ad hoc email and letters for applicants.
Send Correspondence
Use the Send Correspondence action to send the following types of correspondence:
An email with message text that you manually enter.
An email with message text that the system generates based on a template that you select.
A letter that the system generates based on a template that you select.
Recruiting Solutions uses Oracle Business Intelligence Publisher (BI Publisher) to generate recruitment letters.
The Send Correspondence action is available from these pages:
Search Applicants (all types of searches)
Manage Applicant
Search Applications
Manage Application
Manage Job Opening
Manage Applicant List
Email Generation
When you invoke the Send Correspondence action, the Send Correspondence page appears with Email as the default contact method. You can enter freeform message text, or you can select from a list of available templates. If you select a template, the system creates the message text, merging applicant data into the template as necessary. You can preview the system-generated message, but you cannot modify it.
Both template-based and freeform email messages require you to enter the email subject. You can optionally add attachments to the email as well.
Note: To support freeform text messages, the system applies the delivered HRS_SEND_CRSP_GEN_EM template when no other template is selected. This is a PeopleTools Workflow generic template, not a BI Publisher template. As delivered, this template places a greeting before your message text and a sign-off after your message text. To remove this wrapper, you can modify the template.
Letter Generation
If you change the contact method to Letter, you must select a letter template. Once you select a template, the Generate button appears. Clicking this button generates a merged letter and opens it in a new browser window so that you can print and send it. You can optionally preview the merged letter before generating it.
When you generate a letter, it is up to you to print and send it. Letters that you generate using Send Correspondence are not added to the queue of letters for the HRS Letter Generation process (HRSLETTR).
Applicant Notes Created by Send Correspondence
When you send email or generate a letter using the Send Correspondence action, the system records the transaction in an applicant note. You can view the note on the Manage Applicant Page: Notes Tab.
The note is designated as public or private based on the setting you choose when you create the correspondence. The original sender is the only one who can view private notes. Users with standard security can see all public notes. For users with enhanced applicant security, note visibility depends on the public/private setting and on whether the user has access to any of the job openings (if any) that are associated with the transaction.
See Understanding Enhanced Applicant Security.
For email correspondence, the email subject becomes the note subject. When you click the subject to view the note details, the correspondence appears on the Send Correspondence page. You can modify the correspondence (though you cannot change the contact method) and then resend the correspondence. For template-based email, you can change the subject, the attachments, and the Cc and Bcc recipients, but you cannot change the template selection, nor can you modify the message.
For letter correspondence, the default note subject is Application Letter. When you click the subject to view the note details, the Applicant Notes page appears, and the letter appears as an attachment to the note. You can edit the note as necessary, including replacing the attachment if you modified the generated letter before printing and sending it.
Note: If you do not end up sending the physical letter than you generate, you should manually delete the applicant note for that letter. If you modify the letter before sending it, you should update the applicant note accordingly.
Template Selection
The Send Correspondence action uses BI Publisher for PeopleSoft templates for both email and letter correspondence. The templates that are available for selection are those with the HRS_APP_LETTERS report definition.
Note: You cannot use the Send Correspondence action to send offer letters or interview letters, which require the context of their specific pages.
See PeopleTools: BI Publisher for PeopleSoft
Batch Processing for Correspondence
The Send Correspondence action processes correspondence in real-time as long as the number of letters or emails does not exceed the Batch Action Threshold specified on the Recruiting Installation – Applicants Page. When the amount of correspondence exceeds the threshold, the Group Action Notification (HRS_ACT_MAIL) Application Engine process sends the correspondence in batch.
If the batch process does not successfully send all of the letters or emails, the user who performed the Send Correspondence action receives a failure notification. The notification, which uses the PeopleTools Workflow HRS_BATCH_NOTIFY template, advises the user to contact a system administrator, who can restart the process. Because the process tracks correspondence as it is sent, correspondence that was created before the process failed is not reprocessed when the batch process is re-started.
When sending letters (but not email), the system provides links to the letters so that the user can print and send the letters. Access to the completed letters depends on whether the letters were generated in real-time or in batch:
If the letters are generated in real-time a new browser window opens for each letter.
If the letters are generated in batch, the originator receives a single email with links for each letter, and clicking a link opens the letter in a browser window.
If the batch process processed some, but not all, letters, the notification to the originator includes links to the letters that were successfully created along with the notification that some letters were not created.
This overview discusses the generation and delivery of context-specific recruitment letters.
Types of Recruitment Letters
PeopleSoft Talent Acquisition manager enables you to generate context-specific recruitment letters during these recruiting activities:
Entering or reviewing application information on the Application Details Page.
Scheduling applicant interviews on the Interview Schedule Page.
Preparing job offers on the Prepare Job Offer Page.
The pages where you perform these recruiting activities all display a Letter field that you use to select a letter template.
Manual Letter Generation vs the HRS Letter Generation Process
All of the pages that support context-specific recruitment letters include a Generate Letter link that you click to manually generate the letter. The system merges applicant data into the selected template and opens the resulting letter in a new browser window.
If you select a letter but do not generate it manually, the system automatically places the letter in a queue to be processed by the HRS Letter Generation (HRSLETTR) Application Engine process.
Important! The HRS Letter Generation process is not used for letters that you send from the Send Correspondence page. It is used only when users specify a context-specific recruitment letter.
When a letter has been placed in the HRS Letter Generation process queue but has not yet been processed, manually generating the letter removes it from the queue. Because manually generating a letter prevents it from being processed by the HRS Letter Generation process, the person who manually generates the letter is responsible for delivering the letter.
When you manually generate a letter, the system automatically creates an applicant note with the letter as an attachment.
The HRS Letter Generation process, on the other hand, creates a single file with all of the letters that were generated using the same template. This means that if multiple letters were based on the same template, individual letter documents do not exist. For this reason, the HRS Letter Generation process does not create an applicant note or associate an attachment with the applicant record.
Letter Delivery
After generating a letter manually, users have two delivery options: hard copy and email.
For hard copy delivery, users can print the letter from the browser window where the letter is displayed. Users can also save the letter locally for later printing. The default file format for the generated letter is .rtf (rich text file), which is compatible with most word processing applications.
For email delivery, an Email Applicant link enables users to access the Send Correspondence page with the generated letter already attached. Users can enter their own email message text before sending. If there is no email address for the applicant, the system displays a warning.
Note: Only interview and job offer letters can be emailed. The Application Details page does not have the Email Applicant option.
Clicking the Email Applicant link before generating the letter displays the Send Correspondence page without any attachments. Although you can select letter templates from the Send Correspondence page, the available templates are not context-sensitive: choices are always the same as those on the Application Details page, even if you access the Send Correspondence page from the Interview Schedule page or the Prepare Job Offer page.
Modified Letters and the Upload Option
To modify a template-based letter, you must generate it, save it locally, and make your changes to the local copy. To ensure accurate records, you must then upload the modified document to the system.
For interview letters and offer letters, the system provides an Upload Letter link that you can click to upload the modified document to the correct context. If you subsequently click the Email Applicant link, the system automatically attaches the modified letter (rather than the original) to the email.
Applicant Notes Created by Context-Specific Recruitment Letters
Applicant notes, which appear on the Manage Applicant Page: Notes Tab, are automatically created for recruitment letters that you generate individually (The HRS Letter Generation process does not create applicant notes for letters that it produces in batch.) By default, the automatically-generated applicant notes are designated as public, but you can make a note private so that only the sender can see it.
The system generates applicant notes when:
You generate a recruitment letter.
If you generate a letter but do not send it, you should manually delete the note from the applicant's record.
You upload a recruitment letter.
The Application Details page does not have an upload link. If you modify an application letter, you should manually replace the attachment in the related note.
You email a recruitment letter.
If you perform multiple letter-related actions, the applicant ends up with multiple notes that refer to the same interaction. For example, if you generate a letter, then upload a modified letter, then email the modified letter, the system creates three separate applicant notes related to this one letter. To eliminate redundant applicant notes, delete these extra notes manually on the Manage Applicant page: Notes tab.
When you email a letter to the applicant, the email subject becomes the note subject. When you generate or upload a letter, the default subject text describes the letter context: Application Letter, Interview Letter, or Offer Letter.
Clicking the subject of an applicant note opens a page that displays the note details; the actual letter appears as an attachment to the note. You can edit the note as necessary. If the note is for an email, the note details appear in the Send Notification page, where you can modify the email and then resend it.
Letter Selection
Recruitment letters use BI Publisher for PeopleSoft templates. The templates that are available for selection are those with the following report definitions:
Templates from the HRS_APP_LET report definition are available from the Application Details page.
Templates from the HRS_INT_LET report definition are available from the Interview Schedule page.
Templates from the HRS_OFF_LET report definition are available from the Prepare Job Offer page.
Delivered Letter Templates
Talent Acquisition manager delivers the following recruitment letter templates:
|
Report Definition |
Template ID |
Template File |
Purpose |
|---|---|---|---|
|
HRS_APP_LET |
HRS_APP_LETTER_ACQ |
LTRACQxml.rtf |
Acknowledges receipt of applicant's resume. |
|
HRS_APP_LET |
HRS_APP_LETTER_ANO |
Ltranoxml.rtf |
Notifies applicant of no current job openings. |
|
HRS_APP_LET |
HRS_APP_LETTER_CR1 |
LTRCR1xml.rtf |
Thanks applicant for interest in company and states that the applicant’s qualifications are being reviewed. |
|
HRS_APP_LET |
HRS_APP_LETTER_IR |
LTRIR.rtf |
Interview rejection letter. |
|
HRS_APP_LET |
HRS_APP_LETTER_LAQ |
Ltrlaqxml.rtf |
Thanks applicant for interest in company and states that the applicant’s qualifications are being reviewed. |
|
HRS_INT_LET |
HRS_INT_LETTER_IS1 |
LTRIS1xml.rtf |
Notifies applicant of scheduled interview date and time. |
|
HRS_INT_LET |
HRS_INT_LETTER_IS2 |
LTRIS2xml.rtf |
Notifies applicant of scheduled interview date and time. |
|
HRS_INT_LET |
HRS_INT_LETTER_IS3 |
LTRIS3xml.rtf |
Notifies applicant of scheduled interview date and time. |
|
HRS_OFF_LET |
HRS_OFF_LETTER_OF1 |
LTROF1xml.rtf |
Notifies applicant of offer and compensation package. |
|
HRS_OFF_LET |
HRS_OFF_LETTER_OF2 |
LTROF2xml.rtf |
Notifies applicant of a revised offer and compensation package. |
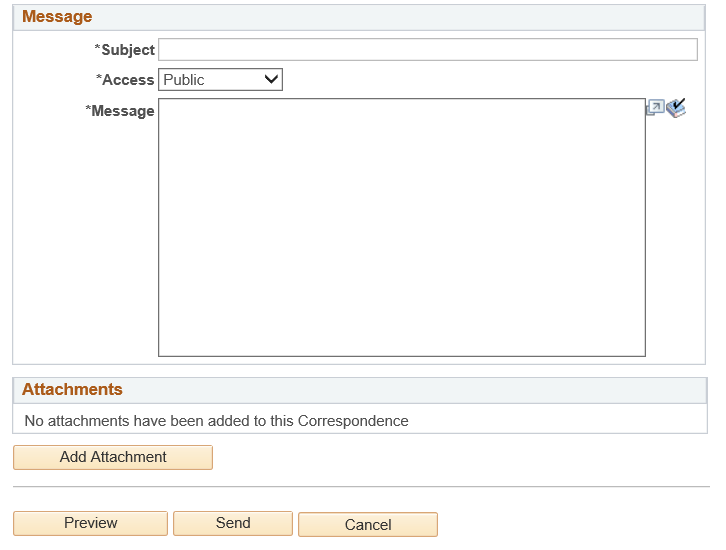
Use the Send Correspondence page (HRS_SEND_CRSP) to send ad hoc letters and emails to applicants.
Letters must be template-based; email can be freeform or template-based.
Navigation:
Select Send Correspondence (or from the row-specific action menu or the group action menu on any of these pages:
Search Applicants (all types of searches)
Manage Applicant
Search Applications
Manage Application
Manage Job Opening
Manage Applicant List
This is the first of two example illustrating the Send Correspondence page. In this example, enhanced applicant security is active, so the page displays instructional text that would not be there if all users had standard security.

This is the second of two examples illustrating the Send Correspondence page.
This example illustrates the Recipients grid when the Job Opening column is visible. When the Job Opening column is visible, the separate Job Openings grid is hidden.

Understanding Job Openings in the Send Correspondence Transaction
This page displays job opening information in one of two ways:
If the transaction was initiated from a specific application, the job opening is identified in the Recipients grid, and the user cannot modify the information.
This occurs when the transaction is initiated from the Manage Application page or from the list of applications on the Manage Applicant page, the Search Applications page, or the Manage Job Opening page
If the transaction was initiated from the applicant record (without the context of a specific application), a separate Job Openings grid appears, and the user can manually add job openings to the grid.
This occurs when the transaction is initiated from the Search Applicant page or the Manage Applicant List page.
Instructional Text
If enhanced applicant security is enabled for at least one recruiting role type, instructional text at the top of the page explains how the combination of the transaction’s job openings and its public/private setting affects which users can see the note.
Recipients
Field or Control |
Description |
|---|---|
ID and Applicant Name |
These fields identify the applicants to whom you are sending correspondence. |
Job Opening |
If you initiated the transaction from the context of a job opening, this field identifies that job opening. If this column is visible in the Recipients grid, the page does not display a separate Job Openings grid. |
Job Openings
The Job Openings grid and the associated Add Job Opening button are visible only if you initiated the transaction without the context of a job opening. Use this grid to manually associate job openings with the transaction.
Field or Control |
Description |
|---|---|
Job ID and Posting Title |
Select one or more job openings to associate with this transaction. You can only select job openings to which you have access, and they must be in Open, Filled/Closed, or Hold status. All users have access to job openings that they created and where they are on the hiring team. Users with standard applicant security can additionally access job openings if they the department security tree gives the user access to the job opening’s department. Users with enhanced applicant security do not gain access to job openings through the department security tree. See Understanding Enhanced Applicant Security. Associating the transaction with job openings can affect the visibility of the applicant note that the transaction creates. Specifically, users with enhanced applicant security can view the note only if they have access to at least one of the job openings. Job openings do not affect note visibility for users with standard security. |
Add Job Opening |
Click this button to add additional rows to the Job Openings grid. |
Message Type and Method
Field or Control |
Description |
|---|---|
Contact Method |
Select Email or Letter. The default value is Email. In this mode, the page shows standard email fields. If you select Letter:
|
Letter |
Select a letter template to use. This field is optional when you send email and required when you send a letter. |
Recipient Information
Field or Control |
Description |
|---|---|
To |
This field appears for both email and letter correspondence. It displays the names of the applicants to whom you are sending correspondence and is not editable. If you are sending the correspondence to multiple applicants, all names appear together. However, the system sends separate correspondence to each applicant: template-based messages are generated separately for each recipient, and the applicants do not see each other's names in the To field of the email they receive. |
Cc, Bcc, and Find |
These fields appear only for email correspondence. By default, the sender's preferred email address appears in the Cc field, and the Bcc field is empty. You can edit these fields directly to add or remove recipients, or you can look up recipients who are employees by clicking the Find link to access the Find Email Address page. |
Include Interested Parties |
Select this check box if you want the people listed as interested parties for the applicant to receive a copy of this email. An applicant's interested parties are listed on the Manage Applicant page: Interested Parties tab. The system sends the interested parties copies of the correspondence, but does not display their names or email addressed on this page. |
Sender Information
If the Contact Method is Letter, this section is hidden.
Field or Control |
Description |
|---|---|
From |
If the Contact Method is Email, this field displays the sender's name. When the system creates an applicant note for this transaction, the sender is considered the note author. |
Message
Field or Control |
Description |
|---|---|
Subject |
This field appears only for email correspondence. Enter the email subject. This field is required for email correspondence (whether freeform or template-based). |
Access |
This field appears for both email and letter correspondence. Select a value to indicate whether the note that the transaction creates is public or private. Select Private to limit access to the note’s author (the person forwarding the applicant).. Select Public to allow other users to see the note. Users with standard security can see all public notes. Users with enhanced applicant security can see public notes as long as they have access to one of the associated job openings (or if there are no associated job openings). |
Message |
This field appears only for email correspondence. For freeform email, enter the text of the email message. If you select a template, this field disappears until you click the Preview button, at which point the field displays the non-editable template-based message text. Note: To support freeform text messages, the system applies the delivered HRS_SEND_CRSP_GEN_EM template when no other template is selected. This is a PeopleTools Workflow generic template, not a BI Publisher template. As delivered, this template places a salutation before your message text and a signature after your message text. If your organization is using the delivered template, your message should not duplicate the greeting or sign-off text from the template. |
Notes |
This field appears only for letter correspondence. Enter any comments that should be saved in the applicant note that the system creates when it generates the letter. |
Attachments
If the Contact Method is Email, use this section to add attachments to and remove attachments from the email.
If the Contact Method is Letter, this entire section is hidden.
Action Buttons
Field or Control |
Description |
|---|---|
Preview |
Click to preview the email or letter. When you preview a letter or a template-based email, the message text appears directly on the Send Correspondence page. If you are not satisfied with what you see, select a different letter (or clear the Letter field) to make changes. When you preview a freeform email, the message text appears on the Send Correspondence Preview page. You can return to the Send Correspondence page without sending. |
Send |
Click to send email correspondence, create the associated applicant note, and return to the page from which you invoked the Send Correspondence action. This button appears only when the Contact Method is Email. If enhanced applicant security is active for at least one recruiting role type, and the access is Public, and the transaction is not associated with any job openings, then saving triggers a warning message that the note will be visible to all users. This gives the sender an opportunity to protect job-opening related information by editing the message or associating the note to the relevant job opening(s). If the number of email notifications does not exceed the threshold established on the Recruiting Installation – Applicants Page, the notifications are sent immediately, before the Send Correspondence page closes. If the number of email notifications does exceed the threshold, the notifications are sent by the Group Action Notification (HRS_ACT_MAIL) Application Engine process. The originator receives a notification only if the batch process fails. |
Generate |
Click to generate letter correspondence, create the associated applicant note, and return to the page from which you invoked the Send Correspondence action. This button appears only when the Contact Method is Letter. The system creates the associated applicant note immediately. If you don't print and send the letter, be sure to delete the note. If the number of letters does not exceed the threshold established on the Recruiting Installation – Applicants Page, the system generates the letter or letters immediately and opens a new browser window for each letter. If the number of letters does exceed the threshold, the letters are generated by the Group Action Notification (HRS_ACT_MAIL) Application Engine process. When the batch process is finished, the system sends the originator an email with links to each letter. If the process fails, the notification includes links to the letters that were generated before the failure and advises the originator to contact an administrator who can restart the process for the remaining letters. |
Resend |
This button appears only if you access the page from the Manage Applicant page: Notes tab. Click to resend email correspondence if there were delivery issues or if you have modified the email. You can always modify the subject, the attachments, and the Cc and Bcc recipients before resending, but you can modify the message text only for freeform correspondence. |
Cancel |
Click this button to return to the previous page without sending the correspondence. |
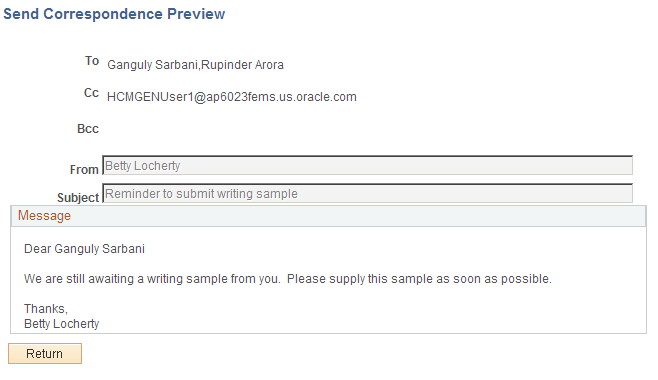
Use the Send Correspondence Preview page (HRS_FWRD_APP_PRVW) to preview the content of a freeform email.
You must return to the Send Correspondence page before sending the email.
Navigation:
Click the button on the Send Correspondence page when it is configured to send a freeform email.
This example illustrates the Send Correspondence Preview page.
Field or Control |
Description |
|---|---|
To |
The preview page lists all of the recipients, even though each recipient will receive a separate email that does not list other recipients. |
Message |
Displays the message to be sent to the first applicant. Note that a salutation and a signature are added to the texts provided on the Send Correspondence page. |
Use the Find Email Address page (HRS_FND_EMAIL_ADDR) to search for and select employees to whom you want to forward applicants.
Navigation:
Click the Find link on the Send Correspondence page.
This example illustrates the Find Email Address page.
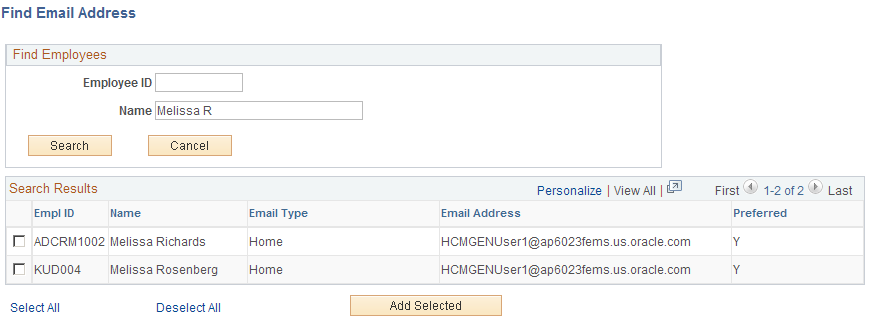
Find Employees
Enter a full or partial employee ID or name and click Search to display the search results.
Search Results
This group box displays the search results. Select one, several, or all employees in the search results and click the Add Selected button to add their email addresses to the appropriate fields on the page from which you initiated the email address lookup.
Field or Control |
Description |
|---|---|
Preferred |
Indicates whether this is the preferred email address for the employee. If an employee has multiple email addresses, the system lists all email addresses and indicates which email address is the preferred email address so that you can select the email address that is most appropriate. |
Use the Generate Recruitment Letters page (HRS_RUN_LETTERS) to run the process that generates letters from the recruiting letter queue.
Navigation:
This example illustrates the Generate Recruitment Letters page.

Field or Control |
Description |
|---|---|
Language |
Choose a language and select the Specified option to generate all letters using the language that you explicitly select. Select the Recipient's option to print each letter in the preferred language of its recipient. In this case, the language that you select in the Language field is used only when there is no record of the recipient's preferred language. |
Run |
Click to run the HRS Letter Generation job (HRSLETTR) using PeopleSoft Process Scheduler. |
Note: If you select Printer in the Type field on the Process Scheduler Request page, you must enter the URL address for your printer in the Output Destination field.