Creating Bank Reporting Formats
This topic discusses how to create bank reporting formats.
|
Page Name |
Definition Name |
Usage |
|---|---|---|
|
GPBR_LAYOUT |
Create new bank reporting layouts for different EFTs. |
|
|
GPBR_LAYOUT_DEF |
Create the structure and hierarchy for bank reporting layouts. You can define headers, details and trails records as well as field positions and length for each record type. |
|
|
GPBR_LAYOUT_SEC |
Modify the information in an existing field in a layout definition row. |
|
|
GPBR_LAYOUT_REP |
Define the characters that need to be replaced in the bank reporting layout. |
|
|
CENTRALIZATION_BRA |
Group establishments to obtain centralized data for supported processes. |
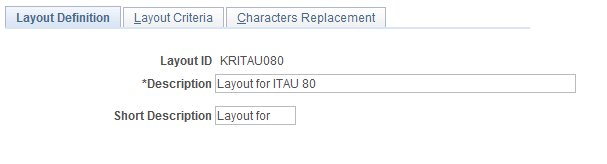
Use the Layout Definition page (GPBR_LAYOUT) to create new bank reporting layouts for different EFTs.
Navigation:
This example illustrates the fields and controls on the Layout Definition page.
Field or Control |
Description |
|---|---|
Layout ID |
Displays the unique identifier for the layout. |
Description |
Enter a description for the layout. |
Use the Layout Criteria page (GPBR_LAYOUT_DEF) to create the structure and hierarchy for bank reporting layouts.
You can define headers, details and trails records as well as field positions and length for each record type.
Navigation:
This example illustrates the fields and controls on the Layout Criteria page.
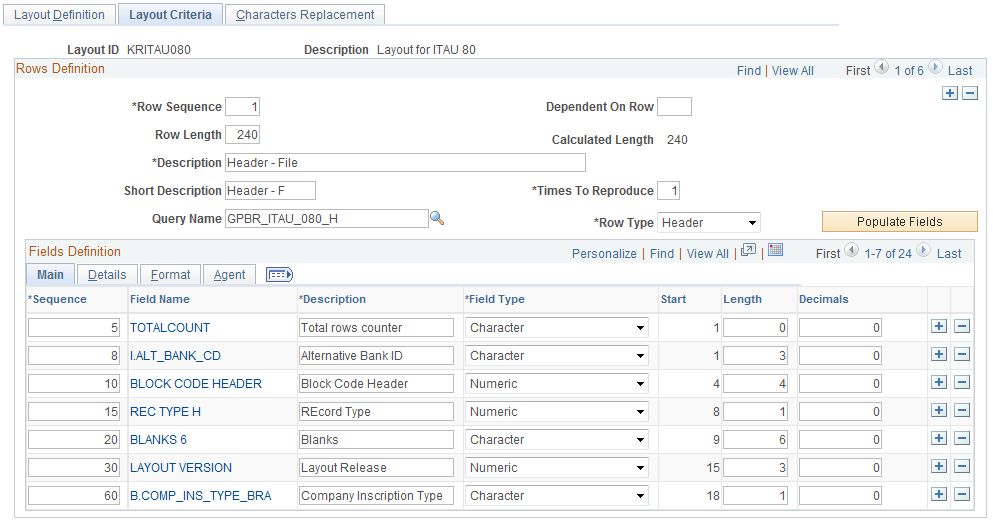
Rows Definition
Field or Control |
Description |
|---|---|
Row Sequence |
Enter the sequence to process the row during the EFT layout process |
Row Length |
Enter the number of positions, or characters, that the row contains, based on you bank layout specifications |
Calculated Length |
Displays the number of positions based on the fields identified in the Fields Definition region. This value is automatically calculated when you save the layout definition, and when you make a change in theFields Definition region. |
Description |
Enter a description that identifies this row in the EFT layout. |
Times to Reproduce |
Enter the number of times you need to repeat the current row in your EFT layout. |
Query Name |
Enter a query that extracts the required information for the current row. Note: Most bank layouts in Brazil are very similar, so you should be able to reuse the provided ITAU layout queries. See PeopleTools: Query |
Row Type |
Specify whether this is a Header, Detail, or Trail row. Select Header to indicate that the row is a heading row for the EFT. Select Detail to indicate that the row is part of the body of the EFT. Select Trail to indicate that the row is used for totals. |
Populate Fields |
Click to populate the fields coming from the query. This option automatically fills in the information in the Fields Definition region based on the query definition. |
Fields Definition
Use the fields in this region to enter the detail for each column on an EFT layout. This grid is automatically populated with the selected fields in the query, however you can add user fields.
Field or Control |
Description |
|---|---|
Sequence |
Enter the order to print the field. |
Field Name |
Click a Field Name link to access the Field Definition page and modify an existing field. Note: You can also use the Main, Details, and Agent tabs in the Fields Definition region to access the information provided on the Field Definition page. |
Alignment |
Select to align field information to the left or right. |
Use the Field Definition page (GPBR_LAYOUT_SEC) to modify the information in an existing field in a layout definition row.
Navigation:
Click a field name link on the Layout Criteria page.
Note: You can also use the Main, Details, and Agent tabs in the Fields Definition region of the Layout Criteria page to access the information provided on the Field Definition page.
This example illustrates the fields and controls on the Field Definition page.
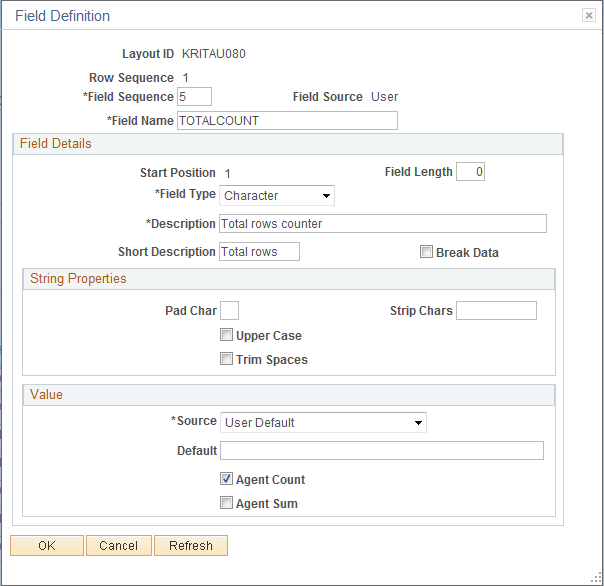
Field Details
Field or Control |
Description |
|---|---|
Start Position |
Increments the last defined position by one and displays that value. |
Field Length |
Enter the number of characters for this field based on the EFT layout definition. |
Field Type |
Select the field type. Valid values are: Character, Date, Date Time, Image, Long Char, Numeric, Signed Number, and Time. |
Break Data |
Select to use this field as a break to generate subtotals. |
String Properties
Field or Control |
Description |
|---|---|
Pad Char (pad characters) |
Enter a value to use when the system fills an remaining blank positions. |
Upper Case |
Select to convert the string in this field to upper case text. |
Trim Spaces |
Select to remove blank spaces from this field. |
Value
Field or Control |
Description |
|---|---|
Source |
Select the source for your field. Select Agent Value to obtain the value for this field from the sum of a count of other fields. The system displays the Agent and Agent Count fields. Use Agent Count to count the number of occurrences. Agent Sum sums the value of the field. Select Conversion to convert one value to another. You must enter the conversion values. Select Field Data to indicate that the value for this field is obtained from the query. Select User Default to provide a default field value. |
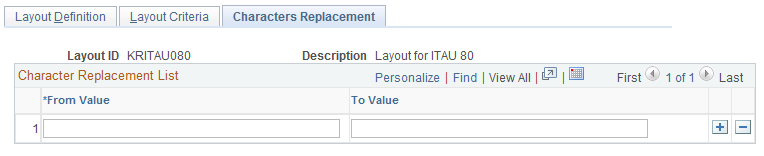
Use the Characters Replacement page (GPBR_LAYOUT_REP) to define the characters that need to be replaced in the bank reporting layout.
Navigation:
This example illustrates the fields and controls on the Characters Replacement page.
Field or Control |
Description |
|---|---|
From Value and To Value |
List the values you want to replace in the From Value field and the values you want the system to use in theTo Value field. |
Use the Centralization Data BRA page (CENTRALIZATION_BRA) to group establishments to obtain centralized data for supported processes.
Navigation:
This example illustrates the fields and controls on the Centralization Data BRA page.
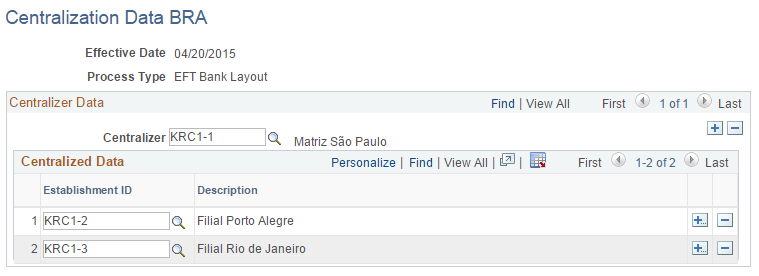
Field or Control |
Description |
|---|---|
Process Type |
Displays the type of process that you selected for data centralization. Options include CAGED Process, EFT Bank Layout, MANAD Process, PIS Process and SEFIP Process. |
Centralizer |
Enter the name of the establishment that creates centralized data for reporting purposes. (For SEFIP process) The centralizer (establishment) and its associated establishments that you select must have CNPJ as the inscription type. |
Centralization Option
Field or Control |
Description |
|---|---|
Use Centralization |
Select to use centralization and generate one single SEFIP report for all establishments listed on this page, which have the same first eight digits of CNPJ as the centralizer. This option is useful for companies with many establishments, which would benefit from generating one centralized SEFIP report rather than many individual reports, one for each establishment. |
Use Grouping |
Select to use centralization and generate one single SEFIP report for all establishments listed on this page. |
Not Using |
Select to not use centralization. The process generates a SEFIP report for each listed establishment. |
Centralized Data
Field or Control |
Description |
|---|---|
Establishment ID |
Enter the IDs of all establishments from which the centralizer collects data. |