Creating, Viewing, and Updating Online Tax Statements
This topic discusses how to create, view and update online tax statements.
|
Page Name |
Definition Name |
Usage |
|---|---|---|
|
GPCH_RC_TX07 |
Create PDF files for tax statements (when the XML file was created through the dashboard). |
|
|
GPCH_LAW_DATA |
Set attributes for LAW creation |
|
|
GPCH_IF_TX07 |
View tax statements online. |
Use the Tax Statement CHE page (GPCH_RC_TX07) to create PDF files for tax statements (when the XML file was created through the dashboard).
Navigation:
Tax Statement 2006 CHE page
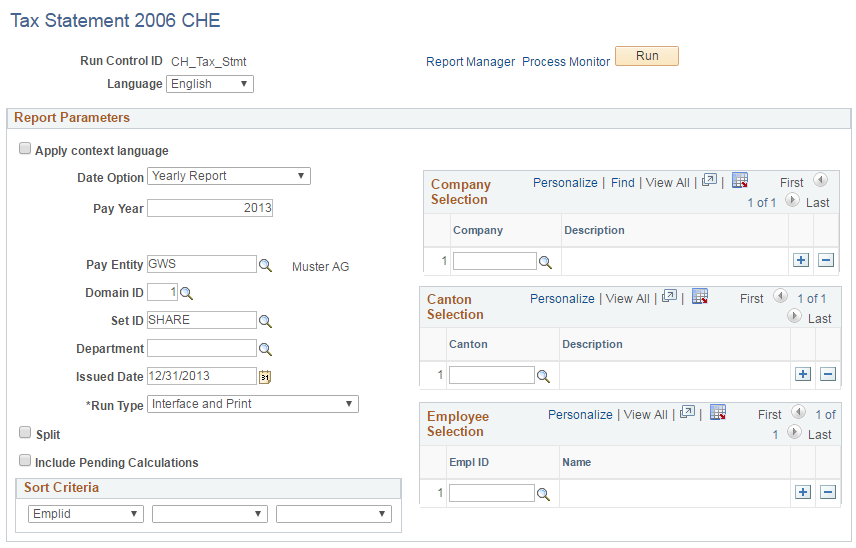
Field or Control |
Description |
|---|---|
Apply context language |
Print in the employee’s language. |
Date Option |
The regular mode is Yearly Report. You can, however, choose Date Range. This option is not supported for Print Only mode, however. If you select Yearly Report, the system displays the Pay Year field. If you select Date Range, the system displays the From Date ad To Date fields. |
Pay Year |
Enter the pay year. |
From Date and To Date |
Enter the date range for which you want to create a tax statement. |
Pay Entity |
Select the pay entity for which you want to create a tax statement. |
Domain ID |
Select the domain ID for which the XML was created. |
SetID |
Select a set ID if you only want to print statements for a certain department. |
Department |
Select a department if you only want to print statements for a certain department. In this case you need to also select a set ID. |
Issued Date |
If you want to override the creation date in the Form field I Ort Datum, enter a date in this field. To do this should have already selected overrides in Sender Details on the company level. If you don't want to override, leave this field blank. |
Run Type |
Select Print (recommended). The Interface run type is used for testing purposes and the creation of special tax statement scenarios. |
Split |
This option is not supported for the Print run type. Depending on the expat status, the tax statement can be split by expat status periods. This option is used primarily for testing purposes and the creation of special tax statement scenarios. |
Include Pending Calculations |
This option is not supported for the Print run type. In Interface mode selecting this option would include pending calculations, not finalized periods. This option is primarily available to support testing. |
Sort Criteria |
Select the fields that you want the system to use to sort the data. |
Company, Canton, and Empl ID |
Select the company, canton, and employee IDs for the statement that you want to print. |
Selecting the Print run type creates a PDF file using the current official form. The system retrieves data from the XML as created through the dashboard. A barcode is enabled. In case the text in lines 2.3, 4, 7, 13.1.2, 13.2.3, 14 or 15 exceeds the size of the form, the system creates an additional page, which displays unlimited text. The second page is confirmed by the tax administration as well.
Note: Use this run control only for the Print run type. The creation of Interface files must be done through the dashboard before you use the Print run control. You can also create the PDF using the Swissdec tool called Viewgen and ignore this mass print. You can select subsets here. To print and view single employee IDs, use the online view and update feature.
Use the Override Tax Statement CHE page (GPCH_IF_TX07) to view tax statements online.
Navigation:
Override Tax Statement CHE page

Click View.
The system displays the PDF file in your browser.
Navigation:
Maintain LAW Data 2006 CHE page 1 of 3
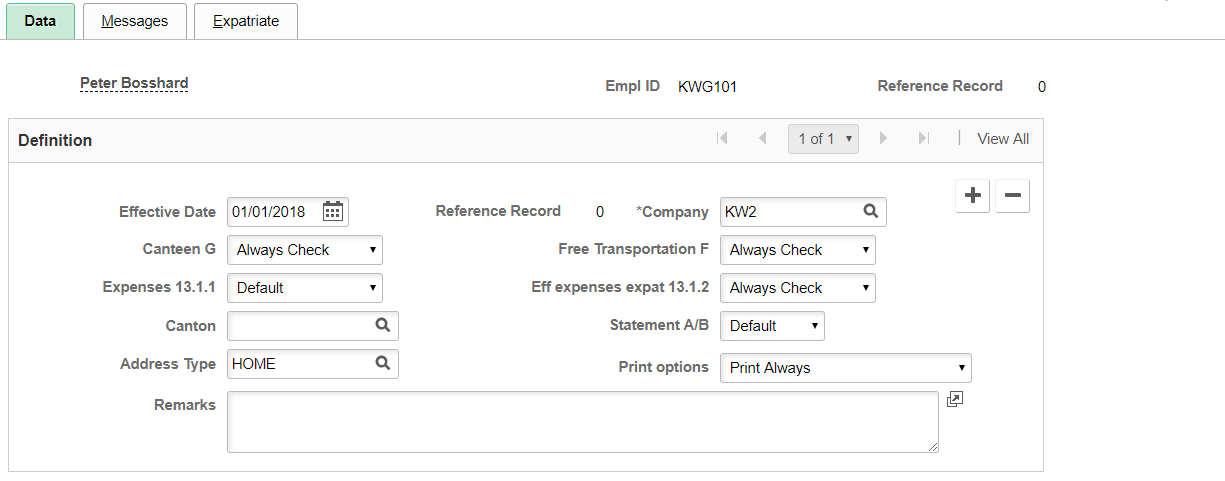
Field or Control |
Description |
|---|---|
Canteen G |
Override Check box G. Values are:
|
Free Transportation F |
Override Check box F. Values are:
|
Expenses 13.1.1 |
Override Check box 13.1.1. Values are:
|
Expenses 13.1.2 |
Override Check box 13.1.2. Values are:
|
Canton |
Override canton of residence |
Statement A/B |
Override tax statement / Pension Statement (default ‘Tax’). Values are:
|
Address type |
Override source of address (default ‘HOME’) |
Print Option |
Override Check box G, Values are:
|
Remarks |
Track reason of override (not transferred to XML) |
Maintain LAW Data 2006 CHE page 2 of 3
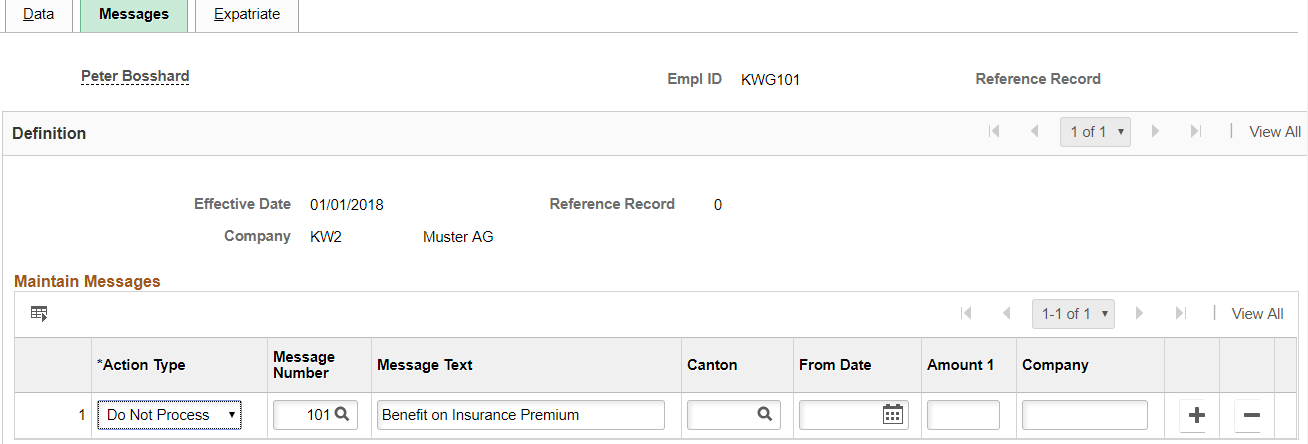
Field or Control |
Description |
|---|---|
Action |
Add, suppress or update generated messages. Values are:
|
Message Nbr |
Prompts for existing messages ( 1 to 9001) |
Message Text |
Defaults to setup text, overwritable as of setup |
Canton |
Fills canton in message (e.g.in message 1) |
From Date |
Fills from date in message (e.g. in message 1) |
Amount 1 |
Fills amount in message (e.g. in message 7) |
Company |
Fills company in message (e.g. in message 5) |
Maintain LAW Data 2006 CHE page 3 of 3
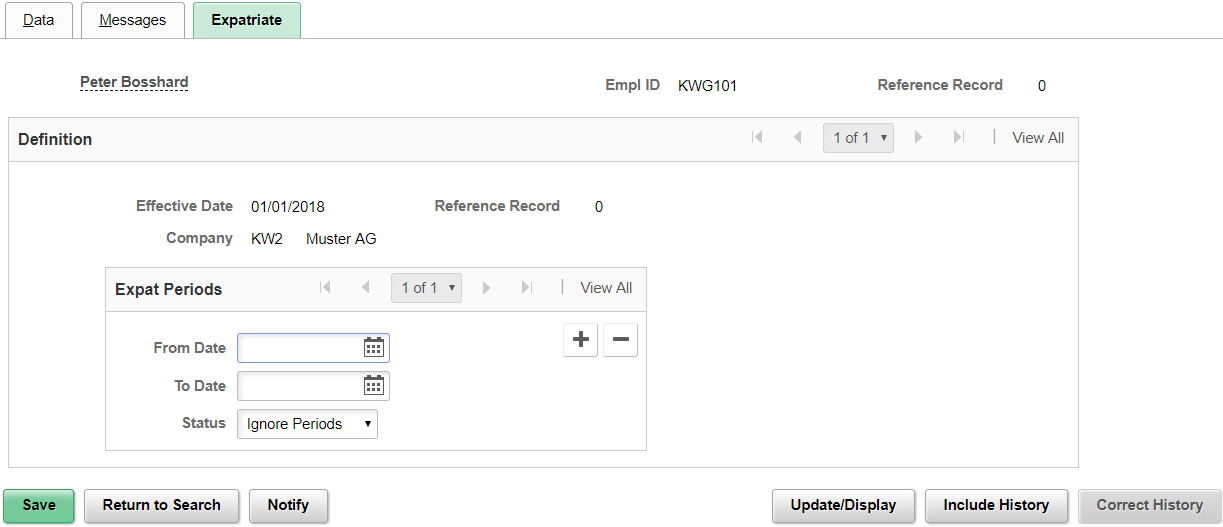
Field or Control |
Description |
|---|---|
From date |
Begin of Period to consider Status |
To date |
End of Period to consider Status |
Status |
Defines whether period is ignored or split. Values are:
|
Use the Override Tax Statement CHE page (GPCH_IF_TX07) to update Tax Statements online.
Navigation:
Override Tax Statement CHE page

To update the tax statement online:
Access the Override Tax Statement CHE page.
Select the Add a new row (+) button.
The page should now have an additional row.
Click View and save the PDF file.
Click Edit.
The system displays the Tax Statement Lump page (GPCH_IF_TX07_1). Use this page to change the Form ID that the system is using to create the PDF.
Click OK.
Click Edit.
The PDF file displays as a form.
Update any values that you want to change.
Click Save.