Generating and Managing Dashboard XML
This topic provides an overview on dashboard processing.
|
Page Name |
Definition Name |
Usage |
|---|---|---|
|
GPCH_EG_RSTATUS |
Run a set of reports based on a previously defined domain. The system generate XML only for providers within the domain, which are mapped on the company level. |
|
|
GPCH_EG_FSTATUS |
View the files that were processed in the run. From this page you can also validate, save, or ping the receiver's WebServer and send the file. |
|
|
GPCH_EG_SEND_OPTN |
Select the options that you want to use to transmit or save the file. |
|
|
GPCH_EG_PING_INTER |
Send an XML message to the distributor. |
|
|
GPCH_EG_BI_PUBLISHER |
Select the parameters that you want to use to run the report. You can also select the criteria by which you want the system to sort the information. |
|
|
File Management Options Page |
GPCH_FILE_PROCESS |
Upload, Save, Delete and View Files. Optional as well further Process and Print by BI Publisher. See also Robust File Management. |
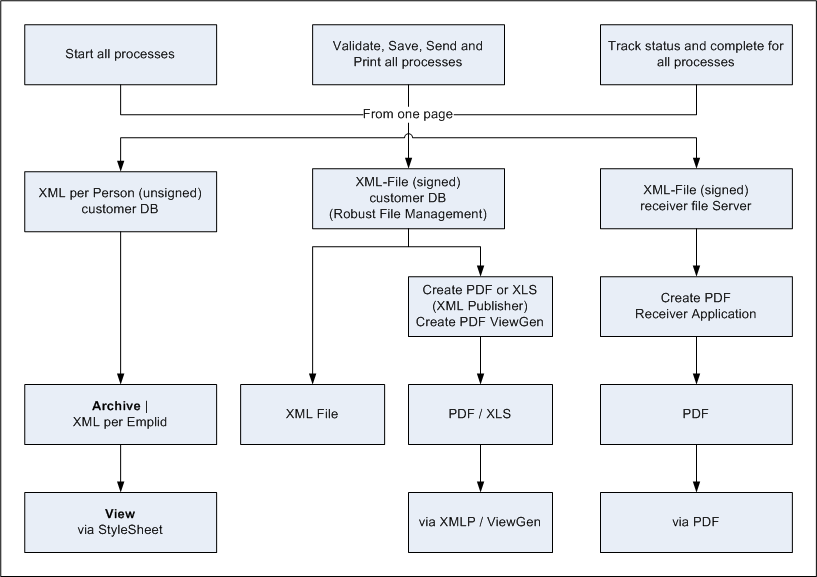
From a central dashboard, eGovernment allows you to control the year end and monthly reporting process. Using the dashboard you can Create and manage the XML, which is finally sent to the authorities.
Here is a graphical representation of how the system processes information from the dashboard:
GP Switzerland dashboard manages all XML based reporting with one framework. The following graphics provides an overviewon for all monthly and yearly XML created by dashboard. User starts Job GPCH_AE_XML which launches - depending on navigation ( monthly or yearly ) – in the backend jobs GPCH_MON or GPCH_ELM.
This example illustrates XML based reporting CHE.

Graphical representation of how the system processes information from the dashboard
Use the Prepare Files page (GPCH_EG_RSTATUS) to run a set of reports based on a previously defined domain.
The system generates XML only for providers within the domain, which are mapped on the company level.
Navigation:
Navigation:
Prepare Files page (1 of 2)

Prepare Files page (2 of 2)
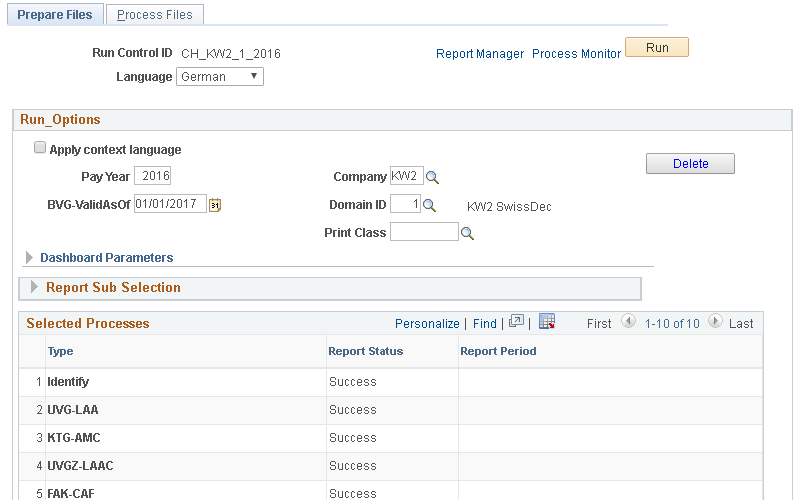
Prepare files page (when the Navigation is Monthly)

Field or Control |
Description |
|---|---|
Apply context language |
Print the report in the employee’s language. |
Pay Year |
Enter the year for which you want to run the reports. |
Company |
Select the company for which you want to run the reports. |
BVG Valid asOfDate |
The system populates this field with the first day of the pay year +1 that you entered. It is used for the control of individual BVG_LPP processing. |
Domain ID |
Select the domain ID that you set up on the ELM Domain Setup CHE page. The system populates the values that you entered on the ELM Domain Setup CHE page in the fields below. Note: Prompt will only show domains of type ‘Yearly’. |
Delete |
To delete this information, click the Delete button, then save and then enter domain ID again (same or other). Note: Delete will clean up all entries, whether the data was already sent to the authorities or not. By default, the delete button is not active. If inactive, delete button is hidden (till Image 17 just grey ). You can activate it by setting the PowerUser parameter to ‘Y’ in the Online Processing CHE page. |
Print Class |
Only submitted for Monthly audit (see Chapter 31). |
Dashboard Parameters |
These fields describe the various parameters used to create the current file. This information is entered on the ELM Domain Setup CHE page and is populated when you select the domain ID (this entry is mandatory for GE ISEL). |
Run |
Dashboard processing follows the logic of payroll processing (starting with Image 17). It allows to run again as long as the file was not sent. Thus send will play the same role as finalize does in payroll processing. The Run button is greyed out if the file is sent (that isa Declaration ID has been filled in the second folder). |
Report Sub Selection (when the Navigation selected is Yearly)
Using the fields in this group box selects only a subset of information, which means the entities need to be included in the processed domain.
Field or Control |
Description |
|---|---|
Provider Type |
Select the type of provider for whom you want to create the XML Mandatory for ISO20022, if more than 1 homebank per company. |
Provider Code |
Select the provider for whom you want to create the XML. Mandatory for ISO20022, if more than 1 homebank per company. |
EmplID (employee ID) |
Select the ID(s) of the employee(s) for whom you want to create the XML |
Company |
Select the Company (only for GE ISEL XML, see Yearly). |
Group List ID |
Select a group for which you want to create XML. You create group lists on the Group List page (select Set Up HCM, Product Related, Global Payroll & Absence Mgmt, Payee Groups, Group Lists, Group List). See also Creating Group Lists. |
Select Processes |
|
Type |
Domains selected for this domain Always included: Identify and Write File Others depend on set definition |
Report Status |
The system displays the status of the report after the job has been run to completion. |
Report Period |
For Navigation Yearly it’s always blank (display only) |
Note: Once a user saves the page, the system creates a table suite for the dashboard. Setup information, like company address, domain attributes, and so on, have already been saved in XML format. When starting the job the process invokes all included legal processes, but only executes processes that are included in that domain set. The last step is an Application Engine process (GPCH_AE_ELM), which creates the final XML file. The system stores XML snippets for each person on the employee ID and domain level (GPCH_EG_PERSON). The system also stores provider totals as well as ready to go XML snippets on the provider and year level. All further viewing and reporting inside the dashboard uses the XML file as a source.
Report Sub Selection (when the Navigation selected is Monthly)
There are subtle differences to the filed when the Navigation is Monthly. The field descriptions for the Report Sub section when the Navigation is Monthly is given below:
Field or Control |
Description |
|---|---|
Provider Type |
Select the type of provider for whom you want to create the XML Mandatory for ISO20022, if more than 1 homebank per company. |
Provider Code |
Select the provider for whom you want to create the XML. Mandatory for ISO20022, if more than 1 homebank per company. |
EmplID (employee ID) |
Select the ID(s) of the employee(s) for whom you want to create the XML |
Company |
Select the Company (only for GE ISEL XML, see Yearly). |
Group List ID |
Select a group for which you want to create XML. You create group lists on the Group List page (select Set Up HCM, Product Related, Global Payroll & Absence Mgmt, Payee Groups, Group Lists, Group List). See also Creating Group Lists. |
Select Processes |
|
Type |
Domains selected for this domain Always included: Identify and Write File Others depend on set definition |
Report Status |
The system displays the status of the report after the job has been run to completion. |
Report Period |
For Navigation Yearly it’s always blank (display only) |
Current Pay End Date |
Defaults to the most recent open month end in the current year. Users can edit this field. |
New Period Run |
This field is available, if the current period got finalized. Click to open the next period in this year. Validates for ISO20022 for existing Payment Prep and for others against Payr Run for this months |
Note: Once a user saves the page, the system creates a table suite for the dashboard. Setup information, like company address, domain attributes, and so on, have already been saved in XML format. When starting the job the process invokes all included legal processes, but only executes processes that are included in that domain set. The last step is an Application Engine process (GPCH_AE_ELM), which creates the final XML file. The system stores XML snippets for each person on the employee ID and domain level (GPCH_EG_PERSON). The system also stores provider totals as well as ready to go XML snippets on the provider and year level. All further viewing and reporting inside the dashboard uses the XML file as a source.
Use the Process Files page (GPCH_EG_FSTATUS) to view the files that were processed in the run.
From this page you can also validate, save, or ping the receiver's WebServer and send the file.
Navigation:
Or
Navigation:
Process Files page
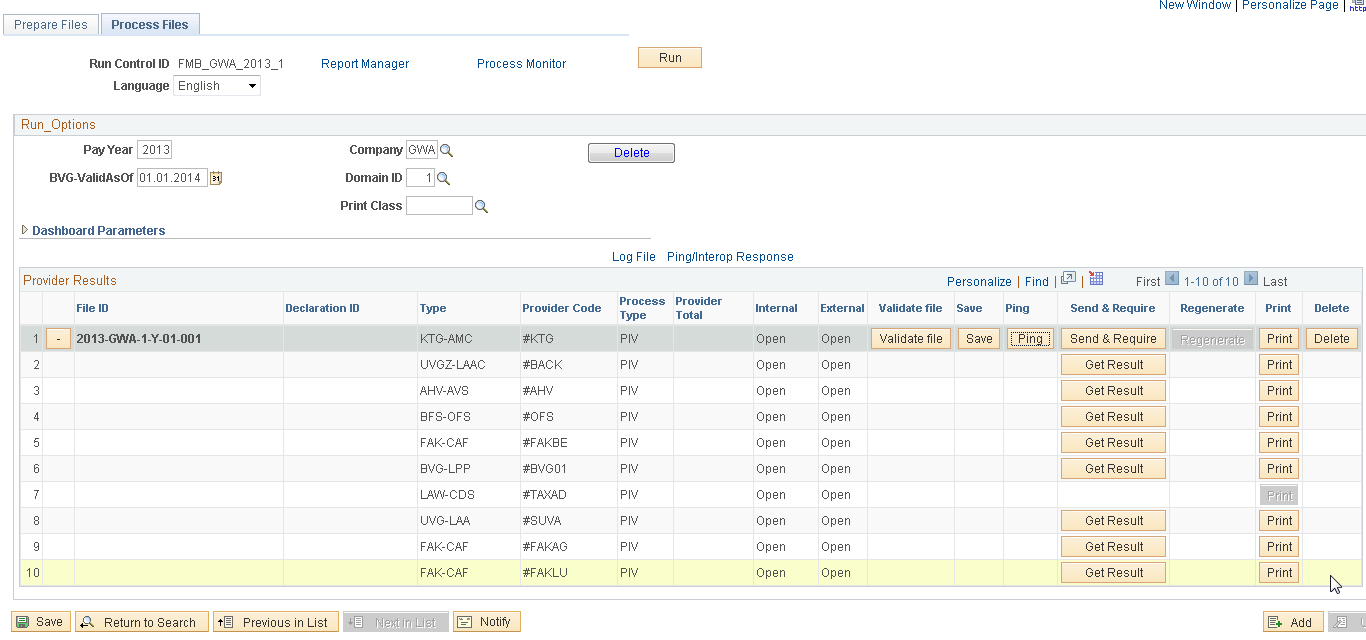
From this page you can validate, print, save, or send the file. Further you can print (via ViewGen a/o BI Publisher) , or ping the receiver's WebServer
Field or Control |
Description |
|---|---|
Log File |
Link to internal log – only available after validation. |
Ping/Interop Response |
Link to Ping/Inter Response – only available after Ping/Interop. |
+/- |
Explode or collapse receiver list for this file. |
File ID |
File ID created as combination of Year-Company-DomainSet-PeriodOption-Period-SerialNumber. In the XML we additionally append the time stamp to File ID. |
Declaration ID |
The Swissdec distributor returns the Declaration ID. Once the file is sent, the Declaration ID will be shown here. |
Type |
Lists the domain type of receivers addressed by this domain set. |
Provider Code |
Lists the receivers addressed by this domain set. |
Process Type |
Shows the assigned Process type (EIV or PIV). For Swissdec, PIV is mandatory (will set distributor to true). |
Provider Total |
Currently not supported. |
Internal |
Displays status of the Internal processing (status of creation and validation). |
External |
Displays status of the external processing (status of send & response). |
Validate File |
Click to identify any validation errors (against the related XSD provided by authorities). The system displays a message that tells you if the XML file validates (JAVA validation on XSD) and lists all validation errors, if any. |
Save |
The Save button will guide you to the Transmit Options page in Saving mode. The sub page File Management option gives you the options to save the data in test mode, as a signed file and or as encrypted file. For ISO 20022 Transmit Options page is skipped and it directly navigates to File management options. For all domains (but requested for ISO 20022): For restricted access to XML see Parameter “Security” in Online Processing Options CHE. Note: By default, Test option is inactive and Encrypt is active. Sign option follows the setup default. To override this option, set the PowerUser parameter to ‘Y’ in the Online Processing Setup CHE page. |
Ping |
Click the Ping button to confirm that connection to the Swissdec distributor is active and Interop button to perform an operability check. The system displays the Ping / Interop details page where you can choose either Ping or Interoperability. |
Send&Request |
If you selected the PIV (Prozess Integriertes Verfahren) transmission method on the Providers page (Set Up HCM, Product Related, Global Payroll & Absence Mgmt, Social Security / Insurance, Providers CHE, Providers), the system displays the Send&Request button. The Send&Request button will guide you to the Transmit Options page in Transmission mode. The sub page gives you the options to send the data in test mode, as a signed file and or as an encrypted file. |
Regenerate |
If the files were sent already with success, click the Complete Flag in the ‘Review files’ folder. This will grey out the Send button and activate the Regenerate button. Click this button to regenerate the file. This creates new generations of the files, appending the ID numbers with sequence numbers (_n) to identify the generation. You can now send the files again. Internally, the files will have new request IDs and the request IDs that preceded them. Using this information, the receiver can identify the files as replacements for the files that were sent previously. Per Definition this feature is only available for PIV mode. |
|
Click to view the file you generated. In this page, you can compare 2 XML files using XSLT processing. The system displays the information in a separate browser window using the BI Publisher or Swissdec ViewGen. ViewGen is available for all Swissdec domains (except BVG_LPP). BI Publisher provides output for internal usage for all domains. |
|
Delete |
Will delete this file, but not the other files for this domain set. |
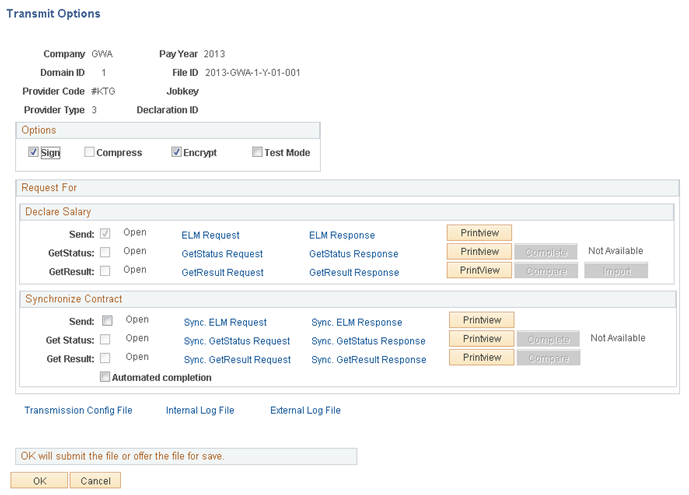
Use the Transmit Options page (GPCH_EG_SEND_OPTN) to select the options that you want to use to transmit or save the file.
To view the internal and external log files and response from the receiver's Web Service.
To compare or import data included in responses from the receiver’s WebService.
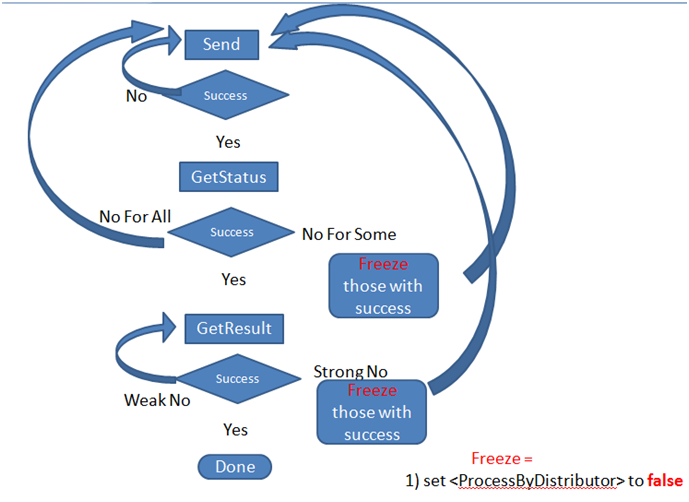
Process flow DeclareSalary - GetStatus - GetResult
Navigation:
Click the Send & Require or the Save button on the Process Files page.
Transmit Options page
Field or Control |
Description |
|---|---|
Company |
Current Company. |
Pay Year |
Current Year. |
Domain ID |
Current Domain Set. |
File ID |
Current File ID. |
Provider Code |
Current Provider. |
Jobkey |
Jobkey returned by distributor for DeclareSalary and Synchronize Contract. |
Provider Type |
Type of current Provider. |
Declaration ID |
Declaration ID returned by distributor. |
Sign File |
By default the system makes this check box unavailable for use. If the PowerUser parameter is set to Yes in the online properties, the system enables this check box. Deselect this check box to create an unsigned file. For Swissdec, it’s mandatory to sign. For non Swissdec XML, uncheck the sign. |
Compress File |
Currently, this feature is not supported. |
Encrypt File |
Select this check box encrypt the file. Selecting this option will cause the encrypt mode to be different from the standard setting for the provider. |
Test Mode |
By default the system makes this check box unavailable for the user. If the PowerUser parameter is set to Yes in the online properties, the system enables this check box. Selecting this check box creates the XML with a Test Tag that informs the receiver that this file is only sent for testing purposes. |
Request For |
|
Send line |
|
Check box |
If checked, the OK will save or send (depending on entry mode) the file = Service DeclareSalary / Synchronize Contract.. After file has been sent, the response will automatically popup as PDF via BI Publisher. |
Text |
Status of send (open, error, success). |
ELM Request |
Link to unsigned source XML (via File management subpage). |
ELM Response |
Link to decrypted response XML (via File management subpage). |
Printview |
Displays decrypted response as PDF via BI Publisher – same as the one that automatically pops up after send. |
GetStatus line(Only available for PIV) |
|
Check box |
If checked, the OK will send the GetStatus Request . After file has been sent, the response will automatically popup as PDF via BI Publisher. |
Text |
Status of send (open, error, success). |
ELM Request |
Link to unsigned source XML (via File management subpage). |
ELM Response |
Link to decrypted response XML (via File management subpage). |
Printview |
Displays decrypted response as PDF via BI Publisher – same as the one that automatically pops up after send GetStatus. |
Complete |
Active, if completion possible or required. |
Text |
Status of Completion. |
GetResult line(Only available for PIV) |
|
Check box |
If checked, the OK will send the GetResult Request . After file has been sent, the response will automatically popup as PDF via BI Publisher. |
Text |
Status of send (open, error, success). |
ELM Request |
Link to unsigned source XML (via File management subpage). |
ELM Response |
Link to decrypted response XML (via File management subpage). |
Printview |
Displays decrypted response as PDF via BI Publisher – same as the one that automatically pops up after send GetResult. |
Compare |
Only for BVG_LPP. Compares response data with the data in current DB and shows the result in a PDF automatically called via BI Publisher. |
Import |
Only BVG_LPP and Source tax. Supports import of BVG_LPP deductions and Source tax changes. |
Automated Completion |
Only for BVG_LPP SynchronizeContctcomplete automatically. |
Transmission Config File |
Link to the config file with transmission parameters. |
Internal Log File |
Link to internal log. |
External Log File |
Link to external log. |
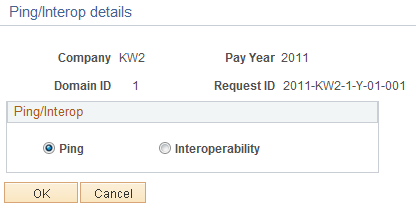
Use the Ping/Interop details page (GPCH_EG_PING_INTER) to send an XML message to the distributor.
Navigation:
Click the Ping button on the Process Files page.
Ping/Interop details page
Field or Control |
Description |
|---|---|
Ping |
Select this option to send a standard XML message to the distributor. If the connection is set up properly, you will receive the same message. |
Interoperability |
Select this option to send various test strings to the distributor so they can evaluate the response. |
Use the BI PUBLISHER/ViewGen Parameters page (GPCH_EG_BI_PUBLISHER) to select the parameters that you want to use to run the report.
You can also select the criteria by which you want the system to sort the information.
ViewGen is a reporting Tool provided by Swissdec, which supports PDF creation, validation and some conversion on XML. This tool is embedded in GPCH dashboard and the recommended way to create legal reports the Swissdec certified domains. User needs to get hold of the Swissdec ViewGen zip and upload the same in Load Files CHE.
|
Plugin |
Oracle Support |
|---|---|
|
AhvFreeReport |
Yes |
|
AhvReport |
Yes |
|
FakReport |
No |
|
FakDetailedReport |
Yes |
|
KtgReport |
Yes |
|
Barcode |
No |
|
TaxAccountingReport |
Yes |
|
UvgReport |
Yes |
|
UvgzReport |
Yes |
|
Anonymizer |
Yes |
|
Validator |
Yes |
|
AhvProofOfInsuranceReport |
Yes |
|
StatisticReport. |
Yes |
|
QstReport |
Yes |
|
QstResultReport |
Yes |
Navigation:
Click the View button on the Process Files page.
BI Publisher/ViewGen Parameters page

Field or Control |
Description |
|---|---|
ViewGen |
Select if you want to create output by ViewGen. Following ViewGen parameters are only active, if ViewGen is checked. |
Run in Batch |
Check in case creation of output will exceed time limit for online transactions (standard setting = 5 minutes). When run in batch mode a message will inform the user, that run got scheduled. |
Plugin Override |
ViewGen supports more than 10 different plugins (see ViewGenReadMe.txt). The system fills the plugin by default. User can override the Plugin (e.g. for AHV Free Report, Validation only or to anonymize the XML) |
Additional Parameters |
Enter additional parameters. The following parameters get filled by default language: -l DE|FR|IT (default as of processing language) canton (for Source Tax only): -c XX (default as of processed canton) Beyond most used parameters are for ViewGen reports are: specimen: -w Creates wartermarked report Additionally for Tax Statement: Position of Address: -i LEFT|RIGHT (default is RIGHT) Third language English instead of Italian: -n (full list see ViewGen Readme) |
Payee List ID |
Select a Payee List to create an output for a subset of the generated XML. Note: Print by Payee List will restrict the XML itself to the selection. Thus user may take a backup of the full XML and restore the same after selective print. |
Sort Criteria |
ViewGen supports sort for Emplid, First Name, Language, Last Name and Residence Canton for 1 to 3 sort levels. Note: Print by Payee List will restrict the XML itself to the selection. Thus user may take a backup of the full XML and restore the same after selective print. |
BI Publisher |
Select if you want to create output by BI Publisher. |
Language Code |
Select the language that you wan to use for the reports. Supported languages are English, French, German, and Italian. |
Output Format |
Select either PDF or XLS. |
Sub Selection |
Select the sub selection mode that you want the system to use; either By Emplid or By Group List. |
Empl ID and Group List |
Depending on the option you selected in the Sub Section field, the system displays one or both group boxes. |
Sort Criteria |
Select the preferred method in which you want the system to sort the data. Sort options include: AHV-Nbr, Birthdate, Empl ID, Last Name, and First Name. |
AHV Report and ALV Report |
These options are only available for the AHV_AVS report. Here you can choose, whether you want to the AHV_AVS yearly report or the AHV_AVS exempted report. |
XSLT Processing |
|
XML Files |
Select XML files you want to compare. Standard supports comparison of FAK_CAF YearToDate files. |
XSLT Name |
Select HTML object, which contains the XSLT to process the files assigned under the XML files. Standard provides the XSLT GPCH_XSLT_Compare. |
XSLT Result |
Link to File management Option Page to manage the result created by XSLT processing. See also Robust File Management. |
Use these steps to generate the Swissdec standard domain XML (AHV_AVS, FAK_CAF, UVG_LAA, UVGZ_LAAC, KTG_AMC, BFS_OFS, LAW_CDS, Source Tax):
|
Step |
Action |
Navigation Path |
|---|---|---|
|
1 |
Create a new provider for each Swissdec standard domain. Provider for Source Tax need to named like this #XX. Where XX is the 2 character Canton Code, e.g. #BE, #ZH etc. |
|
|
2 |
Add the new provider you created in step 1 to a company. |
|
|
3 |
Create a new domain for Swissdec standard domain (1 for all or tailored to your company needs). |
|
|
4 |
Assign Swissdec standard domain attributes to employees. |
|
|
5 |
Run the payroll for the company. |
|
|
6 |
Prepare Dashboard for Swissdec standard domain. |
|
|
7 |
Click Run. Then check the Process Monitor to make sure the process runs to success. |
|
|
8 |
Validate the created file. |
|
|
9 |
Review results. |
Print View (for all Swissdec domains besides BVG_LPP and BFS_OFS preferred usage is ViewGen). |
|
10 |
Send File to Swissdec distributor. For PIV: use Send button For EIV: use Save button Save file to a directory of your choice and Upload to Swissdec distributor using EIV Portal |
See also Robust File Management. |
|
11a |
Review Response, for EIV. |
Swissdec EIV Portal. |
|
11b |
Review Response and Complete for PIV. |
Send GetStatus Complete (if applicable) Send GetResult |
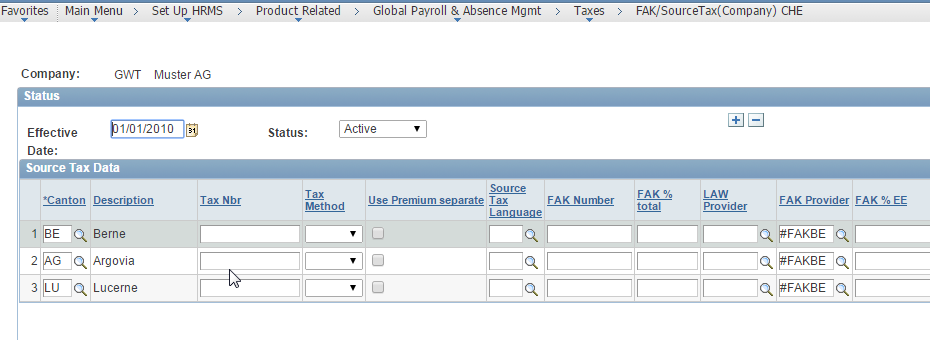
In case a company reports to a “Verbandsausgleichskasse”, it reports all cantons to this institution We support XML creation for multiple cantons with the same customer account. See Swissdec guidelines chapter 3.17.4 We use the XML creation with the ‚normal‘ setup ( = 1 Provider for each canton ) Now we identify the Mode ‘Verbandausgleichskasse’ by the existence of the Canton-/Provider Mapping in Canton The following setup triggers the creation of XML for Verbandsausgleichskassen.
Navigation:
FAK/SourceTax (Company) CHE page
Field or Control |
Description |
|---|---|
FAK Provider |
Dummy Provider for ‘Verbandsausgleichskasse’ – not mapped in Company-Provider page. |
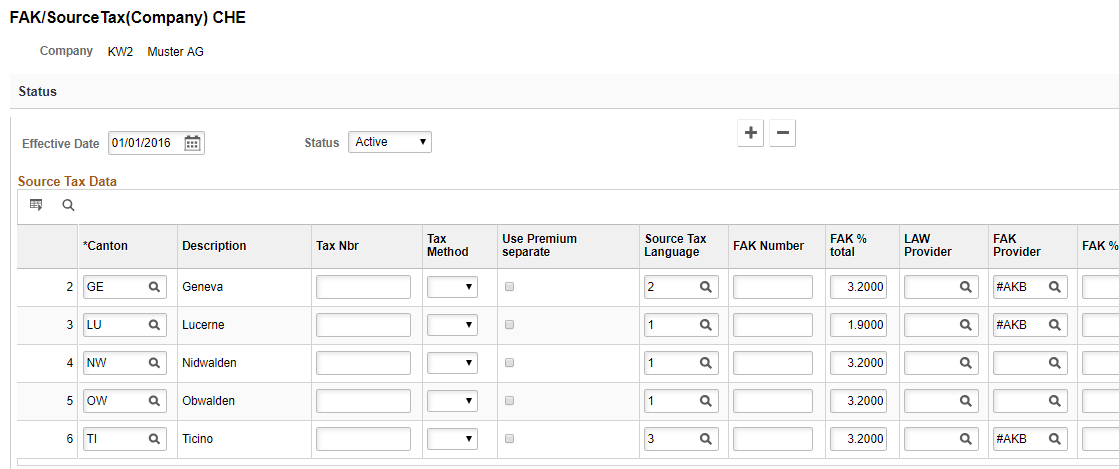
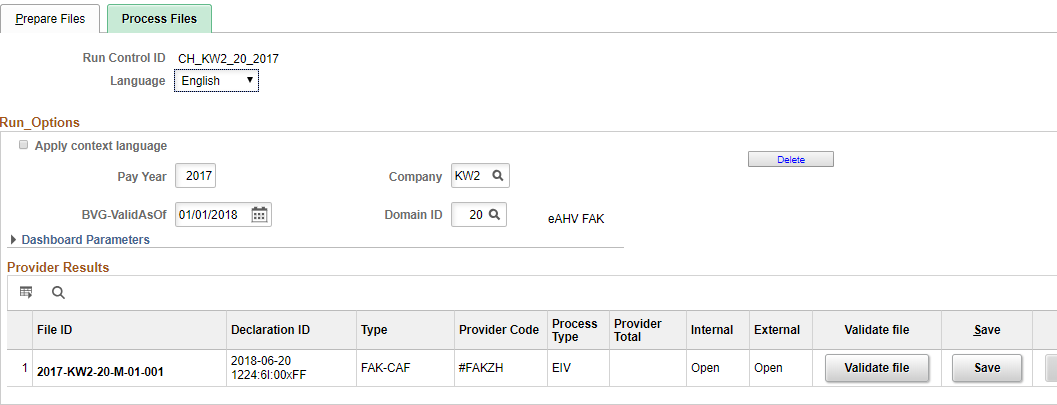
Use the Prepare Files page (GPCH_EG_RSTATUS) for preparing XML file for FAK_CAF Monthly Processing (AK Banken and AK Versicherung).
Processed cantons get identified by the existence of the Canton-/Provider Mapping similar to the creation of XML for Verbandsausgleichskassen.
Navigation:
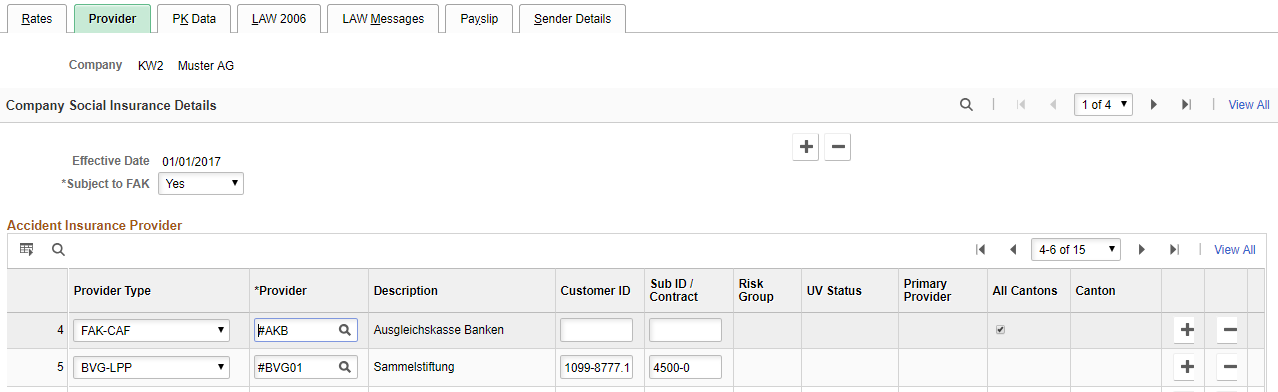
This example illustrates the fields and controls on the FAK/SourceTax (Company) CHE Page. You can find definitions for the fields and controls later on this page.
Field or Control |
Description |
|---|---|
FAK Provider |
AKB Provider and this is the only mapped provider in Company-Provider page. |
This example illustrates the fields and controls on the Provider Page.
Navigation:
Process Files Page
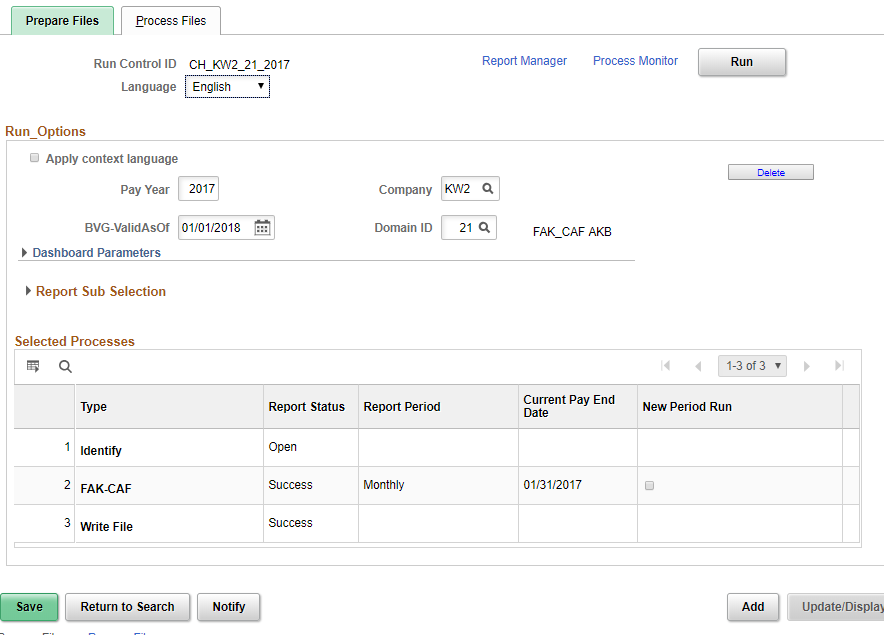
XML for Ausgleichskasse Banken and AK Versicherungen needs to be created in a single domain. In this domain, FAK_CAF mode AKB was selected. This mode does not provide a certificate, therefore you need to deselect the Sign check box on the provider level. You need to create the file in EIV mode, as there is no integrated sending. Therefore, you must save the file to a directory of your choice and upload the file from there to the website provided by Ausgleichskasse Banken or Ausgleichskasse Versicherungenthe.
Note: Once you save the page, the system makes the period display only. If you run the process for a specific month, you can either rerun the process for the month or run the process for the next month. For both scenarios you need to select the New Month Run check box. The system provides a new field that you can use to enter a new date. If you select a new month, the system keeps the old data and switches to the next month. If you select the same date again, the system asks you to delete the current period before you continue. Once you run the process for a particular month, you can view history for the months from the Process Files page. Children without National ID are included in the resulting XML the TAG SV-AS-Number is filled like this “000.CHILD:KWG109” where KWG109 is the EMPLID.
See also Setting Up FAK_CAF Reports
Use the Prepare Files page (GPCH_EG_RSTATUS) for preparing XML File for FAK_CAF YearToDate Processing (eAHV).
Navigation:
Prepare Files
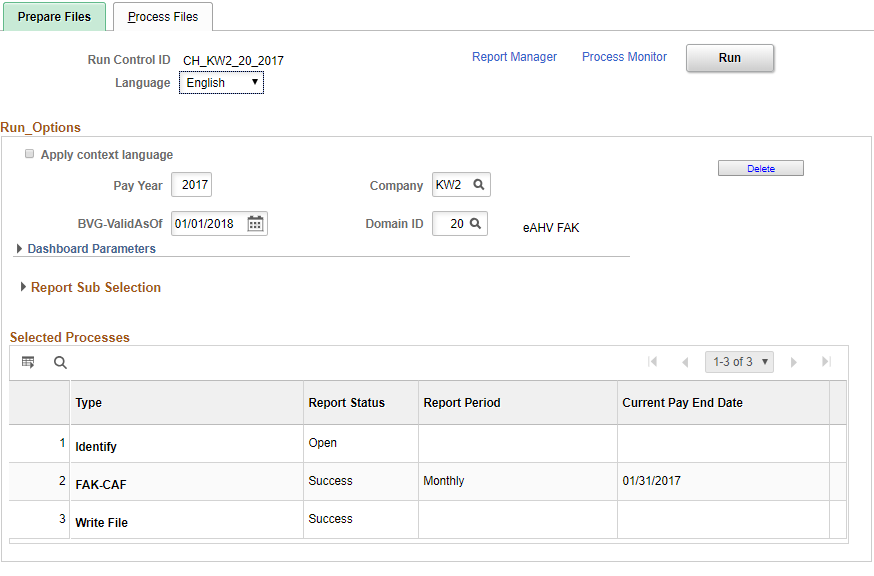
XML for eAHV needs to be created in a single domain. In this domain FAK_CAF mode eAHV is elected. It cannot run in a package with other processes. This mode does not provide a certificate, therefore you need to deselect the Sign check box on the provider level. You need to create the file in EIV mode, as there is no integrated sending. Therefore, you must save the file to a directory of your choice and upload the file from there to the website provided by the proposed receiver.
Further we need this provider as the only FAK_CAF provider in Company mapping with attribute ‘All cantons’.
Provider Page

Note: Once you save the page, the system makes the period display only. If you run the process for a specific month, you can either rerun the process for the month or run the process for the next month. The New Month Run check box is only available after the current month got ‘completed’.
Transmit Options
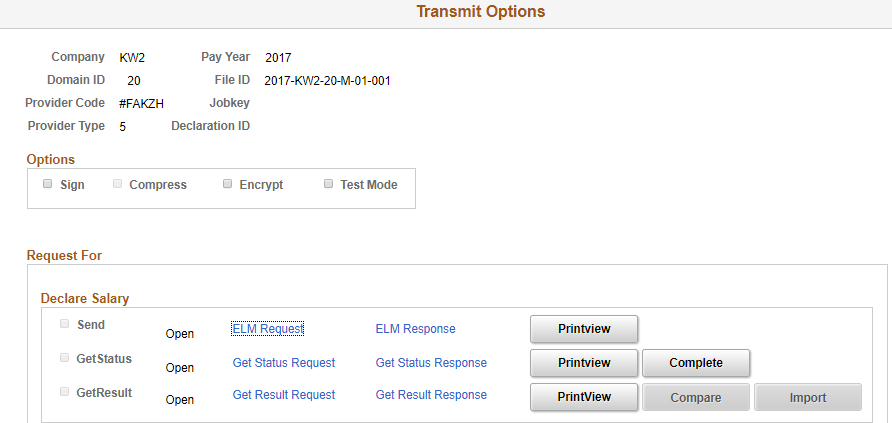
Completion is done in subpage Transmit Options by click the complete flag on line ‘GetStatus’
This example illustrates the fields and controls on the Process Files page.
Once complete is executed the New Period flag will be active and time stamp of completion is filled under ‘Declaration ID’. The system provides a new field that you can use to enter a new date. If you select a new month, the system keeps the old data and switches to the next month. If you select the same date again, the system asks you to delete the current period before you can continue. Once you run the process for a particular month, you can view history for the month from the Process Files page. Children without National ID are not included in the resulting XML and user finds a notification for such cases in the log file.
See also Setting Up FAK_CAF Reports
Use the Prepare Files page (GPCH_EG_RSTATUS) for preparing Source Tax XML Geneva.
Navigation:
Access the Prepare Files page (Global Payroll & Absence Mgmt, Authority Correspondence, XML based reporting CHE, Year End XML CHE, Process Files).
Prepare Files page
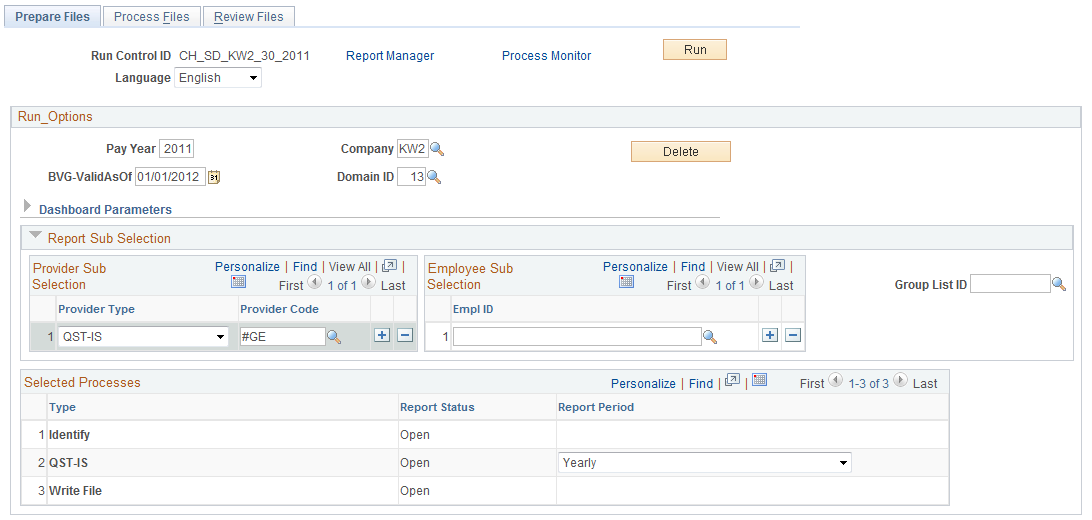
Creating Yearly XML (GE Only)
Field or Control |
Description |
|---|---|
Provider Type and Provider Code |
Select provider type QST-IS and the provider #GE to create the XML. These fields are mandatory. |
Report Period |
Defaults to Yearly (display only) |
Note: The source tax XML needs to be created in a single domain. It cannot run in a package with other processes. The GE tax administrations does not provide a certificate, therefore you need to deselect the Sign check box on the provider level. You also need to create the file in EIV mode, as there is no integrated sending. Therefore, you must save the file to a directory of your choice and upload the file from there to the website provided by the Geneva (ISEL) tax administration.
Preparing XML ISO 20022
Use the Prepare Files page (GPCH_EG_RSTATUS) for preparing XML File for ISO 20022.
Preparing XML Audit
Use the Prepare Files page (GPCH_EG_RSTATUS) for preparing XML Audit.
Preparing XML EO for AKB
Use the Prepare Files page (GPCH_EG_RSTATUS) for preparing XML EO for AKB.