Managing Cret@ Reporting
This section gives you an overview of Cret@ reporting and takes you through different processes/ steps involved in this reporting.
As of January 2015, the Social Security launched a new system for companies to report and pay Social Security contributions called the Cret@: Sistema De Liquidación Directa
Cret@ system defines the way Social Security contributions are calculated and reported. With Cret@ reporting system, instead of companies calculating the contributions or reductions, Social Security directly calculates them based on the affiliation data (FGA: Fichero General de Afiliación) and the data provided by the companies. Companies provide the data either by the AFI, FDI or XML files defined by Cret@.
Communication between Social Security and the companies in Cret@ system is bidirectional; that is, the companies send XML files to Social Security and Social Security in turn sends files back to the company. The new XML files that companies need to create and send to Social Security on a monthly basis are listed in the table below.
|
XML File Name |
Description |
Optional or not |
|---|---|---|
|
Solicitud de Borrador |
Request of a draft |
Optional |
|
Fichero de Bases |
XML of Bases |
|
|
Solicitud de Empleados y tramos |
Request Employees-Slices |
Optional |
|
Solicitud de Cálculos |
Request Calculation details |
Optional |
|
Solicitud de Confirmación |
Request Confirmation |
The two major steps involved in generating the XML reports are:
Data Preparation: To prepare data for reporting, the social security section SS SE PREP CRETA runs the formulas
SS FM CRT WAandSS FM CRT Q-WAduring payroll process. This sends data to the writable arraySS WA CRETAduring the regular payroll process and this writable array stores data in recordGPES_CRT_LQ_EEfor use in reporting process and validation process.Reporting: To generate the reports, the reporting process reads the data in the writable arrays.
The response files that Social Security sends in response to the communication from companies are listed in the table below.
|
XML File Name |
Description |
|---|---|
|
Fichero de Trabajadores y Tramos |
Employees Slices Response File |
|
Fichero de Respuesta |
Response File |
|
Fichero de Cálculos |
Calculation Details File |
Important! To activate the Cret@ reporting in your system and thereby start storing results during payroll calculation to be included in the new reports, you need to update the setup variable SS VR CRT FLAG=1.
An Overview of the Business Process Flow
This diagram illustrates the main processes involved in Cret@ reporting.
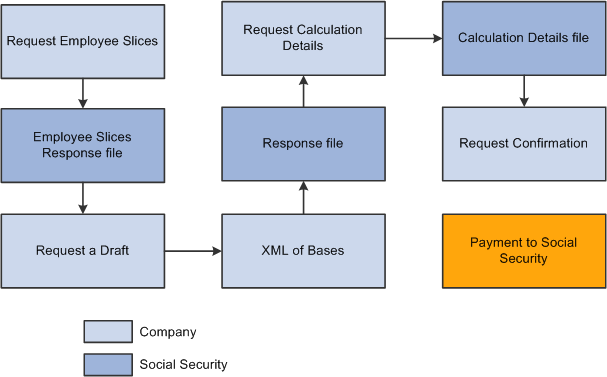
The major steps involved in Cret@ reporting are listed below:
Payroll Calculation: Payroll is run and finalized to ensure employees get paid normally before end of the month.
Checking Slices: Prior to initiating ‘Liquidation of Month’, companies start validating the slices within Social Security. They send a ‘Request of Employee-Slices’ and then load the Employee-Slices response file in the system. This runs an automatic validation with respect to the slices calculated by the system. You can analyze the source of the slices (segmentation triggers) and also run clean-up process. You may also need to run the correction off cycle payroll.
Initiating a Liquidation: They can start the liquidation by sending ‘Request of Draft XML’ file or by sending the XML of bases.
Reporting Social Security Bases: You can generate and send XML of bases. You will be able to send as many files as needed to get all the employees calculated. You can track the status of the liquidation and all the details at any moment in the system
Analyzing Response File: You can load the Response file in the system and check the reported errors. This implies sending of XML of bases
Checking Calculation Details: You can request Calculation Details XML file to Social Security and load the Calculation Details response file in the system which in turn runs a verification process comparing Social Security results with the Company calculated results.
Confirming a Liquidation: You need to confirm the liquidation to get the invoice from Social Security (Request of Confirmation XML file).
Liquidation Types
Compared to FAN reporting, there are some changes to the liquidation types involved in Cret@ system:
Complementary Liquidation with surcharge L09 gets split into:
L90: Complementary liquidation with surcharge due to increase of bases.
L91: Complementary liquidation with surcharge due to new slices.
Reduction Payback L04 is not available in Cret@.
Complementary liquidation of Vacation paid at termination in previous months.
V03: Complementary liquidation without surcharge
V90: Complementary liquidation with surcharge
The default liquidation type for Cret@ report
retroactive payments is L03 (default
value of variable SS VR RTR
L03/L09). The Liquidation Type Override ESP (GPES_PMTRTO_DEF) and Create
Liquidation Type Ovr Setup ESP (GPES_PMTRTR_OVR) components enable you to override the
liquidation type with enhanced flexibility.
Segmentation Triggers and Trigger Cleanup Process
With Cret@ reporting system, Social Security insists that you split employee’s Social Security data into as many slices as situations that affects employee’s contribution. A slice is the part of a liquidation period in which situations affecting contributions remain the same. Changes in the following situations need a split in the period:
Hires/Rehires/Terminations
Change of Social Security work group
Change of occupation code
Change of inactivity type
Change of labor category
Change of contract type
Change of part time coefficient
Change of Job
Change of family bond
Change of special labor relationship
Change of right loss
Reductions (beginning, ending and changes of percentage/amount to reduce)
Absences
The Review Triggers component shows all triggers: iterative, retro and segmentation triggers for all countries. However, the Review Segment Triggers ESP page allows you to manage the segmentation triggers that are considered during calculation and to allow users to easily update. This page lists only the segmentation triggers affecting Global Payroll for Spain.
The Trigger Cleanup process helps you ensure that the payroll takes all changes in the system into consideration. For example, you enter an absence event and it produces some segmentation triggers. Later on, you delete the absence event as it is not needed, but the system still stores the generated segmentation triggers that would have produced a segmentation in the payroll, which is not needed. The Trigger Cleanup process deletes these unwanted triggers.
Note: The Trigger Cleanup is an optional process, but it is highly recommended that you run this process monthly. The clean up process runs for the selected pay group / year / month, irrespective of the criteria you enter in the Selection Criteria group box.
Response File from Social Security
Social Security sends a Response file for all XML files sent by the company. However, we can load a Response file into the system only against an ‘XML of bases’ file sent by the company. None of the other response files can be loaded in the system.
The response file contains a lot of information in the XML of Bases that was originally sent by the company. Additionally, system loads the Error messages. In case of an error being reported, system updates the Liquidation Status to With Errors. The errors are categorized in two levels:
Liquidation Level
Payee level
Each Response file will override the previously loaded errors and includes status for:
Liquidation being reported.
All employees in that liquidation (even if the generated file did not include some of them). This is under the assumption that employees not included in the response file are considered correctly processed.
When we generate a new XML of bases, we update the status and the error list for:
Liquidation being reported
Just the employees being reported.
When the liquidation is correctly processed, you will receive the Message R9529. This updates the status at liquidation level to Validated Without Errors.
Verification Process
Data synchronization between the Social Security system and the company’s system is very important in Cret@ Reporting. Otherwise, the social security contributions of the employee is not processed / calculated correctly. To detect possible discrepancies, there are two verification processes:
A verification process to check if the Slices considered by Social Security (communicated in the Employees-Slices file that can be loaded into the system) match the slice dates calculated during the payroll process in the user’s environment. The discrepancies between Social Security and Payroll system are mainly due to differences in the constructions of slices.
A verification process to check if the Calculations performed by Social Security and included in the Calculation Details file (loaded into the system) match with the Social Security results calculated during the payroll process in the user’s environment.
Note: The data stored during payroll process in the existing Cret@ record (GPES_CRT_LQ_EE) is the source of data in user’s environment for the verification processes.
When loading an Employee Slices XML file or a Calculation details XML file, system automatically runs a specific verification process:
If you load an Employee Slices file, system executes the verification process of slices.
If you load a Calculation Details file, system executes the verification process of calculations.
Note: Calculation Details file contains information about the processed slices and therefore the system runs the verification process of the slices together with the verification process of the calculation. When we run the verification process of the calculation, system checks both Employee Slices and Calculation Details.
Additionally, you can run the verification processes from the Review Cret@ Liquidation ESP page. This option is available only when a file is loaded into the system.
|
Page Name |
Definition Name |
Usage |
|---|---|---|
|
GPES_TRIGGER_SEG |
Manage segmentation triggers that affect Global Payroll for Spain. |
|
|
GPES_RC_CRT |
Create Cret@ files for the electronic transmission to the Social Security agency. |
|
|
GPES_CRT_LQ_REVIEW |
Monitor the liquidation status for a month. |
|
|
GPES_CRT_LQ_ERR |
Review the list of errors that have been loaded in the system |
|
|
GPES_CRT_LQ_VR_REV |
Review the contribution data at a liquidation level. |
|
|
GPES_CRT_COL_DAT |
View Cret@ results by Company, Employer Social Security Number, Month / Year, and Payment Type. |
|
|
GPES_CRT_COL_EDL |
View details of bases, hours and indicators of the employee for a slice. |
|
|
GPES_CRT_COL_VRFY |
View details about contribution data and slices. |
|
|
GPES_CRT_IND_DAT |
View the Cret@ results for an employee. |
|
|
GPES_CRT_LQ_DOC |
Review the XML files generated through the system for Cret@ reporting. |
Use the Review Segment Triggers ESP page (GPES_TRIGGER_SEG) to manage segmentation triggers that affect Global Payroll for Spain. Using this page, you can run the clean up process to remove obsolete triggers. We recommend you to run this clean-up process (optional, but highly recommended) before payroll process every month in order to clean the obsolete triggers. The process checks the existing triggers and the information in the source records, and in case they do not match, you can see the list to decide if you want to delete those triggers or not.
Note: You should slice the social security calculation only in cases specified by Social Security. If you report contribution bases of an employee in a different way than what Social Security is expecting, they will not calculate contributions for that employee. That is, if you modify or delete data that results in segmentation, you need to update the segmentation trigger record accordingly.
Navigation:
This example illustrates the fields and controls on the Review Segment Triggers ESP page. You can find definitions for the fields and controls later on this page.
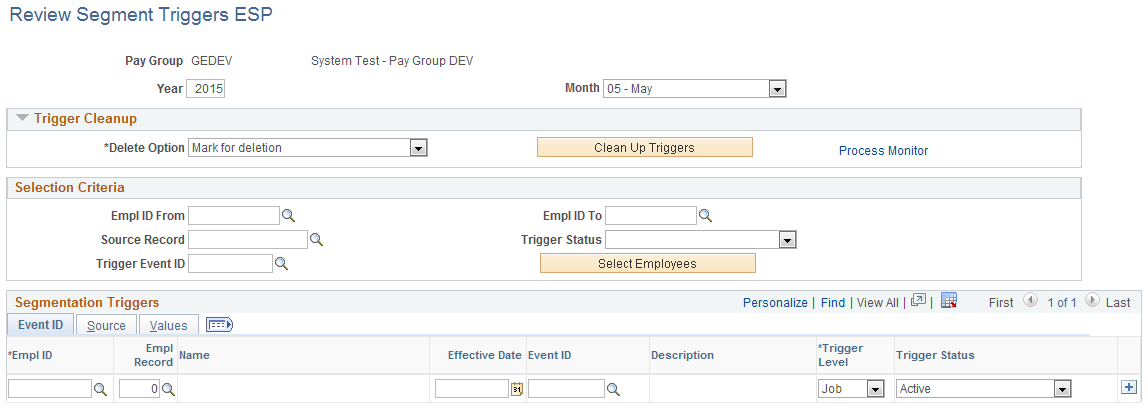
Trigger Cleanup
Use this group box to run a clean up process that deletes obsolete segmentation triggers. The process checks the existing triggers and the information in source records, and if they do not match, the process lists the triggers and allows you to delete them.
Field or Control |
Description |
|---|---|
Delete Option |
The values available are:
|
Clean Up Triggers |
Click this button to initiate the clean up process. |
Process Monitor |
Click this link to access the Process Monitor page where you can monitor the progress of the clean up process. |
Selection Criteria
Field or Control |
Description |
|---|---|
Empl ID From and Empl ID To |
Select the range of employees for whom you want to search for triggers. |
Source Record |
Select the source of the trigger. |
Trigger Status |
Select the status of the trigger. Possible values are: Active. Cancelled, or Marked for Deletion. |
Trigger Event ID |
Select the trigger event to use. This determines the type of segmentation to use to process the segmentation events: Period or Element. In case of element segmentation, it also determines the elements to segment. |
Select Employees |
Click this button to display the employees based on the criteria you selected. |
Segmentation Triggers - Event ID
Field or Control |
Description |
|---|---|
Effective Date |
Displays the effective date of the segmentation trigger. |
Event ID and Description |
Identifies the type of segmentation processed and the elements sliced (in case of element segmentation). |
Trigger Level |
The possible values are:
|
Trigger Status |
The possible values are:
|
Segmentation Triggers - Source
Field or Control |
Description |
|---|---|
Empl ID and Name |
Identifies the payee affected by the change that generates the trigger. |
Empl Record |
Identifies the job affected by the segmentation event. |
Effective Date |
Decides how to segment a pay period. For example, an effective date of June 15 tells the system to divide the June pay period into two slices or segments, one with dates June 1 to June 15 and another with the dates June 16 to June 30. |
Event ID |
Identifies the trigger event id associated with the triggering condition. It tells the system what type of segmentation to apply and the elements to segment (in the case of element segmentation). |
Trigger Source |
Identifies how the segmentation trigger is generated. The possible values are:
|
Created |
System date and time when a trigger is generated. If you change the data and the segmentation trigger is generated repeatedly, the timestamp allows you to identify the instances. |
Source Record |
Identifies the source record from which the segmentation trigger is generated. |
Field Name |
Identifies the field that generates the segmentation trigger in response to a data change. |
Segmentation Triggers - Values
Field or Control |
Description |
|---|---|
Event ID |
Displays the trigger event id associated with the record, field, or value changes as defined in the trigger setup. |
Trigger Field Value and Element |
Displays information about the event associated with the change. |
Note: System does not modify or delete the triggers you have entered manually. System checks only the triggers automatically generated by the system .
In case of triggers affecting already finalized payroll, system does not delete them. Instead, it updates them to ‘Cancelled’. Additionally, system will generate a Retro trigger to ensure that retro calculation is run based on the new situation.
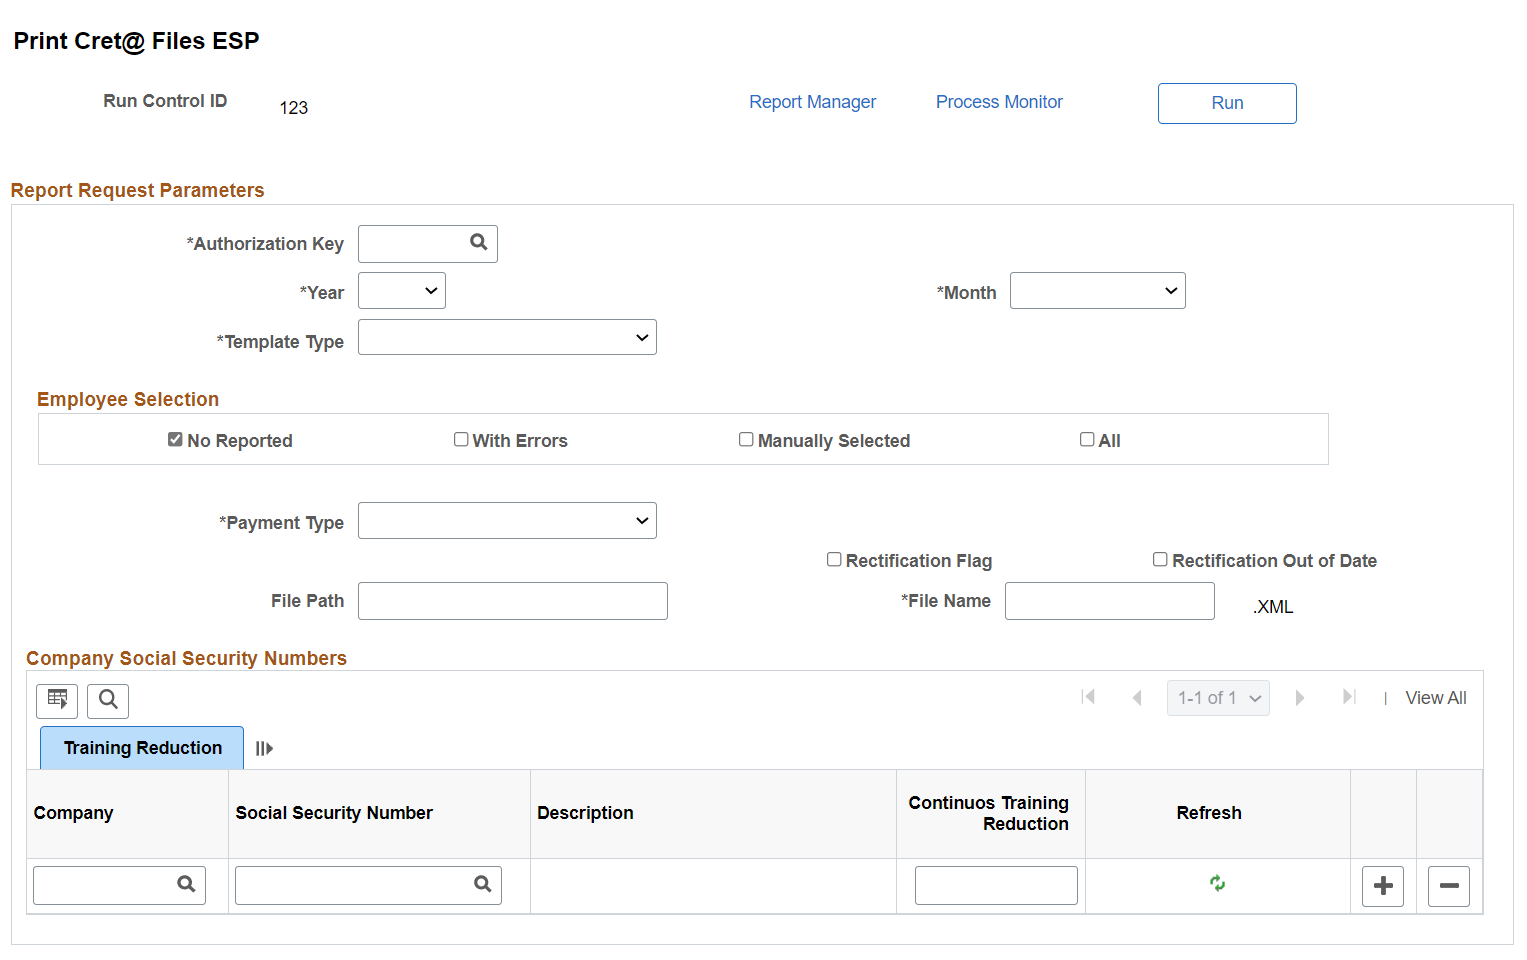
Use the Print Cret@ Files ESP page (GPES_RC_CRT) to create Cret@ files for the electronic transmission to the Social Security agency.
Navigation:
This example illustrates the fields and controls on the Print Cret@ Files ESP page.
Field or Control |
Description |
|---|---|
Authorization Key |
Enter the authorization key for which the XML file is created. The same authorization can manage multiple companies in the same group. |
Year and Month |
Select the year and month for the XML file. |
Template Type |
The values are:
|
Payment Type |
Select the payment type for the report that you want to generate for a specific month for the Employer Social Security numbers that are selected. The possible values are:
|
Break Down of Employees |
Select this check box if you want Social Security to provide the calculations at an employee-level in the response file. Note: This check box appears when you select Request of Calculation Details in the Template Type field. |
Reuse Previous Month Bases |
Select this check box if you want Social Security to load the bases reported for the previous month. This applies only to regular liquidation (L00). Note: This check box appears when you select Request of a Draft or XML of Bases in the Template Type field. This check box is not available for the month of January. |
Negative Bases |
Using this field, you can define how to manage negative deltas in Cret@ reporting. The possible values are:
|
Rectification Flag |
Select this check box to override an already confirmed liquidation. |
|
Rectification Out of Date |
Select this check box if you want to resend a liquidation upon request of Social Security for a rectification process. When this checkbox is selected, the system displays the field Liquidation Number in the grid for Company Social Security Numbers, allowing the user to select the liquidation being replaced. |
File Path |
Enter the directory in which to store the XML file. This is optional. |
File Name |
Enter the name of the file to be sent to Social Security. The file name needs to comply with the legal requirements. The file naming requirements state that the file extension must be .XML and the file name must have 8 characters. The system checks whether the file name follows the naming conventions, and shows an error message if it is not. |
Employee Selection
This group box appears when you select XML of Bases in the Template Type field.
Field or Control |
Description |
|---|---|
No Reported |
Select this check box if you want to generate a XML of bases file just for those employees who were not reported previously. |
With Errors |
Select this check box to select employees who were identified to be in Error after loading a response file from Social Security. |
Manually Selected |
Select this check box to manually select employees. System allows you to modify the status of reporting at employee level, thereby forcing his inclusion in the XML of bases. For more details, see Bases Details Page section. |
All |
Select this check box to get a XML of Bases file that contains all employees, regardless of the status of their communication. |
Company Social Security Numbers - CCC Data
Field or Control |
Description |
|---|---|
Company and Social Security Number |
Enter the Employer’s Social Security number (Código Cuenta Cotización) for which you want to generate the XML file. |
Description and Social Security Number Type |
Displays the description of the Social Security number selected. |
|
Liquidation Number |
Click the search icon corresponding to this field. The list of values displays all the liquidations reported for that CCC (Employer Social Security number). Select the required liquidation you want to replace or rectify. The system generates the new XML of bases just for that liquidation. Note: This field is displayed only when the user select the ‘Rectification Out of Date’ field as mandatory. |
|
Request RNT |
Select this checkbox if you want to request RNT (“Releación Nominal de Trabajadores”) report to Social Security. |
Company Social Security Numbers - Training Reduction
Field or Control |
Description |
|---|---|
Continuous Training Reduction |
Enter the reduction amount corresponding to the continuous training plan (Fundación Tripartita reduction). In case of companies that provide continuous training to their workers, you must enter reductions in Social Security training contributions for inclusion in the XML of Bases file. Note: Enter contributions separately for each Employer Social Security number. |
Refresh |
Click to load the value of available training reduction based on what has been calculated by the Tripartite foundation feature. |
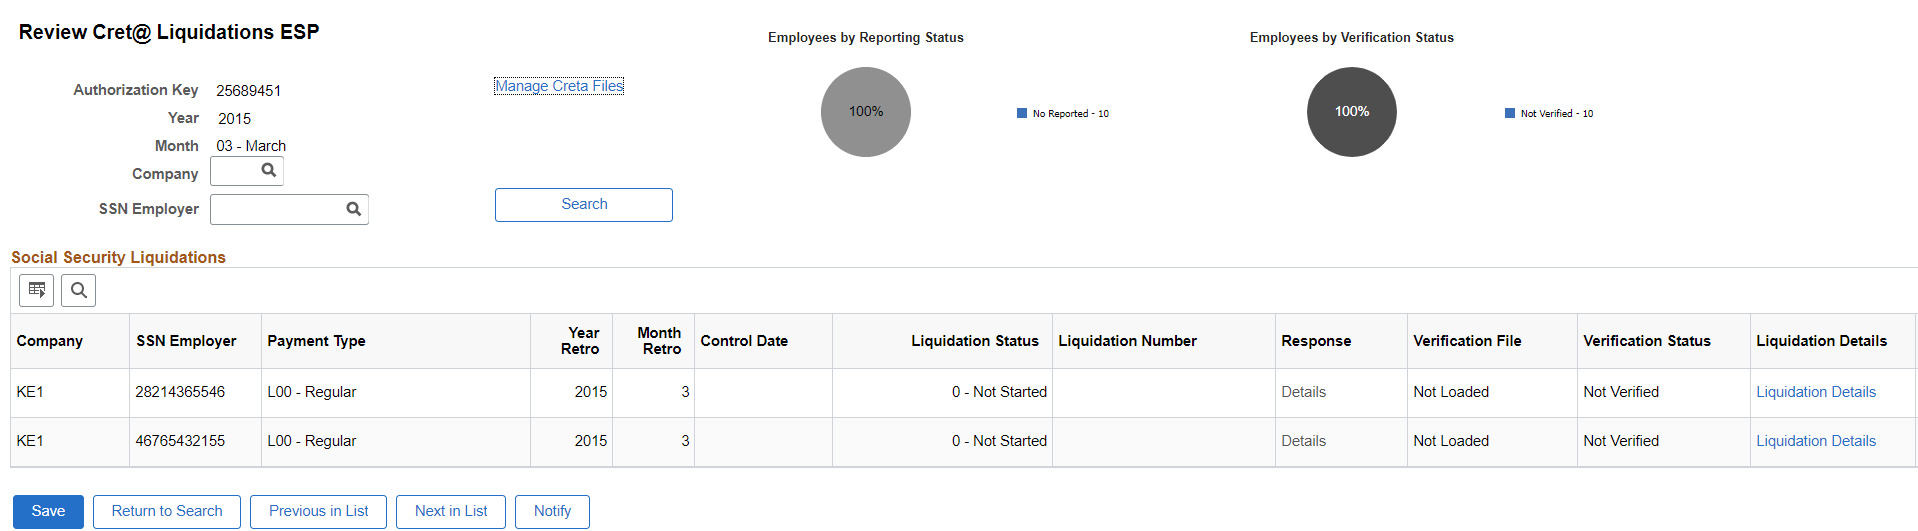
Use the Review Cret@ Liquidations ESP page (GPES_CRT_LQ_REVIEW) to monitor the status of the liquidation for a month.
This is the primary review page from where you can check the status of all liquidations for a specific reporting month. In one shot, you can monitor all the CCC (Employer Social Security number) managed through the same authorization number. This page also gives a graphical representation of the status of liquidations for all the employees to be reported, and the status of the verifications processes that user can run to help during the liquidation business process.
Navigation:
This example illustrates the fields and controls on the Review Cret@ Liquidations ESP page. You can find definitions for the fields and controls later on this page.
Field or Control |
Description |
|---|---|
Authorization Key |
Displays the authorization key selected while searching. |
Year and Month |
Displays the year and month of reporting. |
Company |
You can select a company to filter the data in this page. |
SSN Employer |
You can select a specific CCC to filter the data in this page. |
Manage Creta Files |
Click this link to access the Manage Cret@ Files ESP page, where you can review and manage all the files (generated or received) linked to this liquidation. |
Social Security Liquidations
|
Field or Control |
Description |
|---|---|
|
Company |
Displays the company to which this liquidation belongs to. |
|
SSN Employer |
Codigo Cuenta de Cotización or CCC to which this liquidation belongs to. |
|
Payment Type |
Displays the type of liquidation. The possible values are:
|
|
Year Retro and Month Retro |
In case of complementary reporting, these fields identify the recalculated period. |
|
Control Date |
This field displays the control date for complementary liquidations. For example, in case of retroactivity calculation due labor agreement change, this date will reflect the date of the signature of the agreement. |
|
Liquidation Status |
Displays the status of the specific liquidation. Possible values are:
|
|
Liquidation Number |
Displays the liquidation id reported for the corresponding Employer Social Security number. This field will be populated when the user loads a Response XML file. It will contain the number assigned to the liquidation by Social Security. You will use this number as the reference of the liquidation for example in case of rectification. |
|
Response |
Displays if the response file loaded into the system contains errors. The link opens to a secondary page where you can view the errors at liquidation level and the list of errors at employee level. |
|
Verification File |
Displays the type of response file (either Employee Slices or Calculation Details) that has been loaded and processed. The possible values are:
|
|
Verification Status |
Displays the status of the verification processes at liquidation level. The possible values are:
|
|
Liquidation Details |
Displays a hyperlink that opens up the Liquidation Details page where you can review contribution data at a liquidation level. |
|
Employee Details |
Displays a hyperlink that opens up the Cret@ Collective Data ESP page. |
|
Verification Process |
Displays a hyperlink that allows you to execute the verification process. You can re-run the verification process at any time, without needing to load it again. Note: The link is available only when a file is loaded into the system. |
Use the Errors page (GPES_CRT_LQ_ERR) to review the list of errors that have been loaded in the system. The page displays the list of errors at both liquidation level and employee level.
Navigation:
Click the Details link under the Response field.
This example illustrates the fields and controls on the Errors page. You can find definitions for the fields and controls later on this page.

Liquidation Level Errors
This group box lists the list of errors at liquidation level.
Field or Control |
Description |
|---|---|
Error Code and Error Description |
Displays the code and description of the error reported. |
Liquidation Number |
Displays the liquidation against which the error is reported. |
File Name |
Displays the file name against which the error is reported. |
Creta Code and Creta Value |
Displays the Creta code and value. |
Payee Level Errors
This group box lists the list of errors at employee level.
Field or Control |
Description |
|---|---|
Empl ID and Name |
Displays the ID and name of the employee against whom the error is reported. |
Error Code and Error Description |
Displays the code and description of the error being reported. |
Slice Begin Date and Slice End Date |
Displays the begin and end date of the slice which reported the error. |
Creta Code and Creta Value |
Displays the Creta code and value. |
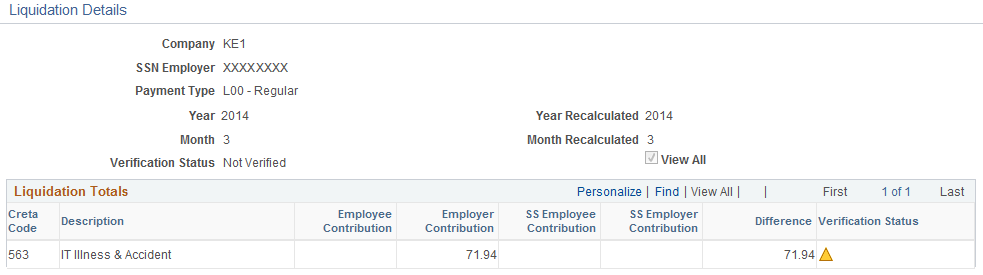
Use the Liquidation Details page (GPES_CRT_LQ_VR_REV) to review the contribution data at a liquidation level.
Navigation:
Click the Liquidation Details link under the Social Security Liquidations group box on the Review Cret@ Liquidations ESP page.
This example illustrates the fields and controls on the Liquidation Details page. You can find definitions for the fields and controls later on this page.
Field or Control |
Description |
|---|---|
Creta Code and Description |
Displays the Cret@ code and description. |
Employee Contribution |
Displays the employee contribution calculated based on the payroll results. |
Employer Contribution |
Displays the employer contribution calculated based on the payroll results. |
SS Employee Contribution |
Displays the employee contribution calculated by Social Security from the Calculation Details response file loaded in the system. |
SS Employer Contribution |
Displays the employer contribution calculated by Social Security from the Calculation Details response file loaded in the system. |
Difference |
Displays the difference between the total contributions calculated by the payroll process and the Social Security. |
Verification Status: Not Verified |
Displays the status of the verification process of calculations at a liquidation level. Possible statuses are:
|
 Matched
  Mismatch
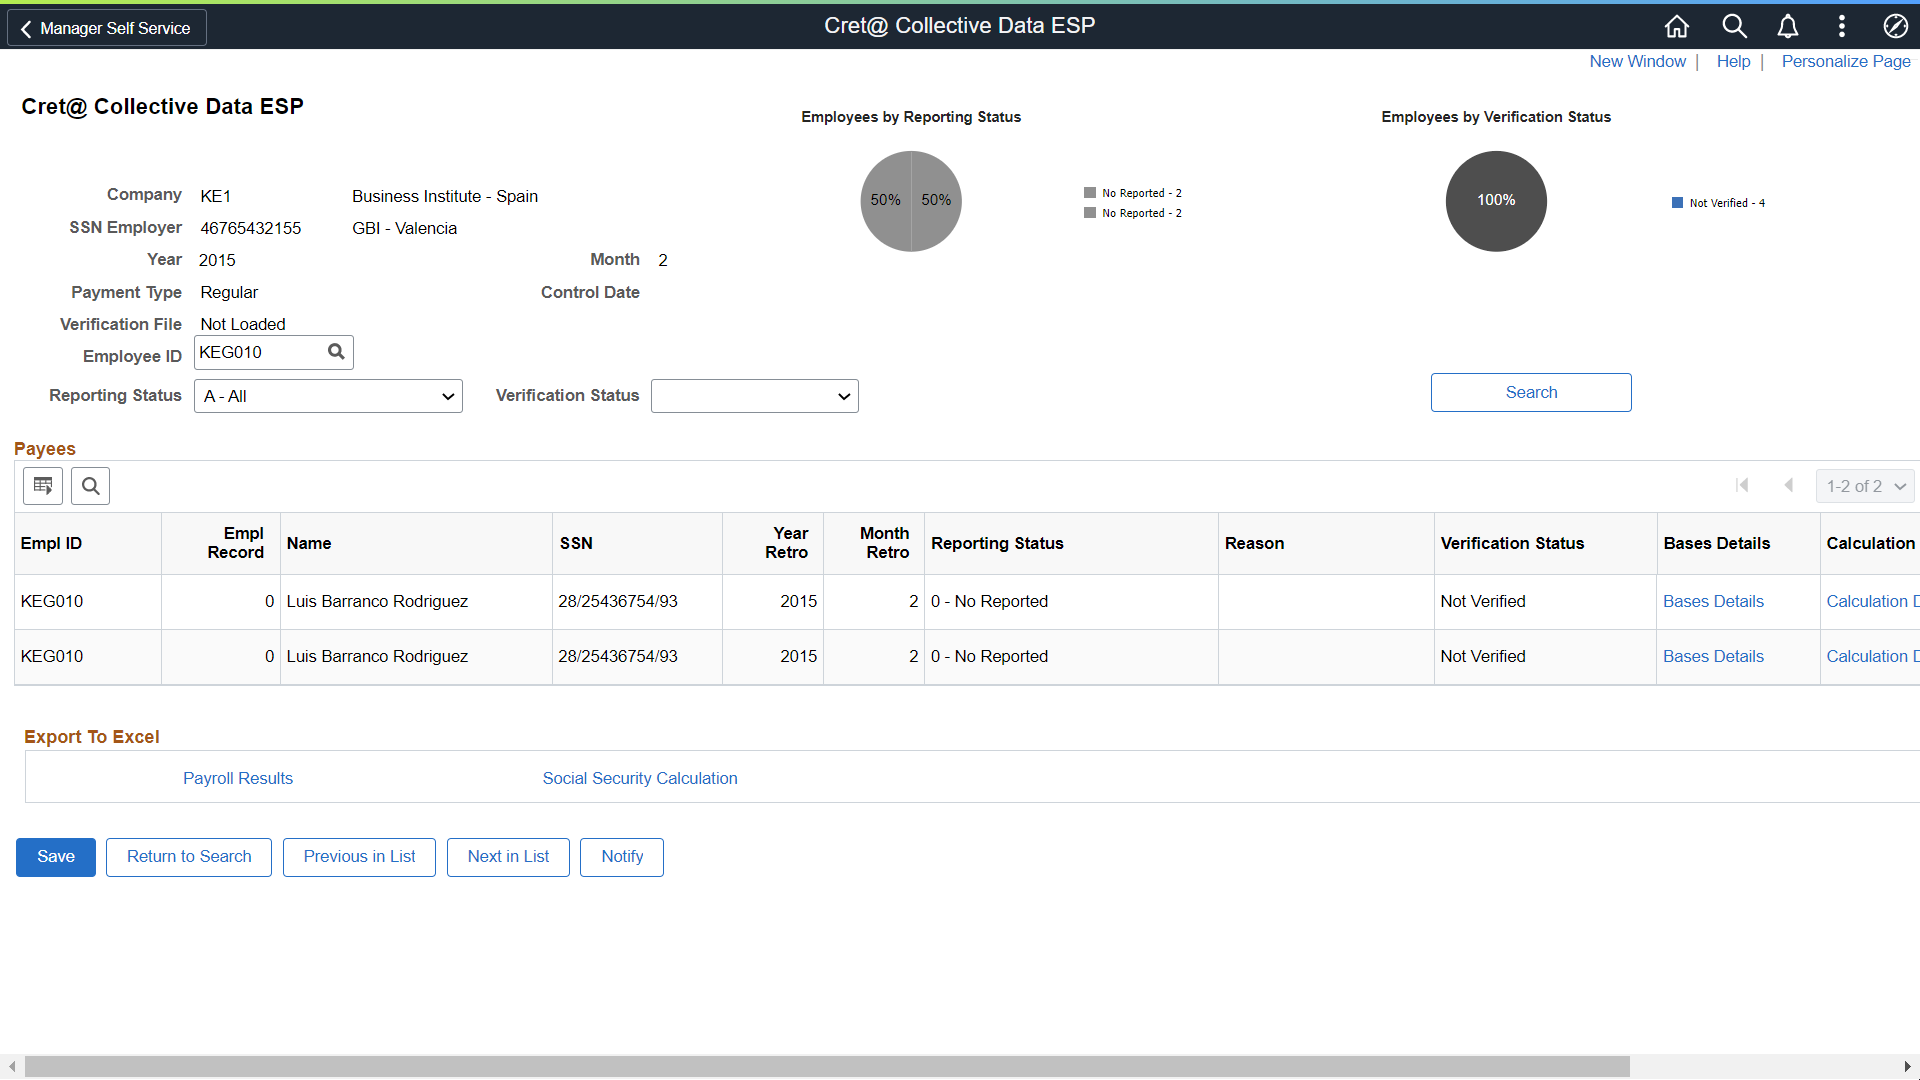
Use the Cret@ Collective Data ESP (GPES_CRT_COL_DAT) page to view Cret@ results by Company, Employer Social Security Number, Month / Year, and Payment Type.
The page displays the Cret@ results, but does not allow you to update, insert or delete data. Any change to the referred record needs to be done by re-running the payroll process.
Navigation:
Click the Employee Details link.
This example illustrates the fields and controls on the Cret@ Collective Data ESP page.
Field or Control |
Description |
|---|---|
Employee ID |
Use this filter field to check data for a specific employee. |
Reporting Status |
Use this filter to check data for specific status. Select the status of liquidation you want to review. The possible values are:
|
Verification Status |
Use this field to filter the data by verification status.. |
Search |
Click this button to search based on the selected filters. |
Payees
Field or Control |
Description |
|---|---|
Empl ID, Empl Record, Name and SSN |
Displays the employee id, record, name and social security number that helps to identify the employee. |
Year Retro and Month Retro |
Displays the year and month of recalculation. |
Reporting Status and Verification Status |
Displays the status of reporting and the verification processes respectively. |
Reason |
In case of reporting status ‘Excluded’, this field displays the reason why the data was not included in the XML of bases. |
Bases Details |
Click this link to open the Bases Details page where you can view details of bases, hours and indicators of the employee for a slice. The Bases Details page also shows the errors contained in a response file, if any. |
Calculation Details |
Click this link to open the Social Security Calculation Details page where you can view details about contribution data and slices. |
Export to Excel
Field or Control |
Description |
|---|---|
Payroll Results |
Click this link to export the contribution data calculated by the system. This is the content of the record GPES_CRT_LQ_EE, filled during payroll calculation. |
Social Security Calculation |
Click this link to export
the contribution data calculated by Social Security, that is the content
of the Calculation Details file (record |
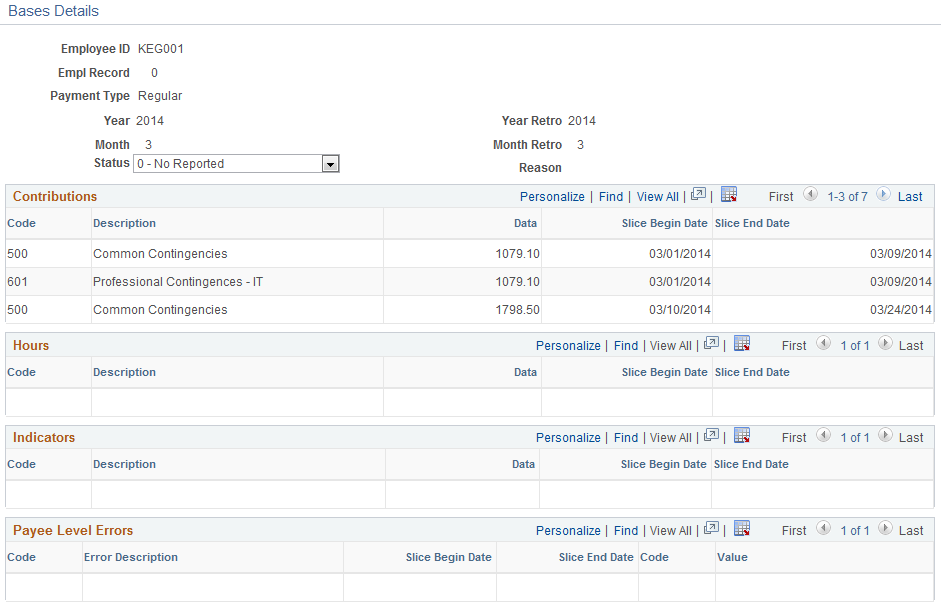
Use the Bases Details page (GPES_CRT_COL_EDL) to view details of bases, hours and indicators of the employee for a slice. The page also shows the errors contained in a response file, if any.
Navigation:
Click the Bases Details link.
This example illustrates the fields and controls on the Bases Details page. You can find definitions for the fields and controls later on this page.
Field or Control |
Description |
|---|---|
Status |
Displays the status of reporting for the selected employee. You can modify the value based on your requirement. The possible values are:
For example, changing status to M allows you to forcefully include the employee in the next XML of Bases. |
Contributions |
Displays the data type C and corresponds to calculated bases. |
Hours |
Displays the data type H and corresponds to the hours to be reported. |
Indicators |
Displays the data type I and corresponds to the flags to be reported. |
Payee Level Errors |
Displays the errors found for an employee (if any), after a response file is loaded into the system. |
Use the Social Security Calculation Details page (GPES_CRT_COL_VRFY) to view details of contributions, slices and the affiliation peculiarities loaded into the system, either by using the Employee-Slices response file or the Calculation details response file.
Navigation:
Click the Calculation Details link.
This example illustrates the fields and controls on the Social Security Calculation Details page. You can find definitions for the fields and controls later on this page.

Liquidation Totals
This group box displays
the liquidation totals for an employee. System calculates these values
based on the data stored during payroll calculation for each employee;
that is, the content of GPES_CRT_LQ_EE for data type ‘Q’.
Field or Control |
Description |
|---|---|
Creta Code and Description |
Displays the Cret@ code and description against which the liquidation totals are displayed. |
Employee Contribution and Employer Contribution |
Displays the Employee and Employer contribution calculated by the system via the Payroll process. |
SS Employee Contribution and SS Employer Contribution |
Displays the Employee and Employer contribution calculated by Social Security based on the Calculation Details response file loaded into the system. |
Difference |
Displays the difference between system data and social security data. |
Verification Status: Not Verified |
Displays the status of the verification process of calculations. Possible values are:
|
Slices Data
This group box displays the slices calculated by the system during the payroll process, along with the slices from Social Security (via Employee Slices file or Calculation Details file)
Field or Control |
Description |
|---|---|
Slice Begin Date and Slice End Date |
Displays the period for which the slice is calculated by the payroll process. |
SS Slice Begin Date and SS Slice End Date |
Displays the period for which the slice is calculated by Social Security. |
Verification StatusNot Verified |
Displays the status of the verification process of calculations. Possible values are:
|
Note: The Slices AFI Data tab displays the affiliation data contained in the response file loaded into the system for each social security slice.
Peculiarities
This group box displays the affiliation peculiarities contained in the response file loaded into the system for each social security slice.
Field or Control |
Description |
|---|---|
SS Slice Begin Date |
Identifies the slice begin date included in the Social Security XML file (either Employee-Slices XML file or Calculation Details XML file). |
Peculiarity Code, Collective, andValue |
Identifies the contribution peculiarities of the specific employee-slice, if any. |
Use the Cret@ Individual Data ESP page to view the Cret@ results for an employee, for a selected period.
Navigation:
This example illustrates the fields and controls on the Cret@ Individual Data ESP page. You can find definitions for the fields and controls later on this page.
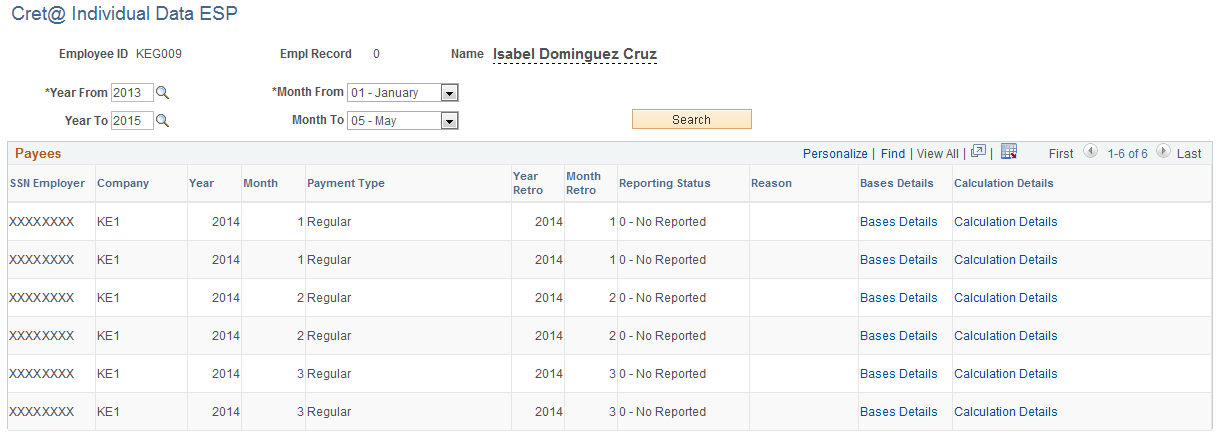
Note: The Cret@ Individual Data ESP page is very similar to the Cret@ Collective Data ESP page. The only difference is that you can use this page to search for an employee’s Cret@ results for a selected period of time. To read more about the page, see topic Cret@ Collective Data ESP Page.
Use the Manage Cret@ Files ESP page (GPES_CRT_LQ_DOC) to:
Review the XML files generated through the system for Cret@ reporting.
Load the response files from Social Security into the system.
Navigation:
Field or Control |
Description |
|---|---|
Authorization Key |
Select the authorization key. |
Year and Month |
Select the reporting month and year. |
Template Type |
Select a template type if you want to attach a response file to categorize it, or if you want to filter. Possible values are:
|
Search |
Click this button to search for the file based on the criteria selected. |
Attach |
Click this button to attach the file to the system. This option is available only for template types Employee Slices, Response, and Calculation Details. |
Social Security Attachments
Field or Control |
Description |
|---|---|
File Name |
Displays the name of the file attached. |
Processed Date |
Displays the processing date. In case of files generated by the system, this date corresponds to the date of last execution of the file. In case of external files attached to the system, this date is either the attachment date, or the date on which the data in the file has been loaded into the system. |
Template Type |
Displays the type of file. The possible values are:
Note: If you are trying to attach a response file, the possible values are: Response, Employee Slices, and Calculation Details. Use the rest of the options while reviewing the XML files generated by the system. |
Status |
Displays the status of the file in the system. Possible values are:
|
View |
Click this link to view the XML file. |
Load XML |
Click this link to run a batch processing that loads the information contained in the file into the system. In case of loading Employee Slices XML or Calculation Details XML, system runs the verification process of slices or calculation automatically. Note: You can load an attached file only once. If you need to load it again, you need to delete the current file, attach it again, and then load it. |