Running the Payslip Report
Using Global Payroll for Mexico the employer can generate printed payslips or digital payslips for each employee. There will also be a digital certificate on the receipt of payment of the employee.
The electronic invoice, CFDI (Comprobante Fiscal Digital por Internet –Fiscal Digital Receipts by Internet) are placed in the server and are sent to the SAT to notify all the payments included on the payroll.
This topic discusses on how to generate payslips.
|
Page Name |
Definition Name |
Usage |
|---|---|---|
|
GPMX_RC_PAYSLIP |
Generates the payslip. Note that you must first define the Group ID to generate the payslip. All groups selected in the Group ID field will automatically be created during the payroll run. |
Use the Create/Print Payslips MEX page (GPMX_RC_PAYSLIP) to run the Printed Payslip Job PSJob process. This job runs the Payslip Preparation process, followed by the Printed Payslip SQR report , and the Create Self Service Payslip process (GP_EPAY). You must set up payslips on the payslip definition pages before running the payslip processes. Also check the configuration elements in Legal Code Payslip MEX page.
When you run the report, the system creates an XML file and stores it in the server. A user can view the XML file in their browser, create a PDF file from the XML and then print it.
Navigation:
Global Payroll & Absence Mgmt, Payslips, Print Payslips MEX
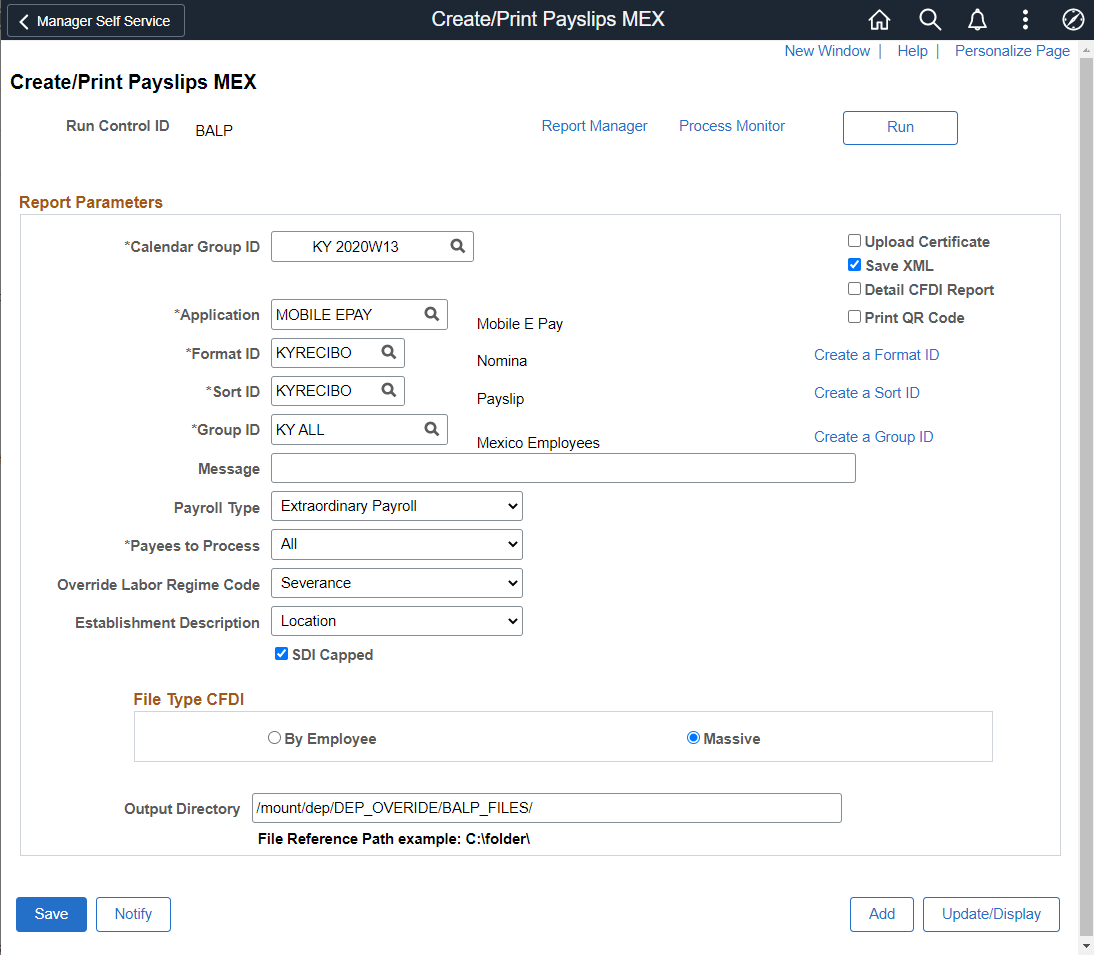
This example illustrates the fields and controls on the Create/Print Payslips MEX page.
Field or Control |
Description |
|---|---|
Calendar Group ID |
Select the calendar group for which you want to load payslip result data. |
Format ID |
Select the Format ID. This value is defined on the Element Lists MEX page and defines the elements listed in the Payslip. |
Sort ID |
Select the Sort ID. This value is defined on the Sort IDs MEX page. |
Group ID |
Enter the criteria that you want to use to select employees. |
Message |
The text you enter here will be printed in the Payslip |
Payroll Type |
Identifies the payroll type that will be generated. Select the payroll as ordinary payroll or extraordinary payroll. |
Payees to Process |
Select the payees to process. Valid Values are:
|
Override Labor Regime Code |
Select the option as ‘Severence’ to override the Labor Regime Code for terminated employees. Note: The Override Labor Regime Code will be validated if Extraordinary Payroll has been select in Payroll Type. This option overrides the Labor Regime Code for terminated employees but not for severance employees. |
|
Establishment Description |
The Valid Values are:
|
SDI Capped |
Select this check box if the SDI capped information needs to be printed in the Payslip. By default, it is selected. |
Upload Certificate |
Select the check box while you upload the certified file. The File Reference path will be the path where the XMLs from the PAC of the corresponding calendar group were placed. |
Save XML |
Select the check box to create the XML to send to the PAC. The files are created in the server path defined in the run control page. |
Detail CFDI Report |
Select this check box to if the element’s information needs to be printed in the CFDI Report MEX. |
Print QR Code |
Select this check box to print QR code. |
Create a Format ID |
Click the link to access the Element Lists MEX page. |
Create a Sort ID |
Click the link to access the Sort IDs MEX page. |
Create a Group ID |
Click the link to create a Group ID. |
File Type CFDI |
Identifies the file type that will be generated. Valid values are:
|
Output Directory |
Specify the directory where generated XML files are stored. XML output (in the form of file) is generated and stored in the specified file output directory. |
Click the Run button to run the payslip process.
Note: Provide a valid file path where the CFDIs (information provided by the PAC) belong to the selected calendar. If there is a mismatch in between the XMLs and the selected Calendar Group the information will be replaced by the last processed file by XML Application Engine which uploaded the Certificate.
As a legal requirement, the electronic payslip, CFDI (Comprobante Fiscal Digital por Internet –Fiscal Digital Receipts by Internet) is sent to the SAT to notify all the payments included on the payroll. CFDI’s are created by payroll regardless to its frequency (weekly, semi-monthly, monthly, bi-weekly, etc.) and these files need to be delivered to SAT prior or on the payment date. It’s also mandatory to provide CFDI’s for annual or special payrolls such as Christmas Bonus, Profit Sharing, Final Payments, Special Payments, etc. These files are provided by the SAT with the technical requirements to create the Electronic Payslips ( CFDI for Payroll).
Once you run the payslip CFDI/XML process, save the generated CFDI/XML file in a folder.
Simulate Stamping with data that the PAC is sending to SAT.
Save CFDI/XML file in the server and using a document editor add the UUID_CFDI print that simulates the XML information .
In the run page, select the option Upload Certifícate .
In the File Reference Path field, specify the location where XML files need to be stored when SAT returns the file with the government information.
This example illustrates the fields and controls on the Create/Print Payslips MEX page when Upload Certificate is selected.

Run the payslip after uploading the saved file
Verify the CFDI/XML with the UUID_CFDI information
Payslip is printed with the new fields.
Payslips and XMLs are available through self-service. The employee will be able to inquire his/her XML by each paid period, also the XML can be saved in a directory or on a device.
Note: CFDI information is extracted from the table PS_GPMX_DIG_TBL where CFDIs are stored.
The CFDI process will print CURP’s mask according to gender if the employee is a foreigner.
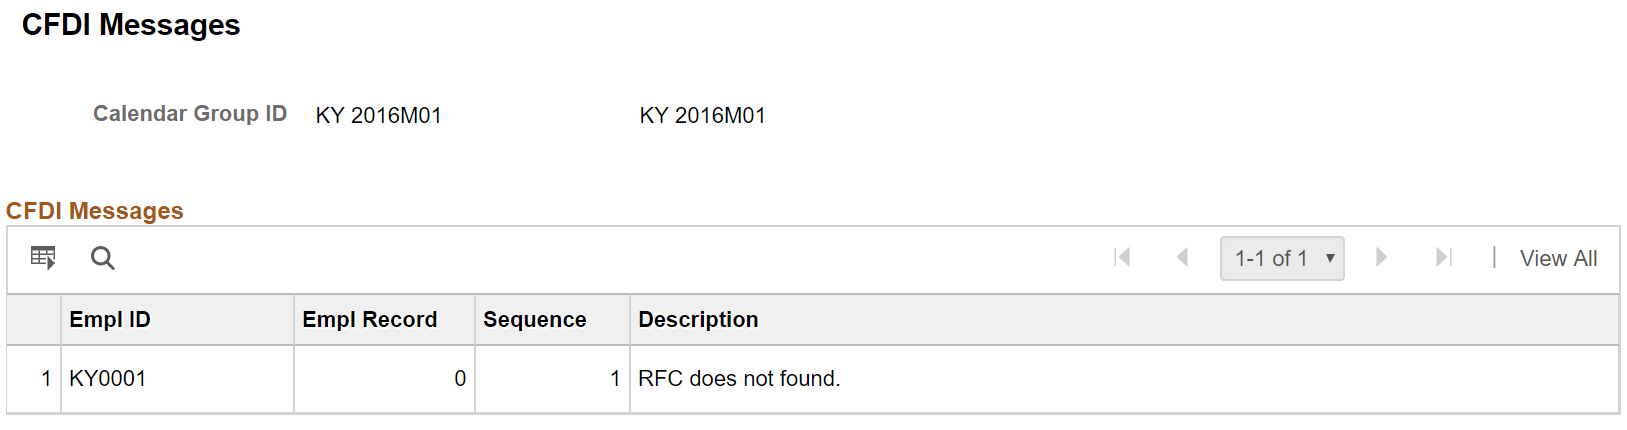
Use the Payee Message CFDI MEX Page to validate the data issues generated for the employees while processing Regular Payroll and the CFDI process. Using this data, the user can correct the errors and regenerate the XML for SAT.
Note: This page shows only the calendar which has been processed after by Create/Print Payslips MEX and with issues detected.
Navigation:
Global Payroll & Absence Mgmt > Absence and Payroll Processing > Review Absence/Payroll Info > Payee Message CFDI MEX
This example illustrates the Payee Message CFDI MEX Page.
Field or Control |
Description |
|---|---|
Calendar Group ID |
Select the calendar group ID for which you want to validate the issues. |
Empl ID |
Shows the employee ID for which data issues are reported. |
Empl Record |
Shows the employee record number of the employee to process in CFDI. |
Sequence |
Establishing the sequence based on the employee errors. |
Description |
Review the messages that are generated during the CFDI process. |