Assigning Repayment Deductions and Amounts
|
Page Name |
Definition Name |
Usage |
|---|---|---|
|
GPUS_LOAN_PYE |
Define repayment deductions. When repayment information is saved on this page, a component interface automatically populates the Element Assignment by Payee and Payee Assignment by Element components with the repayment data and supporting element values (repayment ID). All changes and updates to repayment assignments must be made here and not on the Element Assignment by Payee component or the Payee Assignment by Element component. |
The repayment deductions have a calculation rule of amount with the Amount Type field set to Payee Level. This means that the system does not process repayments unless deduction amounts are assigned to specific payees on the Request Repayments USA page.
This page is used to:
Assign repayments and amounts.
Define payback schedules.
Process additional, non-payroll repayments.
Track and view the status of previously assigned repayments.
Adjust for interest payments.
Forgive existing repayments.
Cancel existing repayments.
To assign a repayment and define repayment amounts:
Use the Request Repayments USA page to assign the repayment to a payee.
Enter the total amount of the repayment.
This is the amount that must be paid back in increments as specified in the repayment schedule (see step 3).
Define the repayment schedule.
The repayment schedule tells the payroll system how much to deduct in each pay period. For example, 100 USD per period, 300 USD per period, and so on.
On the Request Repayments USA page, you also specify:
The deduction used to process the repayment.
You can use the delivered LOAN deduction, or select one that you have created.
Additional payments (if any).
You can use the delivered LOAN AD PYMT deduction to process additional payments, or select one that you have created.
Note: Additional payments are non-payroll payments made outside of the normal repayment schedule. They do not reduce the amount of gross pay; instead, they directly reduce the amount of the repayment balance (LNS VR BALANCE).
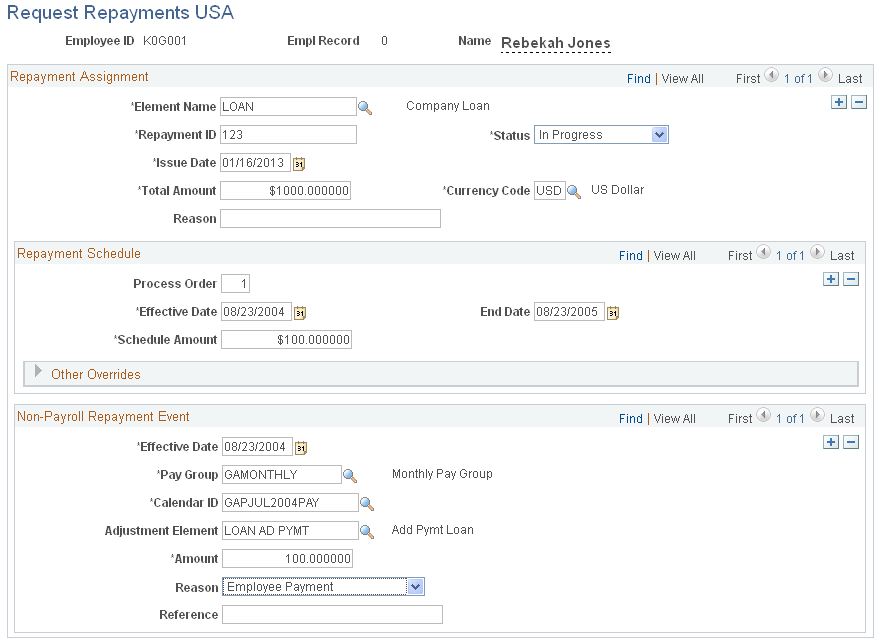
Use the Request Repayments USA page (GPUS_LOAN_PYE) to define repayment deductions.
Navigation:
This example illustrates the fields and controls on the Request Repayments USA page.
Field or Control |
Description |
|---|---|
Employee ID and Name |
Displays the ID and name of the payee to whom you are assigning the repayment. |
Repayment Assignment
Use the fields in the Repayment Assignment group box to define unique instances of a repayment deduction and to define the total repayment amount.
Field or Control |
Description |
|---|---|
Element Name |
Enter the name of the repayment deduction that you want to assign to the payee. You can use the delivered repayment deduction (LOAN), or a deduction that you have created. Note: The prompt table displays only deductions with an element category of LNS. |
Repayment ID |
Enter a repayment ID. The ID must be unique for each repayment. Note: A single payee can have multiple repayments; the system uses the repayment ID to track repayments separately. |
Issue Date |
Enter the date on which the repayment was issued. This field is for information only. It does not affect processing. |
Total Amount |
Enter the total amount of the repayment. This is the amount to be repaid in increments based on the pay period frequency. Note: The LOAN deduction is defined with a frequency of Use Calendar Period Frequency. This means that the amount you enter in the Schedule Amount field (defined below) is deducted each pay period, regardless of the pay period frequency (weekly, biweekly, monthly, and so on). |
Reason |
Enter the reason for the repayment. |
Status |
Specify the current status of the repayment. Values are:
|
Currency Code |
Specify the currency of the loan deduction. |
Repayment Schedule
Use the fields in the Repayment Schedule group box to define the amount to be repaid each pay period.
Field or Control |
Description |
|---|---|
Effective Date |
Enter an effective date. This date determines when the repayment schedule becomes effective. Note: You can define different effective-dated schedules for the same repayment by entering additional rows of data. |
Schedule Amount |
Enter the amount to deduct each pay period. Note: Use the fields in the Repayment Schedule group box to define a standard repayment schedule. If you want to define a one-time override to the scheduled repayment amount, enter the override amount using positive input. |
End Date |
Enter a date after which the repayment deduction should no longer be processed. |
Other Overrides
Use the fields in this group box to override values associated with the selected repayment deduction element on the Deduction Name page.
See Understanding Calculation Elements, Defining Element Names.
Non-Payroll Repayment Event
Use the fields in the Non-Payroll Repayment Event group box to record additional, non-payroll repayments made by a payee. These are deductions that are not included in the regular schedule of repayments and that do not reduce the amount of net pay.
Note: Do not use the fields in the Non-Payroll Repayment Event group box to deduct additional, one-time repayments through the regular gross to net process. If you want to define an additional, one-time repayment to be included in the regular gross to net process, create a positive input entry for the repayment deduction with an action type of Additional.
Field or Control |
Description |
|---|---|
Effective Date |
Enter an effective date. This date determines when the additional repayment payment is processed by the system. |
Pay Group |
Specify the pay group of the payee for whom you are processing the additional repayment deduction. |
Calendar ID |
Specify the calendar in which you want the additional repayment to be processed. The calendars available for selection are those associated with the pay group identified in the Pay Group field. |
Adjustment Element |
Identify the deduction you have defined to process the additional repayment. You can use the delivered deduction (LOAN AD PYMT) or one that you have defined yourself. |
Payment Amount |
Enter the amount of the additional repayment. This amount reduces the repayment balance but has no effect on net pay. |
Payment Reason |
Enter a reason for the additional loan payment. Valid values are:
|
Payment Reference |
Enter a payment reference. The payment reference is typically the number on the additional repayment check. It enables you to identify the payment. |
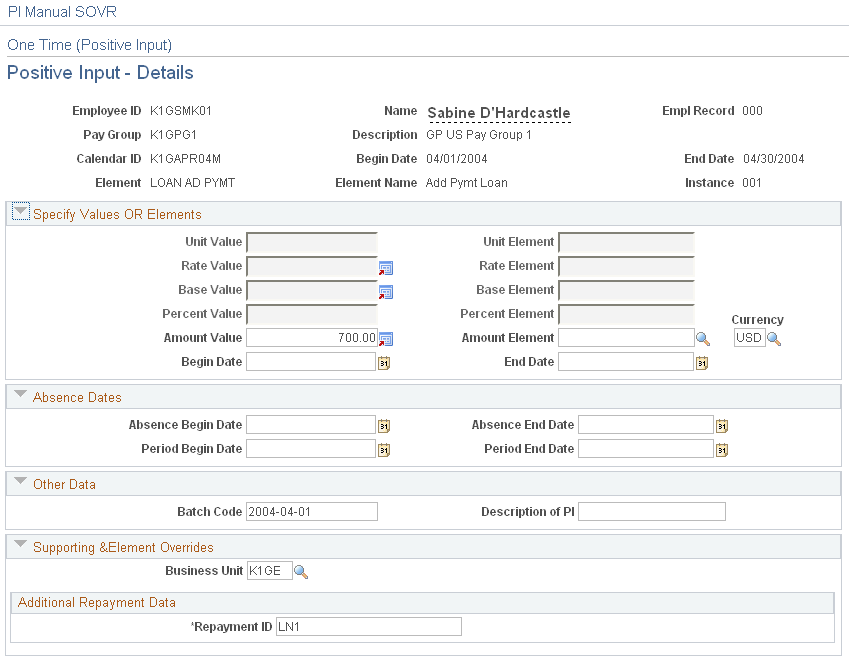
When entering overrides for repayment deductions using the One Time (Positive Input) component, you must specify the repayment ID (LNS VR ID) of the loan for which you are entering the override.
This example illustrates the fields and controls on the Example of a loan override on the Positive Input - Details page of the One Time (Positive Input) component.