(JPN) Setting Up Japanese Control Tables
To set up Japanese control tables, use the Define Postal Code JPN component (POSTAL_CODE_TBL), the Education Level component (EDLVLAG_TBL_JPN), and the Calculation Rules Settings component (SETUP_SALCOMP_JPN).
These topics provide an overview of education level age and discuss setting up Japanese tables.
|
Page Name |
Definition Name |
Usage |
|---|---|---|
|
EDLVLAG_TBL_JPN |
Set up your company's education level age bases. |
|
|
SETUP_SALCOMP_JPN |
Establish your organization's standard calculation birthday and specify whether you want to use a grade range check for certain salary components. |
|
|
RUNCTL_POSTAL_JPN |
Import Postal Code CSV files provided by Japan Post. |
|
|
POSTAL_TBL_JPN |
Enter information to maintain Japanese postal codes or add data that did not import as expected. |
The Education Level Age Table enables you to link highest education levels—already in the system—to what we call the Education Level Age Basis (as of hire). The system uses the Education Level Age Basis in the calculation of a worker's Education Level - Adjusted Birth Date, which is in turn used in the calculation of a worker's Education Level Age at any point in time. The system uses a worker's Education Level Age in education level age-related pay calculations. Education level age-related pay is a form of seniority pay.
Calculating a Worker's Education Level Age
This topic discusses how the system uses the Education Level Age Basis in the eventual determination of a worker's education age-related pay. This topic uses many acronyms, so here's a quick reference:
|
Acronym |
Meaning |
|---|---|
|
ELABa |
Education Level Age Basis (as of Hire) |
|
AELABa |
Adjusted Education Level Age Basis (as of Hire) |
|
ELABi |
Education Level - Adjusted Birth Date |
|
SCB |
Standard Calculation Birthday |
|
CSD |
Company Seniority Date |
|
ELA |
Education Level Age |
Company A has set the Education Level Age Basis (ELABa) for four years of college at 22. The company also set the Standard Calculation Birthday (SCB)—the anniversary for incrementing years of service—to April 1.
Hiroshi was born on February 6, 1972 and graduated after four years of college on March 23, 1994 at age 22. He then spent two years travelling around the world. Company A hired him on June 1, 1996. He is not hired on April 1 because he didn't get back from his travels until May 1996. At the time he is hired, he is 24 years old.
For the purpose of calculating Hiroshi's education age-related pay, each year the system needs to calculate Hiroshi's Education Level Age. It will use his Education Level - Adjusted Birth Date to do this.
In calculating a worker's ELABi, the system uses the ELABa, the Company Seniority Date (CSD), and the company's SCB.
The relationship between the worker's CSD and the company's SCB may result in an adjustment to the worker's ELABa, called the Adjusted Education Level Age Basis or AELABa. If the month/day of a worker's hire date (as determined by the CSD field) is after the company's SCB (that is, CSD is greater than SCB), the worker's ELABa is decreased by 1.
In Hiroshi's case, because his June 1 month/day hire date (also his CSD) falls after the company's April 1 SCB, his ELABa is decreased by 1. If he had been hired on or before April 1, there would be no adjustment to his ELABa.
This is how to get Hiroshi's AELABa:
Since CSD month/day (Jun 1) > SCB month/day (Apr 1), adjustment = -1
Using this -1 you get:
ELABa – 1 = AELABa
Which in Hiroshi's case is:
22 – 1 = 21
The system now uses the AELABa (21) to determine Hiroshi's ELABi year.
This formula is:
Year of Hire – AELABa = ELABi (year)
or
1996 – 21 = 1975
So for education age-related pay calculations, Hiroshi's ELABi is April 1, 1975, the combination of the company's SCB month/day and Hiroshi's ELABi year (remember, he was born February 6, 1972).
Now we can look at how important that ELABi is.
One year later, 1997, the system needs to know Hiroshi's ELA. This is the calculation:
SCB (including Year of Calculation) – ELABi = ELA
or
April 1, 1997 – April 1, 1975 = 22
This is the same ELA as a graduate who started with the company immediately after college. This set of calculations has, then, effectively adjusted Hiroshi's ELA, upon which education age-related pay is based, to take into account the two years that he spent traveling and the fact that he started work after the company's SCB.
Note: If your company considers that the lapse of two months from April to June is not significant, you can adjust Hiroshi's ELABi from April 1, 1975 to April 1, 1974. Then, for the same 1997 calculation, Hiroshi's ELA is 23 (April 1, 1997 to April 1, 1974), the same as a new graduate who has worked for one year.
Use the Education Level page (EDLVLAG_TBL_JPN) to set up your company's education level age bases.
Navigation:
This example illustrates the fields and controls on the Education Level page. You can find definitions for the fields and controls later on this page.
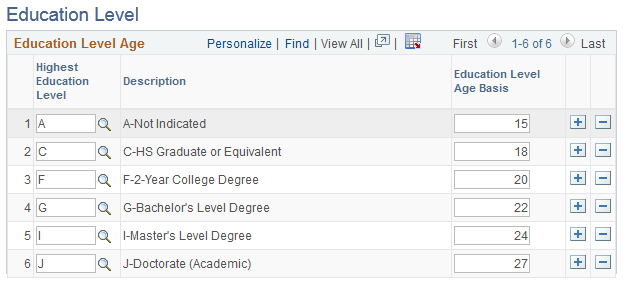
The system uses these age bases in the calculation of a worker's Education Level-Adjusted Birth Date, which is, in turn, used in the calculation of the worker's Education Level Age and education level age-related pay.
Field or Control |
Description |
|---|---|
Education Level Age Basis |
This is the value you associate with the Highest Education Level that you selected in the first field. The system uses this in calculating a worker's Education Level-Adjusted Birth Date, which is used in the calculation of a worker's education level age. |
Note: The Highest Education Level values are translate values from the Highest Education Level table. You access the table to put workers' highest education levels on their Personal History page in Personal Information. If you change any of these translate values (inactivate them, for example), you will need to change any worker records that were using the value to use another value. If you add a translate value and you want to associate an education level age basis with it, you must also add it to this page and allocate an Education Level Age Basis to keep it synchronized with the Highest Education Level table. If you don't add it, and you use the new Highest Education Level value—in Personal Data, Personal Profile, for example—the system will not be able to calculate the worker's Education Level - Adjusted Birth Date (it will remain blank). Consequently, the system will not be able to calculate the worker's Education Level Age.
Use the Calculation Rule Settings page (SETUP_SALCOMP_JPN) to establish your organization's standard calculation birthday and specify whether you want to use a grade range check for certain salary components.
Navigation:
This example illustrates the fields and controls on the Calculation Rule Settings page. You can find definitions for the fields and controls later on this page.
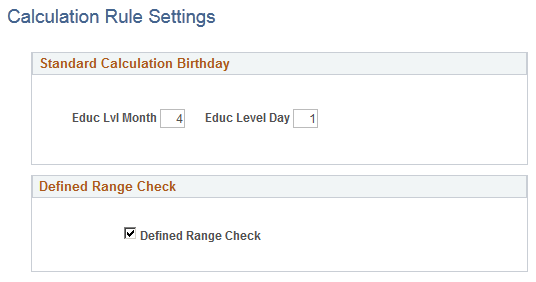
Standard Calculation Birthday
This is the single date, or anniversary, on which your workers' education level ages increment by one.
Field or Control |
Description |
|---|---|
Educ Lvl Month (education level month) |
Enter the month, where January = 1, February = 2 and so on. This sets the month of your organization's Standard Calculation Birthday, the date on which all workers' company years of seniority increment by one year. It is used in the calculation of each worker's Education Level Age. |
Educ Level Day (education level day) |
This is the day of the month of the Standard Calculation Birthday. For example, Month 4, Day 1 sets the Standard Calculation Birthday as April 1. |
Defined Range Check |
Select to ensure the system checks that any record added to a Job Data - Compensation page with a compensation rate code of class Defined Rate of Pay (DFRPAY) is within the range that you have defined for that grade on the Salary Grade Table. The check applies to both a manually added record and an automatically added record. Selecting this check box also ensures that only one compensation rate code of the class DFRPAY can be entered on a worker's Compensation page. |
Use the Load Postal Codes JPN page (RUNCTL_POSTAL_JPN) to import Postal Code CSV files provided by Japan Post.
Navigation:
This example illustrates the fields and controls on the Load Postal Codes JPN page. You can find definitions for the fields and controls later on this page.

Note: Before using this page, you must download and extract the CSV file from Japan Post's website and post it to a FTP server located at your site. The CSV file must be encoded in Shift-JIS character set. You must define URL data in the PeopleTools Utilities menu before using this Load Postal Code process.
Field or Control |
Description |
|---|---|
URL Identifier |
Select the FTP Uniform Resource Locator (URL) where the CSV file that contains the postal codes is located. |
All Prefectures |
Select this option to load postal data for all prefectures. Note: Because there are more than 120,000 postal codes rows, consider batch performance when importing all rows. |
Selected Prefecture |
Select this option to load postal codes for a specific prefecture. |
Load Results
If the length of Address1 or Address AC1 is more than 55 characters, the fields are left blank. Also, if the length of Address1 or Address AC1 is too long and divided into multiple rows, only the first row is imported and the rest of the rows are printed on the log reports as unimported rows.
If you want to remove "Not listed as below" as the Address 1 and AC Address 1, register these text strings in the Strings Table; the Program ID is HGJPPSTL. Set the text that you want to remove to String Text fields.
All rows might not appear when there are multiple rows for a single postal code with the same State, City, Address1, but different Address1_AC because of different pronunciation.
If expected data is not loaded, add it or edit it on the Define Postal Codes JPN page.
Postal Code Load Process Log Reports
After completion of this process, the system generates a process log report that lists the number of rows imported, the number of rows not imported, and a detailed reason for the latter. Possible reasons for not importing rows include:
The import file was not found.
The file is formatted incorrectly.
The import file is for a different prefecture from the one specified in the Selected Prefecture field.
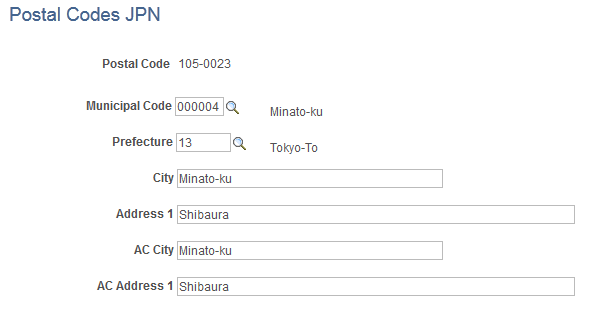
Use the Define Postal Codes JPN page (POSTAL_TBL_JPN) to enter information to maintain Japanese postal codes or add data that did not import as expected.
Navigation:
This example illustrates the fields and controls on the Define Postal Codes JPN page. You can find definitions for the fields and controls later on this page.
Field or Control |
Description |
|---|---|
Municipal Code |
Enter the code for the Japanese municipality that this postal code belongs to. |
Prefecture |
Select the prefecture for this postal code from the list. |