Setting Up Hours Consolidations
To set up hours consolidation rules, use the Hours Consolidation (HOURS) component.
This topic provides an overview of hours consolidations and discusses how to set up hours consolidation rules.
|
Page Name |
Definition Name |
Usage |
|---|---|---|
|
PA_CONS_HOUR_PARMS |
Establish the accumulation period, and identify the hours data to include in the periodic totals. |
|
|
PA_CONS_HOUR_ACCUM |
Set up earnings-to-hours conversion methods, and set limits and adjustments. The system does not apply limits and adjustments until after the period end date, so final periods do not have these adjustments. |
|
|
PA_CONS_HOUR_GEN |
Set up conditions and methods for generating hours. |
|
|
PA_CONS_HOUR_ADJ |
Establish the criteria for determining whether a period is a partial period. Set up parameters for adjusting hire and termination periods. |
To consolidate hours:
Determine the accumulation period and the actual hours for the period.
Generate hours if necessary.
Adjust hire periods if necessary.
Adjust any termination periods preceding a rehire. Note that termination periods are only adjusted if an employee is rehired. Final termination periods are not adjusted by the consolidation process; functions using consolidated data use other parameters for handling the final period.
Add any additional hours.
Apply any minimums or maximums.
Note: There is no partial period fraction for consolidated hours. Instead, there is a flag that identifies a partial period without specifying the portion of the period worked. Hours are generated for complete periods only.
The Service function gets consolidated hours from the final adjusted amount produced after step six. However, the system also stores the intermediate amounts produced by steps one and two. These intermediate amounts are informational only. They appear on the Review Consolidation Results - Hours History page, but they are not referenced in the calculation.
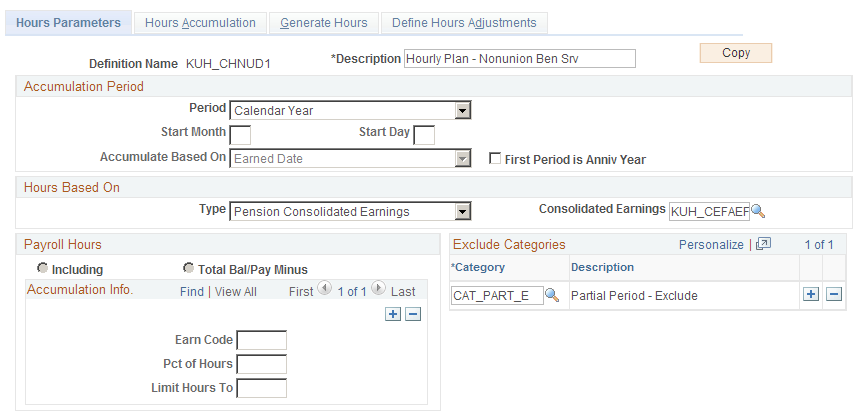
Use the Hours Parameters page (PA_CONS_HOUR_PARMS) to establish the accumulation period and to identify the hours data to include in the periodic totals.
Navigation:
This example illustrates the fields and controls on the Hours Parameters page.
Field or Control |
Description |
|---|---|
Copy |
Consolidated hours definitions can be quite complex. This is a shortcut you can use to copy a similar definition. Establish the first definition, click the Copy button, enter a new name and description, and the system clones the original definition using the new name. You can then make whatever minor adjustments you need to the new definition. If you have to make major adjustments, consider creating the new definition from scratch instead of copying an existing definition. |
Setting Up the Accumulation Period
Field or Control |
Description |
|---|---|
Accumulation Period |
The consolidation process produces periodic hours totals, which provide a period-by-period hours history. Enter the appropriate accumulation period:
The accumulation period must align with the accumulation period for the Hours Counting Service definition where you use your consolidated hours. Because the service definition does not support the Other Year option, you do not use that option in your consolidated hours definition—unless you make modifications. |
First Period is Anniv. Year |
For computation periods other than an anniversary year, an employee's first period is usually a short period. If your service definition gives employees the benefit of a full year for the first period, selectFirst Period is Anniv. Year. If you do this, your adjusted first period overlaps the second period. For example, if the usual computation period is a calendar year, an employee hired on March 5, 2000 has the following computation periods: The first period is March 5, 2000 to March 4, 2001, and the second period is January 1, 2001 to December 31, 2001. Note: If you select this option, be sure to also select it in your Service definition in order to keep your hours and service periods aligned. |
Indicating the Hours Basis
Field or Control |
Description |
|---|---|
Hours Based On |
The hours used for consolidation are based on information from your payroll system. Specify which hours to use in the Type field:
|
Note: Pension Consolidated Earnings and Payroll W2 are used for earnings, not hours. Options for converting earnings to hours are on the Hours Accumulation page.
Multiple Jobs Considerations for the Hours Based On Group Box
If you use the multiple jobs functionality and the consolidated hours are based on pension consolidated earnings or the payroll W-2, the earnings consolidations need to be converted to hours consolidations. For multiple jobs processing, the primary job rate at the beginning of the accumulation period is used to "back into" the hours.
Allocating Hours to Periods
Field or Control |
Description |
|---|---|
Accumulate Based On |
If you base your hours on Pension Consolidated Earnings, Earnings Balance Table, or Payroll W2, your hours data is already aligned with your consolidation period and you can ignore the Accumulate Based On field. If you base your hours on pay period data—that is, you base hours on Payroll Hours or Payroll Special Accumulator—you need to align your payroll dates with your consolidation dates. Select the period into which earnings fall by selecting a value for Accumulate Based On:
|
Indicating Included Hours
Field or Control |
Description |
|---|---|
Payroll Hours |
If you base your hours on actual payroll hours, complete the Payroll Hours section of this page. Select one of the following:
|
Earn Code |
Enter the earnings codes associated with the pensionable hours. You can insert additional rows as necessary. |
Pct of Hours |
You can adjust the number of hours for an earnings code by entering an adjustment percentage. For example, you can use 100 percent of regular hours and 50 percent of overtime hours. If you select Total Bal/Pay Minus to list excluded hours, you can specify 50 here to exclude 50 percent of the overtime hours. |
Limit Hours To |
If you specify a number here, the number of hours for the associated earnings code cannot exceed that number. |
Use the Hours Accumulation page (PA_CONS_HOUR_ACCUM) to set up earnings-to-hours conversion methods and to set limits and adjustments.
The system does not apply limits and adjustments until after the period end date, so final periods do not have these adjustments.
Navigation:
This example illustrates the fields and controls on the Hours Accumulation page.
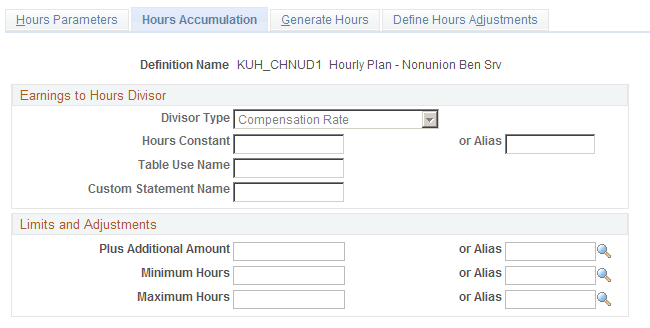
Using the Earnings to Hours Divisor
Field or Control |
Description |
|---|---|
Earnings to Hours Divisor |
If you base your hours consolidation on any of the earnings options, you can convert the earnings to hours with simple division. Select one of these options to indicate the divisor:
|
Setting Limits and Adjustments
All of the fields listed here can be either constants or aliases that you create.
Field or Control |
Description |
|---|---|
Plus Additional Amount |
If you want to add hours to the period total (subject to any maximum you set), enter these hours here. To subtract hours, enter a negative number. |
Minimum Hours |
To limit the total hours per period, enter the minimum number of hours. Also enter Maximum Hours. |
Maximum Hours |
To limit the total hours per period, enter the maximum number of hours. Also enter Minimum Hours. |
Use the Generate Hours page (PA_CONS_HOUR_GEN) to set up conditions and methods for generating hours.
Navigation:
This example illustrates the fields and controls on the Generate Hours page.
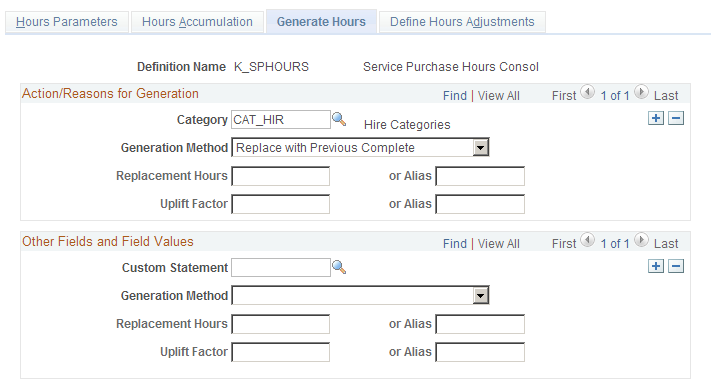
Setting Up Actions and Reasons for Hours Generation
Field or Control |
Description |
|---|---|
Category |
Use the Category field to identify the HR action and reason code categories that require generated hours. You can insert additional rows as necessary. |
Custom Statement |
To indicate other conditions for hours generation, you first have to set up a custom statement specifying these conditions. Enter the name of the custom statement in this field. If the custom statement conditions are met, the system generates hours for all periods that it processes. This means that during a delete-and-rebuild consolidation, which processes several periods at once, the system might generate hours for all periods. If a single period contains multiple reasons for generation—for example, a military leave early in the year and a disability leave later that year—they are processed in chronological order. Hours generated for the final reason replace hours generated for earlier reasons. |
Ending Hours Generation
If you generate hours based on an HR action and reason category, the system uses an employee's action and reason history to determine when to stop generating hours. The system continues to generate hours for the employee until the next relevant action and reason event in the employee's job record. For example, if Liam goes on leave at the end of 2002 and returns at the beginning of 2004, the system generates hours for three years: 2002, 2003, and 2004.
The system only recognizes a return-from-leave action as "relevant" if you reference it elsewhere in the consolidated hours definition. To ensure that the system recognizes the return-from-leave action (and thus stops generating hours), include that action in the Single Partial Period HR Action/Reason Category field on the Define Hours Adjustments page.
If you generate hours based on custom statement criteria, the system generates hours for all periods that are processed. If the statement is no longer true during your next period processing, then the system does not generate hours for that period.
Field or Control |
Description |
|---|---|
Generation Method |
For each hours generation condition that you set up, select a generation method:
All of these methods replace all the hours for the period. For example, consider Liam, who went on leave at the end of 2002 and returned at the beginning of 2004. If you generate hours during his leave, the system overwrites the actual hours from early 2002 and late 2004 with the generated hours for those periods. |
Use the Define Hours Adjustments page (PA_CONS_HOUR_ADJ) to establish the criteria for determining whether a period is a partial period and to set up parameters for adjusting hire and termination periods.
Navigation:
This example illustrates the fields and controls on the Define Hours Adjustments page.
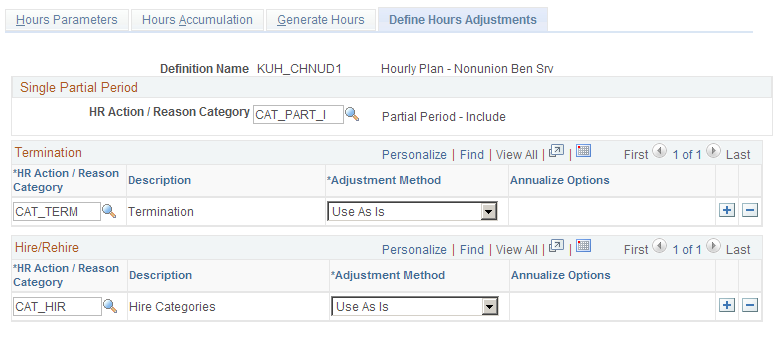
Unlike Consolidated Earnings, the Consolidated Hours function does not produce a partial period fraction. It does, however, produce a partial period flag to identify partial periods. This flag is used during hours generation if the generation method is Complete.
Defining Partial Periods
In the Single Partial Period group box, identify the action and reason categories that indicate partial periods.
Field or Control |
Description |
|---|---|
HR Action/Reason Category |
Enter an HR Action/Reason Category with all the action and reason codes that indicate a partial period. For example, you might include action and reason codes for leaves of absence and returns from leaves. This information is used to set a partial period flag for the period. There is only one field for single partial periods, so you have to create a single category with all the relevant action and reason combinations. The single partial period category should not include action and reason codes that appear in any other action and reason categories in this definition, including generation categories, exclude categories, and hire and termination categories. |
Using Termination and Hire/Rehire
Use the Termination and Hire/Rehire group boxes to set adjustments for hire and termination periods.
Field or Control |
Description |
|---|---|
HR Action/Reason Category |
Enter the HR action and reason categories that indicate hire and termination periods in the HR Action/Reason Category fields of the Termination and Hire/Rehire group boxes. |
Adjustment Method |
The consolidation process only adjusts a termination period after a subsequent rehire. For example, if Quentin terminates in 2004, the 2004 consolidation period is his last. If he is rehired in 2006, the system then adjusts the 2004 period, creates a zero-hours 2005 period, and creates a 2006 period. Because the 2006 period includes the rehire action, it incorporates the hire period adjustment method you specify. For each action and reason category you enter, select an Adjustment Method for adjusting the hours for the resulting partial period:
|
Note: Be sure to use the same methods here for handling hire and termination periods here that you use in your Service definition.