Generating Batch Academic Advisement Report Requests
This section discusses how to:
Generate batch advisement report requests.
Generate batch advisement reports.
Print batch advisement report requests.
|
Page Name |
Definition Name |
Navigation |
Usage |
|---|---|---|---|
|
Generate Report Requests |
SAA_RUNCTL_RPTRQST |
|
Define the report request. |
|
Generate Advisement Reports |
SAA_RC_RPTGEN |
|
Define the run control parameters for the report. |
|
Print Batch Reports |
SAA_RC_RPTPRINT |
|
Define the printing parameters for the report. |
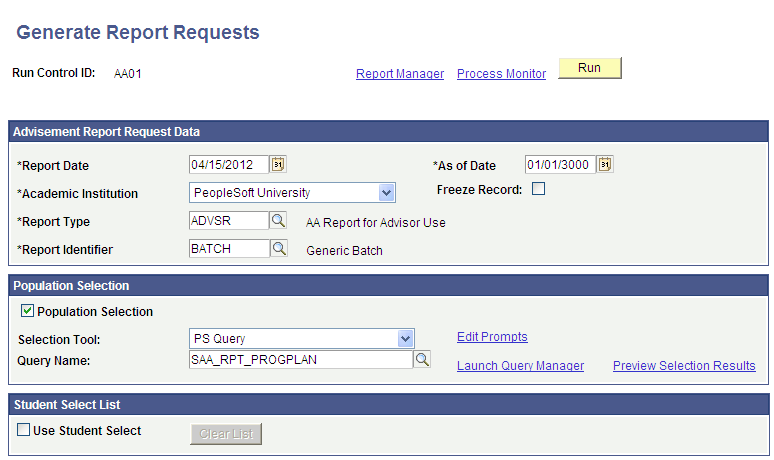
Access the Generate Report Requests page ().
Advisement Report Request Data
Field or Control |
Description |
|---|---|
Report Date |
When you create a new request, the Report Date field displays the current date until you select a Report Type value. Then the Report Date field value displays the appropriate Report Date based on the advisement report type setup. If the default value defined for the advisement report type is Current Date, then you can view two additional items on the page: the Use This Request Report Date check box and the ? icon, which offers explanatory text. |
As of Date |
Reflects the As of Date value identified in the report type setup. When you access the page, the As of Date field value displays the value defined in the Installation Academic Advisement component. This remains the default value until you select the Report Type field value on the page. Then the value will reflect the advisement report type setup. If the default value defined for the advisement report type is Current Date, then you can view two additional items on the page: the Use This As of Date check box and a ? icon, which offers explanatory text. |
Use This Request Report Date |
Select this option for the request process to use the user-defined date as Report Date. If the check box is not selected, then the Report Date on the request is updated with the current date. Note: This check box appears only when the Report Date value defined in the advisement report type is Current Date. |
Use This Request As of Date |
Select this option for the request process to use the user-defined date as the As of Date. If the check box is not selected, then the As of Date on the request is updated with the current date. Note: This check box appears only when the As of Date field value defined in the advisement report type is Current Date. |
|
Mouse-over the icon to read explanatory text for the check box. You can use Message Catalog to customize these texts:
|
Freeze Record |
Select to prevent this request from being purged during a subsequent academic advisement purge process. |

Population Selection
This group box appears when the Population Selection process is selected.
Population selection is a method of selecting the IDs to process a specific transaction. The Population Selection group box appears on the run control pages when the Population Selection process is available or required for the transaction. Selection tools are available based on the selection tools that your institution selected in the set up of the Population Selection process for the application process and on your user security. Fields in the group box appear based on the selection tool that you select. The fields behave the same way from within the group box on all run control pages and application processes.
If your institution uses a specific selection tool (PS Query, Equation Engine equation, or extended file) to identify IDs for a specific transaction, you must use it.
Several queries have been created as "default" queries. They are:
SAA_RPT_ACADLEVEL (AA Report Query by Acad Level).
SAA_RPT_ADVISOR (AA Report Query by Advisor).
SAA_RPT_CAREER (AA Report Query by Career).
SAA_RPT_PROGPLAN (AA Report Query by Plan).
SAA_RPT_PROGRAM (AA Report Query by Program).
SAA_RPT_STUDENT_GROUPS (AA Report Query by Student Group).
SAA_RPT_ADM_CARPROG (AA Report Query by Admission Program).
SAA_RPT_ADM_PROGPLAN (AA Report Query by Admission Plan).
SAA_RPT_ADM_SUBPLAN (AA Report Query by Admission Subplan).
SAA_RPT_PROSPECT_CAR (AA Report Query by Prospect).
Student Select List
Field or Control |
Description |
|---|---|
Use Student Select |
Select if you want specific IDs for inclusion in the process. When the Use Student Select check box is selected, the Clear List button is enabled. |
Clear List |
Click to remove all values the Student Select List group box. |
Use Career Simulation
If you select a what-if advisement report type, the Use Career Simulation check box appears on the page. If you then select the check box, additional fields become available for your use. Use those fields to define the parameters of your what-if scenario for the desired population. You can generate what-if reports for students or even prematriculated students (as long as the prematriculated students have an EMPLID).
This example shows the what-if scenario parameters for a population.
This example illustrates the fields and controls on the Generate Report Requests page with a what-if scenario (1 of 2). You can find definitions for the fields and controls later on this page.
This example illustrates the fields and controls on the Generate Report Requests page with a what-if scenario (2 of 2). You can find definitions for the fields and controls later on this page.
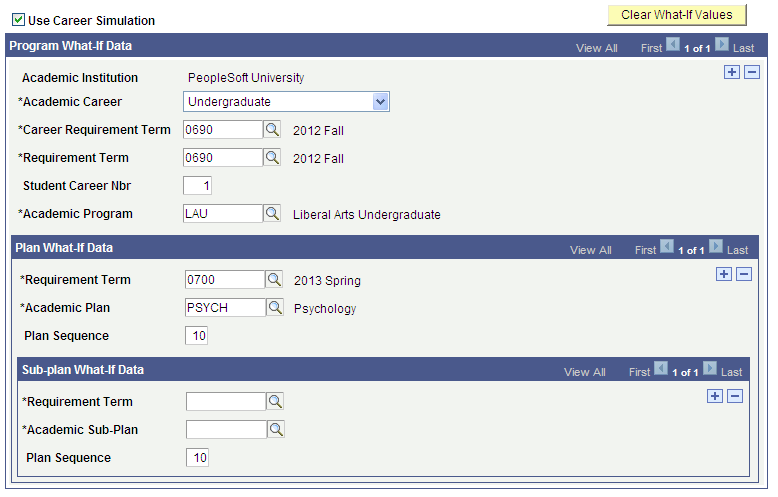
The following lists the field descriptions for the Program What-If Data group box.
Field or Control |
Description |
|---|---|
Academic Institution |
This display-only field shows the institution selected in the Advisement Report Request Data group box. |
Academic Career |
Enter the value for the what-if career. |
Career Requirement Term |
Enter a what-if career requirement term value for the career override. The system uses this value to select the correct effective-dated career-level requirement groups. |
Requirement Term |
Enter the what-if academic program requirement term. The system uses this value to select the appropriate effective-dated program-level requirement groups. |
Student Career Number |
The default value on this page is 1. You can change the student career number for use in the scenario. |
Academic Program |
Enter the academic program value that you want to use in the what-if scenario. You can use one or many programs in the what-if scenario. |
The following lists the field descriptions for the Plan What-If Data group box.
Field or Control |
Description |
|---|---|
Requirement Term |
Enter the requirement term for the what-if plan. The system uses this value to select the appropriate effective-dated plan-level requirement groups. |
Academic Plan |
Enter an academic plan for use in the what-if scenario. The system uses this value to select the correct effective-dated plan-level requirement groups. |
Plan Sequence |
Displays a sequence number. This sequential number is supplied by the system. This number indicates the order or sequence of multiple plans, if any. The plan with the lowest sequence number is considered primary within the plan. You can override the number. |
The following lists the field descriptions for the Sub-plan What-If Data group box.
Field or Control |
Description |
|---|---|
Requirement Term |
Enter the requirement term for the what-if subplan. The system uses these values to select the appropriate effective-dated subplan-level requirement groups. |
Academic Sub-Plan |
Enter an academic subplan for use in the what-if scenario. The system uses this value to select the appropriate effective-dated subplan-level requirement groups. |
Plan Sequence |
Displays a sequence number. This sequential number is supplied by the system. This number indicates the order (or sequence) of multiple subplans, if any. The subplan with the lowest sequence number is considered primary within the subplan. The user can override the number, if necessary. |
Click the Clear What-If Values button to clear values you entered in the Program What-If Data, Plan What-If Data, and Sub-plan What-If Data group boxes.
Access the Generate Advisement Reports page ().
Additional Run Control Parameters
Field or Control |
Description |
|---|---|
From and To |
Enter a valid date range to filter report requests based on the report date on the individual requests. If no date range is entered, all report dates are considered. |
Access the Print Batch Reports page ().
Additional Run Control Parameters
Field or Control |
Description |
|---|---|
From Request Date and To Request Date |
Enter a valid date range to filter report requests based on the report date on the individual requests. If no date range is entered, all report dates are considered. |
Report Identifier |
Select Batch. |