Configuring Tasks
Use the Task Configuration component (SCC_TM_CONFIG) to define additional properties for a template other than those defined in the PeopleTools Manage Activity Guide Templates component. This component is applicable to both the Classic User Interface and the Fluid User Interface.
Note: A configuration record is required in the Task Configuration component before a task can be assigned to students.
This section discusses how to:
Define task properties.
Define launch page properties.
Define agreement pages.
Define agreement page properties.
Defining complete page properties.
|
Page Name |
Definition Name |
Navigation |
Usage |
|---|---|---|---|
|
Task Configuration |
SCC_TM_CONFIG |
|
Required. Define properties of the task including optional prerequisite and subsequent tasks and Notification framework parameters. |
|
Launch |
SCC_TM_CONF_LAUNCH |
|
Optional. Define the properties of the optional launch page that can be displayed to the student as the first step (first action item) in a task. Properties that you can define include instruction text and the optional display of selected contact and career information. |
|
Agreements |
SCC_TM_CONF_AGRMNT |
|
Optional. Define which page definitions to use for agreement pages displayed as interim steps (interim action items) in a task. |
|
Complete |
SCC_TM_CONF_SUBMIT |
|
Optional. Define the content and format of the final action item page of the task. |
|
Field Setup |
SCC_FIELD_SETUP |
|
View the delivered career information fields that you can display on the launch action item page. To choose which of these delivered fields the launch page should display, use the Task Configuration component’s Launch page. |
|
Page Definitions |
SCC_TM_PG_DEFN |
|
Define agreement pages for use in the Task Configuration component’s Agreement page. |
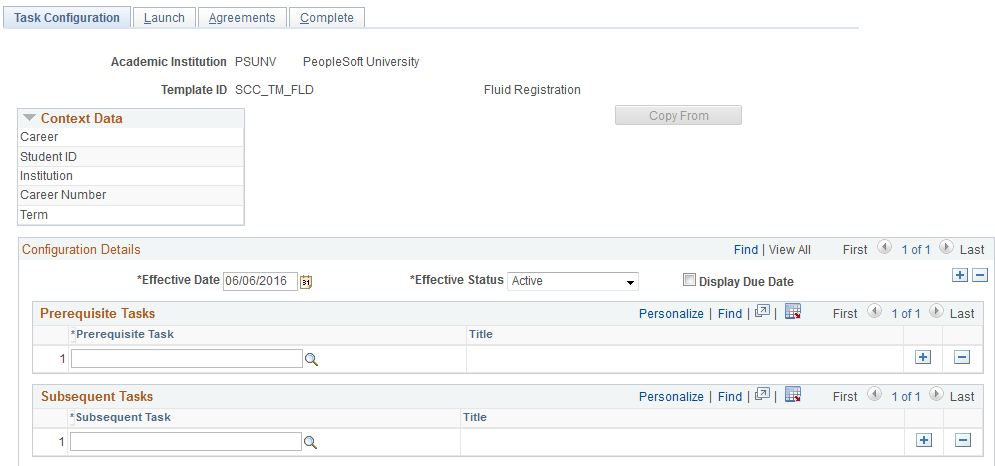
Access the Task Configuration page ().
This example illustrates the fields and controls on the Task Configuration page (1 of 2). You can find definitions for the fields and controls later on this page.
This example illustrates the fields and controls on the Task Configuration page (2 of 2). You can find definitions for the fields and controls later on this page.
On this page, you can create a configuration record for an institution for any active activity guide template. The page displays the context data fields that are defined for the template on the PeopleTools Activity Guide Template - Advanced Options page.
For new configuration records, use the Copy From button to copy all the details from an existing configuration record.
The system refers to the most current effective dated record on this page when the task is displayed to students.
Field or Control |
Description |
|---|---|
Display Due Date |
Select to display the due date on the Launch page and the Complete page. If defined for the instance, that Due Date value is displayed; otherwise the Due Date of the final action item is displayed. |
Prerequisite Task
Optionally, use this region to define any prerequisite tasks that the student needs to complete before you assign this task. The system will make this check when you either manually assign this task using the Create Instance button on the Activity Guide Template - Properties page or when you use the Assign Tasks process.
Subsequent Task
Optionally, use this region to define any related tasks that the system automatically assigns when the student completes this task. For example, the preceding graphic of Task Configuration page illustrates that the Emergency Contacts Verification task is automatically assigned to the student when he or she completes the Program Registration task. Note that the current task must have the required key Context Data fields to create the subsequent task.
The Task Configuration page checks whether all the context data fields for the subsequent task exist for the current task. If any values are missing, the page displays a warning message. You can ignore the warning; however, the system does not create the subsequent task when the student completes the current task.
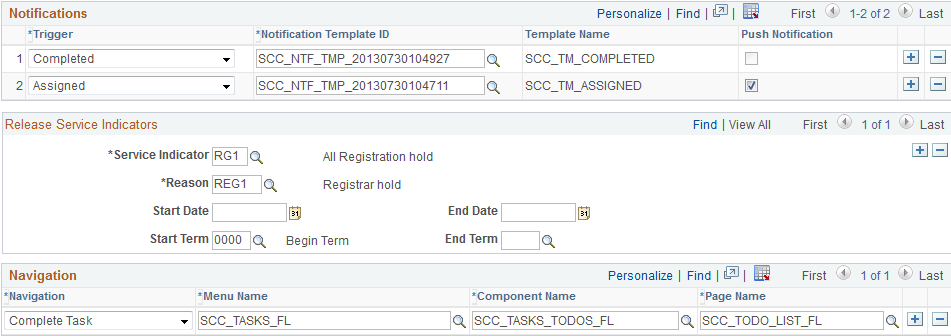
Notifications
Optionally, use this region to define the notifications that the system triggers when the task is assigned to a student or when the student completes a task. The system uses the Notification Framework for handling notifications.
When notifications are not sent through the Notifications Framework but instead through Push Notifications, you can optionally select a Notification Template ID to create alerts for new tasks.
Field or Control |
Description |
|---|---|
Push Notification |
This check box is enabled if the Trigger is set to Assigned. By default, Push Notifications is not selected. If selected, for optimized templates, the Assign Tasks process generates an alert when an instance is created. |
Delivered with the system are the Notification Consumer ID Task Management Notifications (SCC_NTF_CON_20130619110938) for use with Student Activity Guides and the notification setup for example templates SCC_TM_ASSIGNED and SCC_TM_COMPLETED.
Note: The system triggers the assign notification parameter at the point when the task is assigned to the student, which can be before the start date of the task. The notification would need to include an explanation for the student that the task is not available until the start date.
Note
These features (Prerequisite Task, Subsequent Task and Notifications) are dependent on the delivered application class SCC_TM_ACTIVITYGUIDE_FW:TaskProcessingAdapter:PrerequisiteProcessingAdapter having been defined for Instance Creation in the Activity Guide Template definition and SCC_TM_ACTIVITYGUIDE_FW:ActionItemProcessingAdapter:ActionItemPostProcAdapter having been defined for Action Item Post Process for the final complete action item in the Activity Guide Template definition.
Release Service Indicators
This region enables you to define one or more service indicators/reasons. When the student completes the task, the system releases this defined service indicator(s) for the student.
The fields in this region are similar to the fields of Mass Release page. For information on the Mass Release page:
See Mass Assigning or Mass Releasing Service Indicators
For information on service indicator security:
See Setting Up Service Indicator Security
The system applies in this region the same security to the selection of service indicator and reason as it applies to the Mass Release page. For the service indicator that the system should release when a student completes the task, you - as an administrative user - setting up the task must have the Release option enabled for the combination of Service Indicator Code and Reason in the Service Indicator Security page (this setup is not required for the student who triggers this release). The system automatically triggers this release when the student clicks the Finish button on the Complete page (that is, the system releases the service indicator when the student completes the task).
If any of the Start Date, End Date, Start Term or End Term values are defined, then at the point the student clicks Finish, the processing that releases service indicators considers those values when matching to records that need to be released for the student.
To view audit records, use the Audit Service Indicators page For more information:
See Auditing Service Indicators
Note: You can use the Mass Assign page to assign one or more service indicators to each student who has a particular task. To run the Mass Assign process, using PS Query, the query must include the bind record SCC_BND_SRCIND. An example PS Query is delivered (SCC_TM_SI_TASK_LIST) that can be used with the Mass Assign process.
Alternatively, you can assign a service indicator to each student using the Mass Assign process and then run the Assign Tasks process to create a task for every student with that service indicator using a PS Query to identify the population of students.
Navigation
Use this region to specify the page that should appear for:
Default Exit: When the student clicks the Exit button and then the OK button for confirming the exit from the task and the student accessed the task from an email link.
Complete Task: When the student completes a task.
For example, you can define that the My Planner page should appear when a student completes a task.
Further details on the navigation when a student clicks Exit are given under Pagelet Options in Program Registration Template.
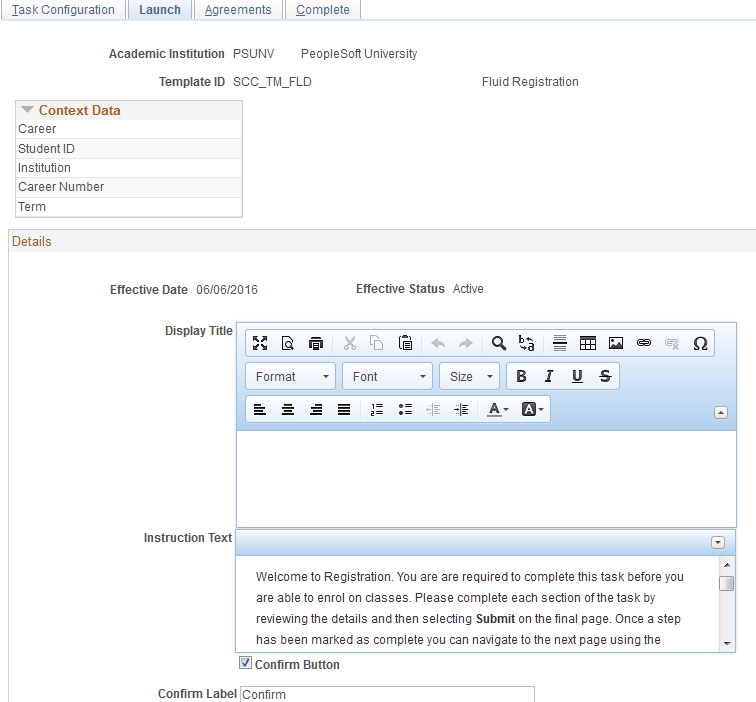
Access the Launch page ().
This example illustrates the fields and controls on the Launch page (1 of 2). You can find definitions for the fields and controls later on this page.
Field or Control |
Description |
|---|---|
Display Title |
Enter the page title that is displayed to the student. This is an optional field for Fluid tasks because the Display Title appears as a secondary title below the action item title. For Classic tasks however, the Display Title is displayed as the page title. |
Instruction Text |
Enter the text that appears after the page title to describe the actions that the student needs to perform. This is an optional field. Note: You can enter text to indicate to the student that clicking the Next button on a page signifies that the student has reviewed the data on an action item page and is satisfied to proceed. |
Confirm Button |
For Fluid interfaces only. Include an action button on the launch page. The user can review read-only details on the page such as career information, and then click the action button to complete the required action item. By default, the Confirm button is not selected. Selecting the Confirm button has the following impact:
|
Confirm Label |
For Fluid interfaces only. Use this field to override the default Confirm label for the button. You can use a maximum of 40 characters in mixed case format. The field is enabled only if the Confirm Button is selected. |
You can format the text for both Display Title and Instruction Text fields using the formatting options including the ability to add URL and email links particularly for the Instruction Text field.
This example illustrates the fields and controls on the Launch page (2 of 2). You can find definitions for the fields and controls later on this page.
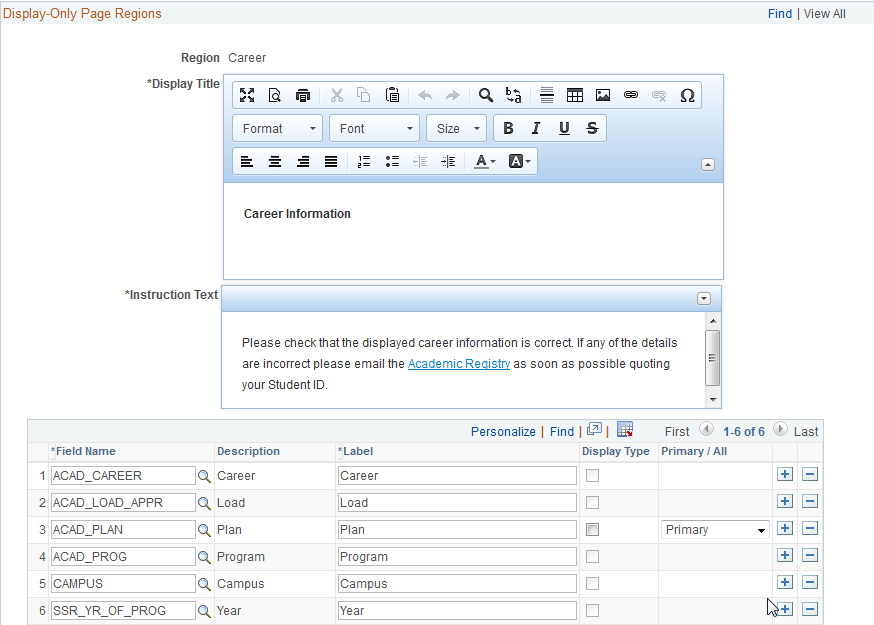
Display-Only Page Regions
Optional. Use this group box to define one or more read-only data regions that the system displays on the launch action item page after the page title and instruction text. The information that the data region displays is based on the context data. You can choose to display career information and contact information (addresses, email addresses, phone numbers and emergency contacts), with instructions on how the student can notify the institution of any incorrect information.
Field or Control |
Description |
|---|---|
Region |
Select which data regions the launch action item page should display. You can add rows to select the following data regions: • Addresses • Career information • Emergency contacts • Phone numbers The fields that appear in the Display-Only Page Regions group box depend on the value that you select for the Region field. The launch action item page displays these regions in a fixed order depending on which regions are included. You cannot modify this order. The fixed order is: (1) Addresses (2) Phone (3) Email (4) Emergency Contacts (5) Career information. Note: The launch action item page can display career information only if the context data for the task includes the key values: EMPLID, ACAD_CAREER and STDNT_CAR_NBR. |
Display Title |
Enter the title that is displayed for the data region. For example, if the region you select is Addresses, you can enter here Your Address Information. |
Instruction Text |
Enter additional information that follows after the display title. For example, if the region is Career, you can enter here Review your program information. If the information is incorrect, please contact the department head. |
Address 1 Type, Address 1 Label, Address 2 Type, and Address 2 Label |
These fields become available for entry when you select Addresses in the Region field. You can select one or two address types to display and configure the label field to display the address type with a description rather than the default description of the selected address type. |
Phone 1 Type, Phone 1 Label, Phone 2 Type and Phone 2 Label |
These fields become available for entry when you select Phone in the Region field. You can select one or two phone types to display and configure the label field to display the phone type with a description rather than the default description of the selected phone type. |
Preferred Phone |
This option becomes available for edit when you select Phone in the Region field. Select this option if you want the data region to not consider the Phone Type 1 and 2 values and display only phone records with Preferred flag. |
Email 1 Type, Email 1 Label, Email 2 Type, and Email 2 Label |
These fields become available for entry when you select Email in the Region field. You can select one or two email types to display and configure the label field to display the email type with a description rather than the default description of the selected email type. |
Preferred Email |
This option becomes available for edit when you select Email in the Region field. Select this option if you want the data region to not consider the Email Type 1 and 2 values and display only email records with Preferred flag. |
Primary Contact Only |
This option becomes available for edit when you select Emergency in the Region field. Select this option if you want the data region to display only primary emergency contact. If you do not select this option, all emergency contacts are displayed. |
Field options for career information
This example shows the grid that contains some of the field options for career information:
This example illustrates the grid that contains some of the field options for career information.
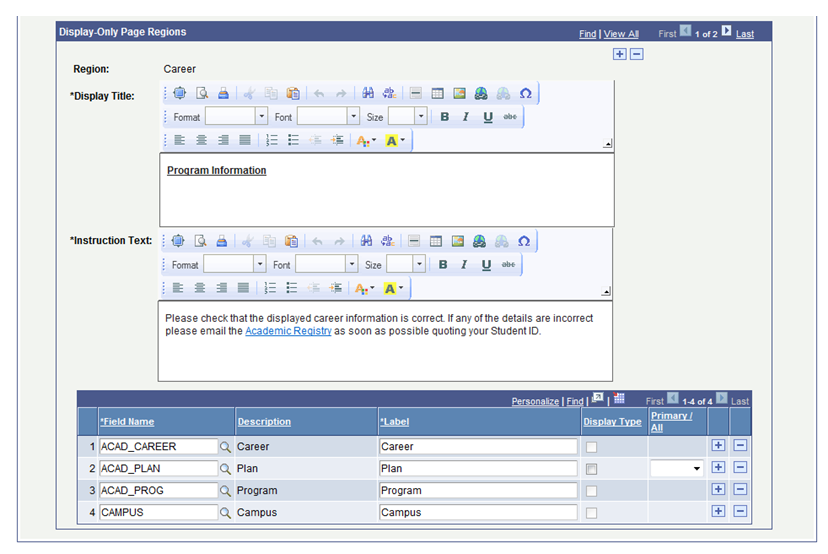
This grid is available for edit only when you select Career in the Region field. Use this grid to add the fields that you want to display in the Career data region of the launch action item page. If you do not include a field in this grid, then that field is not displayed on the launch page.
Field or Control |
Description |
|---|---|
Field Name and Description |
The prompt values are from the Field Setup page. |
Label |
The value defaults from the Description field. You can override this value if you want to display a different label for the field on the Career data region. |
Display Type |
Available for edit only if you select ACAD_PLAN or ACAD_SUB_PLAN in Field Name. If you select this option, the Career data region displays the plan or subplan type description in addition to any defined label. The format is <label>: <type> <field value description>. For example, if there is a label for ACAD_PLAN and you have selected Display Type, then this is displayed: Plan: Major Music Where Plan is the label, Major is the academic plan type, and Music is the field value description. |
Primary/All |
Available for edit only if you select ACAD_PLAN in Field Name. If you select Primary, the Career data region displays only the description of the academic plan with the lowest plan sequence (PLAN_SEQUENCE). If you select All or do not select a value, all the plan descriptions for the Student Program are displayed in plan sequence order. |
The following table describes the source of the value for each Field Name. The system displays this value in the Career Data region.
|
Field Name |
Notes |
|---|---|
|
INSTITUTION |
Displays the description for the INSTITUTION value from context data. This can be excluded if required; the institution value can also be included in the context data displayed for the task in the Student Task WorkCenter. |
|
ACAD_CAREER |
Displays the description for the ACAD_CAREER value from context data. |
|
ACAD_PROG |
Displays the description for the ACAD_PROG value from Student Program for the combination of ACAD_CAREER and STDNT_CAR_NBR from context data. |
|
ACAD_PLAN |
Displays the description for the ACAD_PLAN value from Student Plan. If Primary is selected only the description of the academic plan with the lowest plan sequence (PLAN_SEQUENCE) is displayed (PLAN_SEQUENCE from ACAD_PLAN), otherwise (either All is selected or no value is selected in the Primary/All field) all the plan descriptions for the Student Program are displayed in plan sequence order. If the Display Type option is selected, the plan type as well as the label and field value description is displayed. |
|
ACAD_SUB_PLAN |
Displays the descriptions of all the academic subplans (ACAD_SUB_PLAN from ACAD_SUBPLAN) for each of the displayed academic plans in alphabetical order by subplan code. If the Display Type option is selected, the subplan type as well as the label and field value description is displayed. |
|
CAMPUS |
Displays the description for the CAMPUS value from Student Program (ACAD_PROG). |
|
ACAD_LOAD_APPR |
Displays the long translate name for the ACAD_LOAD_APPR value from Student Program (ACAD_PROG). |
|
SSR_YR_OF_PROG |
Displays the long translate name for the SSR_YR_OF_PROG value from Student Program (ACAD_PROG). |
Note: The launch action item page displays values from the most recent effective dated row on or before the current date in the Student Program record, excluding any future rows. Careers are displayed only if the program status is active (AC).
Note: The sequence of the fields displayed on the launch action item page is determined by a tree structure that relates to the underlying record structure. This is fixed as follows and is not related to the row numbers in the grid:
Institution
Career
Program
Plan
Sub-plan
Academic Load
Campus
Year of Program
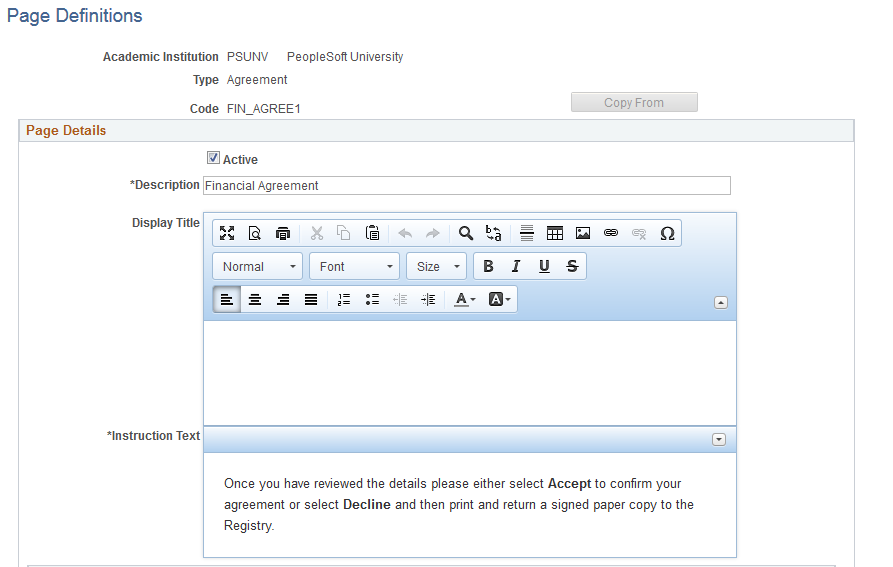
Access the Page Definitions page ().
This example illustrates the fields and controls on the Page Definitions page (1 of 2). You can find definitions for the fields and controls later on this page.
This example illustrates the fields and controls on the Page Definitions page (2 of 2). You can find definitions for the fields and controls later on this page.
This page enables definition of multiple different agreement action item pages that can be associated with one or more tasks in the Task Configuration component’s Agreements page. Define and format the agreement text and other instructions that are to be displayed on the agreement action item page.
Note: When you add a new page definition for an agreement page, the page code must begin with either a letter or a number and be a minimum of two characters.
You can configure whether or not the agreement details (such as text, user ID, IP address, date/time signed and so on) needs to be saved as a separate record for audit purposes.
Field or Control |
Description |
|---|---|
Copy From |
This button is available only when you add a new page definition. Click this button to copy any existing page definition details to the new page definition that you are creating. |
Description |
Enter a description to be used for internal purposes only. This is not displayed to the student. |
Display Title |
Enter the page title that is displayed to the student. This is an optional field for Fluid tasks because the Display Title appears as a secondary title below the action item title. For Classic tasks however, the Display Title is displayed as the page title. |
Instruction Text |
Enter the text that appears after the page title to describe the actions that the student needs to perform. |
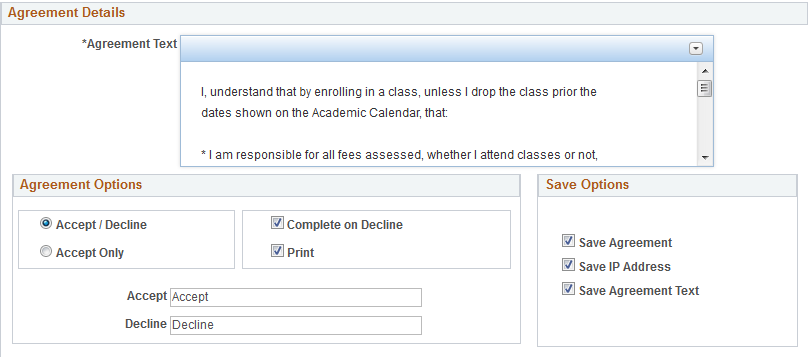
Agreement Text |
Enter the text that is displayed to the student after the page title and instruction text. This is a long char field and the maximum characters is determined by the database depending on how the text is formatted. You can use this field to include the full text of the institution’s terms and conditions or regulations, or include a link with instructions for the student to navigate to the details and then come back to accept the terms and conditions. |
Agreement Options
Field or Control |
Description |
|---|---|
Accept/Decline |
If selected the student is presented with radio button options to either Accept or Decline the agreement in classic tasks. For Fluid tasks, both Accept and Decline buttons are provided. This is provided for cases where the student has the option of declining and then printing, signing and returning a paper copy of the agreement. Instructions can be included in the instruction text. For the Accept/Decline Buttons to be displayed on mobile devices without the need for horizontal scrolling, ensure that label values have a maximum of 20 characters each (40 totally) where both Accept and Decline are included. |
Accept Only |
If selected, the student is presented with a single check box option or button to confirm they have read and accepted the agreement. |
Accept Label |
Enter the text to be displayed for the accept option in a classic interface. For example, you can enter I agree to abide by the rules and regulations specified above. For Fluid tasks, for the Accept Button to be displayed on mobile devices, without the need for horizontal scrolling, ensure that the label value has a maximum of 40 characters. For classic tasks, for display on laptops and desktops, the label value can contain a maximum of 100 characters. |
Decline label |
Available for edit only if you select the Accept/Decline option. Enter the text to be displayed for the decline option. For Fluid tasks, for the Decline Button to be displayed on mobile devices without the need for horizontal scrolling, ensure that the label value has a maximum of 40 characters. For classic tasks, for display on laptops and desktops, the label value can contain a maximum of 100 characters. |
Complete on Decline |
This check box is enabled only if the Accept/Decline option is selected. By default, it is not selected. If this option is selected, then the action item status is set to Complete when the student selects either Accept or Decline. If this option is not selected, and the student selects Decline, the action item status remains In Progress. |
|
If selected the student is presented with the Printable Page option that enables the student to print the agreement. This option is not available for Fluid tasks on small mobile devices, such as smart phones. |
Save Options
Field or Control |
Description |
|---|---|
Save Agreement |
If selected, the system saves the agreement record (related but separate from the task record) with:
If you do not select this option, then a separate agreement record is not saved. However, when the student selects the agree option, the action item in the task is still marked as Completed. The action item remains In progress if the student selects the decline option. Note: You should select the Save Agreement option, if the Accept/Decline option has been selected in the Agreement Options group box. This ensures that the system records the accept/decline decision of the student. |
Save IP Address |
Available for edit only if you have selected the Save Agreement option. If selected, the system also saves the student’s IP address in the agreement record. |
Save Agreement Text |
Available for edit only if you have selected the Save Agreement option. If selected, the system also saves the full agreement text in the agreement record. |
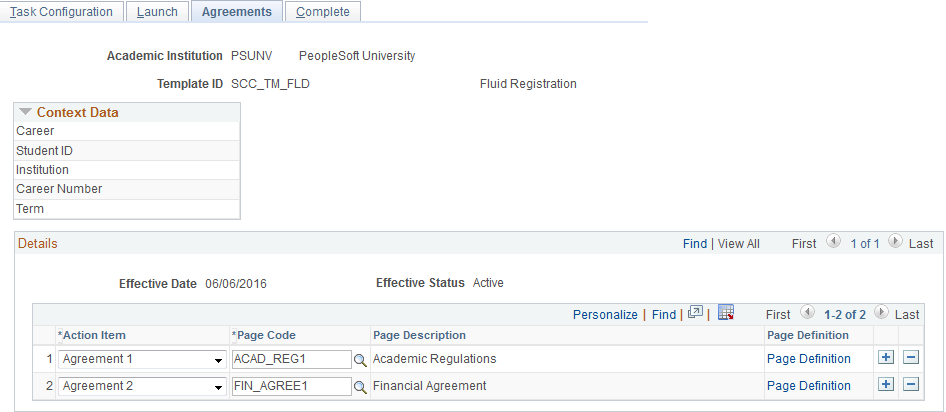
Access the Agreements page ().
This example illustrates the fields and controls on the Agreements page. You can find definitions for the fields and controls later on this page.
Field or Control |
Description |
|---|---|
Action Item |
Select the agreement page for the activity guide template. Values for this field are delivered with your system as translate values. The nine delivered values that appear here are: Agreement 1 to Agreement 9. |
Page Code |
Select the page code for the action item. The page codes are created in the Page Definitions page. See the previous subsection “Defining Agreement Pages”. |
Page Definition |
Click to access the Page Definition page, where you can review or edit the page code details. |
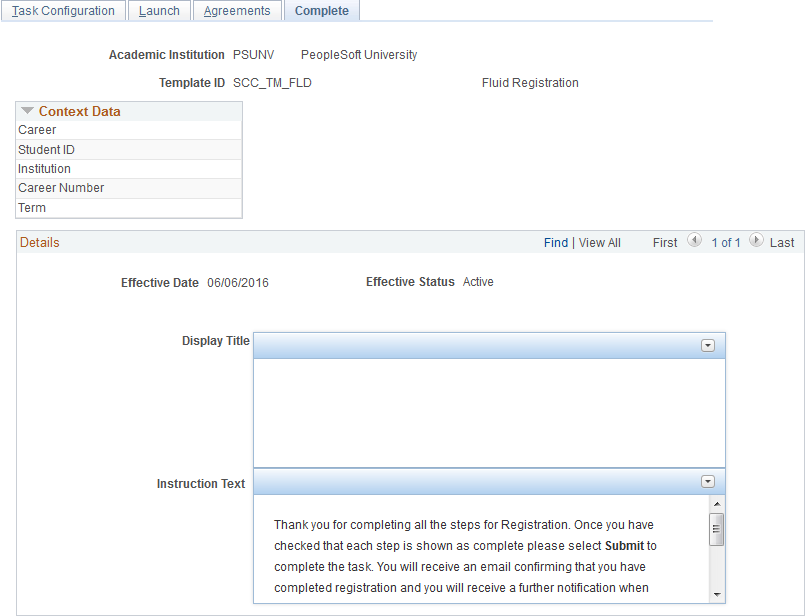
Access the Complete page ().
This example illustrates the fields and controls on the Complete page. You can find definitions for the fields and controls later on this page.
Field or Control |
Description |
|---|---|
Display Title |
Enter the page title that is displayed to the student. This is an optional field for Fluid tasks because the Display Title appears as a secondary title below the action item title. For Classic tasks however, the Display Title is displayed as the page title. |
Instruction Text |
Enter the text that appears after the page title to describe the actions that the student needs to perform. |
When the student clicks the Finish or Submit button on the Complete page, the task status is set to Completed. If subsequent tasks are configured, then new tasks are assigned. If a notification is configured, then a notification is generated for the student.