Creating a New Entity
The way that you create a new entity varies based on the nature of the transaction that uses the entity. For example, if the entity is used as part of a Constituent Transaction Management transaction, the entity you create needs to be set with an entity type that uses stage records and production records. Those records need to be created prior to creating the entity. While these specificities are described in the features’ related documentation, this section describes the generic steps that need to be taken independently from the transactions that use the entity.
This section discusses how to:
Create or extend stage records.
Create an entity application class.
Create an entity.
Generate XSD schemas.
Set up or verify the Campus Solutions SOA framework.
Set up logging.
If the entity you are creating requires staging the information into a temporary record (stage record) prior to posting to a true production record, you first need to create the stage records prior to creating the corresponding entities. You can also extend any of the delivered stage records to meet your requirements. The Staging table holds the staged data before it gets promoted to its matching production table.
The newly created staging record along with its matching production record are later linked together through an entity defined in the Entity Registry component (see the Creating an Entity subsection in this section). In the Entity Registry component, you see that the entities have a parent/child relationship. This relationship is mostly based on the record structure of the production and the stage records.
Note: When creating the entity for the stage and production records, if you select one of the following two delivered entity types: Staged Entity or Staged HR Entity, the system expects the staging record to be keyed by the SCC_TEMP_ID field, and the production record keyed by EMPLID. If instead you create your own Entity Type that also uses staging records, then you can key the stage and the production records however you like.
The high level key used for your staging records (in most cases you use SCC_TEMP_ID) is a unique identifier that replaces the ID used in the equivalent production table. The rest of the keys for a staging record are similar to the equivalent production record.
A staging record is not effective-dated (it does not include the EFFDT and the EFF_STATUS fields). This is true even if the matching production record is effective-dated. This is because the data entered in staging can be modified many times prior to being promoted to production. Only at that time, the data is current, and therefore the production record is set with the date the data is posted.
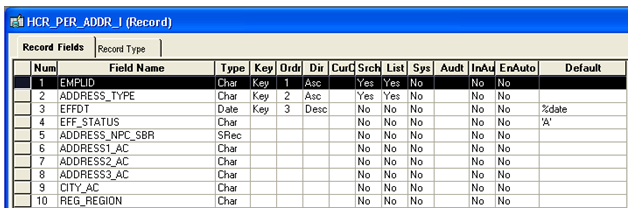
Below is an example of a delivered staging record with its matching production record that uses effective-dating:
This example illustrates the fields and controls on the Production record definition that stores Addresses (HCR_PER_ADDR_I). You can find definitions for the fields and controls later on this page.
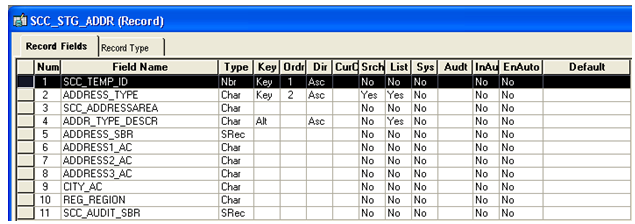
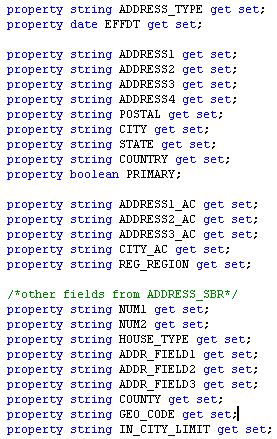
The equivalent staging record definition is defined as follows:
This example illustrates the fields and controls on the Matching Staging record definition that stores Addresses (SCC_STG_ADDR). You can find definitions for the fields and controls later on this page.
The delivered staging tables can be extended or modified to meet your needs. For instance, if you customized the production record that stores addresses (HCR_PER_ADDR_I record) by adding new fields, you may want to make sure those extra fields are also added to the its corresponding staging record (SCC_STG_ADDR record).
Note: If you create or extend a stage record that is later used as part of the Constituent Transaction Management framework, review the information in Developer Reference to Deploy New User Registration, “Step 1: Creating or Extending Staging Tables.”
When creating a new entity, you must select an entity type. The entity type selected is set up with a base application class. The new entity uses this base application class by default. However, you can create a new application class that is specific to the entity name. This entity application class extends the base application class.
To create a new entity application class, follow the below steps:
In the Application Designer, create a new application class under a new application package or reuse an existing one. For example, the application classes setup with delivered entities were created under the following application packages:
Delivered Transactions
Application Package
AAWS Admission Transactions
SAD_ADM_APPL
Academic Item Registry (AIR)
SSR_AIR
Academic Progress Tracker (APT)
SSR_APT
Activity Management
SSR_ACTIVITY
Constituent Transaction Management (CTM)
SCC_SL_TRANSACTION
Class Search
SSR_CLASS
Course Shopping Cart
SSR_COURSE
Delegated Access
SCC_DA
Entity API
SCC_COMMON:ENTITY:API
Evaluation Management
SCC_GENERIC_EVALUATIONS
Notification Framework
SCC_COMMON:NOTIFICATION
Research
SSR_RS_RESEARCH
Rules Engine
SCC_RULES_ENGINE
StudyList
SSR_STUDYLIST
The above table shows the application packages used by the delivered transactions that use entity registry.
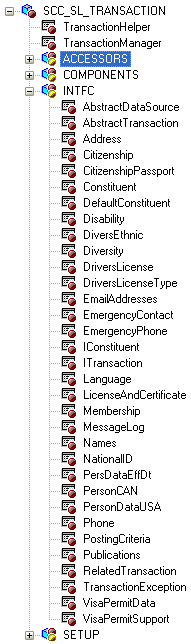
Below is an example of the SCC_SL_TRANSACTION:INTFC application package that comprises application classes used by Constituent Transaction Management:
This example illustrates the fields and controls on the Example of application classes used by CTM. You can find definitions for the fields and controls later on this page.
Warning! It is recommended that you do not update delivered application packages to insert the entity application class. Instead, create a separate application package. This is because any modifications made to the delivered application package is considered a customization, and might be overridden when a software updates are delivered.
Save the new application class without inserting any Peoplecode logic. Use the entity registry to generate the Peoplecode. This task is defined in the next steps.
This section discusses how to create an entity for the application class you created in the previous section.
The new entity can be a parent entity or a child of an existing parent. For instance, delivered with your system, the Constituent and the Application entities are parent entities of many children.
Creation considerations:
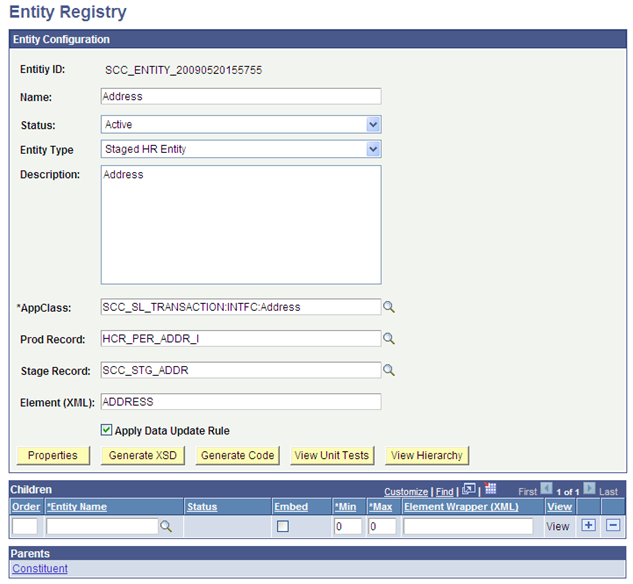
Name the new entity in relation with the underlying record(s) (that is, the stage and/or the production records you are creating the entity for). For example, the entity name for the address underlying records is Address.
Select a delivered entity type that corresponds to the need of the transactions that use the entity. For example, if you create an entity for a transaction that requires temporarily staging the information to a stage record, make sure you select an entity type that use stage records. If the delivered entity types do not match your needs, create a new one.
Enter the application class name you created in the previous step. The application class you insert here extends the Base Application Class defined in the Entity Type selected. For example, if you create an entity using entity type Staged Entity, the application class you insert extends the base application class SCC_COMMON:ENTITY:StagedEntity. If you used entity type Basic Entity, the application class given inside the entity setup extends the base application class SCC_COMMON:ENTITY:BasicEntity.
Enter the other required information and save. After the first save, the Properties button is displayed. Use the Entity Properties page to add any extra needed properties. Save.
If the entity you created was to be a child of an existing entity (like Address is a child to Constituent entity), you can now access the parent entity and list the newly created entity in the Children grid of the Entity Registry page. If the entity you created was to be a parent, you can then attach children to it.
Warning! At this stage, if you added a child entity, the message schema does not reflect this new entity. However, if the entity is added to an incoming message and no schema validation is occurring, the incoming message containing this data is processed and this entity is handled. As an example, the Address entity is registered as a child entity to the Constituent entity.
This example illustrates the fields and controls on the Example of the entity created for Address. You can find definitions for the fields and controls later on this page.
Generate the Application Class Peoplecode
When creating the entity application class, you do not enter peoplecode logic inside the application class. After creating the new entity and entering the newly created application class, use the Entity Registry to write the application class peoplecode for you.
From the Entity Registry component for the entity you created above, select Generate Code in the Action field. In the Entity Code Generation page, select the desired options to include in the peoplecode. The inclusions later facilitate the work of customizing the peoplecode (Custom Presave Code, Custom Validation Code, Custom SetDefault Code and Extend Fill). Click the Generate Code button. The AppClass Code box is shown. Select all the code and paste it in the peoplecode of the application class you created above in Application Designer.
In Application Designer, modify the peoplecode as needed:
Any new class that you create must declare all its own immutable keys and mutable properties:
This example illustrates the fields and controls on the Examples of properties listed inside the SCC_SL_TRANSACTION:INTFC.Address application class. You can find definitions for the fields and controls later on this page.
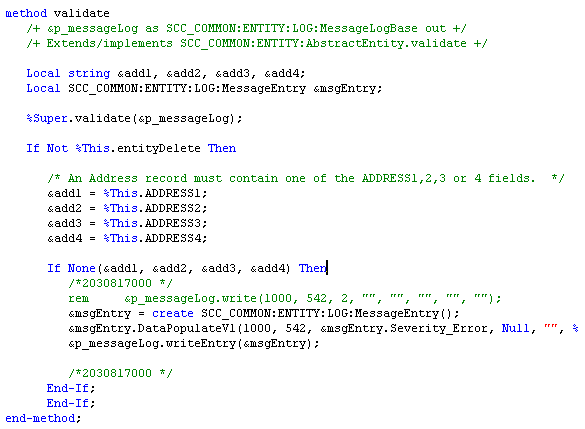
Any new class that you create may choose to override the validate() method in order to validate data prior to saving.
This example illustrates the fields and controls on the Examples of validation done inside the SCC_SL_TRANSACTION:INTFC.Address application class. You can find definitions for the fields and controls later on this page.
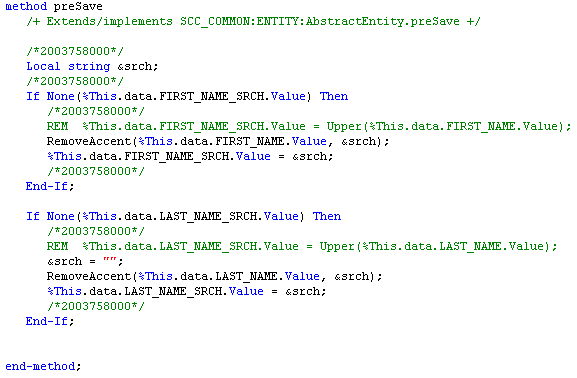
Any new class that you create may choose to override the preSave() method in order to default fields before the user saves the application.
This example illustrates the fields and controls on the Examples of presave logic done inside the SCC_SL_TRANSACTION:INTFC.Names application class. You can find definitions for the fields and controls later on this page.
Any new class that you create may choose to override the setDefault() in order default values.
Any new class may declare get/set methods for its properties.
This example illustrates the fields and controls on the Examples of get and set inside the SCC_SL_TRANSACTION:INTFC.Address application class. You can find definitions for the fields and controls later on this page.

The features using Entity Registry can use web services. Depending on what entities are referenced by the messages on the service operation, select an action of Generate XSD for the entity name that is considered the top level used. Selecting the Generate XSD action creates the message schemas of the API for that entity.
To do so, perform the following steps:
Access the top level entity name referred by the messages in the service operation and select the Generate XSD action (this may not necessarily be the parent entity name. It depends on what entities are referenced by the messages on the service operation).
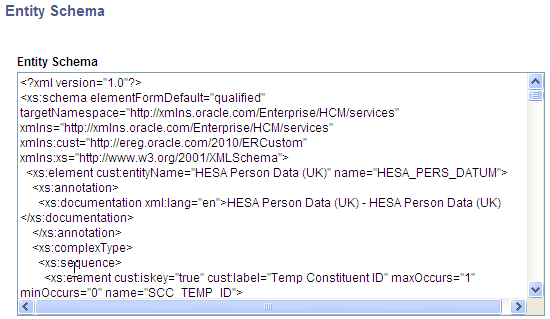
After selecting the Generate XSD action, the entity schema is displayed:
This example illustrates the fields and controls on the Entity schema generated for the Constituent entity (parent entity). You can find definitions for the fields and controls later on this page.
Select the entire generated schema and paste it into the appropriate messages to modify the overall schema.
Navigate to Search for the relevant message. In the Schema tab, click the Edit Schema button and paste in the generated schema. Save the component.
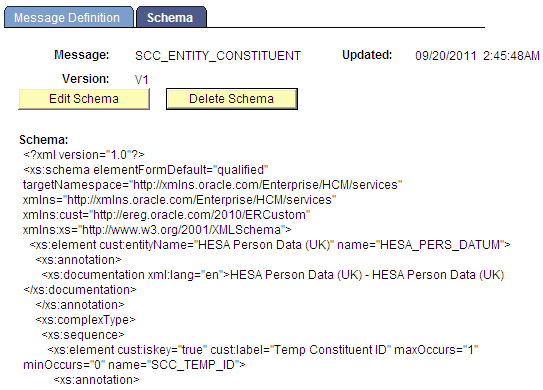
For example, suppose you generated the schema for the Constituent entity. Navigate to the message Schema page. Search for the message called SCC_ENTITY_CONSTITUENT. Click the Edit Schema button and paste the generated schema as shown in screen shot below.
This example illustrates the fields and controls on the Constituent message partial schema. You can find definitions for the fields and controls later on this page.
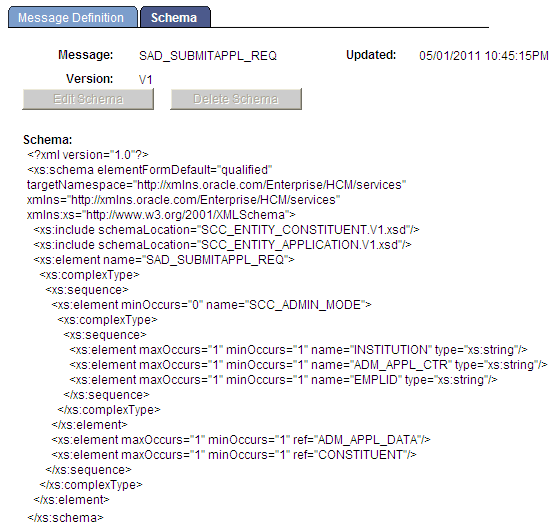
Note: The messages where you paste the schema are entity messages. These messages must be created with a message type of Part NonRowset based. This means they can be used by any Nonrowset based message. The web services created for your transaction can also refer to delivered entity messages. For example, a message with AAWS admission transaction, SAD_SUBMITAPPL_REQ message, calls both SCC_ENTITY_CONSTITUENT and SCC_ENTITY_APPLICANT message schema in its schema.
It is easy to maintain the entity messages as their schema can be generated from the Entity Registry page. Entity messages can be reused in any request or response message as per your requirement.
This example illustrates the fields and controls on the Example of a web service message calling the schema of a Part NonRowset message. You can find definitions for the fields and controls later on this page.
Once the schemas have been updated, the service WSDL needs to be republished in order to have all the new or updated entities recognized. In order to do that delete the existing WSDL under Select the appropriate service WSDL and press delete.
Republish the service WSDL under
During installation, the system automatically inserts configuration data into the Campus Solutions SOA Framework setup tables.
Access the Request Handlers component for the service operations that you created or are planning to use under . For each of the service operations you plan to use, ensure the Request Handler page contains the proper information. The application class path should be properly entered.
Access the Logging component to enable and configure the logging feature under .
This example illustrates the fields and controls on the Example of how the Logging page can be set up. You can find definitions for the fields and controls later on this page.
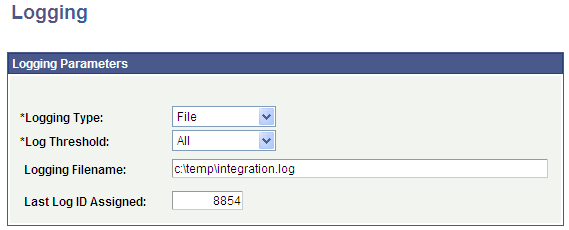
Note: You should not enable logging in a production environment. SOA framework logging is only appropriate for a testing, demo or development environment or when performing critical troubleshooting activities.
See PeopleTools: Integration Broker.