Mapping the File Parser Process for Population Selection
The Population Selection process uses the File Parser process when the selection tool for identifying the population is external file. When using an external file to select IDs for a process, you must map the fields required by the process to the target table fields for the application process that is integrated with Population Selection.
This section discusses how to map the File Parser process for Population Selection.
|
Page Name |
Definition Name |
Navigation |
Usage |
|---|---|---|---|
|
Population Selection File Map |
SCCFP_PS_FILE |
Click the or Edit File Mapping link in the Population Selection group box on any run control page when the Population Selection tool is an external file. |
Map the File Parser process for integration with the Population Selection process. |
Access the Population Selection File Map page ().
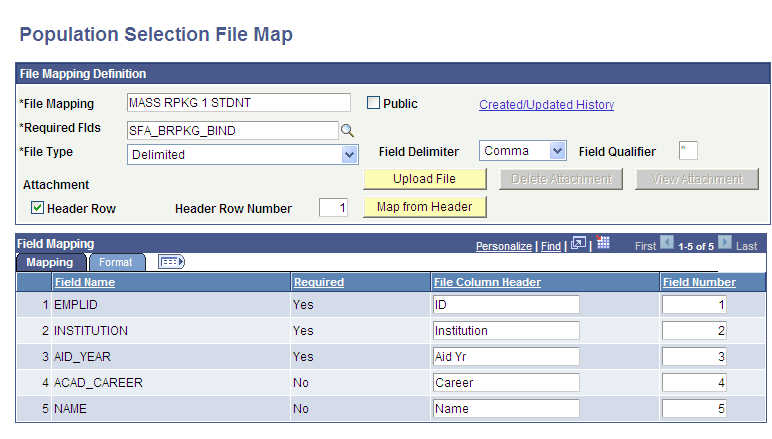
This example illustrates the fields and controls on the Population Selection File Map - Mapping tab. You can find definitions for the fields and controls later on this page.
This example illustrates the fields and controls on the Population Selection File Map - Format tab. You can find definitions for the fields and controls later on this page.

If you access the Population Selection File Map page from the Population Selection group box, the system enters the required fields record from Population Selection Context for the application process, and displays the list of fields in the required fields record in the Field Mapping group box. If you manually navigated to the page, you must enter the name of the required fields records in the Required Flds field. When you exit the field, the system displays the fields from that record.
File Mapping Definition
Field or Control |
Description |
|---|---|
File Mapping |
Enter a name for this mapping. |
Public |
Select to make this mapping accessible for all users to use and update. Clear to make this mapping accessible only to the user who created it. A public mapping is useful for example, when a mapping can be reused for different files or for files that are refreshed regularly. |
Created/Updated History |
Click to view a history of who updated the mapping and when. |
Required Flds (required fields) |
Enter the name of the record that contains the fields required to identify the population. Note: If you access the page directly from a run control page for a process, the Required Flds field does not appear. The bind record containing the required fields is derived from the Population Context for the process, and the field is hidden. |
File Type |
Specify the type of external file, either Flat or Delimited. If you enter Delimited, you must also verify or enter the delimiter and qualifier. File types are translate values. Do not modify these values. |
Field Delimiter |
Appears only for a file type of Delimited. Enter the value in the external file that signifies the end of one value and the beginning of another. Values are: Comma (default value) Pipe Semicolon Tab Field Delimiter values are translate values. Do not modify these values. |
Field Qualifier |
Appears only for a file type of Delimited. Enter the value in the external file that qualifies the end of one field and the beginning of another. The default qualifier is " (quotation mark). |
Header Row and Header Row Number |
The Header Row check box and the Header Row Number field appear only if the file type is Delimited. If the file that contains the IDs to process includes header rows, for example column titles or to display a title for the document, select the Header Row check box and enter the number of rows in the uploaded file used as the header. The Population Selection process evaluates values after the end of the number of header rows specified. If you are unsure if the uploaded file has header rows or unsure of which row to use as the header, click Cancel to return to the run control page. Then, click View File to view the delimited file and validate and count the header rows if they exist. Return to the mapping and continue. |
Map From Header |
Appears only when Header Row is selected. Click to map the column names in the uploaded spreadsheet to the fields required to run the process. The system reads the name of each column in the spreadsheet, compares it to the fields listed in the Field Mapping group box, and if it finds a match, enters the column number in theField Number field for that field. For example, assume that CAREER is the title of the second column in the spreadsheet that you uploaded. If the ACADEMIC_CAREER field appears in the list of fields in the File Mapping group box, then the system sets the Field Number field to 2. The Mapping From Header feature does not map columns in the spreadsheet that do not match any fields in the File Mapping group box. To map these, you must manually enter the column number in the Field Number column. Note: The system uses the short name of the fields to map to the columns in the spreadsheet because PS Query uses the short name as the default value to name the column names when the query results are downloaded into Microsoft Excel. See PeopleTools: Query, “Downloading Queries.” |
Upload File, Delete Attachment, and View Attachment |
These buttons appear only if you navigate to the Population Selection File Map page from the menu, you select the Header Row check box, and if the file option for the External File selection tool on the Selection Tool setup page is set to Attachment. The buttons do not appear if you access the page from a run control page because the buttons are available from the standard Population Selection group box on the run control page. Click to upload, delete, or view the external file to use. Note: The process uses the uploaded file for automatic field mapping only. No other process uses this file. |
File Path and Name |
This field appears only if you navigate to the Population Selection File Map page from the menu, and if the file option for the External File selection tool on the Selection Tool setup page is set to Physical Path. The field does not appear if you access the page from a run control page because the field is available from the standard Population Selection group box on the run control page. Enter the path to the external file to use. The file path must follow the appropriate syntax for the application server that you are using:
Warning! Consider these conditions when uploading an external file to parse for use with the Population Selection process:
For information about “SYLK: File format is not valid” error, see Microsoft web site. |
Field Mapping - Mapping Tab
Field or Control |
Description |
|---|---|
Field Name and Required |
Displays the name of each field in the required fields record that is specified in the Population Selection Context, and indicates Yes if the uploaded file must have the same field for the process to run. Required fields also require a Field Number to map the field to the corresponding column in the uploaded spreadsheet. Fields marked No are optional. They do not need to be in the spreadsheet and do not required a Field Number value unless you choose to use them, in which case you can manually enter the corresponding column number in the Field Number field. |
File Column Header |
Appears only when File Type is Delimited. and Header Rowis selected. When the Header Row check box is selected, the system enters the short name of the field in the File Column Header column. |
Field Number |
Appears only when File Type is Delimited. Displays the number of the column in the uploaded file that corresponds to this field. |
Starting Position and Field Length |
Appear only when File Type is Flat. Enter the starting position and the field length for each required field. |
Field Mapping - Format Tab
Field or Control |
Description |
|---|---|
Field Format |
Appears if formatting options exist. Enter the format to use for the field value. Each field has options relevant to the data type. For example, possible date type formats are DDMMMYY, DDMMYYYY, DDMMYY, and so on. Possible character type formats include the case controls Lower,Proper, and Upper. |
Date Separator |
Appears only for date field types. Enter the symbol to use to separate the date parts. |
Decimal Position |
Appears only for number field types. Enter the position to use for placing the decimal. |
Trim |
Appears only for fields that are not date or time field types. Select to trim leading or trailing spaces in fields. |
Warning! After entering mapping information, preview the results before running the File Parser process to confirm that the column titles match the information inside the columns and that the mapping and results are otherwise correct. To preview the results, access the standard Population Selection group box in the run control component of the application process. If the Population Selection check box is available, select it. Then set the Selection Tool to External File, upload the file, select the mapping name you just created, and click the Preview Selection Results link. The Preview Selection Results link appears only if your institution set the external file selection tool to allow preview results at installation.