Setting Up External Search/Match Functionality
This section discusses how to:
Configure external core data integration.
Configure External Search/Match options.
Configure External Search/Match web services.
|
Page Name |
Definition Name |
Navigation |
Usage |
|---|---|---|---|
|
External Core Data Integration |
SCC_EXT_SYSTEM |
|
Specify an external system that is integrated with CS for core person data. |
|
External System Search Match Options |
SCC_CS_HUB_INSTALL |
|
Specify External Search/Match options when integrating with an external system. |
Access the External Core Data Integration page ().
Field or Control |
Description |
|---|---|
Is External System Installed |
Select this check box to indicate whether CS is integrated with any external system. If you do not select this check box, the other fields on the page are unavailable for input. When users perform a Search/Match, the system evaluates this indicator and determines whether to invoke External Search/Match functionality. |
Integrated External System |
Select an option to indicate which system is integrated: HCM installed as third party: Select to indicate that CS and an HCM system are in separate instances and the administrative user has distinguished the HCM system as an External System with direct integration to it (for example, HCM 9.0, HCM 9.1, or another CS system). Other external system:Select to indicate that an external system other than an HCM system has been integrated to CS. This could potentially be another third-party data hub. [Blank]: Leave the field blank to indicate that CS has no external system integrated with it. This is the default setting for this field. |
Data Hub Name |
Define the name of the external system, based on the selected Integrated External System. If you selected HCM installed as third party, this field changes to HCM Installed as Third Party and is unavailable for input. However, if you selected Other external system, this field becomes active; enter the external system name. Note: PeopleSoft assumes that only one external system will be used. |
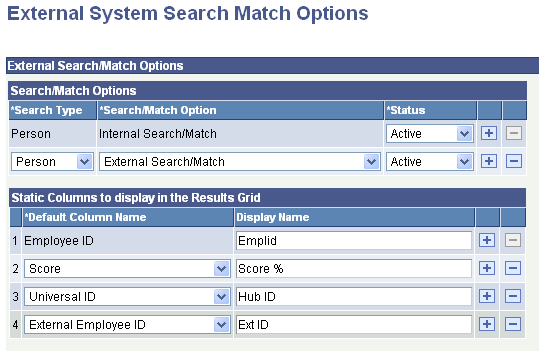
Access the External System Search Match Options page ().
This example illustrates the fields and controls on the External System Search Match Options page. You can find definitions for the fields and controls later on this page.
If the Is External System Installed check box is not selected on the External Core Data Integration page, the following message appears: "Currently, no External System is configured with Campus Solutions. To configure an External System, navigate to External Core Data Integration page."
Search/Match Options
Fields in this group box determine the conditions under which the system uses Search/Match, External Search/Match, or both when adding a new person or saving an updated bio/demo page.
Field or Control |
Description |
|---|---|
Search Type |
Select Person, Applicant, or Organization. Note: At this time, you may only select the Person option. The other search types are not yet integrated with External Search/Match. |
Search/Match Option |
Select the Search/Match functionality to use when an external system is installed: If you select Internal Search/Match and you make it Active, then the Search/Match process searches for person IDs inside the CS database. If you select External Search/Match and you make it Active, then the External Search/Match process searches for person IDs inside the integrated external system. If you clear the status or make the status Inactive, the system does not trigger a specific Search/Match tool. Note: Both searches can be selected at the same time, and results from both searches appear on the same Integrated Search Results page. |
Static Columns to Displays in the Results Grid
Fields in this group box contain information about additional columns to display inside the Results grid of the Integrated Search Results page.
Field or Control |
Description |
|---|---|
Default Column Name |
Select EmplID, Universal ID, Score, or External Employee ID. These are delivered translate values; do not modify them. EmplID is displayed by default (just like for Search/Match). Universal ID is a generic term that refers to the external system ID in use. When selected, the external system ID is displayed inside the Additional Information tab of the Results grid. Score is a generic term that refers to your external system method for ranking the matches found. It is the weight or the accuracy of the results found. It is sometimes expressed by a percentage or a number. If your external system does not have ranking capability, do not select this option. When selected, the column appears first in the Results grid. If you select Score, then the system sorts search results in the Results grid by score in descending order and by EmplID in ascending order. If you do not select Score, then the search results appear only by EmplID in ascending order. External Employee ID refers to the External HCM system EmplID. It is specifically used when the institution has selected to import external EmplIDs rather than generate a CS-unique EmplID. |
Display Name |
Enter a custom column name for the static columns that appear in the Results grid. |
The following example is for requests being sent from Campus Solutions (CS) to Human Capital Management (HCM). To send requests in both directions, you can configure the same service operations in both your CS and HCM systems with outbound and inbound routings.
Activate the search service SCC_SM_SERVICE.
Log on to the Campus Solutions database and navigate to: .
Enter SCC_SM_SERVICE, then click Search.
-
Select SCC_SM_SERVICE
In Existing Operations, click SCC_SM_SERVICE_SYNC.
In Default Service Operation Version, make sure Active is selected.
-
Click Service Operation Security and verify the permission list setup.
Set up the handler for SCC_SM_SERVICE.
Click Handlers and enter the following:
Note: In the distinct ownership configuration example, requests are only coming from the CS side. CS doesn't need to handle any requests so the request handler doesn't need to be configured on the CS side.
Field or Control
Description
Name
Enter SearchReq.
Once the handler details are added, this is converted to REQUESTHDLR.
Type
OnRequest
Implementation
Application Class
Status
Active
Click Details, then enter the following:
Field or Control
Description
Description
Search Request Handler
Package Name
SCC_HR_INTEGRATION
Path
Request_Handler
ClassID
ProcessMatchRequest
Method
OnRequest
Click OK.
Set up the routings for SCC_SM_SERVICE.
Click Routings.
Enter the routing details:
Field or Control
Description
Routing Name
For example,
On CS: SCC_SM_Request_to_HR
On HCM: SCC_SM_Request_from_CS
Description
On CS: Search Request to HR db
On HCM: Search Request from CS db
Sender Node
On CS: CS92ESM (CS database name)
On HCM: CS92ESM (CS database name)
Receiver Node
On CS: HR92ESM (HR database name)
On HCM: HR92ESM (HR database name)
Log Detail
Header and Detail
Click Save, then click Return to Service.
In Routing Definitions, verify that Status is Active and Direction is the expected value. For SCC_SM_REQUEST_TO_HR, the Direction is Outbound.
-
Click Save.
Activate the fetch service SCC_SM_FETCH.
Navigate to: .
-
Enter SCC_SM_FETCH, then click Search.
-
Select SCC_SM_FETCH.
-
In Existing Operations, click SCC_SM_SERVICE_SYNC.
-
In Default Service Operation Version, make sure Active is selected.
-
Click Service Operation Security and verify the permission list setup.
Set up the handler for SCC_SM_FETCH.
Note: If you're issuing requests from the CS side, there's no need to define a handler in CS. Requests are handled on the HR side. If you define a handle that's not being used, you can set it to Inactive.
Click Handlers and enter the following:
Field or Control
Description
Name
Enter FetchRequest.
Once the handler details are added, this is converted to REQUESTHDLR.
Type
OnRequest
Implementation
Application Class
Status
Active
Click Details and enter the following:
Field or Control
Description
Description
Request Handler
Package Name
SCC_HR_INTEGRATION
Path
Request_Handler
ClassID
ProcessFetchRequest
Method
OnRequest
Click OK.
Set up the routings for SCC_SM_FETCH.
Click Routings and define the routing as follows:
Field or Control
Description
Routing Name
For example,
On CS: SCC_SM_FETCH_REQ_to_HR
On HCM: SCC_SM_FETCH_REQ_from_CS
Description
On CS: Fetch Request to HR db
On HCM: Fetch Request from CS.db
Sender Node
On CS: CS92ESM (CS database name)
On HCM: CS92ESM (CS database name)
Receiver Node
On CS: HR92ESM (HR database name)
On HCM: HR92ESM (HR database name)
Log Detail
Header and Detail
Click Save, then click Return to Service.
-
In Routing Definitions, verify that Status is Active and Direction is the expected value. For SCC_SM_FETCH_REQ_TO_HR, the Direction is Outbound.
-
Click Save.