Viewing SEVIS Alerts Process Data
Use pages in the Select Alerts to Report - F/M or Select Alerts to Report - J component to review the events triggered for each student or exchange visitor after running the SEVIS Alerts process for the specific visa type.
The SEVIS school code for F/M visas or the SEVIS program code for J visas and batch ID information are keyed to the data on the Alerts Header page in the component. The batch ID is a unique number generated by the SEVIS Alerts process. Access to the component is controlled through program code or school code security respectively. By using the SEVIS program code or school code and batch ID, you are able to review errors, enter additional data, and indicate if the event should be submitted to SEVIS or to the SEVIS Master component. You can also indicate if a new I-20 is needed for the student or a new DS-2019 form is needed for the exchange visitor.
On the Alerts Headers page, default values appear for the New Form and Send To fields according to the values defined on the SEVIS Event Types page. The system displays these default values only if the event has no errors.
Set the Send To field on the Alerts Header page to Master to update the event in the SEVIS Master component, or set the field to None to prevent processing the event until you can evaluate errors and determine whether to send it to SEVIS or update the SEVIS Master component.
Note: The system automatically sets the Send To field on the Alerts Header page to SEVIS when the Send to SEVIS check box is selected for the event type on the SEVIS Event Types page and when no errors are detected during processing and no additional data is required. Only rows set to send to SEVIS on the Alerts Header page are extracted to the XML file to send to SEVIS.
Clicking Set All "Send To" to SEVIS sets the Send To field to SEVIS for all events where no errors exist and additional data is required.
After reviewing and correcting events data in the Select Alerts to Report component, run the Export SEVIS Events process to create the XML file to send to SEVIS or to update the SEVIS Master component before running the SEVIS Alerts process for that visa type again. Refer to the process flow at the beginning of this document to better understand when to run this process.
Note: Data entered on the Additional Data page in the Select Alerts to Report component is lost if the Export SEVIS Events process is not run before the SEVIS Alerts process is run again for that visa type.
This section discusses how to:
Select data to review.
Review alerts data.
Enter additional data for an event.
View event errors data.
|
Page Name |
Definition Name |
Navigation |
Usage |
|---|---|---|---|
|
Selection |
SEV_REV_U_FILTER |
|
Select data to review. |
|
Alerts Header |
SEV_ALERT_HEADER |
|
Review data on alerts page. |
|
Addl Data (additional data) |
SEV_REV_FMUPD |
|
Enter any additional data required for this event. |
|
Errors |
SEV_REV_U_ERRORS |
|
View event errors. |
|
Message Explanation |
SEV_REV_ERR_EXPL |
Click More on the Errors page. |
Review the error message information. |
Access the Selection page ().
Field or Control |
Description |
|---|---|
SEVIS School Code or SEVIS Program Number |
The system displays either the SEVIS School Code and associated fields for F and M visas, or the SEVIS Program Number and associated fields for J visas. |
Filter Options
If you have a large number of events to view, you can filter the data based on options in this area.
Field or Control |
Description |
|---|---|
School Official or Responsible Officer |
For the F and M visas school official, enter the DSO assigned to the students who appear on the Alerts Header page. The prompt displays all DSOs defined on the SEVIS School Code Table page for the SEVIS school code listed. For the J visas responsible officer, enter the RO/ARO assigned to the exchange visitors who appear on the Alerts Header page. |
Student ID or Exchange Visitor |
For the F and M visas student ID, enter the student's ID (EmplID) whose events you want to review. For the J visas exchange visitor, enter the exchange visitor's ID (EmplID) whose events you want to review. The prompt displays all IDs that have events. |
Event Type |
Select a specific event to review. |
Errors |
Select to review events that have errors or events that have no errors. |
Additional Data |
Select to review events requiring additional data or events that require no further editing. |
Send to SEVIS |
Select to review events that have no additional data, or that have optional or required additional data. |
Alert Nbr Range (alert number range) From and Through |
The system assigns a unique alert number to each event row for each Batch ID. Select an alert number range to review only the events within the range. |
Clear |
Click to clear the data in theFilter Options group box. |
Apply |
Click to filter the alerts results based on the data entered in the Filter Options group box. |
Show All |
Click to show all of the events on the Alerts Header page. |
Access the Alerts Header page. (For F/M alerts, . For J alerts, .)
This example illustrates the fields and controls on the Alerts Header page. You can find definitions for the fields and controls later on this page.
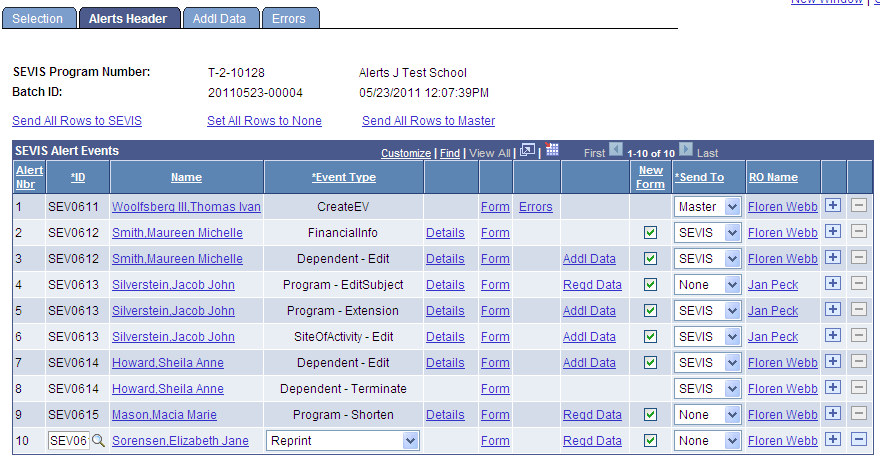
The Alerts Header page lists the events that will trigger when the Process SEVIS Alerts process runs for the specific visa type.
If the Send To SEVIS check box on the SEVIS Event Types page is selected for the event type, and the event has no errors, the system sets the Send To value to SEVIS, and the Extract SEVIS process includes the event in the XML file to send to SEVIS. If the Form Request Available check box on the SEVIS Event Types page is selected, the system also displays the New Form check box already selected on the Alerts Header page to request a new I-20 for F and M visas or a new DS-2019 form for J visas. You can change the default Send To value for each event.
The Extract SEVIS process does not include events set to Master or None in the XML file to send to SEVIS.
When the Send To field is set to Master (for Master Sync), the Alerts process synchronizes the event data by directly uploading it to the appropriate fields on the active effective status row in the SEVIS Master component, and the Extract SEVIS process updates the SEVIS Status value if needed.
For Create Student for F and M visas or Create EV events for J visas set to Master, the Alerts process inserts new active status rows in the SEVIS Master component, and the Extract SEVIS process sets the SEVIS Status to Initial. This enables you to update the SEVIS Master component with data entered manually in SEVIS RTI.
Note: If you set the Send To field to Master for a Create Student, Create EV, or Dependent - Add event types, you must manually enter the SEVIS ID for the student or exchange visitor and their dependents on the SEVIS ID Maintenance page.
When errors occur, the SEVIS Alerts process sets the Send To field to None. You can change it to Master to send the event without clearing the errors. Review the errors before changing it. Correct errors as necessary, and run the Alerts process for that visa type again to trigger the events with no errors before updating the SEVIS Master directly.
An example of when you might want to change None to Master for F and M visas without correcting the data is when the error occurs because the From date is not later than or equal to the current system date for an initial creation Create Student event. The student might have been created in RTI in the past and you need to reflect the dates as they appear in RTI, and therefore the error is acceptable.
An example of when you might want to change None to Master for J visas without correcting the data is when the error occurs because the Start date is not later than or equal to the current system date for Create EV event. The exchange visitor might have been created in RTI in the past and you need to reflect the dates as they appear in RTI, and therefore the error is acceptable.
You can add a row to manually enter an event for a student or exchange visitor if the Allow Manual Addition check box is selected for the event type on the SEVIS Event Types page and the student has a SEVIS ID for the specified school code or the exchange visitor has a SEVIS ID for the specified program code.
When the SEVIS Alerts process for the visa type runs, it moves all events with no errors to the View SEVIS Events History component.
Field or Control |
Description |
|---|---|
SEVIS School Code or SEVIS Program Number |
The page displays either the SEVIS School Code and associated fields for F and M visas or the SEVIS Program Number and associated fields for J visas. |
Send All Rows to SEVIS |
Click to set all the Send To fields to SEVIS for all events with no errors and for which no additional data is required. Only events that have no errors and need no additional data can be changed. |
Set All Rows to None |
Click to set all of the Send To fields to None, preventing them from being submitted to SEVIS during the Extract process. |
Send All Rows to Master |
Click to set all the Send To fields to Master for all events for which no additional data is required. |
SEVIS Alert Events
Field or Control |
Description |
|---|---|
Name |
Click the name to access the individual's Bio/Demo Data page in update/display mode. The page opens in a new window. |
Details |
This link is available only when the Compare Detail check box on the SEVIS Event Types page, Event Defaults tab, is selected for the event type Click to access the Compare Detail page where you can view the changes in data that triggered the event. |
Form |
Click the link to open the I-20 form for F and M visas or the DS-2019 form for J visas in update/display mode. The form opens in a new window. |
Errors |
Appears only if errors are detected. Click the link to access the Errors page. You must correct errors and run the Alerts Process for that visa type again to be able to set the Send to field to SEVIS. You can select Master without clearing the errors. |
Addl Data (additional data) or Reqd Data (required additional data) |
If the Addl Data link appears, additional data is optional. Select the link to access the Additional Data page where you can enter the data. If the Reqd Data link appears, additional data is required. Select the link to access the Additional Data page where you must enter values in the required fields before you can set the Send To field to either Master or SEVIS. No link appears if no additional data is permitted or required. For a list of the event types that have required or optional additional data, refer to the description of the Addl Data field on the SEVIS Event Types page. |
New Form |
The system requests a new I-20 form for F and M visas or a new DS-2019 form for J visas if the event has no errors and if the New Form check box for the event type is selected on the SEVIS Event Types page. You can override the default value. |
Send to |
Select:
|
DSO Name or RO Name |
For F and M visas, the system displays the name of the DSO listed on the most recent I-20 form, and for J visas the system displays the name of the RO listed on the most recent DS-2019 form. Select the name to view a list of DSOs or ROs. If a different DSO or RO is responsible for this event, select the correct one to include in the XML file to send to SEVIS. |
Access the Addl Data page. (For F/M visas, . For J visas, .)
Fields and data on this page change based on the event type.
Field or Control |
Description |
|---|---|
None, Send to SEVIS, Master Synch |
These options appear based on the value set in the Send To field on the Alerts Header page. If additional data is required data, then you must enter it before you can select Send to SEVIS or Master Synch and save the page. |
End Program Reason |
For Program - Shorten, select the reason for shortening the program:
|
The US Address region appears below Email Address and is read-only. This follows the format of the I-20 form. Also, the fields Explanation Code and Explanation Text are available. These fields allow you to view any values that have been populated from the I-20 or DS-2019 form, as well as enter or update the values as required.
Note: If you update the values in Explanation Code and Explanation Text on this page, you must also update the corresponding fields on the I-20 or DS-2019 form. This ensures that the values are in sync with the information reported to SEVIS and what is stored in SEVIS Master.
If you do not update the fields on the I-20 or DS-2019 form, a PersonalInfo or Biographical event is generated for the difference in values between SEVIS Master and the I-20 form or DS-2019 form. This applies to the events CreateStudent, PersonalInfo and Registration for F/M, and Create EV, Biographical, and Validate for J.
For a list of the event types that have required or optional additional data, refer to the SEVIS Event Types page, Addl Data field description.
Access the Errors page. (For F/M visas, . For J visas, .)
The Errors page lists data errors detected by the Alerts process for the event. You must correct the data error before the event can be included in the XML file to send to SEVIS. However, you can choose to ignore the error for Master Sync and set the Send To field on the Alerts Header page to Master. Most errors indicate that required data is missing for the student or exchange visitor, or the dependent. If data is missing for a dependent, the ID of the dependent is listed in the error. Consult the U.S. Immigrations and Customs Enforcement web site for a listing of required fields by event.
Select the More link to view additional detail regarding the error.