Preparing for User Profiles Management
Important! Mass Change is a deprecated product. It is strongly recommended that you use Application Engine instead. For more information on PeopleSoft Application Engine, see PeopleTools: Application Engine.
Important! Letter Generation (Letter Gen) is a deprecated product. It is strongly recommended that you use Communication Generation (Comm Gen) instead. For more information on Comm Gen, see Using the Communication Generation Process
Before you run the User Profiles Management process, you must complete the setup described in this section. You should complete the setup in the order shown.
Warning! Make sure you understand PeopleSoft security before you attempt to use the User Profiles Management process.
This section provides an overview of the creation of the model user ID and discusses how to:
Create the model user ID.
Enter the model user ID description.
Set up the roles.
Set up permission lists.
Set up primary permission lists.
Set up mass changes.
Set up event IDs for the communication, checklist, and comment (3C) engine.
Set up communications.
Set up checklists.
Set up comments.
Set up a certificate alias.
See PeopleTools: Security Administration
The User Profiles Management process creates user profiles based on a user ID that serves as a model. You create user IDs or user profiles in the User Profiles component USERMAINT (
For example, use the delivered model user ID SCC_MODEL for the Campus Solutions model. You only need to complete the first two pages in the User Profiles component. The other pages in the component do not contain any fields that the User Profiles Management process uses.
|
Page Name |
Definition Name |
Navigation |
Usage |
|---|---|---|---|
|
User Profiles - General |
USER_GENERAL |
|
Create a user ID that the User Profiles Management process uses as a clone (model) for creating user profiles. |
|
User Profiles - ID |
PSOPRALIAS |
|
Enter the ID type None and a description for the model user ID that the User Profiles Management process uses for creating user profiles. |
Access the User Profiles - General page ().
This example illustrates the fields and controls on the User Profiles - General page. You can find definitions for the fields and controls later on this page.
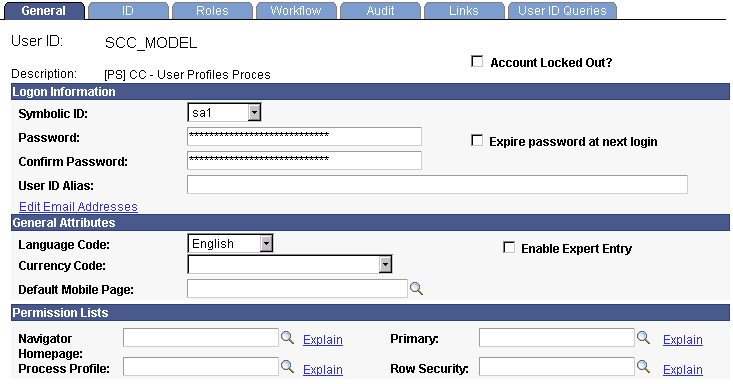
Add a new value to create a user ID or used the delivered example called SCC_MODEL.
Note: The Account Locked Out functionality is not cloned for the user profiles created in batch. When the user profiles are created, they are ready for the self-service users to access the site.
The system clones these fields to create these user profiles: Symbolic ID, Language Code, Navigator Homepage, Process Profile, Primary, and Row Security.
You should always select a symbolic ID, regardless of the role for which you are running the process. For example, if you are running the process using the role Prospects and you believe the role does not need a symbolic ID, then consider that when prospects become applicants or students, they do need a symbolic ID. There is no background process to create one.
Enter a password and confirm it. These fields are required on this page, but the system does not clone the password when you create the new user IDs.
Access the User Profiles - ID page ().
This example illustrates the fields and controls on the User Profiles - ID page. You can find definitions for the fields and controls later on this page.
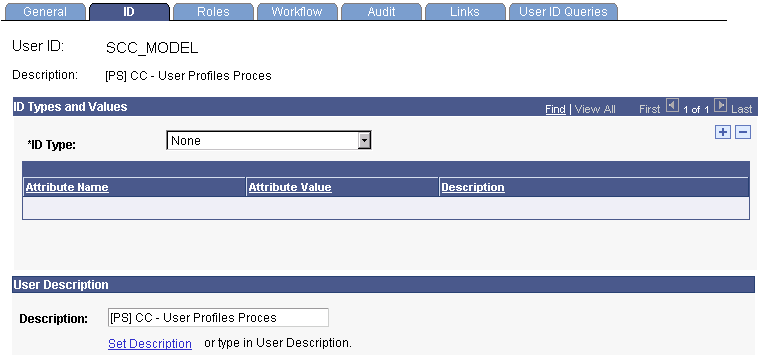
The system uses none of the fields on this page during the User Profiles Management process. However, the component requires an ID type. Select an ID type of None. This value is not cloned by the User Profiles Management process. Use the User Profiles Mass Creation setup page to set up the ID type to use for the user profiles that you create.
Field or Control |
Description |
|---|---|
Attribute Value |
The process automatically adds a value for each user profile that you create. |
User Description
Field or Control |
Description |
|---|---|
Description |
Enter the name for the model user ID. |
Note: You do not need to enter any other fields than the ones described when you create the model user ID to be used by the User Profiles Management process. None of the fields on this page are cloned.
PeopleTools mandates the use of Remote Security Administrator Role Grant Capability in order to provision roles to other users.
Users who deploy Create and Maintain User Profiles should assess their security setup for and modify any user role which would allow access to Setup and Run the User Profile Management process and effectively assign other roles to User Profiles. Those role definitions must be updated to include Role Grant definitions.
You must define the roles that the User Profiles Management process assigns to self-service users. For example, you might want to have roles for applicants, students, prospects, instructors, or recruiters.
Consider the names of the delivered mass changes when creating the roles. For example, the mass change User Profile - Applicant could be used to assign the role of Applicant. Refer to the list of delivered mass changes in previous topics.
See PeopleTools: Security Administration, “Implementing Distributed User Profiles”.
You must set up a permission list to give self-service users access to pages. You should at least give self-service users access to the Campus Personal Information pages if you licensed the PeopleSoft Campus Self Service product. You set up permission lists in the Permission Lists component
For each role that you create, you must create a corresponding mass change to define the search criteria that will identify a population. The Campus Solutions system comes with several mass change examples that you can use to create your own.
See PeopleTools: Data Management
To assign a communication, checklist, or comment to the user IDs that you create with the User Profiles Management process, you must set up a 3C engine event ID.
To send a letter to notify new users of their user IDs and passwords, set up a communication. Make sure the letter code that you create in the Standard Letter table has these characteristics:
Function equal to Gen (general).
SQC name equal to CCLTRWOL.
Without having this specific SQC name, the Letter Generation SQR process (CCLTRGEN) does not extract the user IDs and the passwords to print on the letters. To facilitate printing letters with the user IDs and passwords, you can use the delivered template called CCLTROPR.doc. To use this template, create a letter code called OPR. You must also create a communication speed key (also called a comm key) and an event ID.
Warning! Do not modify the SQC named CCLTRWOL.sqr in any way.
The User Profiles Management process enables you to assign more than one communication. For example, if you are creating user profiles for the prospects for next term, you can create an event ID with different comm keys. One might include a letter code for a letter communicating user IDs and passwords, a second might be for a postcard for an invitation to an open house, and a third might be for an admission package.
Warning! The User Profiles Management process assigns communications only to individuals with a user profile created by the process.
To assign a checklist code to self-service users, you must create checklist items and a checklist code, and you must add the checklist to the event ID. A checklist could be used for the users' list of things to do.
Warning! The User Profiles Management process assigns checklists only to the individuals who have a user profile created by the process.
You can assign a comment to the self-service users. For example, you might need to know whether an individual's user profile was created by the User Profiles Management process. You could create this comment: this individual's user ID was created by the User Profiles Management process. To do this, you create a comment category and add it to the event ID.
Warning! The User Profiles Management process assigns comments only to the individuals who have a user profile that is created by the process.
In order to update the user profiles with inbound SAML definition, Certificate Alias values need to be defined in your system. The section “Installing Application Server-Based Digital Certificates” in PeopleTools documentation provides further information.
See PeopleTools: Integration Broker Service Operations Monitor