Setting Up Payment Plan Contracts
To set up payment plan contracts, use the Create Payment Plan component (TP_PAYMENT_PLAN).
Note: Audit trail is captured in TP_CONTRACT for any changes to the payment plan.
This section discusses:
|
Page Name |
Definition Name |
Navigation |
Usage |
|---|---|---|---|
|
Payment Plan 1 |
TP_PAYMENT_PLAN |
|
Define basic payment plan contract parameters. |
|
Payment Plan 2 |
TP_PAYMENT_PLAN3 |
|
Define payment plan type, eligible charges, and time frame. |
|
Payment Plan Item Type |
TP_PAYMENT_PLN2 |
|
Define payment plan item types. |
|
Self Service Options |
SSF_TP_PMT_PLAN4 |
|
Define self-service options. |
|
Payment Plan Fee |
TP_CONTRACT_ASSESS |
|
Define payment plan administrative fees. |
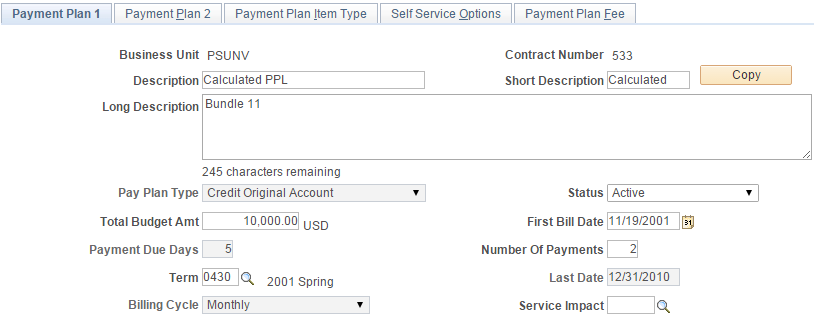
Access the Payment Plan 1 page ().
This example illustrates the fields and controls on the Payment Plan 1 page. You can find definitions for the fields and controls later on this page.
Field or Control |
Description |
|---|---|
Description |
Enter a description. This also appears in Self Service Enroll in a Payment Plan. |
Pay Plan Type |
Define how the system credits payments made to this plan. Values are: Credit the Original Account: Select to credit all eligible charges and create a new payment plan charge. Create Billing Entries: This option should not be used with any of the three payment plans. |
Status |
Specify whether the payment plan contract is active or inactive. You can change the status of a contract to Inactive regardless of the status of any students that are associated with it. Note: You should change the contract status to Inactive on any calculated payment plans for previous terms. This enhances performance because of the way the system automatically recalculates active contracts. An active contract is one for which both the contract and student status have a value of Active, and the last date of the contract is greater than the current system date. When the system recalculates contracts for a student, it evaluates all active contracts for that student. You do not need to set the student status to Inactive to receive this performance benefit as long as you have set the appropriate contract status to inactive. |
Total Budget Amt (total budget amount) |
This should be defined in conjunction with all eligible charges. Enter the maximum amount of installment payments that a student can make through the payment plan account. Carefully consider all eligible charges when you establish this figure to make sure that it is high enough to cover all the intended costs. For lump sum plans, the total budget amount becomes the default lump sum amount. You can adjust this amount for each student who is linked to the plan. |
First Bill Date |
Set the date on which you generate the first bill for the payment plan. The system uses the first bill date and the billing cycle to set the billing dates for the duration of the payment plan. You can override this setting for each student who is linked to the plan. Note: The billing program does not acknowledge the payment plan until on or after the first bill date specified. For example, if your first bill date is set for November 16 and you run your billing process on the 15th, the system does not process Payment Plan billing until the next run. |
Payment Due Days |
Enter the number of days after the bill date that the payment is due. |
Number of Payments |
Enter the number of payments (installments) that students must make to pay off the plan. The system uses the information in this field as the default value. You can override the number of payments for each student who is linked to the plan. |
Term |
This field is required for calculated payment plans. Enter the term that the system posts on the payment plan credit and the installments. This field is optional for existing and lump-sum payment plans. Note: When a payment plan covers charges in more then one term, you must clear the Account Per Term check box on the Accounts Types page for the payment plan account type. |
Last Date |
Enter the last date that charges can be added or adjusted and still be picked up by the plan. |
Billing Cycle |
Specify the frequency of creating a bill. You should not select a value of User Selected for calculated payment plans or payment plans that are used in Self Service. |
Service Impact |
Enter the service impact that would prevent enrollment into the payment plan. This prevents enrollment into the payment plan through Batch Assignment, Assign Page, and Self Service. |
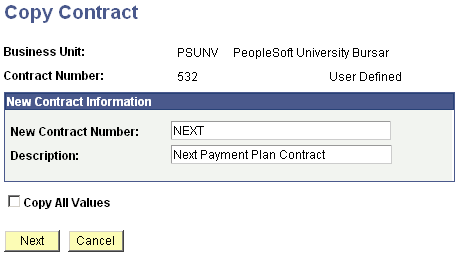
Copy Contracts
Click the Copy button to copy an existing payment plan contract as the basis of a new payment plan contract. You can copy all contract setup information except for term and date information.
Access the Copy Contract page (click the Copy button on the Payment Plan 1 page).
This example illustrates the fields and controls on the Copy Contract page. You can find definitions for the fields and controls later on this page.
Field or Control |
Description |
|---|---|
New Contract Number |
Enter a new number for the copied contract. If auto numbering is enabled on the SF Business Unit payment plan contract set up page, NEXT is automatically assigned as the new contract number. You can change the contract number. |
Description |
Enter a description for the copied contract. |
Copy All Values |
Select to copy all other related contract information from the previous contract. |
Enter the desired information and click Save. You are returned to the Payment Plan 1 page, where you can modify the new contract information as desired.
Access the Payment Plan 2 page ().
This example illustrates the fields and controls on the Payment Plan 2 page. You can find definitions for the fields and controls later on this page.

Field or Control |
Description |
|---|---|
Plan Type |
Select the plan type from the following values: Calculated: Select to determine which charges to include based on the rules that you define on this page. If you use this option, each time that you calculate or recalculate the payment plan, the system picks up all eligible charges and adds them to the plan balance. You can also use the Calculate Real Time option to have the contract recalculated each time an eligible change occurs in the student's account. This is available for Self Service Enroll in a Payment Plan. Existing: Select to manually choose which charges to include in each student's payment plan at the time you add the student to the plan. Note: When you choose Existing, the rest of the fields (with the exception of Calculate Real Time) become unavailable. Lump Sum: Select to create a payment plan for a fixed amount. This is the most basic type of plan and is useful for students who do not expect any changes to occur in their accounts and know how much they need to finance. This is available for Self Service Enroll in a Payment Plan. Note: When you select the Lump Sum option, the Lump Sum Amount field becomes available and all other fields on the page become unavailable. |
Maximum Amount |
The maximum amount is set by default from the total budget amount and can be overridden, if needed. This field is available with calculated payment plans only. |
Lump Sum Amount |
Enter the lump sum amount that you want the contract to cover. The default value for this field is the total budget amount that is established on the Payment Plan 1 page. You can override this value, but you cannot exceed the total budget amount limit. This field is available with lump sum payment plans only. |
Item Type Group |
Select the item type group that includes all of the charges to be included in the payment plan. This field is available with calculated payment plans only. |
Offset Item Type Group |
Select the offset item type group that includes payments, financial aid, or both that the system uses to offset charges and thereby reduce the amount of the payment plan. This field is available with calculated payment plans only. |
Term and Offset Term
In these group boxes, enter the range of terms for which the system includes charges and offsetting credits in the payment plan. These fields are available with calculated payment plans only.
Charge Date and Charge Offset Date
In these group boxes, specify when charges and offsetting credits can be added to or adjusted in the payment plan. These fields are available with calculated payment plans only.
Field or Control |
Description |
|---|---|
Add |
Enter the earliest date to include charges, offsetting credits, or both in the payment plan. |
Adjust |
Enter the last date on which you can adjust the payment plan for new charges or a reduction in charges, offsetting credits or both. |
Anticipated Aid Term/Date
Enter the range of terms for which the system considers anticipated aid. These fields are available for the calculated payment plan, but not required.
Field or Control |
Description |
|---|---|
From and To |
Enter the earliest term and latest term for which the system considers anticipated aid. |
Anticipated Aid Date |
Enter the date that the system uses to determine whether anticipated aid is eligible. If this date is less than the current system date, the system disregards anticipated aid when it calculates the payment plan contract. |
Calculate Real Time Check Box
Field or Control |
Description |
|---|---|
Calculate Real Time |
Select to automatically calculate payment plan charges whenever a change is made to eligible charges. This option affects all students who are associated with the plan, but you can override it at the student level. If you do not select this option, you must calculate payment plan agreements in batch mode. |
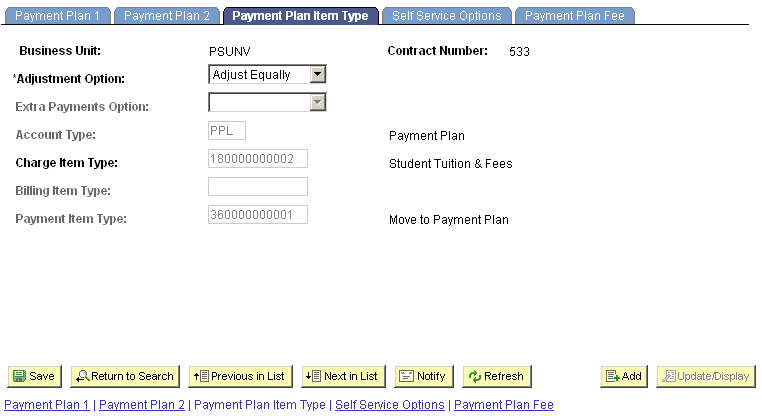
Access the Payment Plan Item Type page ().
This example illustrates the fields and controls on the Payment Plan Item Type page. You can find definitions for the fields and controls later on this page.
Field or Control |
Description |
|---|---|
Adjustment Option |
Enter how the system distributes changes to payment plan installments. See Increasing Payment Plan Contract Installments and Decreasing Payment Plan Contract Installments below for detailed information about this field and its values. |
Extra Payments Option |
Specify how the system applies payments that exceed the amount billed. Values are: All Bills: Select to reduce the amount due in equal portions across all remaining bills. First Bill: Select to reduce the amount of the next bill by the amount of the excess payment. If the excess is greater than the amount of the next bill, the system applies it to remaining bills in the order due. Last Bill: Select to apply the excess amounts to the final bill of the contract. |
Account Type |
Enter the account type that you have defined for the plan. |
Charge Item Type |
Enter the charge item type. This creates the installment charges on the payment plan account. Note: If this field is not available, change the payment plan type on the Payment Plan 1 page to Credit Original Account. |
Billing Item Type |
This field is not available for use with this type of payment plan. If the field is available, change the payment plan type on the Payment Plan 1 page to Credit Original Account. |
Payment Item Type |
Enter the payment item type to use to credit the tuition and fees covered by the payment plan. Note: If this field is not available, change the payment plan type on the Payment Plan 1 page to Credit Original Account. |
Note: How you set up the account types and item types that you use with your payment plans significantly affects the way the plan works. How you define your account types determines how charges and payments appear on the student's account. Item type setup controls how charges and payments are applied. Test your setup using different configurations to determine what works best for your situation.
Increasing Payment Plan Contract Installments
Anytime you add a new eligible charge to a payment plan contract or decrease a payment offset for a contract, the amount of the payment plan contract increases. When this happens, the system must distribute this increase to one or all of the payment plan contract installments.
For calculated payment plan contracts, the Adjustment Option field value determines how the system distributes increases to installments. Values are:
Adjust Equally: Distributes increases equally among the unbilled installments.
Adjust Last: Adds increases to the last unbilled installment.
Adjust First: Adds increases to the first unbilled installment.
Do Not Adjust: Does not allow increases.
Note: If all installments have been billed, you cannot increase the payment plan contract, regardless of the adjustment option. In addition, these adjustment options apply only if you have billed at least one installment. If no billing has occurred, the system adjusts equally by default.
For existing payment plan contracts, when you click the Calculate button, the system distributes increases equally among all installments. This happens regardless of the selected adjustment option or whether you have billed any installments. You can use the Payment Distribution page to manually update the installment amounts before posting.
Decreasing Payment Plan Contract Installments
Anytime you reverse or reduce an eligible charge from a payment plan contract or increase a payment offset for a contract, the amount of the payment plan contract decreases. When this happens, the system must distribute this decrease to the payment plan contract installments. Student Financials does not allow payment plan credits to have an unapplied balance. This means that unlike payment plan contract increases, payment plan contract decreases cannot be prevented. Even if all of the payment plan contract installments have been billed, or the payment plan is inactive, or the last adjustment date has passed, the system must adjust the installments whenever a payment plan contract amount decreases.
Similar to payment plan increases, the Adjustment Option field value determines how the system distributes decreases to installments. Because an individual installment can never be less than 0.00, however, the adjustment option rules don't always apply in exactly the same way that they do with payment plan contract increases. When the total amount of a payment plan contract decrease is greater than the amount of each individual installment, the adjustment option provides a starting point for the system to apply decreases. Values are:
Adjust First: Adjusts installments in ascending item number order.
Adjust Last: Adjusts installments in descending item number order.
Do Not Adjust: Adjusts installments in descending item number order.
Adjust Equally: Divides the adjustment amount equally across all installments.
If no unbilled installments exist for a payment plan contract decrease, or the total of the unbilled installments is less than the total decrease, the system adjusts installments in the following order using the starting point that is designated by the adjustment option:
Unbilled and unpaid installments.
Unbilled and paid installments.
Billed and unpaid installments.
Billed and paid installments.
For example, a payment plan contract with an adjustment option of Adjust Last has two unbilled installments of 200.00 USD each and undergoes a decrease of 500.00 USD. The system cannot apply the entire decrease to the last unbilled installment because that would bring the installment to an amount that is less than 0.00 USD, so it subtracts 200.00 USD from the last unbilled installment, and with the remaining 300.00 USD moves to the next to last unbilled installment. Again, it can apply only 200.00 USD to the installment, leaving an unapplied balance of 100.00 USD. The system subtracts this unapplied balance to one of the billed installments according to the order given previously.
Access the Self Service Options page ().
This example illustrates the fields and controls on the Self Service Options page. You can find definitions for the fields and controls later on this page.
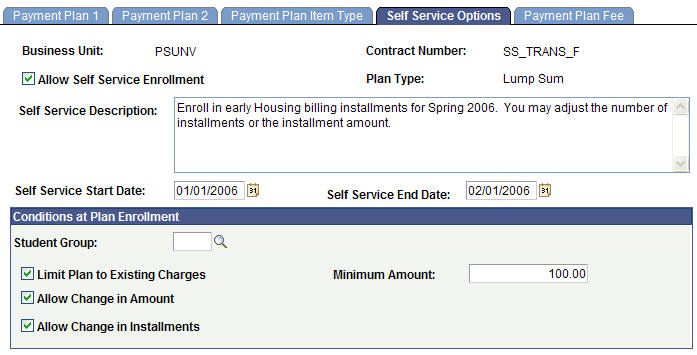
This self-service component enables students to link their charges to a specified payment plan. Only the calculated and lump sum payment plans are available for the self-service enrollment in a Payment Plan functionality.
If the student wants to revoke permission, this can be done only by the administrator, not by means of self service by the student.
Field or Control |
Description |
|---|---|
Allow Self Service Enrollment |
Select to enable self-service enrollment in the payment plan. |
Self Service Description |
Enter a useful summary of the payment plan that the system displays to the student. |
Field or Control |
Description |
|---|---|
Self Service Start Date and Self Service End Date |
Enter a start and end date for self-service enrollment. The system performs an edit to check that the billing date is equal to or later than the self service end date. |
Conditions at Plan Enrollment
Field or Control |
Description |
|---|---|
Student Group |
Enter a value to limit self-service enrollment to a specific group of students. |
Limit Plan to Existing Charges |
Select to allow the student to link only the eligible charges to the payment plan at the time of payment plan enrollment. Any additional transactions do not affect the payment plan amount. If you do not select this option, the payment plan maximum amount defaults to the contract amount and the system can move any future eligible transactions to the payment plan. |
Allow Change in Amount |
Select to allow the student to change the contract amount to less than the payment plan maximum amount or less than the existing charges but greater than the minimum amount. If you do not select this option and you have selected the Limit Plan to Existing Charges option, the plan amount is either the maximum amount or the eligible charges. |
Allow Change in Installments |
Select to allow the student to change the number of installments. |
Minimum Amount |
Indicate a minimum amount for the payment plan. If you have selected the Limit Plan to Existing Charges option or the Allow Change In Amount option, you must enter an amount greater than zero. |
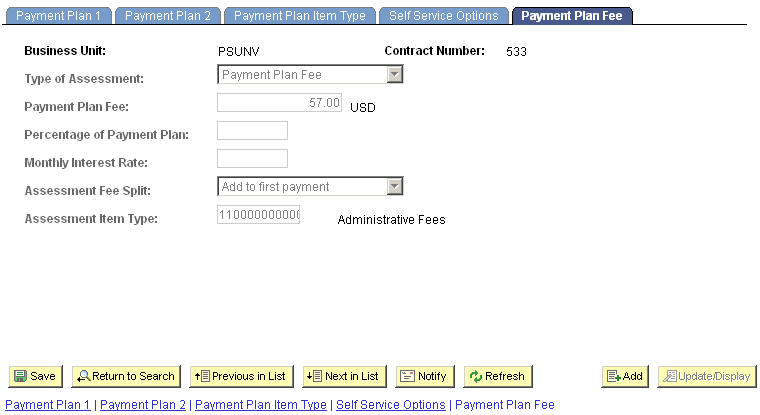
Access the Payment Plan Fee page ().
This example illustrates the fields and controls on the Payment Plan Fee page. You can find definitions for the fields and controls later on this page.
Field or Control |
Description |
|---|---|
Type of Assessment |
Select the type of assessment. You can leave this field blank if you do not want to assess a fee. When you leave the field blank, all of the other fields on the page become unavailable. If the majority of the students who are associated with this payment plan should be assessed a fee, select one of the following options. When linking each student to the payment plan, you can waive the fee on an individual basis. Monthly Interest Rate: Select to charge interest that is calculated monthly against the outstanding balance in the plan. When you select this option, you must also set a monthly interest rate. Note: This option is not available with calculated payment plans. Payment Plan Fee: Select to assess a fixed amount fee. If you select this option, the Payment Plan Fee, Assessment Fee Split, and the Assessment Item Type fields become available. Percentage of Payment Plan: Select to assess a fee based on a percentage of the plan's initial balance. If you select this option, the Percentage of Payment Plan, Assessment Fee Split, and the Assessment Item Type fields become available. |
Payment Plan Fee |
Enter an optional flat-amount payment-plan fee if your institution assesses a flat fee for payment plans. This field is available only if you select Payment Plan Fee in the Type of Assessment field. |
Percentage of Payment Plan |
Enter the percent amount that you want the system to use when you select Percentage of Payment Plan in the Type of Assessment field. |
Monthly Interest Rate |
Enter a monthly interest rate that you want to charge when you select Monthly Interest Rate in the Type of Assessment field. |
Assessment Fee Split |
Select how you want to split the assessment fee. This field is available only if you select Payment Plan Fee or Percentage of Payment Plan in the Type of Assessment field. Add to first installment: Select to apply the entire assessment fee to the first payment of the contract. Add to last installment: Select to apply the entire assessment fee to the last payment of the contract. Split over all installments: Select to divide and apply the assessment fee equally over all payments. |
Assessment Item Type |
Enter the item type that you want to use for the assessment fee. |