Using Express Payments
This section discusses how to create and review express payments.
|
Page Name |
Definition Name |
Usage |
|---|---|---|
|
PYMNT_EXPRESS |
Create a payment for one or multiple vouchers for one specific supplier. |
|
|
EXP_PYCYCL_MGR |
Review and process Express Payments. You can only review express payments being processed from the Express Payment Manager. |
Use the Express Payment page (PYMNT_EXPRESS) to create a payment for one or multiple vouchers for one specific supplier.
Navigation:
This example illustrates the fields and controls on the Express Payment page. You can find definitions for the fields and controls later on this page.
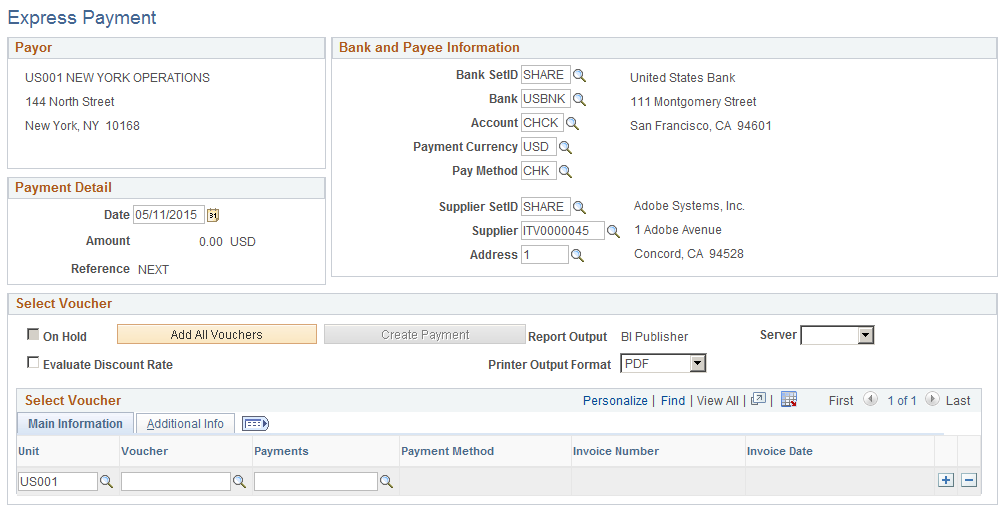
Note: Multiple views of this page are available by clicking the tabs in the scroll area.
Note: Only one payment is created for the supplier, unless the Separate Payment option or the Do Not Mix Units options are selected. In those cases, more than one payment can be created to pay the supplier.
Payor
This group box displays the payor information. If you have multiple payments being paid for the same bank, it is possible that the payor could be different than what appears on the page.
Bank and Payee Information
The bank and payee information appears by default from the schedule payment selected on the Voucher - Payments page.
Payment Detail
Field or Control |
Description |
|---|---|
Date |
Enter the date that prints on the check. |
Amount |
Displays the amount of the payment, based upon the vouchers that are selected in the Select Voucher group box. |
Reference |
Displays the number of the check. NEXT indicates that the system generates the number, incrementing the reference number based on the last number that it used for a check in the specified bank account. |
Bank and Payee Information
Once you select a bank SetID and a supplier SetID, the system displays the name and address of the bank and supplier information in this group box.
Field or Control |
Description |
|---|---|
Bank SetID |
Enter the bank SetID, bank, and bank account from which the payment is drawn. |
Payment Currency |
Enter the payment currency. |
Pay Method |
Enter the pay method. |
Supplier SetID |
Enter the SetID, supplier ID, and address of the supplier you are paying. |
Select Vouchers
Field or Control |
Description |
|---|---|
On Hold |
Specifies whether the payment scheduled is on hold. The holding option can be set manually or by a scheduled process. For example, the withholding process places those vouchers with withholding exceptions on hold. |
Evaluate Discount Rate |
Select for the system to compare where you receive the most benefit, such as paying a discounted voucher early and taking the discount or waiting for the due date and earning the interest income during that time. |
Printer Output Format |
Select the printer output format for printing checks from the options:
Note: The printer output format is PDF by default. You may select the PCL or the PS option and recreate the check with new reference number or reprint using same reference number. |
Add All Vouchers |
Click to automatically enter all outstanding payments for the supplier to this payment. |
Create Payment |
Click to generate a pay cycle with the name XPC001 through XPC999. The system transfers you to the Express Payment Manager page to complete your check processing. Note: If financial sanctions validation is enabled, the system validates the supplier against financial sanctions lists (for example, the SDN list) upon clicking the Create Payment button. The system does not allow you to create a payment for a supplier with a financial sanctions status of Review or Blocked. However, if financial sanctions validation is enabled at the bank level and you no longer validate for a particular supplier's bank, the system may allow you to create an express payment for a supplier with a financial sanctions status of Review. |
Server |
Select from the available options. The prompt only shows servers that have a status of Running on the Process Monitor Server List page. The system performs validation before a process is initiated to ensure that PeopleSoft Process Scheduler server is currently running. |
Pay Cycle |
Appears after you click the Create Payment button. |
Note: If you reach a Quick 9 pay cycle you can process the existing express pay cycles and then create a new express pay cycle or use the regular pay cycle and select only those payments you want to process.
Main Information Tab
Select the Main Information tab.
Choose the payment schedules that you want to pay.
Field or Control |
Description |
|---|---|
Unit |
Enter the business unit for the payment schedule that you want to pay. |
Voucher |
Enter the voucher ID for the payment schedule that you want to pay. |
Payments |
Enter the payment schedule number associated with the payment schedule that you want to pay. |
Payment Method |
Displays the payment method for the payment schedule that you want to pay. |
Invoice Number |
Displays the invoice number associated with the voucher that you select. |
Invoice Date |
Displays the invoice date associated with the voucher that you select. |
Apply Discount |
Select to apply the discount to the payment. |
Additional Information Tab
Select the Additional Information tab.
Field or Control |
Description |
|---|---|
Gross |
Displays the gross amount for the selected payment schedule. |
Amount |
Displays the payment amount for the selected payment schedule. This amount differs from the gross amount when there is a discount available. |
Use the Express Payment Manager - Pay Cycle page (EXP_PYCYCL_MGR) to review and process Express Payments.
You can only review express payments being processed from the Express Payment Manager.
Navigation:
Click the Create Payment button on the Express Payment page.
This example illustrates the fields and controls on the Express Payment Manager - Pay Cycle page. You can find definitions for the fields and controls later on this page.
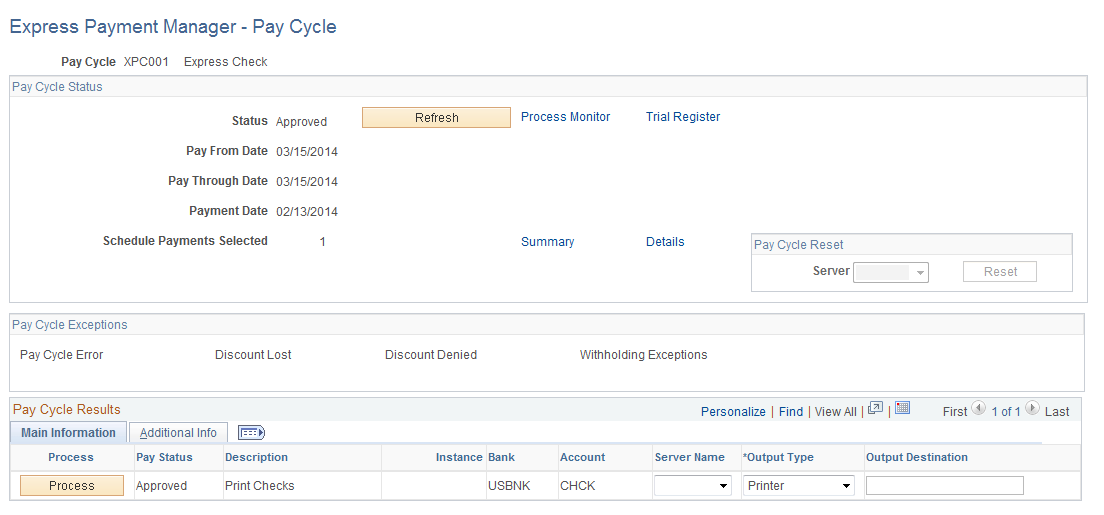
Note: Multiple views of this page are available by clicking the tabs in the scroll area.
Pay Cycle Status
Field or Control |
Description |
|---|---|
Status |
Displays the current status of the express payment pay cycle. Options include: New: The first time that the express payment pay cycle runs. Approved: Ready to run. express payments are preapproved by definition. Running: Currently running. Complete: Complete. |
Refresh |
Click to refresh the Express Payment Manager page to display the most current status. Some express payment processes must complete before the next process can start. While these processes are running, the status for the Express Payment is Processing. Click the Refresh button to update the page, so that you can view whether the express payment is ready to advance to the next step. |
Pay From Date |
Displays the scheduled pay date for the voucher payment schedule. If the scheduled pay date is between the pay from and pay through dates, the voucher payment schedule can be paid in the current express payment pay cycle. |
Payment Date |
Displays the date that prints on payments. It can differ from the pay through date. |
Schedule Payments Selected |
Displays the number of scheduled payments selected to be processed. |
Summary |
Click to access the Pay Cycle Summary Data page, where you can view summary information about scheduled payments by each bank account. |
Details |
Click to access the Pay Cycle Detail Data page, where you can search scheduled payments by different search criteria, such as business unit, invoice, or supplier ID. |
Pay Cycle Reset
Field or Control |
Description |
|---|---|
Server |
Select a server from the available options. |
Reset |
Click to initiate a process to clear all of the scheduled payments currently being processed in the pay cycle. This link is active when payments are created, selected, and rejected. It remains active until the pay cycle has been Approved. |
Pay Cycle Exceptions
Field or Control |
Description |
|---|---|
Discount Lost |
Opens the Lost Discount Alert page, so that you can review lost discount alert exceptions generated during pay cycle processing. |
Withholding Exceptions |
Opens the Wthd Exception (withholding exception) page, so that you can review withholding exceptions generated during pay cycle processing. |
Discount Denied |
Click to review and to override discount denied information. If the bank interest earned on the net voucher amount is greater than the amount of the discount that you gain by paying early, the system issues a discount denied exception and the Discount Denied link becomes active. |
Main Information Tab
Select the Main Information tab.
The Main Information and Additional Information tabs only show high-level information about the scheduled payments in the pay cycle. For detailed information about both electronic and nonelectronic payments, click the Summary and Detail links in the Pay Cycle Status group box.
Field or Control |
Description |
|---|---|
Process |
Click to initiate the next step of the express payment pay cycle, such as creating an EFT file, or printing checks or advices. |
Recreate |
Click to recreate checks that have already been generated. |
Pay Status |
Displays the current status for the pay cycle's bank account or payment method. |
Instance |
Displays the process instance for the latest process that you initiated for the bank account or payment method. |
Bank and Account |
Displays the bank and account that is being processed for the pay cycle. |
Server Name |
Select a specific PeopleSoft Process Scheduler server from which to run the pay cycle Output process. |
Output Type |
Select this option to create your express payments in a file format. This is useful if the printer is not attached to the server that creates the checks. You may send the checks to a file and later copy this file to another machine where the check could be printed. |
Output Destination |
Specify the output file directory or the printer name for the output file creation. If the File check box is selected, the Output Destination field appears by default from the Server File Destination specified on the User Preferences - PayCycle page. You can override the default with a valid directory path, but remember that a meta string (such as %%OutputDirectory%%) is not permitted. You must specify a full directory path with a backslash at the end (for example: C:\TEMP\). Note: Make sure that you do not specify the root directory of a shared drive, as it is not supported by this functionality. |
Note: System checks, EFTs, ACHs, and drafts can be processed by express payment.
Additional Information Tab
Select the Additional Information tab.
Field or Control |
Description |
|---|---|
Pay File |
Displays the name of the payment output file that is created. |
Form ID |
Displays the Form ID specified on the bank account definition for the document formatting. |
Positive Pymnt (positive payment) |
This does not apply to express payment processing. |
Copy Frm (copy form) |
Displays the Form ID specified on the bank account definition for formatting check copy files. |
First Payment |
Displays the beginning payment reference number for the pay cycle. |