Defining Payment Predictor Methods
|
Page Name |
Definition Name |
Usage |
|---|---|---|
|
PP_METHODS_TABLE |
Define a payment predictor method. |
|
|
PP_METHODS_REVIEW |
View, but not change, an existing payment predictor method. The fields on this page are identical to those on the Predictor Method page. |
To define payment predictor methods, use the Predictor Method (PP_METHODS) and Predictor Method Review (METHOD_REVIEW) components.
A payment predictor method tells Payment Predictor how to handle the different situations it encounters during processing. Each method consists of a series of conditions and actions based on remittance information. You can define as many methods as you want, but keep the methods as simple as possible and tailor them closely to the remittance patterns of your customers to optimize the efficiency of auto matching. Although PeopleSoft Receivables ships with sample methods, you must create your own methods and assign them to a SetID or individual customers.
Ideally, the methods that you define should enable Payment Predictor to apply all your regular payments, leaving only the exceptions to be applied online using payment worksheets. To minimize the number of exceptions, your methods must reflect the ways that your customers pay you. You can assign methods to an entire business unit or to specific customers so that you can tailor your methods to groups of customers with similar payment practices.
If you have a mixed situation with some overrides, diagnosing problems is much easier if your methods are stored under one SetID. Deposit business unit values and item business unit values, if different, should both point to the same, common TableSet. Oracle also recommends that you keep the number of methods that you use to a minimum. Start with one method that is specified at the deposit business unit level. Then add methods for handling customers who consistently pay you in a way that is different from your other remit from customers.
When you define a payment predictor method, consider the reference information that comes with the payment and how it can be used to match the payment to the customer. The type of reference information determines which algorithms you use.
Oracle recommends that the first algorithm group in a method apply the most payments.
Important! If you use the vendor rebate option in PeopleSoft Purchasing or the claim back option in PeopleSoft Order Management, create payment predictor methods that do not write off the remaining balance for items. Assign those methods to the business unit that is set up for vendor rebate and claimback processing. Use the Claims Management Workbench in PeopleSoft Purchasing or PeopleSoft Order Management to handle write-offs. This enables the system to determine whether the write-offs meet the write-off tolerances for claim processing.
Payments Without Reference Information
For payments with no reference information, use the following algorithm groups.
#BALANCE
#COMBOS
#OLDEST1
#OLDESTC
#OVERDUE
#PASTDUE
#STATMNT
Payments with Summary Reference Information
For payments with summary reference information (that is, references with item identification but no amount), use the following algorithm groups:
#REFS
#REF_ONE
#REF_NG
If you use the Cash Drawer Receipts feature to record payments for counter sales, use one of these algorithm groups in your payment predictor method to apply the payments.
Note: Use an algorithm group for detail references if you receive payments with summary reference information that pay for multiple line items with the same item ID.
Payments with Detail Reference Information
For payments with detail reference information (that is, references with item identification and amount), use the following algorithm groups:
#DETAIL
#DTL_TLR
#DTL_PM
#DTL_TPM
You must define the algorithm groups for payment methods, because methods use algorithm groups to select items.
Use the Predictor Method page (PP_METHODS_TABLE) to define a payment predictor method.
Navigation:
This example illustrates the fields and controls on the Predictor Method page. You can find definitions for the fields and controls later on this page.
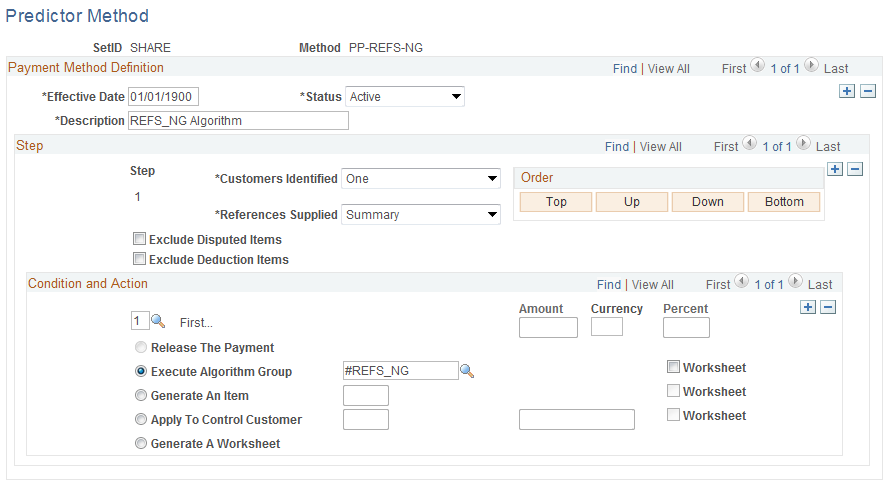
Step
Each step consists of one or more payment conditions; each condition has an action. The step number determines the order in which the step is processed in the method.
Click the Order buttons to change the order of the steps.
Field or Control |
Description |
|---|---|
Customers Identified |
Select if customers must be identified for this step. Values are: None, One, More Than One, and Doesn't Matter. |
References Supplied |
Select the type of reference information that the payment must have for this step. Values are: Summary: Use summary references (references such as an invoice number without amounts). Detail: Use detail references (references such as an item ID with an amount). No: No reference identification. Doesn't Matter: Process the step with or without reference information. In some cases, you do not care about customer information or payment references. For example, if you receive payment references, you can designate that customer information Doesn't Matter or vice versa. You might even define a step using Doesn't Matter in both cases: no matter how many customers are involved and regardless of payment reference information, take the specified action. |
Exclude Disputed Items |
Select if you do not want to apply payments to items in dispute. |
Exclude Deduction Items |
Select if you do not want to apply payments to deductions. |
Condition and Action
A step must have at least one condition. You can assign up to seven conditions to a step and select one of five actions for each condition. The conditions cannot conflict with each other. The number of the condition determines the order in which it will be processed within the step. Values are:
First...
Any Overpayment
Overpayment Exceeds
Overpayment Is Less Than
Any Underpayment
Underpayment Exceeds
Underpayment Is Less Than
Note: If you use Any Overpayment or Any Underpayment, you cannot use the tolerance choices for overpayments or underpayments that exceed or fall short of a certain amount. The reverse is also true. If you use Overpayment Exceeds, Underpayment Exceeds, or Underpayment Is Less Than, you cannot use Any Overpayment or Any Underpayment. The exceptions are the #DTL_TLR and the #DTL_TPM algorithm group. For the #DTL_TLR and #DTL_TPM algorithm groups, you should not select any of the underpayment or overpayment conditions. The conditions for exceptions for this algorithm group are defined using the Predictor Detail Options page.
See Receivable Options - Predictor Detail Options Page.
Field or Control |
Description |
|---|---|
Amount or Percent |
If you select an overpayment or underpayment, enter values in one or both of these fields. For example, you can specify an action when an overpayment is less than 100.00 EUR or less than 12 percent of the payment. If you specify both an amount and a percent, the system processes the overpayment or underpayment as long as one of the tolerance criteria is met. You can specify only one set of tolerance criteria for each condition. Enter the currency for the amount to enable the system to convert amounts properly when determining whether a write-off amount meets the tolerance. |
You must select one of the following actions:
Field or Control |
Description |
|---|---|
Release The Payment |
Select to have Payment Predictor reset the payment for processing in a subsequent step. Normally, if Payment Predictor has applied even part of a payment, it ignores that payment in future steps. You can release the payment several times within a method. Not available for condition 1, First. |
Execute Algorithm Group |
Select to have Payment Predictor run the SQL statements that are predefined as part of the selected algorithm group. A field appears to the right, so you can select the algorithm group. If the method results in successful application, the payment status is Applied, and Payment Predictor creates a group and sets the posting action to Batch Standard. You can look at the group using an inquiry page. Select Worksheet to have Payment Predictor create payment worksheets instead of setting the posting action for the payment to Batch Standard. |
Generate an Item |
Select to have Payment Predictor create a pending item according to the system function that you provide in the field that appears. The payment status is Applied, and the posting action is Batch Standard. Select Worksheet to have Payment Predictor create payment worksheets instead of setting the payment to a Batch Standard posting action. For an underpayment or overpayment condition, when more than one customer is identified in the PS_PP_CUST_TAO table, Payment Predictor will not create an adjustment item. Instead, it will create a payment worksheet and leave the remaining amount on the worksheet. You must manually balance the worksheet. The MAX function in SQL determines the highest ID through an alphanumeric sort sequence that will differ by database platform. Valid system functions differ according to the payment conditions. Condition 1 can use only WS-05. Conditions 2, 3, and 4 can use only WS-04, WS-05, WS-06, and WS-10. Conditions 5, 6, and 7 can use only WS-07, WS-08, and WS-11. |
Apply To Control Customer |
Select to have Payment Predictor place the payment or remaining amount on account for the control customer business unit and customer ID that you provide. (If you omit the business unit, the system uses the deposit business unit by default.) The payment status is Applied, and Payment Predictor creates a group and sets the posting action to Batch Standard. Select Worksheet to have Predictor create payment worksheets instead of setting the posting action for the payment to Batch Standard. This option is useful for placing payments on a control account when no customer is identified. This action is available only for Condition 1, First. |
Generate A Worksheet |
Select to have Payment Predictor create a payment worksheet for online review. The payment status is Worksheet. You can look at the resulting payment worksheet by accessing the Worksheet Selection page. The worksheet has the items that Payment Predictor matched with payments, plus the suggested overpayments and underpayments. You can then use the worksheet to accept the results of Payment Predictor processing as is or to make manual adjustments. When you are done working with the payment worksheet, you can post the payments. |
Note: If you select Apply To Control Customer and Payment Predictor cannot identify any customers, Payment Predictor determines whether the default method associated with the deposit business unit indicates Apply To Control Customer when the customer identification is missing or is set to Doesn't Matter.
Use the Predictor Method Review - Review page (PP_METHODS_REVIEW) to view, but not change, an existing payment predictor method.
The fields on this page are identical to those on the Predictor Method page.
Navigation:
This section includes an example of a summary reference Payment Predictor method.
The sample method contains five steps. Each step is based on remittance characteristics: how to structure Payment Predictor's actions based on the results of customer identification and the presence or absence of summary reference information. Each step considers various payment conditions and each condition has an associated action.
The example assumes that you receive a mix of payments, some with payment summary references—references without associated item amounts—and some without summary references. It places the steps using algorithm groups for payments with references first, because it is normally more efficient to perform those steps first.
Note: To create an example of a detail reference method, change the algorithm group in Step 1 to one of the algorithm groups for detail references.
Step 1
In Step 1, the method's remittance conditions take into account payments with references. Regardless of whether customers are identified, if payment summary references are supplied, Payment Predictor runs the algorithms in the #REFS group.
For the Customers Identified field, select Doesn't Matter. For References Supplied, select Summary.
Field or Control |
Description |
|---|---|
Step 1, Condition 1 (First) |
Select Execute Algorithm Group, and then select #REFS. |
Step 1, Condition 3 (Overpayment Exceeds) |
Enter a value in the Amount or Percent field. For example, an amount of 100.00. Select Release The Payment. If an overpayment exceeding the tolerance occurs, the method directs Payment Predictor to release the payment for processing by another relevant step. This step shows that when a large variance occurs, the wrong item may have been referenced. In this case, releasing the payment is better than applying it to the wrong item, which may belong to a different customer. Another possibility is that a mix of valid and invalid references caused the large overpayment. If most references are valid or most payments have only one reference, this use of the overpayment condition could be helpful. |
Step 1, Condition 4 (Overpayment Is Less Than) |
Enter a value in the Amount or Percent field, for example, a percent value of 15. Select Generate An Item and select the system function WS-05 to place an amount on account. The same remittance conditions apply here as in the previous condition. If an overpayment is less than the specified tolerance, Payment Predictor creates an on-account item. You can then use this item to apply to another item on a maintenance worksheet. Notice that the tolerance amounts are the same as for Condition 3. Use the same amounts for both of the overpayment conditions so that Payment Predictor can handle all overpayment amounts. You don't need to build a worksheet for online review; instead, enable the resulting payment group to be processed the next time the Receivables Update Application Engine process (ARUPDATE) runs for the appropriate business unit. |
Step 1, Condition 6 (Underpayment Exceeds) |
Enter a value in the Amount field, for example, 5.00. Select Generate An Item and select the WS-08 system function to create a deduction. The same remittance conditions apply here. If an underpayment occurs that is greater than the specified amount, Payment Predictor creates a deduction for the difference and builds a worksheet for online review. To define this condition and the following one, an online payment application scenario was considered and Payment Predictor was directed to emulate that action during background processing. |
Step 1, Condition 7 (Underpayment Is Less Than) |
Enter a value in the Amount field, for example, 5.00. Select Generate An Item and select the WS-11 system function to eliminate an underpayment. The same remittance conditions apply here. If a very small underpayment occurs, Payment Predictor writes off the amount of the underpayment. You don't need to build a worksheet for online review; instead, enable the resulting payment group to be processed the next time the Receivables Update process runs for the appropriate business unit. |
Step 2
The second step in the sample method runs regardless of the results of customer identification and only if you did not receive references.
For Customers Identified, select Doesn't Matter to ask Payment Predictor to process any payment for which at least one customer was identified. For References Supplied, select No.
Field or Control |
Description |
|---|---|
Step 2, Condition 1 (First) |
Select Execute Algorithm Group, and then select #COMBOS. This algorithm group has three algorithms, two of which are active in the sample data. The two active algorithms look for a single debit or a single debit net of earned discount—belonging to one of the identified customers—that matches the payment amount. This approach is useful if your remittance analysis indicates that your customers often pay one open item at a time and the open items are usually for different amounts. If you do not offer discounts, inactivate the algorithm that evaluates earned discounts. If your customers often pay two items at a time, consider activating the algorithm that looks for any two items combined that match the payment amount. |
Step 3
Step 3 repeats the same remittance conditions as Step 2. It runs regardless of the results of customer identification and only if you did not receive references.
This step is useful for customers who often pay their entire open-item balance. An algorithm variation exists for handling earned discounts.
For Customers Identified, select Doesn't Matter so that Payment Predictor processes any payment for which at least one customer is identified. For References Supplied, select No.
Field or Control |
Description |
|---|---|
Step 3, Condition 1 (First) |
Select Execute Algorithm Group, and then select #BALANCE. |
Step 4
Step 4 repeats the same remittance conditions as Steps 2 and 3. It runs regardless of the results of customer identification and only if you did not receive references.
For Customers Identified, select Doesn't Matter to ask Payment Predictor to process any payment for which at least one customer was identified. For References Supplied, select No.
Field or Control |
Description |
|---|---|
Step 4, Condition 1 (First) |
Select Execute Algorithm Group, and then select #PASTDUE. |
This step shows how the order in which algorithms are run must be taken into consideration. More than one algorithm group could apply to the same payment.
For example, if a remit from group has only one open item (for a new or low-volume customer), then either #COMBOS or #BALANCE would work. If all of the open items are past due (customer has not bought anything recently), then #BALANCE or #PASTDUE would work. Under these circumstances, you should order the algorithms from most to least efficient, which would result in the order #COMBOS, followed by #BALANCE, and then #PASTDUE.
Other factors, such as the number of payments that a given algorithm group applies, are also important. If #PASTDUE could apply to 90 percent of payments, #BALANCE to 10 percent, and #COMBOS to 10 percent (the total can exceed 100 percent), then an option is to place #PASTDUE first. These decisions must be made on an individual basis, looking at both payment profiles and enabled algorithms.
When you start using Payment Predictor, begin by ordering steps according to efficiency. If production runs demonstrate that most payments are applied in a step far down in the method, reorder the steps until you establish an optimal configuration.
Step 5
Step 5 runs regardless of remittance conditions. It places any payments that steps 1 through 4 did not apply on account for a control customer. It acts as a catch all for payments that it could not identify.
For Customers Identified, select Doesn't Matter to enable Payment Predictor to process any payment for which at least one customer is identified. For References Supplied, select Doesn't Matter.
Field or Control |
Description |
|---|---|
Step 5, Condition 1 (First) |
Select Apply to Control Customer, and then select a business unit and customer ID, selecting 99999 or another out-of-range identifier. Select the Worksheet check box. Take a similar approach if your business practices call for posting all unidentified cash to a control customer. |