Entering or Updating Pending Items
|
Page Name |
Definition Name |
Usage |
|---|---|---|
|
GROUP_ENTRY1 |
Enter or update control information. |
|
|
GROUP_ENTRY2 |
Enter information about individual pending items, such as the entry type and reason, payment terms, and discount data. |
|
|
Receivables Item Type / Code Page |
AR_SF220_TYPES |
(USF) Click the TROR Type link to assign an entity code and receivable type to a pending item. This information is required for the Treasury Report on Receivables (TROR). This page is available only if you selected the Treasury Report on Receivables check box on the Installation Options - Receivables page. See the Online Pending - Pending Item 1 Page. |
|
GROUP_ENTRY_VATS |
View summarized VAT header information and VAT lines for an item and drill down to the VAT header and line defaults. |
|
|
GROUP_ENTRY_VATHDR |
View VAT header defaults. Manually override values if applicable. |
|
|
GROUP_ENTRY_VAT_LN |
View VAT line defaults including the VAT amounts. Manually override values if applicable. |
|
|
GROUP_ENTRY2B |
Enter correspondence, personnel, direct debit, draft, and cash forecasting information for the pending item. |
|
|
GROUP_ENTRY2C |
Enter consolidated invoice information (used in PeopleSoft Billing). Enter values in user-defined fields. |
|
|
GROUP_ENTRY_TAX |
Enter and calculate excise duty, sales tax, or VAT amounts for India. This page is available only if you enabled sales tax, VAT, or excise duty for a receivable business unit type on the Business Unit Tax Applicability page. (IND) Enter and calculate GST amounts for India. (IND) |
|
|
GROUP_ENTRY_TAX_DT |
Display excise duty, sales tax, or VAT detail information for India and view the results of the tax calculation. This page is available only if you enabled sales tax, VAT, or excise duty for a receivable business unit type on the Business Unit Tax Applicability page. (IND) |
|
|
GROUP_ENTRY3 |
Create accounting entries for one pending item at a time. |
|
|
GROUP_ENTRY4 |
Specify the action that the system performs on a group of pending external items, such as posting the group, or creating or deleting accounting entries. |
|
|
Group Action Page - Online Items |
GROUP_ENTRY4_RTM |
Specify the action that the system performs on a group of pending online items, such as posting the group, or creating or deleting accounting entries. See the documentation for the Group Action Page - External Items. |
|
Cash Drawer Receipt Page |
CDR_RECEIPT |
Review cash drawer receipts for unposted items. See the documentation for the Group Action Page - External Items and the Cash Drawer Receipt Page. |
The pages used to review pending items that are loaded with a billing interface resemble the pages for entering items online. However, they require a different navigation path, and the path that you use determines the information that can be displayed or updated.
Use the External Items menu options for unposted groups that you interfaced from your billing system.
Use the Online Items menu options to:
Enter groups online.
Update an existing online group.
These groups can be either groups that you entered online or system-generated groups, such as overdue charges groups.
The following table describes the four components that you can use for both online and external groups:
|
Menu Name |
Description |
|---|---|
|
Group Entry |
Use this option to enter a new group or to view all pending items in a small group (about 50 pending items or less). |
|
Single Item |
Use this option to access a single pending item when the group is too large for the system to handle within the pending item entry scroll. This is useful when you want to update a single item in a very large group. |
|
Large Group |
Use this option to open a large group and add a row for a new pending item. The system automatically increments the count for the control total by one. Note: You can add rows for new pending items only for online groups. |
|
Overdue Charges Items |
Use for groups that you generated using the Overdue Charges Application Engine process (AR_OVRDUE). This option is available only on the Online Items menu. |
You can work only with groups that have not been posted.
PeopleSoft Receivables also provides three components that enable you to quickly set a group to post. To access these components, use one of the following navigation paths:
For external groups, select
For online groups, select
For overdue charges groups, select
This documentation discusses how to:
Enter or update group control information.
Complete the Pending Item 1 page.
Review summarized VAT information.
Review VAT header defaults.
Review VAT line information.
Complete the Pending Item 2 page.
Complete the Pending Item 3 page.
(IND) Enter tax information for India.
(IND) View tax details for India.
Create and review accounting entries online.
Select a group action.
Use the Group Control page (GROUP_ENTRY1) to enter or update control information.
Navigation:
Alternatively, select Single Item, Large group, or Overdue Charge Items instead of Group Entry.
This example illustrates the fields and controls on the Online Pending - Group Control page. You can find definitions for the fields and controls later on this page.
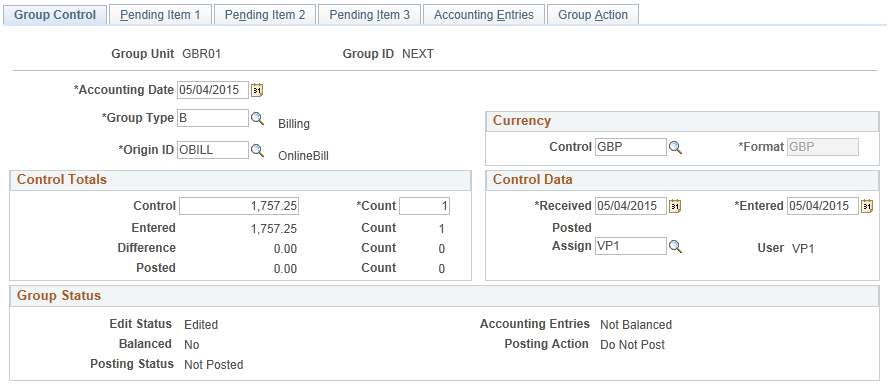
This page displays control and header information for a group of pending items. At a minimum, you need to enter a group type, origin ID, control amount, and control count.
If the group contains pending items in different currencies, you can handle the control total using the following approaches:
If your organization requires pending item groups in a single currency, split the pending items into separate groups by currency and enter the control currency for each group.
This restricts all pending items to the selected currency and ensures that your control total is meaningful in the selected currency.
If your organization uses control amounts to check matching pending item amounts with the group total, leave multicurrency items in a single group.
In this case, the control total is a hash total (###), representing the total amount of the pending items, irrespective of currency.
Field or Control |
Description |
|---|---|
Group ID |
Displays the group ID for the group. When you save this page, the system assigns the next available group ID. The group ID is based on the settings made on the Business Unit Definition page. You can override automatic numbering by entering your own group ID. |
Accounting Date |
Displays the accounting date that is the default for each pending item in the group. The date determines the fiscal year and accounting period to which the pending item is posted. This date determines the VAT declaration date if the declaration point is Accounting Date. |
Group Type |
Select one of the group types that you defined for billing. |
Origin ID |
Select the group origin ID, for example OBILL (online billing). The system assigns an origin ID that is valid for external entry to groups that are received through the billing interface. |
Control Currency |
Select a currency only if you want all pending items in the group to have the same currency. |
Format Currency |
Displays the default format currency value that you entered on the Receivables Data Entry 2 page. The system uses the format currency to determine the default currency of the pending item amounts that you enter. If you enter a control currency, the format currency changes to that value, and the field becomes unavailable for entry. |
Control |
Enter the group control totals: the total monetary amount of pending items in this group and the control count (the total number of pending items in this group). The system compares the control amount and count with the entered amount and count and calculates the difference. The control amount must match the entered totals amount before you can post the pending items in this group. In other words, the difference should be 0. After you post a group, you view the posted amount and count for the group using inquiry pages. |
Received and Entered |
Indicate when the group was received into the system and when items were entered. Use these fields to indicate processing delays, such as a department receiving the credit memo on Thursday, but not entering the items until Friday. These fields are informational only and appear on inquiry pages. |
Assign |
Select the user ID of the user who will enter pending item information. The user ID of the assigned user appears in the User field. |
Edit Status |
Indicates whether pending items have been edited. Edited indicates that pending items have been edited. (Most online groups have a status of Edited). Not Edited indicates that external groups have not yet been processed by the Receivables Update process. |
Balanced |
Indicates that the system has balanced the online group. If the value is No, the pending item group has not yet been processed by the Receivable Update process and the group may not actually be out of balance. To determine whether a group is really out of balance, click the Balance button on the Group Action page. |
Posting Status |
Indicates whether pending items have been posted. Not Posted indicates that the groups have not yet been processed by the Receivables Update process. After Receivable Update runs, the posting status is either Errors or Complete. |
Accounting Entries |
Indicates whether accounting entries for pending items are Balanced or Not Balanced. |
Posting Action |
Displays the posting action that you selected on the Group Action page: Do Not Post, Post Now, Post Now to GL, Batch Priority, or Batch Standard. |
Use the Online Pending - Pending Item 1 page (GROUP_ENTRY2) to enter information about individual pending items, such as the entry type and reason, payment terms, and discount data.
Navigation:
Alternatively, select Single Item, Large group, or Overdue Charge Items instead of Group Entry.
This example illustrates the fields and controls on the Pending Item 1 page. You can find definitions for the fields and controls later on this page.
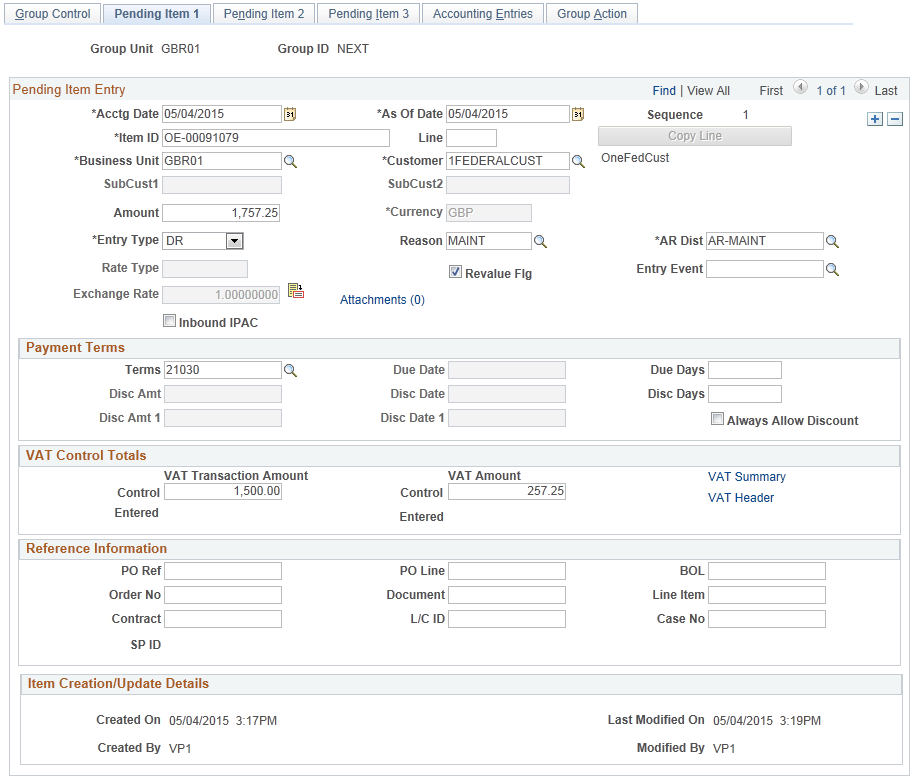
Pending Item Entry
Field or Control |
Description |
|---|---|
Accounting Date |
Displays the date entered on the Group Control page. The date determines the fiscal year and accounting period used to post the item for both PeopleSoft Receivables and PeopleSoft General Ledger. This date determines the VAT declaration date if the declaration point is Accounting Date. |
As Of Date |
Enter a date, which is usually the same as the accounting date. You can use a different date for aging. You can also use this date to record the invoice date used to calculate payment terms. |
Item ID |
Enter a number that describes the pending item, such as the invoice number. While you enter pending items, the system assigns each row a sequence number, which appears as you scroll through the pending items on the page. |
Line |
Enter a line number when you want to enter more than one amount or entry type for the same item ID. |
Copy Line |
Click to add the next line number and automatically copy some of the pending item information to the new row if you need to divide an invoice into multiple lines. You need to complete the AR Dist (accounts receivable distribution code), Entry Type, and Reason fields on the new row. |
Business Unit and Customer |
Enter the business unit and customer ID. A customer can exist in more than one business unit with the same ID. The business unit that you specify determines which customer the pending item is posted to. The customer business unit does not need to match the group business unit, although typically it does. |
SubCustomer 1 and SubCustomer 2 |
Displays subcustomer qualifiers, which come from the customer, if the feature is enabled. You specify whether to use the subcustomer feature and, if so, the number of qualifiers for the entire installation on the Installation Options - Overall page. The default subcustomer qualifiers for customers are specified on the Miscellaneous General Info page. You can override the default qualifiers for individual pending items. You use these subcustomer qualifiers for tracking history and aging information and to filter item lists on inquiry pages. |
Amount and Currency |
Enter the amount and currency for the pending item. If the entry currency differs from the base currency of the receivables business unit, the system handles the conversion automatically and displays the base currency equivalent. |
Entry Type and Reason |
Enter the entry type and reason used to create the pending item. Entry types and entry reasons are among the most important pieces of information associated with a pending item. They determine how accounting entries are created, how they are carried with the pending item through posting, and how they are considered when history is generated. They are also used as identifiers for open items, determine how items are aged, and determine whether accounting entries are included on customer correspondence and drafts. |
AR Dist (accounts receivable distribution) |
Select the distribution code that governs the ChartFields that are used when the system generates accounting entries. To create a single receivables (AR) line for accounting entries, use the default or override the default with a different code. The system obtains the default AR distribution code in the following order:
|
Entry Event |
Enter an entry event code for the item to create supplemental accounting entries if entry events are enabled for PeopleSoft Receivables. |
Revalue Flg (revalue flag) |
Select if you want the Revaluation Application Engine process (AR04000) to revalue the item. |
|
Attachments |
Click to view/ add attachments. See Installation Options - Multiple Attachments Page to define the maximum attachment upload limit for various products. |
Inbound IPAC |
Select this check box if you want to be able to select an item for inbound IPAC processing. This field is displayed only if the IPAC check box is selected in the AR installation options and the customer is identified as a federal customer. If an item is selected for inbound IPAC processing, outbound IPAC transactions will not be created. Deselect this check box if the item was incorrectly selected for inbound IPAC processing. |
Error Info (error information) |
Appears only when errors are present. Click to open a page where you can view more details about the error. |
Document Sequence |
Click to access a page where you can enter document sequencing information. This button is available only if you enabled the document sequencing feature for the PeopleSoft General Ledger business unit. |
TROR Type (USF) |
Click this link to access the Receivables Item Type / Code page (AR_SF220_TYPES), where you can enter an entity code and receivable type for a pending item. This information is required for the Treasury Report on Receivables (TROR). This link is available only if you selected the Treasury Report on Receivables check box on the Installation Options - Receivables page. |
Payment Terms
If you do not enter payment terms, the system checks to determine whether you have set them at the next level up—the customer level. If you specified payment terms on the Bill To Options page for the customer, the system draws them from there. If you did not set payment terms for this customer, the system uses the terms that you associated with the business unit on the Receivables Options - Accounting Options 2 page. If no payment terms are specified, the system prompts you to enter a payment terms code or a due date.
Field or Control |
Description |
|---|---|
Terms |
Displays the default payment terms code. Change the default, or leave this field blank. If you change the default, you cannot use the discount fields. If you leave this field blank, you can enter the discount amounts and dates of your choice. |
Due Date |
If no default values exist for the discount fields, you still must enter a due date. If the due date falls on a bank holiday, the system adjusts it automatically. This field is required for the Aging Application Engine process (AR_AGING). |
Due Days |
Enter grace days or leeway to the payment terms. |
Disc Days (discount days) |
Enter the number of days past the discount date during which the customer is still eligible to receive a discount. |
Always Allow Discount |
Select during conversion and for preferred customers. Select to override previously set discount parameters and ensure that a customer receives a discount regardless of due date and payment date. Payment worksheets and Payment Predictor use this check box. |
Note: If discounts must be included in VAT calculations, then enter the payment terms before entering the VAT amounts.
VAT Control Totals
Use this group box to enter control amounts for VAT and to access the VAT Header and VAT Lines pages where you can view and, if applicable, manually override VAT default values.
Field or Control |
Description |
|---|---|
VAT Transaction Amount |
Enter the control amount for the transaction amount that is subject to VAT. This is typically the transaction amount printed on the invoice. If you are entering an item online, the system populates the Transaction Amount field for the first VAT line with the control amount. If you create additional VAT lines, you must change the transaction amount for each line so that they add up to the amount of the control amount. You have to open the VAT lines page and enter a VAT override amount. |
VAT Amount |
Enter the control amount for the VAT amount in this field. This is typically the VAT amount printed on the invoice. The system compares the total recorded VAT amount for all the VAT lines on the VAT Lines page to the control amount. The system automatically calculates the VAT for each line. You need to enter an override VAT amount only if the calculated VAT amount does not match the VAT amount on the invoice. If you enter an override VAT amount, the system uses this as the recorded amount. Otherwise, the system uses the calculated VAT amount as the recorded amount. |
VAT Summary |
Click to open the VAT Summary Information page where you can view summarized VAT header information and VAT line information in one place. |
VAT Header |
Click to open the VAT Header page, where you can review VAT defaults as well as access VAT details for the VAT line. When you click this link, the system retrieves the VAT defaults based on your VAT setup and entered customer information. |
VAT Lines |
Click to view VAT line information. Appears only when you view a group and a VAT line exists for the item, or when you are entering new items and you have navigated to the VAT pages and back. |
Reference Information
Field or Control |
Description |
|---|---|
BOL (bill of lading) |
Enter the bill of lading number for the pending item. |
L/C ID (letter of credit ID) |
Enter the letter of credit ID for the pending item. |
Use the VAT Summary Information page (GROUP_ENTRY_VATS) to view summarized VAT header information and VAT lines for an item and drill down to the VAT header and line defaults.
Navigation:
Click the VAT Summary link on the Online Pending - Pending Item 1 page.
This example illustrates the fields and controls on the VAT Summary Information page. You can find definitions for the fields and controls later on this page.
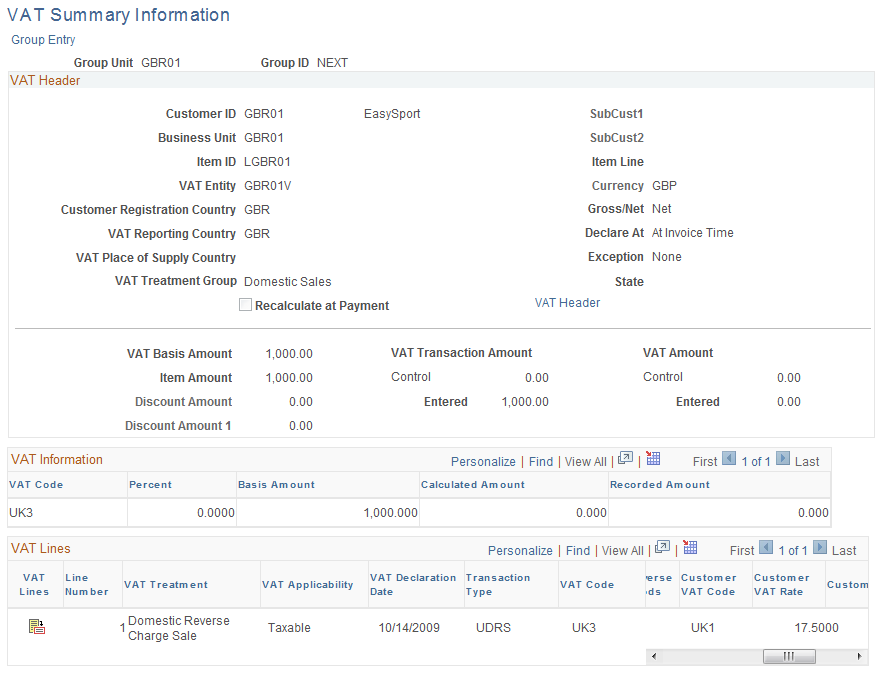
If you change the VAT defaults or amounts on the VAT Header page or VAT Lines page and return to the VAT Summary Information page, the system updates the amounts on this page. This enables you to review the amounts before you save the information.
Field or Control |
Description |
|---|---|
VAT Entity |
Displays the VAT entity associated with the business unit. The VAT entity is the level within your organization at which the VAT return is filed. |
Customer Registration Country, Exception, VAT Reporting Country, and State |
Displays the VAT registration defaults that you defined on the VAT Header page in the VAT Registration section. The customer registration country is the registration country of the bill to customer. The Exception field displays the exception granted to the customer. The reporting country and state are the country and state or province in which the VAT will be reported. |
Gross/Net, Declare At, and Recalculate at Payment, |
Displays the VAT control information that you defined on the VAT Header page, which indicates how the VAT is calculated and recognized for reporting purposes. |
VAT Place of Supply Country and VAT Treatment Group |
Displays the VAT treatment group as defined on the VAT Header page in the VAT Treatments section and, for services, displays the country in which the VAT is liable. |
VAT Header |
Click to access the VAT Header page where you can view VAT header defaults and manually override the values if needed. |
The documentation for the VAT Header page describes the preceding fields in detail.
See VAT Header Page.
Field or Control |
Description |
|---|---|
VAT Basis Amount |
Displays the total amount on which the VAT is calculated in the transaction currency for all lines. If VAT is being calculated at net, this amount is net of any discounts. |
Item Amount, Discount Amount, and Discount Amount 1 |
Displays the total item amount and discount amounts that you entered for the item on the Pending Item 1 page. |
VAT Transaction Amount, Control, and Entered |
Displays the control amount for the transaction amount that is subject to VAT that you entered on the Pending Item 1 page and the total transaction amount that you entered for all VAT lines. |
VAT Amount, Control, and Entered |
Displays the control amount for the VAT amount—this is typically the VAT amount printed on the invoice—that you entered on the Pending Item 1 page and the total recorded VAT amount for all the VAT lines on the VAT Lines page. |
VAT Information
The VAT Information grid summarizes the total VAT basis amount, the system-calculated amount, the recorded amount (amount of VAT that will be recorded for this transaction), and the applicable VAT percentage for all lines with the same VAT code.
Field or Control |
Description |
|---|---|
VAT Code |
Displays the VAT code that defines the rate at which VAT is calculated for the lines. |
VAT Lines
The VAT Lines grid displays summarized VAT details for each VAT line.
Field or Control |
Description |
|---|---|
|
Click the VAT Lines icon to access the VAT Lines page where you can view all VAT line defaults and override values if needed. |
Domestic Reverse Charge Goods |
This check box is selected if this country requires the use of the domestic reverse charge provision. |
Customer VAT Code |
Displays the customer VAT code used for domestic reverse charges. This code is used to calculate a domestic reverse charge VAT amount. |
Customer VAT Rate |
Displays the rate from the customer VAT code. |
Customer Amount |
Displays the customer VAT amount for domestic reverse charges that are calculated using the Customer VAT Code. |

See Domestic Reverse Charge Goods VAT.
The documentation for the VAT Lines page describes the rest of the fields in the VAT Lines grid.
See VAT Lines Page.
Use the VAT Header page (GROUP_ENTRY_VATHDR) to view VAT header defaults.
Manually override values if applicable.
Navigation:
Click the VAT Header link on the Online Pending - Pending Item 1 page.
This example illustrates the fields and controls on the VAT Header page (1 of 2). You can find definitions for the fields and controls later on this page.
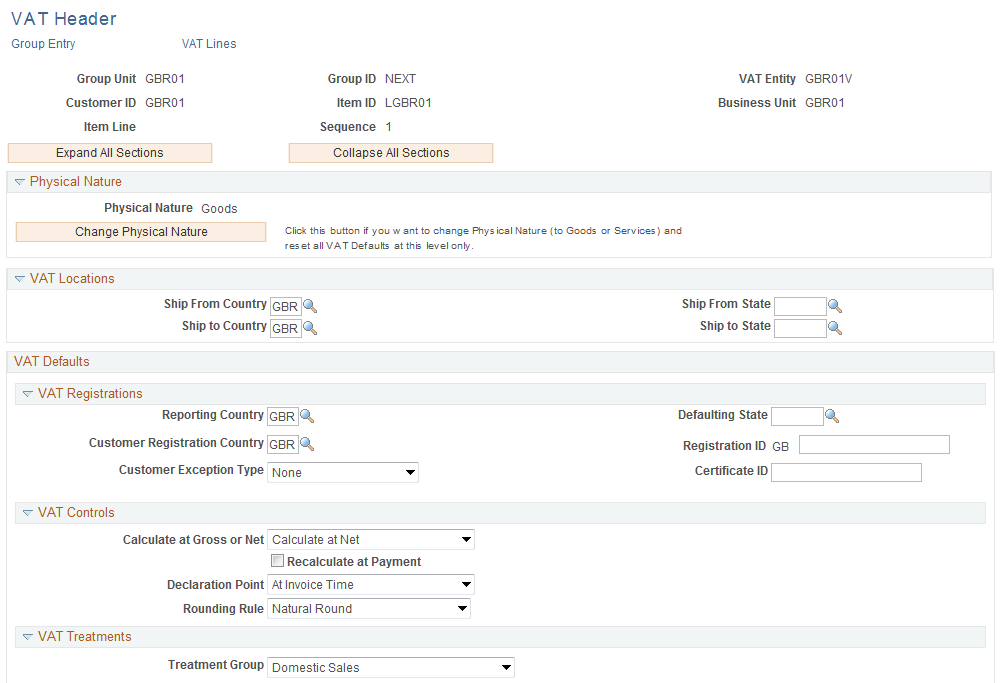
This example illustrates the fields and controls on the VAT Header page (2 of 2).

Review and manually override VAT header defaults, as applicable.
VAT defaults appear in descending order of impact. When you change multiple VAT defaults and click Adjust Affected VAT Defaults, specific fields may be adjusted. You should work from the top to the bottom of the page, clicking Adjust Affected VAT Defaults at appropriate times to avoid adjustments to VAT defaults that you overrode but did not memorize.
For example, if you override Calculate at Gross or Net and click Adjust Affected VAT Defaults, nothing happens because Calculate at Gross or Net does not affect any other VAT defaults. If you then override Customer Registration Country and click Adjust Affected VAT Defaults again, the system adjusts all VAT defaults except customer registration country. This time, Calculate at Gross or Net is overridden, which means that you probably have to override this VAT default again to undo the adjustment.
Note: Because complex algorithms are used to obtain the VAT header defaults, avoid manually changing these values as much as possible. If you must make changes, make sure that you understand how those changes will affect the way the system calculates VAT amounts and how the VAT will be recorded and reported.
Field or Control |
Description |
|---|---|
VAT Lines |
Click to open the VAT Lines page to review VAT information for the line. |
VAT Entity |
Displays the VAT entity associated with the business unit. The VAT entity is the level within your organization at which the VAT return is filed. |
Sequence |
Displays the sequence number for the line. Because you can enter multiple VAT lines for one pending item, the VAT sequence number is used to protect against duplicate rows. |
Expand All Sections |
Click to scroll to and access every section on the page. You can also expand one or more sections by clicking the arrow next to the section's name. |
Collapse All Sections |
Click to collapse all expanded sections so that only header information is displayed. You can also collapse one or more expanded sections by clicking the arrow next to the section's name. |
Physical Nature
Field or Control |
Description |
|---|---|
Physical Nature |
Indicates whether an object is a good or a service. Many countries are required to report the sale and purchase of goods separately from services. The default comes from the customer location, customer, or receivables business unit. |
Change Physical Nature |
Click to override the default physical nature for this item. The system resets all the VAT defaults. |
VAT Locations
Field or Control |
Description |
|---|---|
Ship From Country |
Displays the receivables business unit location country. In the case of transactions involving goods or freight service transactions, this is used to determine the VAT treatment. |
Ship From State |
Displays the receivables business unit location state. In the case of transactions involving goods or freight service transactions, this is used to determine the VAT treatment. |
Ship to Country |
Displays the ship to customer location country. In the case of transactions involving goods or freight service transactions, this is used to determine the VAT treatment. |
Ship to State |
Displays the ship to customer location state. In the case of transactions involving goods or freight service transactions, this is used to determine the VAT treatment. |
Location Country |
For services only, displays the PeopleSoft Receivables business unit country. |
Location State |
For services only, displays the PeopleSoft Receivables business unit state. |
Customer Location Country |
For services only, displays the customer's bill to location country. |
Customer Location State |
For services only, displays the customer's bill to location state. |
Service Performed Country |
Depending on the services performed flag setting in the product defaulting hierarchy (for example on the customer or business unit), the system sets the value for this field in the following way:
|
Service Performed State |
Depending on the services performed flag setting in the product defaulting hierarchy (for example on the customer or business unit), the system sets the value for this field in the following way:
|
VAT Defaults
Review VAT registrations, service specific defaults, controls, and treatments. Adjust or reset VAT default values as necessary.
VAT Service Specific Defaults
Field or Control |
Description |
|---|---|
Service Type |
If the transaction is for a service, this field displays the VAT service type of Freight or Other. Special rules exist for freight transport within the European Union, and the value in this field determines whether they apply. |
Place of Supply Driver |
If the transaction is for a service, this field displays the usual place of supply (the place where VAT is usually liable) for the service. This value is used to help determine the place of supply country and the VAT treatment. Options are Buyer's Countries, Supplier's Countries, or Where Physically Performed. |
VAT Registrations
Field or Control |
Description |
|---|---|
Reporting Country |
Displays the country for which this VAT will be reported. This is the VAT Entity VAT registration country and determines many of the VAT defaults. |
Defaulting State |
If the reporting country requires that VAT be tracked by state or province, this field displays the state within the reporting country for which an associated value is retrieved from the VAT defaults table. |
Customer Registration Country and Customer Registration ID |
Displays the registration country and ID of the bill to customer. The Customer Registration ID field is a character field of up to 20 characters. The system appends the corresponding 2-character country code automatically from the country statistics table to the VAT Registration ID once you select the appropriate country on the Customer Information, General Information, Customer VAT Info page. Note: This PeopleSoft application delivers the required 2-character country codes that appear in front of the VAT Registration ID. The delivered country codes cannot be changed. You can use the Country Stat Rpt Codes page (Set Up Financials/Supply Chain, Common Definitions, Location, Country Statistics) to view these 2-character VAT country codes, along with various other types of country codes. |
Customer Exception Type |
Displays the exception granted to the customer. Options are None, Exonerated, and Suspended. This value is specified for the bill to customer. |
Certificate ID |
If applicable, displays the ID of the VAT exception certificate that may have been issued to the customer. |
VAT Controls
Field or Control |
Description |
|---|---|
Calculate at Gross or Net |
Indicates how VAT is calculated. Options are: Gross: The system calculates VAT before it applies any early payment discounts. Net: The system calculates VAT after it deducts early payment discounts. If two percentage discounts exist, the system uses the larger of the two when it calculates VAT. The system does not use discount amounts, only discount percentages. The default value comes from the VAT entity driver. |
Recalculate at Payment |
Select to enable the recalculation of VAT at payment time to allow for any early payment discounts if you are calculating VAT at gross. This causes the system to adjust the VAT amount at the time of payment if the discount has been taken. This is set on the VAT entity driver. |
Declaration Point |
For a good or a service, displays when you want VAT transaction information to be recognized for reporting purposes. Options are: Accounting Date: VAT is recognized at the accounting date of the transaction. The user cannot override the declaration date when this option is selected. Invoice: VAT is recognized at time of invoice. Payment: VAT is recognized at time of payment. Delivery: VAT is recognized on delivery. You can set this value at any level in the VAT hierarchy—VAT entity registration, business unit options, customer, or customer location. |
Rounding Rule |
Displays the VAT rounding rule. The value comes from the VAT country driver or VAT Entity driver definition. Options are: Natural Round: Amounts are rounded normally (up or down) to the precision specified for the currency code. For example, for a currency defined with two decimal places, 157.4659 would round up to 157.47, but 157.4649 would round down to 157.46. Round Down: Amounts are rounded down. Round Up: Amounts are rounded up with a rounding precision to one additional decimal place. For example, for a currency defined with two decimal places, 157.4659 would round up to 157.47, but 157.4609 would be rounded down to 157.46. |
VAT Treatments
Field or Control |
Description |
|---|---|
Place of Supply Country |
For services, displays the country in which the VAT is liable. |
Treatment Group |
Displays the VAT treatment group. Options are Domestic Sales, Exports, European Union Sales, No VAT Processing, and Out of Scope. Within the PeopleSoft system, detail VAT treatment values on the transaction lines are used for applying the precise defaults applicable to the transaction lines. Each of these detail VAT treatment values are associated with a VAT treatment group. The system tracks the VAT treatment group on the header enabling individual transaction lines to be grouped together into invoices during batch processes and to validate the detail line VAT treatment values on the transaction lines. |
Adjust/Reset VAT Defaults
Any changes that you make to fields on this page may affect VAT defaults on this page. For accuracy and consistency, use the following fields to adjust affected VAT defaults or to reset all VAT defaults. Adjusting or resetting VAT defaults affects only fields within the VAT Defaults group box.
Field or Control |
Description |
|---|---|
Adjust Affected VAT Defaults |
Click to have the system adjust the VAT defaults that are affected by your changes. All changes that you have made to VAT defaults on this page that affect other VAT defaults on this page are retained. Note: Oracle recommends that you always click the Adjust Affected VAT Defaults button after changing any defaults on the VAT page. |
|
Click this icon to list the fields that will be adjusted when you click the Adjust Affected VAT Defaults button. |
Levels |
Enables you to specify levels affected when you click the Reset All VAT Defaults button. Options are: All lower levels: Resets all VAT defaults at lower levels for this page. This and all lower levels: Resets all VAT defaults on this page and at any lower levels of this page. This level only: Resets all VAT defaults on this page. Note: Resetting completely redetermines the VAT defaults. This does not necessarily mean that they are reset to their original values. For example, you may not have changed any VAT default values, but if a VAT driver field was changed, resetting redetermines all defaults based on the new driver value. |
Reset All VAT Defaults |
Click to have the system reset the VAT defaults based on the levels value that you selected. Any changes you have previously made to VAT defaults are lost. |

Use the VAT Lines page (GROUP_ENTRY_VAT_LN) to view VAT line defaults including the VAT amounts.
Manually override values if applicable.
Navigation:
Click the VAT Lines link on the Online Pending - Pending Item 1 page.
This example illustrates the fields and controls on the VAT Lines page (1 of 2).

This example illustrates the fields and controls on the VAT Lines page (2 of 2).
Review the VAT defaults for each item line and override, as applicable.
VAT defaults appear in descending order of impact. When you change multiple VAT defaults and click Adjust Affected VAT Defaults, you can adjust specific fields. Work from the top to the bottom of the page, clicking Adjust Affected VAT Defaults at appropriate times to avoid adjustments to VAT defaults that you overrode, but did not memorize.
Note: Because complex algorithms are used to obtain the VAT defaults, avoid manually changing these values as much as possible.
VAT Lines
These fields are explained in the section on VAT header defaults.
See VAT Header Page.
Physical Nature
These fields are explained in the section on VAT header defaults.
See VAT Header Page.
VAT Locations
Field or Control |
Description |
|---|---|
Location Country |
For services only, displays the receivables business unit country. |
Location State |
For services only, displays the receivables business unit state. This is displayed only if the location country requires that VAT be tracked by state or province. |
Customer Location Country |
For services only, displays the customer's bill to location country. |
Customer Location State |
For services only, displays the customer's bill to location state. This is displayed only if the customer location country requires that VAT be tracked by state or province. |
Service Performed Country |
Displays a country depending on the value that you select for the Where Services Performed field on the VAT Defaults page or the Where Performed field on the General Information page
|
Service Performed State |
Displays a state or province associated with the Service Performed Country default value. If the default country has a state associated with it, the system displays that state depending on the value that you select for the Where Services Performed field on the VAT Defaults page or the Where Performed field on the General Information page
|
Ship From Country |
Displays the PeopleSoft Receivables business unit location country. In the case of transactions involving goods or freight service transactions, this is used to determine the VAT treatment. |
Ship From State |
Displays the PeopleSoft Receivables business unit location state. In the case of transactions involving goods or freight service transactions, this is used to determine the VAT treatment. |
Ship to Country |
Displays the ship to customer location country. In the case of transactions involving goods or freight service transactions, this is used to determine the VAT treatment. |
Ship to State |
Displays the ship to customer location state. In the case of transactions involving goods or freight service transactions, this is used to determine the VAT treatment. |
VAT Defaults
Review VAT default values and update as necessary.
VAT Service Specific Defaults
Field or Control |
Description |
|---|---|
Service Type |
If the transaction is for a service, this field displays the VAT service type of Freight or Other. Special rules exist for freight transport within the European Union, and the value in this field determines whether they apply. |
Place of Supply Driver |
If the transaction is for a service, this field displays the usual place of supply (the place where VAT is usually liable) for the service. This value is used to help determine the place of supply country and the VAT treatment. Options are Buyer's Countries, Supplier's Countries, and Where Physically Performed. |
VAT Registrations
These fields are explained in the section on VAT header defaults.
See VAT Header Page.
VAT Controls
Field or Control |
Description |
|---|---|
Declaration Date |
Displays the date on which this transaction will be reported to the tax authorities. |
Domestic Reverse Charge Goods |
Select this check box if this country requires the use of the domestic reverse charge provision. |
VAT Treatments
Field or Control |
Description |
|---|---|
Place of Supply Country |
For services, displays the country in which the VAT is liable. |
Treatment |
Displays the VAT treatment. Options are: Deemed Service Export: Services that are provided in the supplier's country to a foreign buyer, where the supply of these services must be zero-rated (that is, the place of supply is the country in which the supplier is located and registered for VAT, but the customer is located in another country). Domestic Goods Sale: Sale of goods when the supplier and customer are located in the same country. Domestic Reverse Charge Sale: Sale of goods when the domestic reverse charge provision is required. Domestic Service Sale: Sale of services when the supplier and customer are located in the same country. EU Goods Distance Sale: Sale of goods between European Union (EU) countries in which the supplier is registered in an EU country and the purchaser is not registered in an EU country. The VAT rate charged is the rate applicable in the suppliers country. EU Goods Sale: Sale of goods between EU countries. EU Sale (Simplification): Used for a transaction between an intermediary and the purchaser in cases in which a sale of goods occurs between EU countries involving three parties: the purchaser, an intermediary (bill-from) supplier, and the actual goods supplier. Each party is located in a different EU country and registered in its own country, and not in either of the other two countries. The only difference between this VAT treatment and that applied to normal EU sales is that the supplier is required to print a different message on the invoice referencing the statute that applies to triangulation, rather than the one that references the statute for normal EU sales. No VAT Processing: No VAT processing is required. Out of Scope EU Service Sale: EU services are out of the scope of VAT. Out of Scope Service Export: Services that are provided in the supplier's country to a foreign buyer, where services are out of scope for VAT. Outside of Scope: Outside the scope of VAT. Zero-Rated EU Service Sale: Sale of services within the EU is subject to zero-rated VAT. Zero-Rated Goods Export: Export of goods is subject to zero-rated VAT. Zero-Rated Services Export: Export of services is subject to zero-rated VAT. Within the PeopleSoft system, detail VAT treatment values on the transaction lines are used for applying the precise defaults that are applicable to the transaction lines. The treatment is determined based the rules that are applicable to the transaction. |
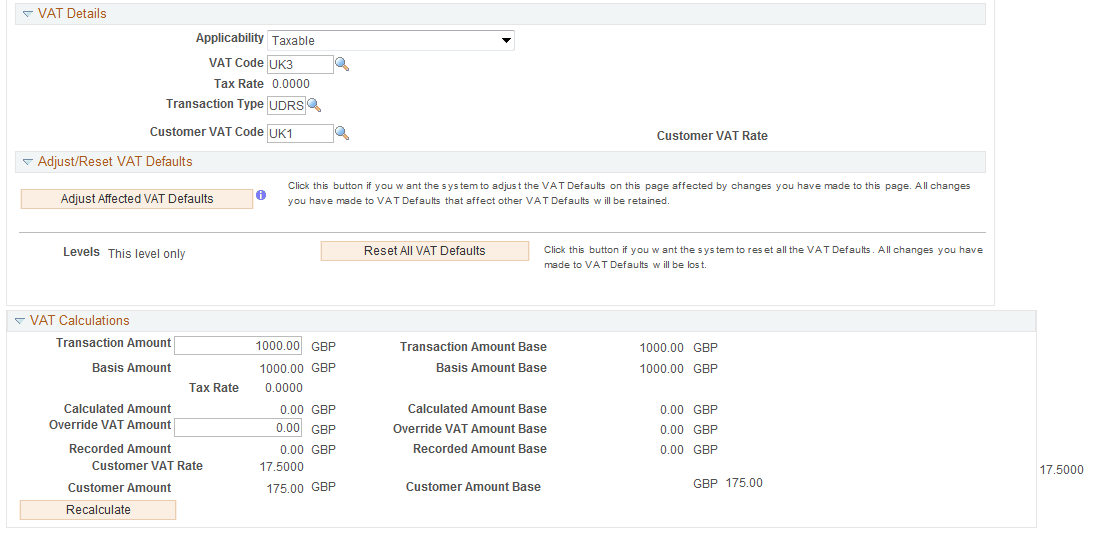
VAT Details
Field or Control |
Description |
|---|---|
Applicability |
Displays the VAT status. Values are: Exempt (not subject to VAT) Exonerated N/A Outside (outside of scope of VAT) Suspend Taxable VAT Only |
VAT Code |
Displays the VAT code that defines the rate at which VAT is calculated for this line. |
Transaction Type |
Displays the code that categorizes and classifies this transaction for VAT reporting and accounting. |
Customer VAT Code |
Enter the customer VAT code used for domestic reverse charges. This code is used to calculate a domestic reverse charge VAT amount. |
Customer VAT Rate |
Displays the rate from the customer VAT code. The calculated amount for domestic reverse charges is displayed in the Customer Amount field in the VAT Summary Information page of this component. |
Adjust/Reset VAT Defaults
These fields are explained in the section on VAT header defaults.
See VAT Header Page.
VAT Calculations
Field or Control |
Description |
|---|---|
Transaction Amount |
Enter the amount of the transaction in the transaction currency. If the control total amount has been entered on the pending item, the system automatically populates this field with a value from the pending item for the first VAT line. |
Transaction Amount Base |
Displays the amount of the transaction in the base currency. |
Basis Amount |
Displays the amount on which the VAT is calculated in the transaction currency. If VAT is being calculated at net, this amount is net of any discounts. |
Basis Amount Base |
Displays the amount on which the VAT is calculated in the base currency. If VAT is being calculated at net, this amount is net of any discounts. |
Tax Rate |
Displays the applicable VAT percentage. |
Calculated Amount |
Displays the system-calculated VAT amount in the transaction currency. |
Calculated Amount Base |
Displays the system-calculated VAT amount in the base currency. |
Override VAT Amount |
Override the calculated VAT amount by entering the VAT amount for the line if the calculated VAT amount is not equal to the VAT on the invoice being recorded. Otherwise, the field is blank. |
Override VAT Amount Base |
Displays the entered override VAT amount in base currency. This is calculated from the transaction currency override VAT amount, based on the exchange rate that is applicable to the transaction. |
Recorded Amount |
Displays the amount of VAT that will be recorded for this transaction in the transaction currency. If the calculated VAT amount has been overridden, this is the entered override VAT amount. Otherwise, this is the calculated VAT amount. |
Recorded Amount Base |
Displays the amount of VAT that will be recorded for this transaction in the base currency. If the calculated VAT amount has been overridden, this is the entered override VAT amount. Otherwise, this is the calculated VAT amount. |
Customer VAT Rate |
Displays the rate from the Customer VAT Code field that is used to calculate domestic reverse charges. |
Recalculate |
Click to recalculate the VAT for the line. |
Use the Pending Item 2 page (GROUP_ENTRY2B) to enter correspondence, personnel, direct debit, draft, and cash forecasting information for the pending item.
Navigation:
Alternatively, select Single Item, Large group, or Overdue Charge Items instead of Group Entry.
This example illustrates the fields and controls on the Pending Item 2 page. You can find definitions for the fields and controls later on this page.
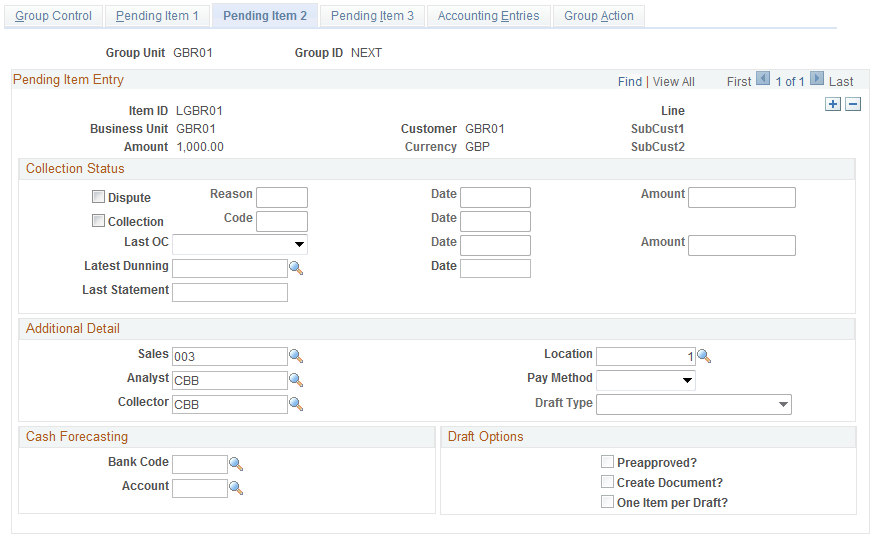
Collection Status
Field or Control |
Description |
|---|---|
Dispute |
Select to mark a pending item for dispute. Then enter a reason in the Status field, and enter the date and the amount. |
Collection |
Select to mark a pending item for collection. Then enter a collection agency in the Status field and enter the date. |
Latest Dunning |
Enter the type of dunning letter that the customer last received. Then enter the date it was sent. |
Last OC (last overdue charge) |
Enter the type of overdue charge: Finance, Administrative, or Penalty. Then enter the date and the amount of the last overdue charge. |
Last Statement |
Enter the date when you sent the customer the last statement. Note: The Dispute, Collection, Latest Dunning, Last OC, and Last Statement fields are often used during conversion. |
Additional Detail
Field or Control |
Description |
|---|---|
Sales |
Select the name of the primary sales person assigned to the customer. |
Location |
Select the address sequence number of the bill to customer. This is usually the address used by PeopleSoft Billing for invoices or for debit or credit memos. It can also be the address attached to the item. The address, if entered, is used for correspondence for the item. Otherwise, the default location for the customer is used for correspondence. |
Pay Method |
Select a payment method for the customer. If you leave this field blank, the system uses the payment method specified for the customer on the Bill To Options page. If a payment method is not defined for the customer, the system uses the default defined on the Receivables Options - Payment Options page for the business unit. Options are Cash, Check, Credit Card, Direct Debit, Electronic Files Transfer (EFT), Giro - EFT, and Letter of Credit. |
Draft Type |
If you selected the payment method Draft, the system displays the default draft type for the customer that was specified on the Bill To Options page. If you did not assign a default draft type, select one. |
Cash Forecasting
Field or Control |
Description |
|---|---|
Bank Code and Account |
Enter the bank code and account that the customer uses to send payments. PeopleSoft Cash Management uses this for cash forecasting. |
IBAN |
Displays the international bank account number (IBAN) in addition to the local, domestic bank account number when the country has been set up to display the IBAN on the IBAN Formats Page. |
Draft Options
If you selected a payment method of Draft, you must select one of the following check boxes.
Field or Control |
Description |
|---|---|
Preapproved? |
Select if the item is preapproved for draft processing. |
Create Document? |
Select if the item must be included in a draft document that is prepared for the customer. |
One Item per Draft? |
Select if the item must appear on a separate draft. |
Use the Pending Item 3 page (GROUP_ENTRY2C) to enter consolidated invoice information (used in PeopleSoft Billing).
Enter values in user-defined fields.
Navigation:
Alternatively, select Single Item, Large group, or Overdue Charge Items instead of Group Entry.
This example illustrates the fields and controls on the Pending Item 3 page. You can find definitions for the fields and controls later on this page.
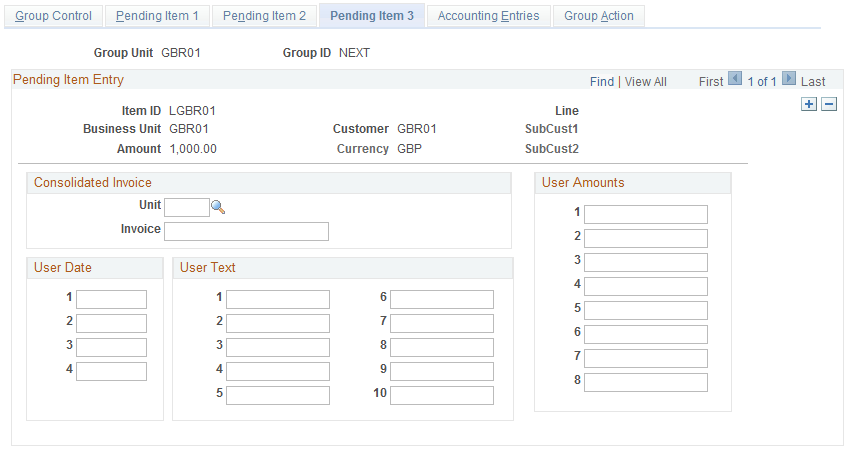
If multiple invoices in PeopleSoft Billing were consolidated, the business Unit and Invoice number fields identify which open items correspond to the consolidated invoice. The Billing interface automatically populates these fields. If you have a similar concept in the billing systems that you integrate with, you can use these fields for a similar purpose.
PeopleSoft Receivables provides configurable user fields in the pending item tables that you can use to track company-specific or industry-specific information that is not predefined on the Pending Item table, such as a contract or shipment. User fields include:
User Date 1 through User Date 4
User Text 1 through User Text 10
User Amounts 1 through User Amounts 8
Use the Group Entry Tax page (GROUP_ENTRY_TAX) to enter and calculate excise duty, sales tax, or VAT amounts for India (IND).
This page is available only if you enabled sales tax, VAT, or excise duty for a receivable business unit type on the Business Unit Tax Applicability page.
Enter and calculate GST amounts for India. (IND)
Navigation:
Alternatively, select Single Item, Large group, or Overdue Charge Items instead of Group Entry.
This example illustrates the fields and controls on the Group Entry Tax page (IND). You can find definitions for the fields and controls later on this page.
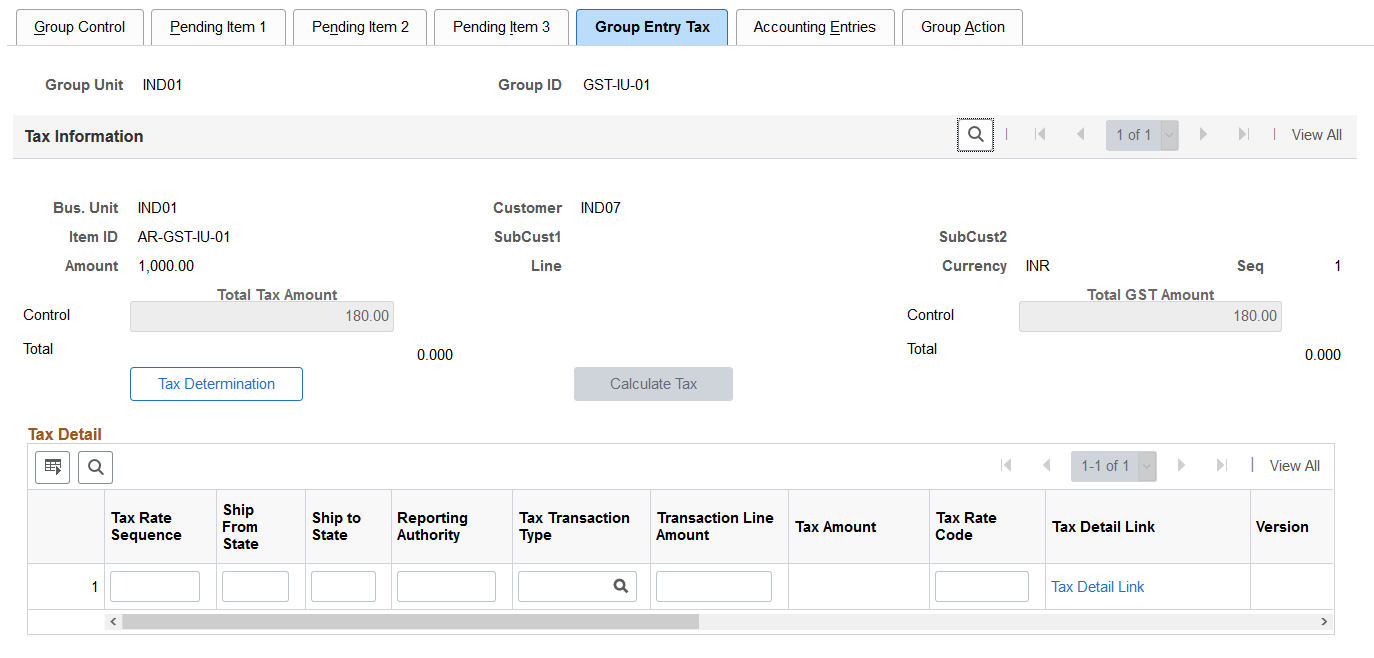
The system calls the Tax Determination process to supply default values for the tax transaction lines based on the business unit and customer for the item.
Entering Control Totals
Field or Control |
Description |
|---|---|
Total Tax Amount |
Enter the total tax amount. This is the sum of the excise tax amount and sales tax or VAT amount. |
Total Excise Amount |
Enter the total amount of excise tax. This field is required if excise tax is applicable. |
Total ST/VAT Amount (total sales tax/value added tax amount) |
Enter the total amount of sales tax or VAT. This field is required if sales tax or VAT is applicable. |
Total GST Amount (Total India Goods and Services Tax amount) |
Enter the total amount of GST. This field is required if India GST is applicable. (IND) |
Determining Tax Information or Calculating Tax
Field or Control |
Description |
|---|---|
Tax Determination |
Click to supply default information such as ship from country and state, ship to county and state, tax authority (for sales tax or VAT), tax form code (for sales tax or VAT), tax transaction type, excise duty and tax codes from the business unit, and customer setup to the tax transaction line. The transaction line can have excise duty only, sales tax only, both, or VAT. If you change the default value for the tax transaction type, tax form code, or tax rates codes, you must click this button again to run the tax determination routine again. |
Calculate Tax |
Click to calculate taxes only if the items are entered in PeopleSoft Receivables or for items interfaced from billing for which PeopleSoft Receivables will create the accounting entries. Taxes cannot be recalculated if the accounting entries were created in PeopleSoft Billing. The system calculates the excise duty tax amounts, sales tax, and VAT amounts. You view the results on the Tax Detail page. |
Entering Indian Tax Line Information
Field or Control |
Description |
|---|---|
Ship From State |
Displays the default ship from state that the tax determination routine identifies. The system determines the ship from state based on the business units assigned to the item:
|
Ship to State |
Displays the ship from state. The system uses the country and state for the ship to customer to populate the field. |
Reporting Authority |
Displays the reporting authority. The Tax Determination process populates the field. |
Tax Transaction Type |
Select a tax transaction type. Values are: DEB: Direct export with bond DEWB: Direct export without bond DIMP: Direct export DOM: Domestic IUT: Interunit transfer LEB: Local export with bond LEWB: Local export without bond LIMP: Local import |
Tax Form Code |
Select a tax form code. This is only for sales tax or VAT and is used for form tracking. Valid entries are: 20: Tamilnadu Local S/P 32: West Bengal Local S/P 37: Karnataka Local S/P C: Interstate Sales D: Sale to Government EI: Intransit Purchase EI & C: Intransit Sales EII: Intransit Sales Level 2 F: Stock transfer form H: Deemed Export |
Transaction Line Amount |
Enter the total amount of transactions for the line. Each line has its own transaction total. The system uses this amount to calculate the taxes. |
Excise Tax Amount |
Displays the total amount of excise tax for the line. Each line has its own excise tax amount. If excise tax is applicable. The sum of all the excise tax amounts should equal the control excise tax amount. |
Excise Tax Rate Code and Tax Rate Code |
Enter the excise duty or tax rate associated with this line. Excise duty and tax rate codes represent a specific grouping of tax type components, calculation schemes, and other tax attributes. If excise duty, sales tax, or VAT is applicable to a line, this field must be populated. If excise duty, sales tax, or VAT is not applicable to a line, this field must not be populated. |
Tax Amount |
Displays the total amount of sales tax or VAT for the line. Each line has its own tax amount. The sum of all the tax amounts should equal the control tax amount. |
Tax Detail Link |
Click to access the Tax Detail page, where you can view the excise duty, sales tax, and VAT detail information. |
Invoice Reference Number |
Displays the invoice number for the line. |
IRP Date |
Displays the IRP date for the line. |
Customer Type |
Displays the customer type for the line. |
Transaction Category |
Displays the transaction category for the line. |
Document Type |
Displays the document type for the line. Values can be INV (regular invoice), CRN (credit note), or DBN (debit note). |
Reverse Charge Applicable |
Indicates whether a reverse charge is applicable for the line. |
Report Process |
Indicates whether the GST Transaction Loader process extracted data from PS_PENDING_TAX table. |
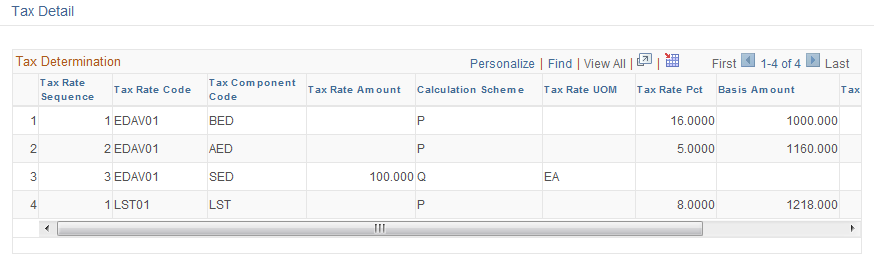
Use the Tax Detail page (GROUP_ENTRY_TAX_DT) to display excise duty, sales tax, or VAT detail information for India (IND) and view the results of the tax calculation.
This page is available only if you enabled sales tax, VAT, or excise duty for a receivable business unit type on the Business Unit Tax Applicability page.
Navigation:
Click the Tax Detail link on the Group Entry Tax page.
This example illustrates the fields and controls on the Tax Detail page (IND). You can find definitions for the fields and controls later on this page.
Field or Control |
Description |
|---|---|
Tax Rate Code |
Displays the tax rate used to calculate the tax for each line. Tax is applied to each line separately, rather than applied to a subtotal of the bill, enabling you to establish different tax rates for each line. |
Tax Component Code |
Displays the tax component for the line. One tax component code exists for each tax type. Multiple tax component codes that have the same tax type are grouped together to define tax rate codes. |
Calculation Scheme |
Displays the calculation scheme that determines how the taxes are calculated. PeopleSoft Receivables uses only the P (percentage) calculation scheme. |
Tax Rate Pct (tax rate percentage) |
Displays the rate at which the taxes are calculated. The value that appears here is determined by the value in the Calc Scheme field and is always a percentage. |
Basis Amount |
Displays the amount of the line on which the tax was calculated. |
Tax Amount |
Displays the amount of the tax that the system calculated for the line. |
Use the Accounting Entries page (GROUP_ENTRY3) to create accounting entries for one pending item at a time.
Navigation:
Alternatively, select Single Item, Large group, or Overdue Charge Items instead of Group Entry.
This example illustrates the fields and controls on the Group Entry - Accounting Entries page. You can find definitions for the fields and controls later on this page.
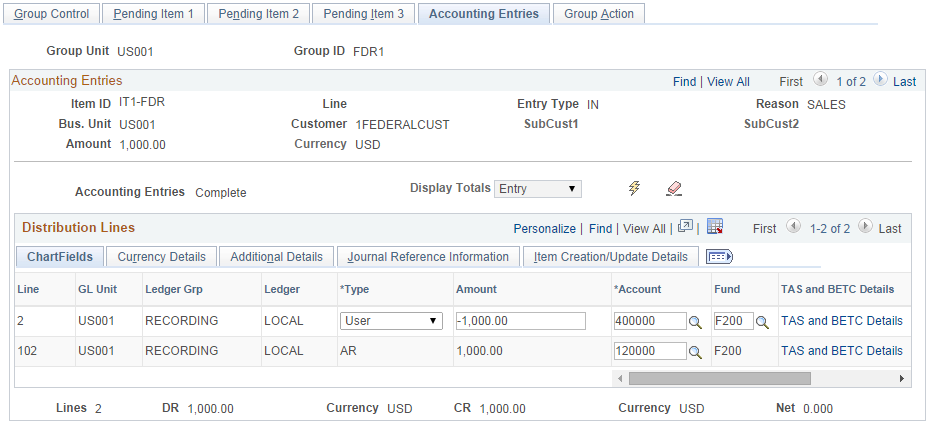
Before you can view and edit the accounting distribution lines on this page, you must select the Group Action tab and click the Create Entries button.
Field or Control |
Description |
|---|---|
Amount |
Displays the amount in the entry currency. |
Tot Base (total base) |
Displays the amount converted into the base currency. |
Creating and Deleting Accounting Entries
Field or Control |
Description |
|---|---|
Display Totals |
Select the type of currency used to display the totals at the bottom of the page. Select either Base or Entry. |
|
Click the Create icon to have the system create accounting entries for one pending item at a time. After you click the Create icon, the accounting entries appear in the grid at the bottom of the page. |
|
Click the Delete icon if you make a mistake and want to start over. The system deletes only the pending item shown in the scroll area, not all pending items in the group. |
Accounting Entries |
Displays the status, which changes from Incomplete to Complete after you create accounting entries and the entries are balanced. |
 (Create)
  (Delete)
Reviewing and Updating Accounting Entries
The Distribution Lines grid displays the individual lines for a single item. To see the accounting lines for a different pending item, use the Accounting Entries group box.
The accounting entries that appear are based on the item entry template and are either system-defined or user-defined. For billing groups, you can edit both system-defined receivables lines and user-defined (revenue) lines. You can have multiple lines for each. For other group types, you can edit the receivables lines only for transactions that do not reference existing items, but you can edit the user-defined lines. If you selected Always Inherit or Inherit within BU for the inheritance option, you cannot modify the ChartField values.
The lines must balance; that is, total debits must equal total credits, and the total of all accounts receivable lines must equal the entry amount of the pending item.
Manually enter the ChartField values for the pending item as needed, or supply the value automatically by click the SpeedType button and select a SpeedType code to automatically display the ChartField values. If accounting tags are enabled for Receivables, the Account Code field will be displayed instead of SpeedType.
You must set up Speed Type codes in advance to use the automatic Speed Type feature.
Similarly, you must enable accounting tags for Receivables and set up the accounting tags in advance to use the Accounting Tags feature. For more information, see Setting Up Accounting Tags.
Note: The ChartFields that appear in the grid depend on the ChartField configuration setup for your organization.
See Understanding ChartField Combination Editing.
Field or Control |
Description |
|---|---|
GL Unit (general ledger business unit) |
Displays the general ledger business unit that is linked to the receivables business unit and receives journals. |
Type |
Indicates the type of accounting line (for example, accounts receivable, user-defined, VAT, and so on). |
Ledger Grp (ledger group) and Ledger |
Displays the ledger group and ledger for the entries. The system populates these fields for all entries, but the fields appear only if you selected the multibook option on the Installation Options - Overall page. See Multibook Processing. |
Ledger Base |
In a non-multibook environment, displays the business unit base currency. |
Statistics Code |
If the accounting template that you selected on the Accounting Template page includes a statistic code for the particular entry type that you are working with, the statistic code value appears in this field. If the Statistics Code field is populated, then the associated unit of measure field is also populated. For instance, suppose that you track the number of workdays associated with the item. The statistic code is DAY (work days), and the associated unit of measure is also DAY (days). The field that appears between these two is the statistical amount, which in this example you might enter as 3.00, the number of days. If the Stat field is not populated, you can enter a value and overwrite the existing unit of measure as needed. |
Open Item Key |
Enter the information that you need to track and maintain for the open item account in PeopleSoft General Ledger. This field is available only if the account for the distribution line is marked as an open item account. |
Verify that the debits and credits are balanced. The total number of lines for each pending item, the debit (DR) and credit (CR), and the net must be 0 before you can post the group.
If you receive a ChartField Combination editing error message, you may need to make the correction before you run the Receivables Update process depending on the setup for the business unit on the Receivables Options - General 2 page. If you receive an error message, you must correct the error before you post the pending item group. If you receive a warning message, you can post the group without correcting the errors.
ChartField Combination Error Tab
A single error message appears for a pending item if at least one item distribution line has a ChartField combo edit error. This message instructs the user to refer to the ChartField Combo Error tab for further details about the error. The ChartField Combo Error tab appears in the Distribution Lines grid. This tab identifies the specific fields and combination group that were used to compare against the distribution line with the error. If no errors occur, this tab does not appear.
(USF) Entering TAS and BETC Details
When you create accounting entries online or in batch using the Receivables Update, the system provides default TAS and BETC values on the distribution lines. The TAS and BETC values are available on the distribution lines by first selecting the CTA check box on the Installation Options - Receivables Page. Once you see the Billing ALC field on the Receivables Options - General 1 Page, you can set the ALC to be a GWA Reporter for Receivables.
To view TAS and BETC values, click the TAS and BETC Details link in the Distribution Lines grid on each accounting line. The TAS and BETC fields are required when the agency is a GWA Reporter for Receivables.
The system derives the TAS and BETC using the Fund Code value on the accounting line. The Fund Code is a required field when the agency is a GWA Reporter for Receivables, and you must enter a Fund Code on the accounting lines. The system defaults the BETC based on the TAS value only when there is just one BETC code defined for Collections. When more than one collection BETC is defined, you select the BETC code from a dynamic prompt based on the TAS code.
If accounting entries are created in batch using Receivables Update processing, the group is available in the error correction component to fix a missing fund code, set up a missing TAS or BETC, or select one BETC where more than one BETC has been defined.
For Direct Journal payments, accounting entries are always created online not in batch, by PeopleCode not AR_PGG_SERV.
For Classification Transactions and Accountability (CTA) processing, entry events should be set up as required for Receivables.
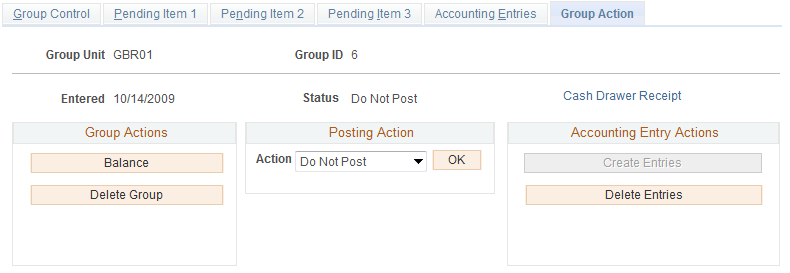
Use the Group Action page (GROUP_ENTRY4) to specify the action that the system performs on a group of pending items, such as posting the group, or creating or deleting accounting entries.
Navigation:
Alternatively, select Single Item or Large group instead of Group Entry.
This example illustrates the fields and controls on the Group Action page. You can find definitions for the fields and controls later on this page.
Field or Control |
Description |
|---|---|
Cash Drawer Receipt |
Click this link to access the Cash Drawer Receipt page (CDR_RECEIPT). This link appears:
This link does not appear if:
Because no security is applied to access the Cash Drawer Receipt page from the Accounts Receivable menu, then no security is applied to access this page by means of the Drawer Receipt link on the Group Action page. If a user enters pending items and runs ARUPDATE, and ARUPDATE creates entries in error, the Drawer Receipt link does not appear on the Group Control page due to error. If a user accesses the Cash Drawer Receipt page from the Accounts Receivable menu, the items are not available because the group was not posted. A user can partially pay for an item after the item is posted. Users can reference partially paid items on the Cash Drawer Receipt page. However, the Drawer Receipt link appears only on the Group Control page for pending items that are not posted. |
See Cash Drawer Receipt Page and Using a Cash Drawer.
Group Actions
Field or Control |
Description |
|---|---|
Balance |
Click to balance the group but not set it to post. The system reviews the completed fields on the Group Control page to confirm that the control amount and count are equal to the entered amount and count. If the entered pending items match the group controls and you entered them online, the system verifies that the accounting entries are balanced. The system also verifies that any VAT amounts are balanced. If the group, accounting entries, or VAT amounts are out of balance, you receive a warning message. The system also checks for required fields. For an external group, the Group Status group box on the Group Control page shows the status of the group. |
Delete Group |
Click to delete the entire group of pending items. If you delete a draft group, the system deletes any draft fees associated with the group. Note: Deleting a group created by overdue charges does not roll back the overdue charges. You can delete groups created by overdue charges and the overdue charges on the Overdue Charge Pending Items page () or on the Overdue Charge Items page (). |
Posting Action
The Posting Action group box varies depending on whether you are working with an external group or an internal group.
Field or Control |
Description |
|---|---|
Action |
Select a posting action for the group and click OK to perform the action. Valid values are: Do Not Post: Saves the changes to the group, but no posting takes place. Use this option to change the posting option for a group set to Batch Standard or Batch Priority, if the group has not been processed yet. Post Now: Runs the Receivables Update process immediately. If the user enabled the notification feature, the system displays a message when the process finishes. Post Now to GL: Runs the Receivables Update process immediately and runs processes to create and post journals to the general ledger. If the user enabled the notification feature, the system displays a message when the process finishes. Batch Priority: Runs the Receivables Update process the next time a priority-scheduled job runs or the next time a standard scheduled job runs if that occurs first. This option is not intended for large jobs. Batch Standard: Runs the next time a standard scheduled batch job runs. This may occur once a day depending on how often the organization schedules standard jobs. Note: The posting options that are available depend on the options that you select for the user on the Define User Preferences - Process Group page. Use the Post Now and Post Now to GL options only for small groups or when you need to post the transaction immediately. The system issues a message if another user or scheduled process is posting transactions for the same business unit and customer combination at the same time. See Receivables Update Processing Options. For external groups, only these posting actions are available:
|
Accounting Entry Actions
Field or Control |
Description |
|---|---|
Create Entries |
Click to create and initially balance accounting entries for all of the group's pending items that do not yet have entries. This option creates entries for all pending items in the group at once, whereas on the Accounting Entries page, you create entries for only one pending item at a time. Note: Normally, you create accounting entries during a Receivables Update run unless you must review them. To create accounting entries in a batch, select a posting action. |
Delete Entries |
Click to erase the accounting entries that were created for all pending items in the group. |