Generating the 1099-C Report
|
Page Name |
Definition Name |
Usage |
|---|---|---|
|
AR_CANCEL_DEBT_RP |
Define control values to identify the type of system function codes to use for canceled debt reporting. |
|
|
AR_CANCEL_DEBT_CR |
Enter creditor taxpayer ID and address information. Associate AR business units with the ID. |
|
|
CUST_CREDIT_SEC |
Enter customer cancellation of debt details. |
|
|
RUN_AR_1099C |
Run control to create a preliminary table with data necessary for 1099-C reporting. |
|
|
SUBMIT_AR_1099C |
Select one or more customers for 1099-C form submission. Reset submission dates for or delete selected customer rows from the reporting table. |
|
|
AUDIT_AR_1099C |
Search for and review 1099-C actions for one or more customers. |
The 1099-C form for Cancellation of Debt is required by the Internal Revenue Service (IRS) in the United States to summarize how much debt has been written off for a specific customer.
To generate the 1099-C form for one or more customers:
Enable 1099-C processing in the Receivables installation options.
Define the system functions that are legitimate canceled debt transactions.
Create the debt creditor ID, including taxpayer identification, address, and associated Receivables business units.
Set up customers for 1099-C processing, including taxpayer identification and reporting details.
Create a customer group for Canceled Debt Reporting. (Optional)
Run the 1099-C process.
You can also audit the 1099-C processing history for one or more customers.
Before you generate the 1099-C report, enable 1099-C processing by selecting the 1099-C Forms check box on the Installation Options - Receivables page (, and click the Receivables link).
Use the Canceled Debt Report Setup page (AR_CANCEL_DEBT_RP) to define control values to identify the type of system function codes to use for canceled debt reporting.
Navigation:
This example illustrates the fields and controls on the Canceled Debt Report Setup page. You can find definitions for the fields and controls later on this page.
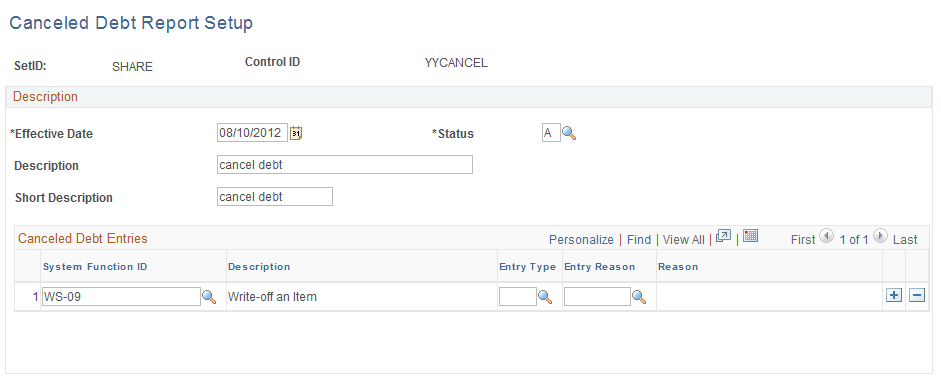
You must enter at least one System Function ID in the Canceled Debt Entries grid. Control values identify which function codes the system will use to report canceled debt. If desired, you can further limit which system function codes to select by entering an Entry Type and Entry Reason.
Only transactions with a Posted status in the Item Activity table are eligible for 1099-C reporting. If only the system function code is selected without a qualifying entry type or reason code, all transactions with the system function code are considered eligible. If a user defines an entry type and entry reason, only transactions with the specified entry type and entry reason are selected; all other entry types and entry reasons for the system function code will be ignored.
Reporting Interest Amounts in Box 3
The amount of canceled debt reported on the 1099-C form includes write-offs of principal owed, which can also include interest, administrative fees, and penalties, as specified in the Canceled Debt Entries on the Canceled Debt Report Setup page.
To report interest amounts in Box 3 of the 1099-C form, you must add a Canceled Debt Entry using system functions FC-01 and/or IT-01 with OC in the Entry Type field to designate Overdue Charges. If desired, you can include an Entry Reason value to further filter which types of overdue amount transactions are reported in Box 3 of the 1099-C form.
Note: On the Canceled Debt Report Setup page, entry type OC is reserved for reporting interest amounts in Box 3 of the 1099C form. Entry type OC will not be used for reporting amounts in Box 2.
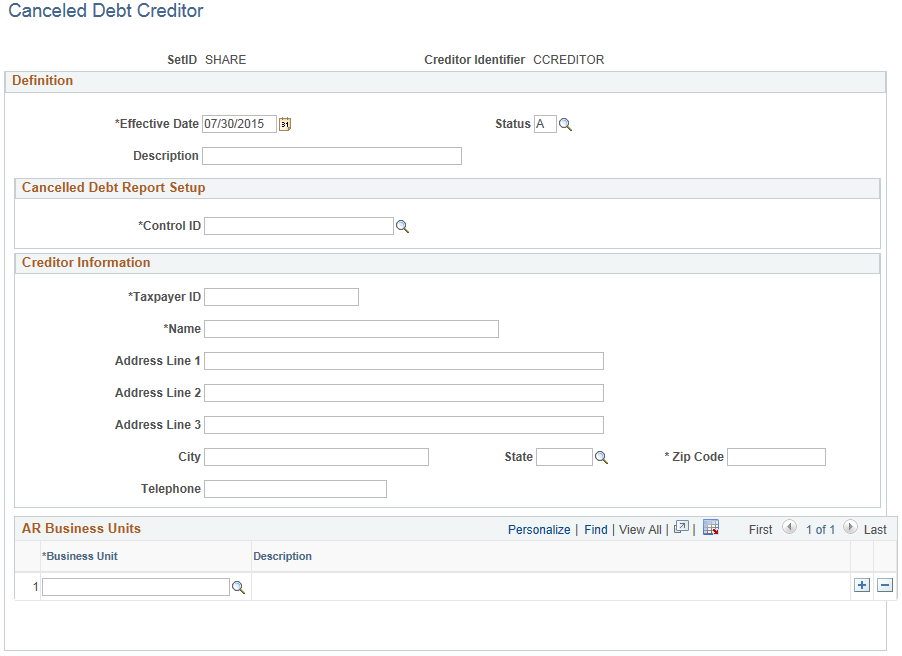
Use the Canceled Debt Creditor page (AR_CANCEL_DEBT_CR) to enter creditor taxpayer ID and address information.
Associate AR business units with the ID.
Navigation:
This example illustrates the fields and controls on the Canceled Debt Creditor page. You can find definitions for the fields and controls later on this page.
Field or Control |
Description |
|---|---|
Control ID |
Enter a valid control value. You can define control values on the Canceled Debt Report Setup page. The Control ID will identify which function codes the system will use to report canceled debt for this creditor. |
Taxpayer ID |
Enter the 9-digit numerical value that identifies this creditor to the IRS. |
Field or Control |
Description |
|---|---|
AR Business Units |
Enter at least one business unit associated with this creditor. Conversely, a business unit can be associated with only one creditor. The system uses the business unit to identify which items to select when creating canceled debt amounts. |
Before you can create the 1099-C Cancellation of Debt report, the customer for whom you are submitting the 1099-C report must have required tax identification in your Receivables system. To set up customers for 1099-C processing, complete these steps:
Enter customer tax identification numbers.
Define customer 1099-C reporting details.
Note: Only customer transactions with a Posted status in the Item Activity table are used to gather amounts. The total amount of canceled debt for a customer must be more than 600 USD to be eligible for 1099-C reporting.
See PeopleSoft Order to Cash Common Information documentation, "Maintaining General Customer Information."
Entering Taxpayer IDs for Customers
The taxpayer identification number as well as subcustomer information can be entered on the Miscellaneous General Info page (Customers, Customer Information, General Information, Miscellaneous General Info).
See PeopleSoft Order to Cash Common Information documentation, "Maintaining General Customer Information," Entering Tax ID, Supplier ID, Web Addresses, Stock Symbols, and SubCustomer Information.
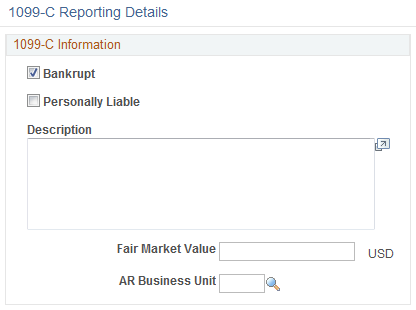
Use the 1099-C Reporting Details page (CUST_CREDIT_SEC) to enter customer cancellation of debt details.
Navigation:
This example illustrates the fields and controls on the 1099-C Reporting Details page. You can find definitions for the fields and controls later on this page.
Field or Control |
Description |
|---|---|
Bankrupt |
Select this check box if the customer is bankrupt. For reporting Receivables transactions such as write-offs as canceled debt, the Bankrupt check box must be selected or a Description must be entered. |
Personally Liable |
Select this check box if this customer is an individual and not a business entity. This information appears on the 1099-C form to be submitted to the IRS. |
Description |
If desired, enter a description of the canceled debt. This information appears on the 1099-C form to be submitted to the IRS. |
Fair Market Value |
Enter an amount in USD for the fair market value of the canceled debt, such as a foreclosure, to indicate that the canceled debt is not related to a Receivables transaction, such as a write-off. If you enter a value here, the system bypasses transactions associated with the control values identified on the Canceled Debt Report Setup page for this customer in Receivables and reports only this amount on the 1099-C form. |
AR Business Unit |
Required if you enter a fair market value amount. The business unit must be associated with a creditor on the Canceled Debt Creditor page. |
See PeopleSoft Order to Cash Common Information documentation, "Maintaining General Customer Information," Setting Up and Reviewing Customer Credit Profiles.
You can optionally group customers with similar traits and define processing criteria for the entire group instead of individual customers. If desired, you can associate a customer with the Canceled Debt Reporting customer group. You can then select the designated 1099-C customer group, a single customer, or all customers for 1099-C preparation processing on the Receivables 1099-C Run Control page.
For 1099-C reporting, use the Canceled Debt Reporting group type delivered as system data. First, create a group table for your 1099-C customers. Then add eligible customers to the customer group.
Creating a Canceled Debt Reporting Customer Group Table
Use the Customer Group Table search page (Set Up Financials/Supply Chain, Common Definitions, Customers, Customer Group Table).
To add a new customer group specifically for canceled debt reporting, follow these steps:
Select a SetID value.
Select Canceled Debt Reporting from the Customer Group Type list.
Add a Customer Group value, for example, USGROUP.
Click the Add button.
The Customer Group Table page for your new Customer Group appears.
This example illustrates the fields and controls on the Customer Group Table page. You can find definitions for the fields and controls later on this page.
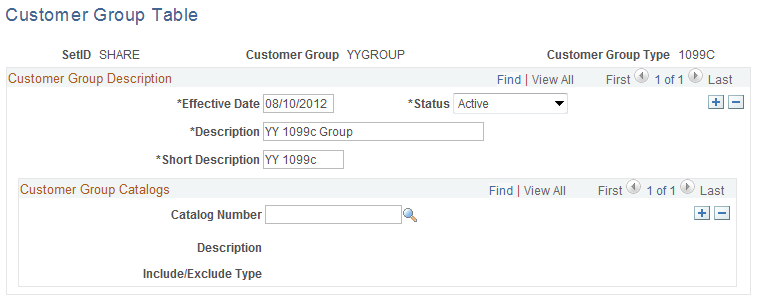
Enter required values on the Customer Group Table page, including Effective Date, Description, and Short Description. In this example, the user has already saved these values.
See PeopleSoft Order to Cash Common Information documentation, "Maintaining Additional Customer Information," Establishing Customer Group Tables.
Adding Customers to the Canceled Debt Reporting Customer Group
Use the General Information - Customer Group Info page (Customers, Customer Information, General Information, and select 0070 - Customer Group in the General Info Links list on the General Info page).
To associate a customer with a group, add a row to the Customer Groups by Type grid. In the Group Type field, select CDT. Select a Customer Group from the lookup list. Only groups added with the Canceled Debt Reporting group type will display on the list. Customers associated with a group can also be selected for individual 1099-C reporting.
See PeopleSoft Order to Cash Common Information documentation, "Maintaining General Customer Information," Assigning Individual Customers to Customer Groups.
Run the 1099-C process to create the report in two steps:
Run the 1099-C Preparation Program (AR_1099_PREP).
Submit records for the 1099-C Form.
First, you run a preparation Application Engine program, which creates the basic data table (AR_1099C_TBL). Next, you use the Submission page to select records from this table to print, resubmit, or delete.
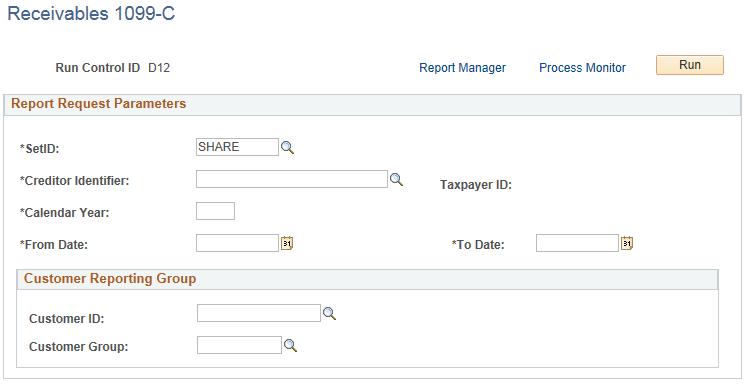
Use the Receivables 1099-C page (RUN_AR_1099C) to run control to create a preliminary table with data necessary for 1099-C reporting.
Navigation:
This example illustrates the fields and controls on the Receivables 1099-C page. You can find definitions for the fields and controls later on this page.
Field or Control |
Description |
|---|---|
SetID |
Select a SetID. Customer data used for reporting must be within this SetID value. You cannot report 1099-C information across SetIDs. |
Creditor Identifier |
Select the Creditor ID. This value determines the creditor information including taxpayer ID and address, as defined on the Canceled Debt Creditor page. This value also determines the Control ID as entered on the Canceled Debt Creditor page, which controls the type of data selected for the 1099-C report. The business units associated with the Creditor ID are the only business units that will be used to gather data for the customer's 1099-C report. Receivables business units can be associated with only one Creditor ID. You cannot create 1099-C reports that contain data across taxpayer IDs. |
Calendar Year |
Enter a four-digit value for the calendar year. All data selected for reporting are restricted to one calendar year. Any calendar year is valid. |
From Date and To Date |
Select a date range within the calendar year entered in the Calendar Year field. The data for reporting will be restricted to the selected date range. |
Customer Reporting Group |
Select the customers to be included in the record table from these options:
|
Enter the desired parameters and click the Run button to launch the AR_1099_PREP process to create the record table (AR_1099C_TBL) that will be used to submit records for the Cancellation of Debt report.
Use the Submit 1099-C page (SUBMIT_AR_1099C) to select one or more customers for 1099-C form submission.
Reset submission dates for or delete selected customer rows from the reporting table.
Navigation:
This example illustrates the fields and controls on the Submit 1099-C page. You can find definitions for the fields and controls later on this page.
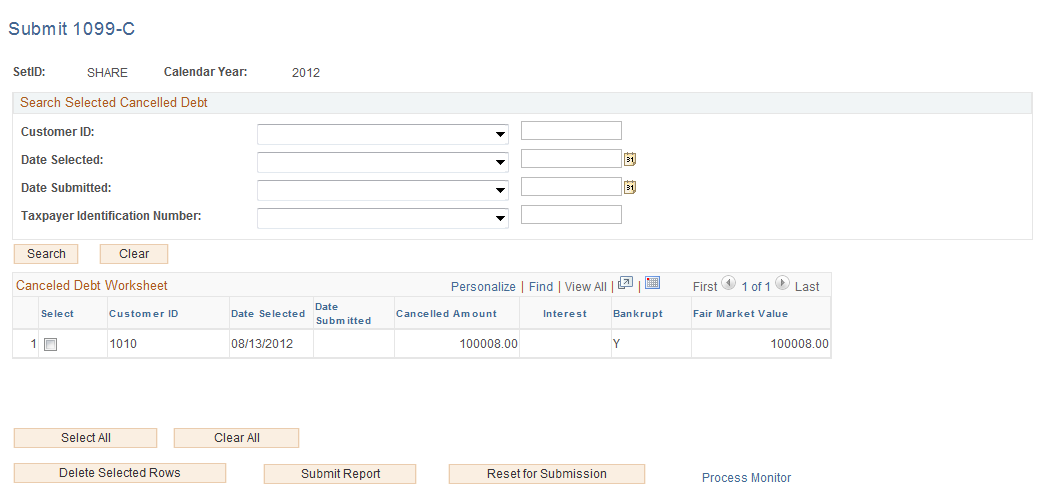
Field or Control |
Description |
|---|---|
Search Selected Canceled Debt |
Select the search criteria for customer records to retrieve from the record table (AR_1099C_TBL) to display in the Canceled Debt Worksheet grid. You can choose from these search options to display records within the SetID and calendar year specified on the Submit 1099-C page:
For each field, you can select a filter from the drop-down list to search for values that are Equal, Greater Than, Greater Than or Equal, Less Than, Less Than or Equal, Like, or Not Equal to the entered values. If you leave the search fields blank, the system retrieves all records for the selected SetID and calendar year. |
Canceled Debt Worksheet |
Select rows in the worksheet for which you want to perform a single action. You can select rows in the worksheet using these options:
The action buttons will delete, submit reports for, or reset for submission the rows that you select in the worksheet. |
Selecting a 1099-C Action
To perform an action, click one of the action buttons to delete selected records, submit selected records to be formatted for the 1099-C form and sent to the IRS, or reset the selections for submission. When you click an action button, a warning message appears. You can choose to cancel or proceed with the action.
Note: The 1099-C action buttons on the Submit 1099-C page produce one-way results. After you confirm the action, the only recovery is to run or in some cases re-run the 1099-C process.
Field or Control |
Description |
|---|---|
Delete Selected Rows |
Click this button to remove rows from the record table, AR_1099C_TBL. Use this button to remove data before recreating the row with corrected data for the customer, if needed. Only selected rows with a Date Submitted value of None can be deleted. If a row has already been submitted, you must first reset the row using the Reset for Submission button, then delete the row. An audit record will be written to the AR_1099_AUD_TBL for each row that has been deleted. |
Submit Report |
Click this button to create a 1099-C form for all selected rows that have a Date Submitted value of None. The system will not process any row that has already been submitted, namely, that has a Date Submitted field with any value other than spaces. When processing is complete, the Date Submitted field for the row will be updated with the current date. |
Reset for Submission |
Click this button to reset the Date Submitted value for the selected row to None before deleting or resubmitting the row to create a new 1099-C form. Only selected rows with a Date Submitted value other than spaces will be processed. An audit record will be written to the AR_1099_AUD_TBL for each row with a Date Submitted value that has been reset to None. |
Use the Canceled Debt Audit page (AUDIT_AR_1099C) to search for and review 1099-C actions for one or more customers.
Navigation:
This example illustrates the fields and controls on the Canceled Debt Audit page. You can find definitions for the fields and controls later on this page.
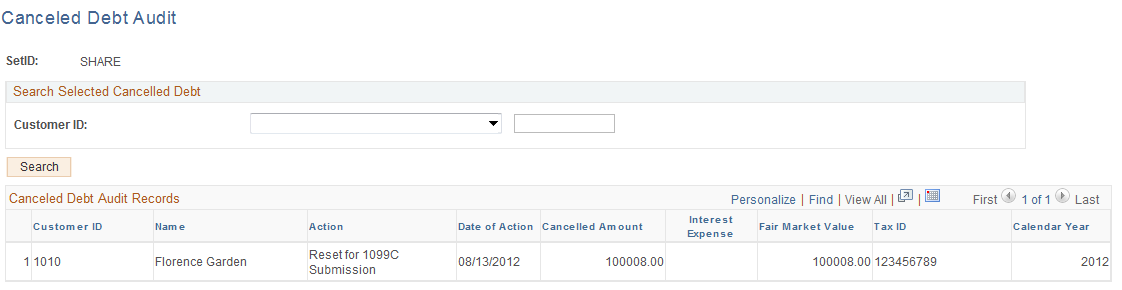
If the Customer ID fields are blank when you click the Search button, the system displays all records on the audit table (AR_1099_AUD_TBL).
You can filter the Canceled Debt Audit Records by Customer ID in the Search Selected Canceled Debt box.