Setting Up Automatic Entry Types
|
Page Name |
Definition Name |
Usage |
|---|---|---|
|
AUTO_ENTRY_TABLE1 |
Set up new automatic entry types. Specify whether you distribute accounting entries to the general ledger and assign entry reasons to the automatic entry type. |
|
|
AUTO_ENTRY_TABLE2 |
Define how the system creates accounting entries for the general ledger. |
To define automatic entry types, use the Automatic Entry Type component (AUTO_ENTRY_TABLE2).
Use this component to:
Define automatic entry types.
Define accounting templates for automatic entry types.
Automatic entry types define how the system assigns entry types to pending items created in the background. When you use online pages to tell the system what to do—for example, create a deduction or place a payment on account—the system uses automatic entry types. Batch processes that generate pending items also use entry types.
Automatic entry types are related to the subset of system functions that includes transfers, drafts, direct debits, overdue charges, and worksheet functions. To enable the use of an underlying system function, you must:
Map the system function to an entry type.
You can assign only one entry type to a system function, but you can associate the same entry type with multiple system functions. For example, you can associate the Dishonor Draft entry type with different system functions based on your organization's needs.
Define how the system creates accounting entries.
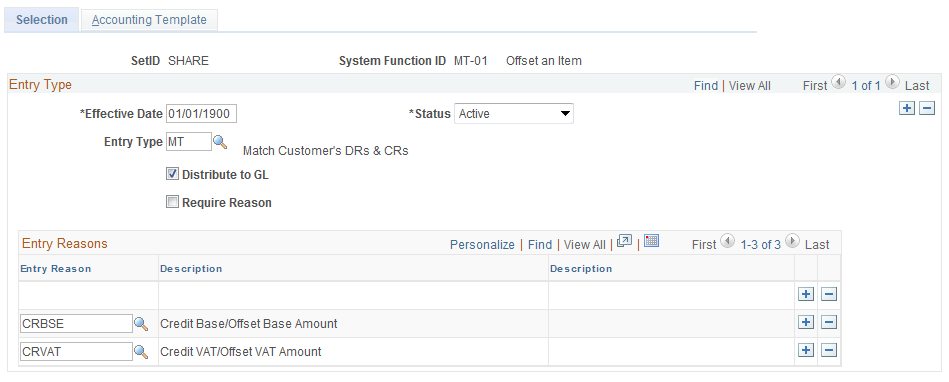
Use the Automatic Entry Type - Selection page (AUTO_ENTRY_TABLE1) to set up new automatic entry types.
Specify whether you distribute accounting entries to the general ledger and assign entry reasons to the automatic entry type.
Navigation:
This example illustrates the fields and controls on the Automatic Entry Type - Selection page for Entry Type MT. You can find definitions for the fields and controls later on this page.
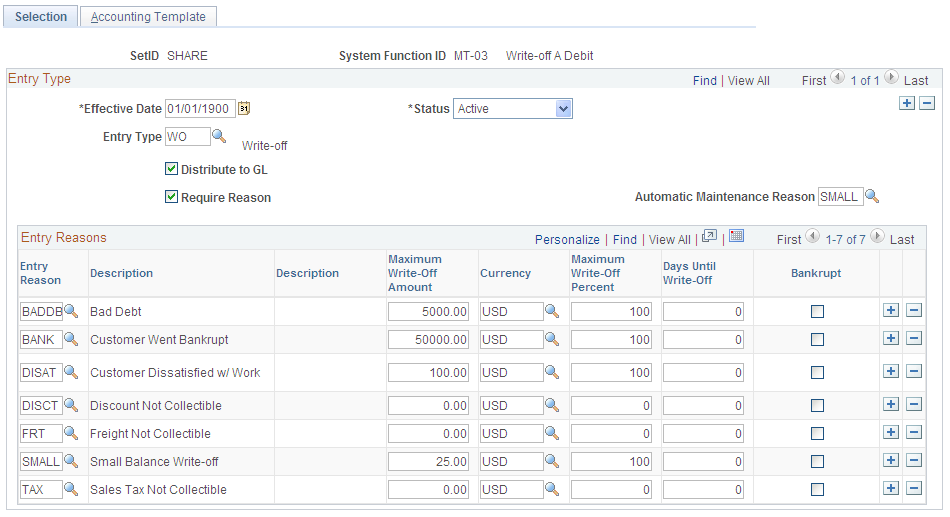
This example illustrates the fields and controls on the Automatic Entry Type - Selection page for Entry Type WO. You can find definitions for the fields and controls later on this page.
Field or Control |
Description |
|---|---|
Entry Type |
Select the entry type that is appropriate for pending items that the system creates for the system function. Each automatic entry type assigns only one entry type to a pending item. |
Distribute to GL |
Select to distribute accounting entries for this item type to general ledger. Your accounting entry design determines whether you use this feature. |
Require Reason |
Select this check box if you want the system to require an entry reason when it uses this automatic entry type. For example, if a cash applier creates a write-off on the payment worksheet, this setting determines whether the cash applier must supply an entry reason. When you select the Require Reason check box, the Automatic Maintenance Reason field displays and the Entry Reasons grid becomes active. You must select a default reason code in the Entry Reasons grid for a credit write-off (MT-06) or a debit write-off (MT-07). |
Predictor Reason |
If you selected Require Reason, enter the entry reason that the Payment Predictor process assigns to all items that it creates using the system function for the automatic entry type. When a payment predictor method specifies conditions under which it creates an item, the method itself contains the system function it uses for the item, but does not specify an entry reason. It uses the entry reason that you supply. This applies only to these system functions: WS-04: Prepay an item. WS-05: Place an amount on account. WS-06: Adjust remaining overpayment. WS-07: Adjust remaining underpayment. WS-08: Create a deduction. WS-10: Write off an overpayment. WS-11: Write off an underpayment. |
Automatic Maintenance Reason |
If you selected Require Reason, enter the entry reason that the Automatic Maintenance process assigns to all items that it creates using the system function. This applies only to these system functions: MT-02: Write off a credit. MT-03: Write off a debit. MT-04: Create new debit. MT-05: Create new credit. MT-06: Write off remaining credit. MT-07: Write off remaining debit. |
Entry Reasons
The Entry Reasons grid contains the valid entry type and entry reason combinations.
Field or Control |
Description |
|---|---|
Sequence |
Enter a sequence number to prioritize the order in which the Payment Predictor process applies payments to overdue charge line items. |
Entry Reason |
Each automatic entry type can have more than one entry reason. To enable an entry type to be used without an entry reason, you must have one row in the grid that contains just the entry type with a blank reason. You must include the entry reason specified for the Payment Predictor or Automatic Maintenance processes in the grid. Important! If you use vendor rebate claim processing in PeopleSoft Purchasing or claimback processing in PeopleSoft Order Management, you must enter the entry reasons for the WS-01 and DM-01 system functions that you set up for VAT processing. Also you must enter entry reasons for the MT-01 system function. |
Default Reason Code |
Appears only for a credit write-off (MT-06) or a debit write-off (MT-07) when the Require Reason check box is selected. You must choose one entry reason to be the default reason code. |
Entry Event |
Enter the entry event that is used to generate supplemental accounting entries for each entry reason if you create one overdue charge for all of a customer's eligible items. This option is available only for the Create an Overdue Charge (FC-01) system function and if you enabled the entry event option for your organization. |
AR Distribution Code |
Select a different code to vary the accounting entries that the system creates for an automatic entry type. |
Maximum Write-Off Amount |
Enter the maximum amount that you can write off for either an individual item or for the remaining balance for a normal group or match group on the maintenance worksheet or in the Automatic Maintenance process. This enables write-offs for an amount below the maximum amount as long as it does not exceed the percentage of the original amount for the item. For example, if you enter an amount of 25.00, the process allows write-off amounts up to 25.00. However, if you enter a maximum write-off percent of 10, and the total original amount of an item is 240.00, the system does not write off more than 24.00. For no limit, enter all 9s. See Write-Off Tolerances. |
Maximum Write-Off Percent |
For the maintenance worksheet, enter the maximum percentage of the item amount that the system can write off. The write-off percent applies only to write-offs for individual items, not for remaining amounts for items or match groups. For the Automatic Maintenance process, enter the maximum percentage that the remaining balance can be for a match group. The process adds the total debits or total credits and divides the higher amount by the remaining balance for the match group to determine the percentage that can be written off. The maximum percentage that you can enter is 100. For no limit, enter 100. Note: Because the calculation for the Automatic Maintenance process and the maintenance worksheet are different, you might want to create a unique entry reason for automatic maintenance write-offs. If you do this, select the Require Reason check box and enter the entry reason in the Automatic Maintenance Reason field. |
Days Until Write-Off |
Enter the minimum age of items before you can write them off on the maintenance worksheet or during automatic maintenance. The system calculates the age by subtracting the accounting date from the current date. For no limit, enter 0. Note: The write-off tolerance fields are available only for the MT-02, MT-03, MT-06, and MT-07 system functions. |
Bankrupt |
Select this check box if the entry reason for the transaction is due to bankruptcy. This option is used when processing a write-off for French business transactions, where the VAT final balance should be zero after a write-off when the write-off is due to bankruptcy. Note: The Bankrupt check box is available only for the MT-02, MT-03, and WS-09 system functions. The Bankrupt check box has no effect on the accounting for write-offs when the VAT Adjustment for WO check box is deselected on the Receivable Definition - Accounting Options 2 page (). See also VAT Adjustment for Write-Offs. |
Rev Estimate (revenue estimate) |
If you selected the Receivables check box in the Enable Commitment Control group box on the Installation Options - Products page, and if the system function associated with the automatic entry type indicates that the revenue bucket is user-defined, specify whether you must update the Collected or Recognized bucket, Both buckets, or none of the buckets. The options vary by system function. If the system function defines the bucket, the field is unavailable. See Setting Up Item and Automatic Entry Types for Revenue Estimate Processing. If the bucket that you update varies under certain circumstances, create two entry reasons and select a different bucket for each entry reason. For example, when you offset an item (system function MT-01) on the maintenance worksheet, you can offset it with on-account cash or a credit memo. If you offset it with cash, you should update the collected bucket. If you offset it with a credit, you reverse the amount of both the original item and the credit memo in the recognized budget. You do not update the collected bucket. In this case, you set up a separate entry reason for a cash offset and a credit memo offset to update the correct buckets. |
For example, suppose the user selects the following entries on a maintenance worksheet:
|
Item |
Amount |
Reason |
Description |
|---|---|---|---|
|
ITEM001 |
100.00 |
ITEM |
Offsets CREDIT1 credit memo |
|
CREDIT1 |
–100.00 |
ITEM |
Offsets ITEM001 |
|
ITEM002 |
50.00 |
CASH |
Offsets OA-01 on account cash |
|
OA-01 |
–50.00 |
CASH |
Offsets ITEM002 |
The Revenue Estimate process then generates these source transactions:
|
Bucket |
Amount |
Description |
|---|---|---|
|
Recognized |
–100.00 |
Reverses ITEM001 |
|
Recognized |
100.00 |
Reverses CREDIT1 |
|
Collected |
50.00 |
From ITEM002 |
You also need to create two entry reasons for MT-09 (refund of a credit):
One for a credit memo refund (from an IT-02 item activity) that reverses the entry in the recognized bucket.
One for cash or a non-IT-02 item activity that does not update any revenue bucket.
Use the Automatic Entry Type - Accounting Template page (AUTO_ENTRY_TABLE2) to define how the system creates accounting entries for the general ledger.
Navigation:
Field or Control |
Description |
|---|---|
Entries Must Balance |
If this check box is selected, you must define 100 percent of the accounting entries and enter an account for every line in the User Defined Entries grid. You can override the default account after the lines are created during processing. Deselect to leave the user-defined entries blank and complete them during processing. |
System-Defined Entries
The information for system-defined accounting entries comes from the system function table and the distribution codes. It also stipulates that the system distribute the entire amount to AR either as a credit (–) or a debit (+).
User-Defined Entries
User-defined entries are specific to your particular organization and are not always required. You provide defaults for the template, but you can change any information on the user-defined entries after you generate accounting entries. Enter the ChartField values for the revenue line, as needed. You cannot specify a statistical account for any automatic entry accounting template. For some automatic entry types, you do not define the user-defined entries. In this case, the user-defined grid is not available.
If you want to vary the ChartField combination at a level lower than the entry type and reason, you have two options:
Enter a number of user-defined lines without a percentage (unbalanced) with all of the accounts that you might use.
Then, when the lines are created, delete the ones that you do not want, and add dollar amounts to the remaining lines.
Do not enter user-defined lines on the template, and deselect Entries Must Balance.
Operators can enter these lines on the appropriate Accounting Entries page after the system-defined lines are created.
Note: If you selected the Receivables check box in the Enable Commitment Control group box on the Installation Options – Products page, you must use ChartFields that are in the control budget ledger as well.