Setting Up Collection and Assessment Rules
This topic provides an overview of collection and assessment rules, lists common elements, and discusses how to:
Define schedules.
Set up collection rules and exceptions.
Define assessment rules without SQL.
Define assessment rules using SQL.
|
Page Name |
Definition Name |
Usage |
|---|---|---|
|
SCHEDULE |
Create the schedules that you assign to the collection and assessment rules. |
|
|
AR_CRULE_TBL |
Enter the rules for the Collection condition. |
|
|
AR_CRULE_EXCL |
Define item exclusion and cancel document options for the Collection condition when generating Dunning letter output. |
|
|
AR_ARULE_TBL |
Enter the rules for the system-defined conditions other than collection conditions. |
|
|
AR_ARULE_SQL |
Enter the rules for user-defined conditions using SQL criteria. |
|
|
Assessment Rule User SQL Statement Page |
AR_ARULE_SQL_SBP |
View the free-form SQL statement for an assessment rule or copy the statement to test it using a SQL query tool. See the Assessment Rule User Page. |
To set up collection and assessment rules, use the Schedules (SCHEDULES), Collection Rule (AR_COLLECTION_RULE), Assessment Rule (AR_ASSESS_RULE), and Assessment Rule SQL (AR_ASSESS_RULE_SQL) components.
The Condition Monitor process uses the collection and assessment rules to evaluate the nature of a condition to determine whether to create an action for the customer or item.
You define rules at the following assessment levels:
|
Level |
Rule Applies To |
|---|---|
|
SetID |
All customers assigned to the SetID. |
|
Customer group |
Only for customers in the customer group that you specify. |
|
Customer |
Only for customers that you specify. |
Rules that are at the customer level override rules that are at the other two levels, and rules that are at the customer group level override rules for SetIDs. From a maintenance standpoint, you should set up defaults at the highest possible level so that if a change is required, you do not have to go to every instance at a lower level to make the change.
Collections rules apply only to the Collection (COLL) condition. The rules for collection conditions are based on both the amount and the number of days past due for outstanding balances. When the Condition Monitor process runs, it determines the age of the oldest past due item on a customer's account and the total amount past due to determine if a collection condition exists.
Assessment rules without SQL are for customer-level conditions other than the collection condition. The assessment rules are based on the existence of data specified in the rule or the comparison of data against a specified value. For example, the rule may say that the Approaching Credit Limit Expiration (ACLD) condition is violated if the numbers of days that are remaining for the customer's credit limit is less than 21 days. These rules are used for system-defined conditions other than collection conditions and item-level conditions, such as deductions and disputed items.
Assessment rules with SQL criteria are for item-level conditions and user-defined conditions. The assessment rules are based on a value in a specified field or fields on an item's record. For example, a rule may specify that the Condition Monitor process should create an action plan if the Deduction field is Y and the deduction date is 2 days less than the current system date. You need to be familiar with building SQL statements to create these assessment rules. The SQL criteria can also use fields from the Item Activity (PS_ITEM_ACTIVITY), Item Distribution (PS_ITEM_DST), Customer (PS_CUSTOMER), and Customer Options (PS_CUST_OPTION) tables. You can use assessment rules with SQL criteria only for user-defined conditions.
If you plan to define assessment rules with SQL criteria, you must create messages in the message catalog that appear as the description text on action lists.
If you create an assessment rule for these conditions, you must set up additional tables before you create the assessment rules:
|
Condition |
Prerequisite Table Setup |
|---|---|
|
Entry Type/Reason (ETRC) |
Define the entry type and reasons to use in the assessment rules. |
|
Key Statistics Exceeded (KSTE) |
Define system-defined or user-defined history IDs to use in the assessment rules. |
Field or Control |
Description |
|---|---|
Condition |
Displays the condition ID and description for which you are creating a rule. |
Schedule |
Enter the schedule ID that determines when the Condition Monitor processes the rule. For example, if you enter Weekly and the weekly schedule is for Wednesdays, the process checks for conditions in the customer's account that violate the rule every Wednesday. |
Use the Schedules page (SCHEDULE) to create the schedules that you assign to the collection and assessment rules.
Navigation:
Define the schedules that the Condition Monitor uses to determine the frequency and days to run a collection or assessment rule. You can select any frequency that you want.
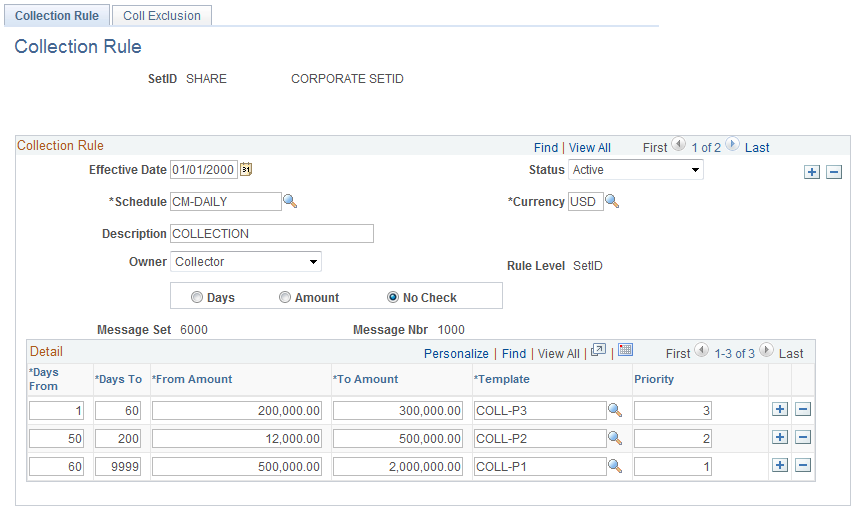
Use the Collection Rule page (AR_CRULE_TBL) to enter the rules for the Collection condition.
Navigation:
This example illustrates the fields and controls on the Collection Rule page. You can find definitions for the fields and controls later on this page.
Field or Control |
Description |
|---|---|
Currency |
Enter the currency for the amounts in the collection rule. |
Owner |
Select the type of owner for an action:
The Condition Monitor process assigns an action to the owner based on the value assigned to the customer. |
Rule Level |
Indicates to whom the rule applies. Values are: Customer: Applies to a specific customer. Customer Group: Applies only to customers in a specific customer group. SetID: Applies to all customers associated with a SetID. |
Message Set and Message Nbr (message number) |
The system populates the message set and message number, and you cannot change the value. The system displays this message when the rule is violated in the action list. |
Specifying Validation Criteria
Your selection criteria determine how you enter information in the grid.
Field or Control |
Description |
|---|---|
Days |
Select to enable entry of a value only in the From Day column in the first row. The system assigns the value for the from day for subsequent rows by incrementing the value in the To Day field from the previous row by 1. You can enter any values that you want in the From Amount and To Amount columns. |
Amount |
Select to enable entry of an amount in the From Amount field in the first row. The system assigns the from amount for subsequent rows by incrementing the amount in the To Amount field from the previous row by .01. You can enter any values that you want for the From Day and To Day columns. |
No Check |
Select to enable entry of any values that you choose in the day and amount fields. You must make sure that there are no gaps or overlaps in the criteria. |
Entering Validation Information
Field or Control |
Description |
|---|---|
Days From and Days To |
Enter the range of days of the oldest past due items for the customer. |
From Amount and To Amount |
Enter the total amount of past due items for the customer. |
Template |
Enter the action template that the Condition Monitor uses when the customer's past due balance meets the days and amount criteria. |
Priority |
Enter a priority number for the rule. The Condition Monitor uses the priority number for each action template to determine which action template to use when a customer meets the collection rule criteria. It uses the number when:
Another situation causes the Condition Monitor to cancel customers' current action plans and establish new ones. When customers enter an action plan, the Condition Monitor records the assessment level of the rule that they violated. If you subsequently enter a rule with a higher assessment level and the customer meets the new rule criteria, the Condition Monitor automatically cancels the original action plan and uses the new one. You must select the Enable Auto Escalation check box on the Installation Options - Receivables page for this to occur. |
Use the Collection Rule Exclusion Options page (AR_CRULE_EXCL) to define item exclusion and cancel document options for the Collection condition when generating Dunning letter output.
Navigation:
This example illustrates the fields and controls on the Collection Rule Exclusion Options page. You can find definitions for the fields and controls later on this page.
Field or Control |
Description |
|---|---|
Include Finance Charge |
Select to add finance charges (FC_AMT) to the balance amount (ANCHOR_BAL_AMT) for all items for customers having finance charges. |
Dunning Grace Days and Apply Grace Days to Credit Items |
Enter the number of grace days for Dunning calculations, and indicate whether the grace days apply to credit items. |
Item Exclusion Options
Field or Control |
Description |
|---|---|
Exclude Collection Items |
Select to exclude items in collection. Items in collection will not be picked up by the collection rule. |
Exclude Disputed Items |
Select to exclude disputed items. Items with a disputed status will not be picked up by the collection rule. |
Exclude Credit Items |
Select to exclude credit items. Credit items will not be picked up by the collection rule. |
Exclude Deduction Items |
Select to exclude deduction items. Deduction items will not be picked up by the collection rule. |
Exclude Items < (less than) Item Min (item minimum) and Currency |
Select to exclude items with less than the item minimum amount specified. Those items will not be picked up by the collection rule. Specify a currency for the item minimum amount. |
Cancel Document Options
Field or Control |
Description |
|---|---|
Cancel Collection Customer |
Select to cancel documents if the customer is a collection customer. The system will not generate documents for the collection customer when using the Collection condition (COLL). |
Customer Is In Dispute |
Select to cancel documents if the customer is in dispute. The system will not generate documents for the customer in dispute when using the Collection condition (COLL). |
Customer Has Credit Total |
|
Document Total < (less than) Doc Min (document minimum) and Currency |
Select to cancel documents when Condition Monitor runs for the COLL condition if the customer balance for a specific business unit or customer ID is less than the document minimum amount entered. Specify a currency for the document minimum amount. |
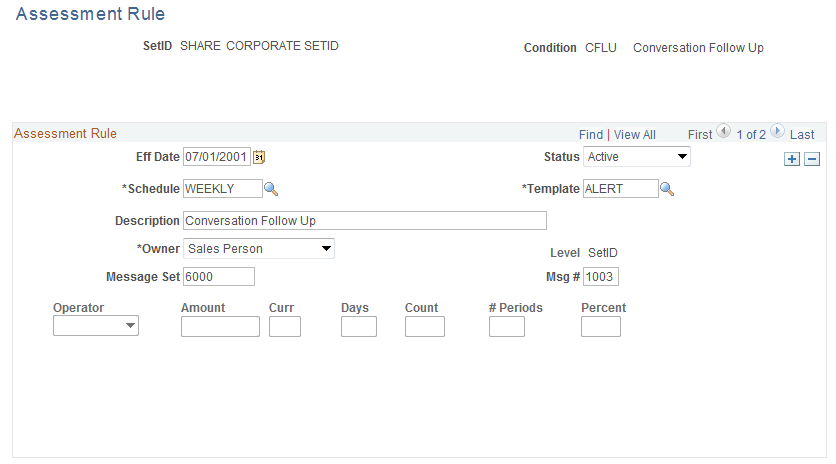
Use the Assessment Rule page (AR_ARULE_TBL) to enter the rules for the system-defined conditions other than collection conditions.
Navigation:
This example illustrates the fields and controls on the Assessment Rule page. You can find definitions for the fields and controls later on this page.
Field or Control |
Description |
|---|---|
Template |
Select the action template that the Condition Monitor uses when the customer meets the criteria that you define in the rule. |
Summary |
Select this check box if:
|
Owner |
Select the type of owner for an action:
The Condition Monitor process assigns an action to the owner based on the value assigned to the item or customer. For example, if you select Credit Analyst for the Exceeds Credit Limit condition, the process assigns the action to the credit analyst assigned to the customer. |
Level |
Indicates to whom the rule applies. Values are: Customer: Applies to a specific customer. Customer Group: Applies only to customers in a specific customer group. SetID: Applies to all customers associated with a SetID. |
Message Set and Msg # (message number) |
The system populates the message set and message number and you cannot change the value. The system displays this message on the action list when the rule is violated. |
Parameters
The Condition Monitor process uses the criteria in the Parameters group box to determine whether the condition has been violated. If a condition does not require a specific criteria, the field is unavailable. The following table identifies the type of criteria that are applicable for each condition:
|
Condition |
Operator |
Amount |
Days |
Count |
Percent |
Number of Periods |
|---|---|---|---|---|---|---|
|
Approaching Credit Limit (ACLA) |
X |
|
|
X |
|
|
|
Approaching Credit Limit Expiration (ACLD) |
X |
|
|
|
||
|
Approaching Credit Card Expiration Date (CCEX) |
X |
|
|
|
||
|
Cancel Credit Hold (CCHD) |
X |
|||||
|
Conversation Follow Up (CFLU) |
|
|
|
|||
|
Credit Hold Code Exists (CHLD) |
|
|
|
|||
|
Customer Promise Date Broken (CPDB) |
||||||
|
Customer Promise Date Review (CPDR) |
||||||
|
Deduction Item (DEDN) |
|
|
|
|||
|
Disputed Items (DISP) |
|
|
|
|||
|
eBill Item (EBIL) |
||||||
|
Exceeding Credit Limit (ECLA) |
|
|
|
|||
|
Exceeded Credit Limit Expiration Date (ECLD) |
|
|
||||
|
Entry Type/Reason Code (ETRC) |
X |
X |
X |
|
|
|
|
Key Statistics Exceeded (KSTE) |
X |
X |
|
X |
X |
X |
|
Large Amount Coming Due (LACD) |
X |
X |
|
|
|
|
|
Risk Score (RISK) |
X |
|||||
|
Welcome Back Dormant Customer (WBDC) |
X |
|||||
|
Welcome New Customer Welcome (WCNC) |
X |
Defining Rule Parameters
Field or Control |
Description |
|---|---|
Operator |
Select an operator such as less than or equal to (Less/Equal) if you are creating a comparison rule for a Key Statistics Exceeded (KSTE) or Entry Type/Reason Code (ETRC) condition. |
Amount |
Enter the monetary amount for the comparison. |
Count |
Enter the count of times for the comparison. |
Percent |
If you are creating a rule for the Approaching Credit Limit (ACLA) condition, enter the percent to trigger the condition when customers' outstanding balances reaches the percentage that you enter of their credit limits. For example, a customer's credit limit is 100,000.00 EUR and you enter 80 percent. The Condition Monitor creates an action when the customer's outstanding balance reaches 80,000.00 EUR. If you are creating a rule for the Key Statistics Exceeded (KSTE) condition, enter the number of periods and the percent for the rule. The Condition Monitor process uses these values to determine if a key statistic has changed. Enter the relative period to compare in the # Periods (number of periods) field. The current period is considered to be period 0, so if you want to monitor the change between the current period and the same period last quarter, you would enter 3 in the # Periods field. Then, enter either a positive or a negative number in the Percent field. The Condition Monitor process calculates the percentage change between the current period and the comparison period and then compares the change, using the operator that you entered and the percent for the rule. |
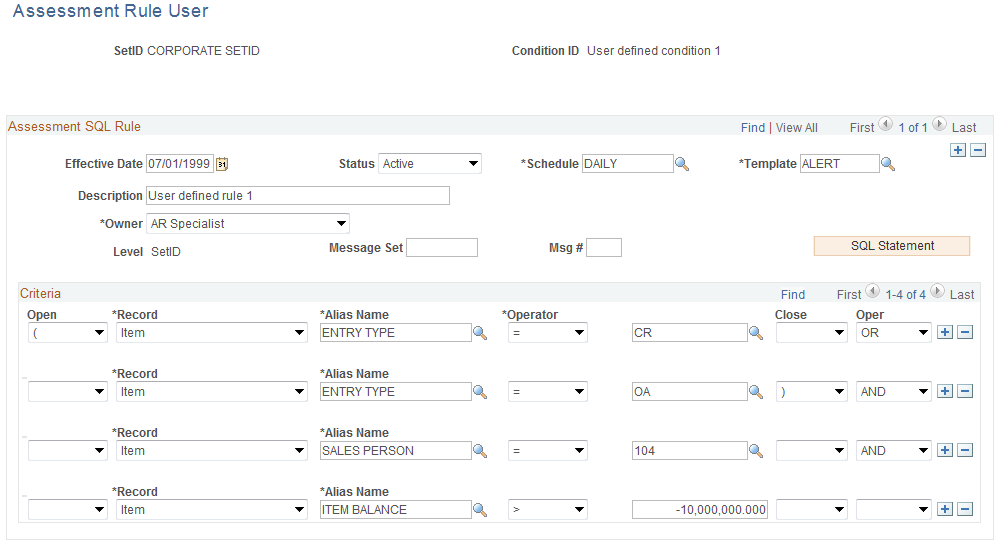
Use the Assessment Rule User page (AR_ARULE_SQL) to enter the rules for user-defined conditions using SQL criteria.
Navigation:
This example illustrates the fields and controls on the Assessment Rule User page. You can find definitions for the fields and controls later on this page.
Field or Control |
Description |
|---|---|
Template |
Enter the action template that the Condition Monitor process uses when an item or customer meets the SQL criteria that you enter. |
Owner |
Select the type of owner for an action:
The Condition Monitor process assigns an action to the owner based on the value specified on the item or customer. By default, an owner assigned at the customer level will be used as the action owner. If an owner at the item level is different from the owner at the customer level, the owner at the item level will be used as the action owner. Note: This status applies to Assessment Rule User: USR1. |
Level |
Indicates to whom the rule applies. Valid values are: Customer: Applies to a specific customer. Customer Group: Applies only to customers in a specific customer group. SetID: Applies to all customers associated with a SetID. |
Message Set and Msg # (message number) |
The system populates the message set and message number for system-defined conditions, and you cannot change the value. For user-defined conditions, enter the message number for the message that you want to display when the rule is violated and the message set in which you put the message. |
SQL Statement |
Click this button to access the Assessment Rule User SQL Statement page (AR_ARULE_SQL_SBP) where you can view the SQL statement in a free-form format or copy the statement to test it using a SQL query tool. This button is available only after you save the SQL criteria in the grid. |
Open |
(Optional) Select a character to open the SQL statement. The character is used to signify the start of a group or block of parts in the Where clause that work together to test a condition. |
Record |
Select the table that contains the fields that you want to include in the SQL statement. Valid values are:
|
Alias Name |
Select a field name. The values that you select come from the table that you selected in the Record field.
|
Operator |
Select a mathematical operator, such as Equal To or Greater Than. |
Close |
(Optional) Select a character to close the SQL statement. The character is used to signify the end of a group or block of parts in the Where clause that work together to test a condition. |
Oper (operator) |
Select a value to concatenate multiple Where clause conditions. The options are: AND, OR, or blank. You leave it blank only if you enter one SQL criterion. |