Setting Up and Maintaining Contacts
To define contacts, use the Contact Information component. Use the CONTACT_INFO component interface to load data into the tables for this component.
This section provides an overview of staffing front office setup pages and discusses how to complete various steps involved.
|
Page Name |
Definition Name |
Usage |
|---|---|---|
|
CONTACT |
Create and maintain information about each contact. |
|
|
CONTACT_CUST_PAGE |
Build relationships between contacts and customer IDs served by the contact or with which they are associated. If a contact is associated with only one customer, enter that customer on this page. If the contact is a broker, for example, use this page to establish relationships with the multiple customers the broker serves. Set up security options on the Self Service Security tab. |
|
|
Contact Customers - Credit Cards Page |
CONTACT_CCARD_INFO |
View, add, and delete credit card data associated with this customer. This page indicates that credit card data is locally stored and processed, that is, part of a traditional credit card implementation. SeeUsing the Contact Customers - Credit Cards (or Credit Card Profiles) Page |
|
Contact Customers - Credit Card Address Page |
CONTACT_CUST_ADDR |
View the customer credit card payment address associated with a contact. SeeUsing the Contact Customers - Credit Cards (or Credit Card Profiles) Page |
|
Contact Customers - Credit Card Profiles Page |
CONTACT_CCARD_INFO |
View, add, and delete permanent credit card profiles for use on systems that use a hosted credit card implementation. A credit card profile indicates that complete credit card data is stored and processed on a third-party system. SeeUsing the Contact Customers - Credit Cards (or Credit Card Profiles) Page |
|
CONTACT_ADDTL_INFO |
Select the type of documents for the external customer to receive, and the preferred communication method. |
|
|
CONTACT_PHONE_PAGE |
Enter phone information and contact types for internal and external contacts. |
|
|
CONTACT_USER_PROF |
Enter the information that enables contacts to access self-service transactions, and enter the roles to which the contact will be assigned. |
|
|
CONT_STAF_INFO |
Enter contact information for use in Staffing Front Office. |
|
|
FO_ORDER_HDR |
View and add orders associated with this contact. |
|
|
CONT_MRKTNG_ACTIV |
Enter the type of marketing events for which you want this contact to be included. |
|
|
FO_HISTORY |
Review the history items associated with the contact. |
|
|
FO_AGENDA_DETAIL |
View agenda details and add agenda items for contacts. |
|
|
FO_HISTORY_DTL |
View history details. |
|
|
CONTACT_EMP |
Enter the IDs of the employees that the contact usually requests for staffing services. |
|
|
CONT_QUALIFS |
Enter the target qualifications that the contact requests most often. This information can be used in Opportunity searches. |
|
|
Resource Qualifications - Select Qualification Profile Page |
RS_SELQUALPROFILE |
Add target qualifications from a qualification profile. |
|
Resource Qualifications - Search for Qualifications Page |
RS_QUALIF_SRCH |
Add target qualifications from the qualifications list. |
|
Resource Qualifications - Select Competencies Page |
RS_SO_COMP |
Add target qualifications from a competency tree. |
|
CONT_JOBTITLE |
Enter the job titles that the individual contacts request most often. This information can be used for Opportunity searches. |
|
|
CONT_FORMS |
Review the forms associated with the contact. |
|
|
CONT_FORMS_DTL |
Associate a new form with the contact record and enter the appropriate values for the fields in the form. Forms enable you to capture information that is not already captured in other fields in the component. The fields in each form are defined through system configuration. |
|
|
CONT_ATTACHMENT |
Add attachments to contacts. |
Of the pages described in this section, only these are applicable to Staffing Front Office:
Staffing Information.
Marketing Activity.
Related Employees.
Target Qualifications.
Resource Qualifications - Select Qualification Profile.
Resource Qualifications - Search for Qualifications.
Resource Qualifications - Select Competencies.
Target Job Title.
Forms.
Forms Detail.
Attachments.
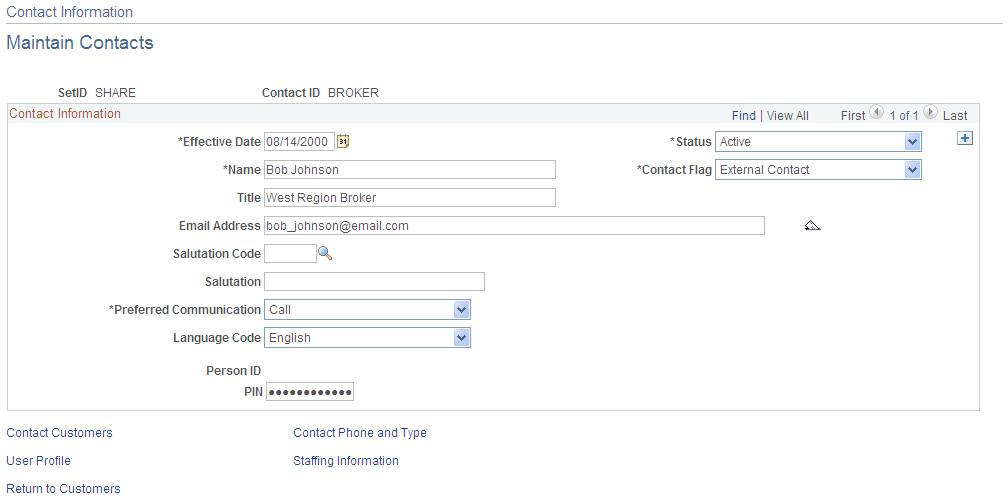
Use the Contact Information - Maintain Contacts page (CONTACT) to create and maintain information about each contact.
Navigation:
This example illustrates the fields and controls on the Contact Information - Maintain Contacts page. You can find definitions for the fields and controls later on this page.
Field or Control |
Description |
|---|---|
Contact ID |
You can assign specific contact IDs that you choose or let the system automatically assign the next available sequential contact ID. You can have multiple contact names with different effective dates for each contact ID. The contact ID for new contacts is based on the settings on the Automatic Numbering page. |
Contact Flag |
Select from these values: External: Select if this contact is a consumer, customer, or business partner who needs to access self-service transactions and receive documents from you. Internal: Select if this contact is an employee of the organization and needs to be set up as a contact to receive email through PeopleSoft Conversations and PeopleSoft Contact Us. |
Email ID |
If you are performing credit card processing, third-party credit card authorization and payment applications require an email ID. The email ID on the Credit Card Data page is used by default during sales order entry if the customer is paying by credit card. This field is also required if you are sending a remittance advice for direct debit transactions. Note: This field is also required if you are sending a remittance advice for direct debit transactions. |
Salutation Code and Salutation |
You can either select a code or enter a free-form text salutation for correspondence with the contact, but not both. You define salutation codes on the Salutation Table page. |
Language Code |
The system uses this code for recipient documents such as sales order acknowledgments and buying agreement renewal letters. |
Person ID |
If the installation interfaces with PeopleSoft CRM, the system populates this field from PeopleSoft CRM. |
PIN |
Enter a personal identification number (PIN) for this contact to use if paying by electronic check in the self-service component, eBill Payment. The system must be set up to support ePayments for Electronic Check to appear as a payment option on the Electronic Payment Options for Self Service page (). When the PIN is Mandatory on the setup page, this field is required. When a PIN exists on the Maintain Contacts page, the user must enter this PIN in the Payment Cart to proceed with the electronic check payment. When no PIN value exists on the Maintain Contact page, the system hides the PIN field in the Payment Cart and bypasses the validation. |
Use the Contact Information - Contact Customers page (CONTACT_CUST_PAGE) to build relationships between contacts and customer IDs served by the contact or with which they are associated.
If a contact is associated with only one customer, enter that customer on this page. If the contact is a broker, for example, use this page to establish relationships with the multiple customers the broker serves. Set up security options on the Self Service Security tab.
Navigation:
Click the Contact Customer Information link on the Maintain Contacts page.
Click the Contact Customer Information link on the other pages in the Contact Info component.
This example illustrates the fields and controls on the Contact Information - Contact Customers page.
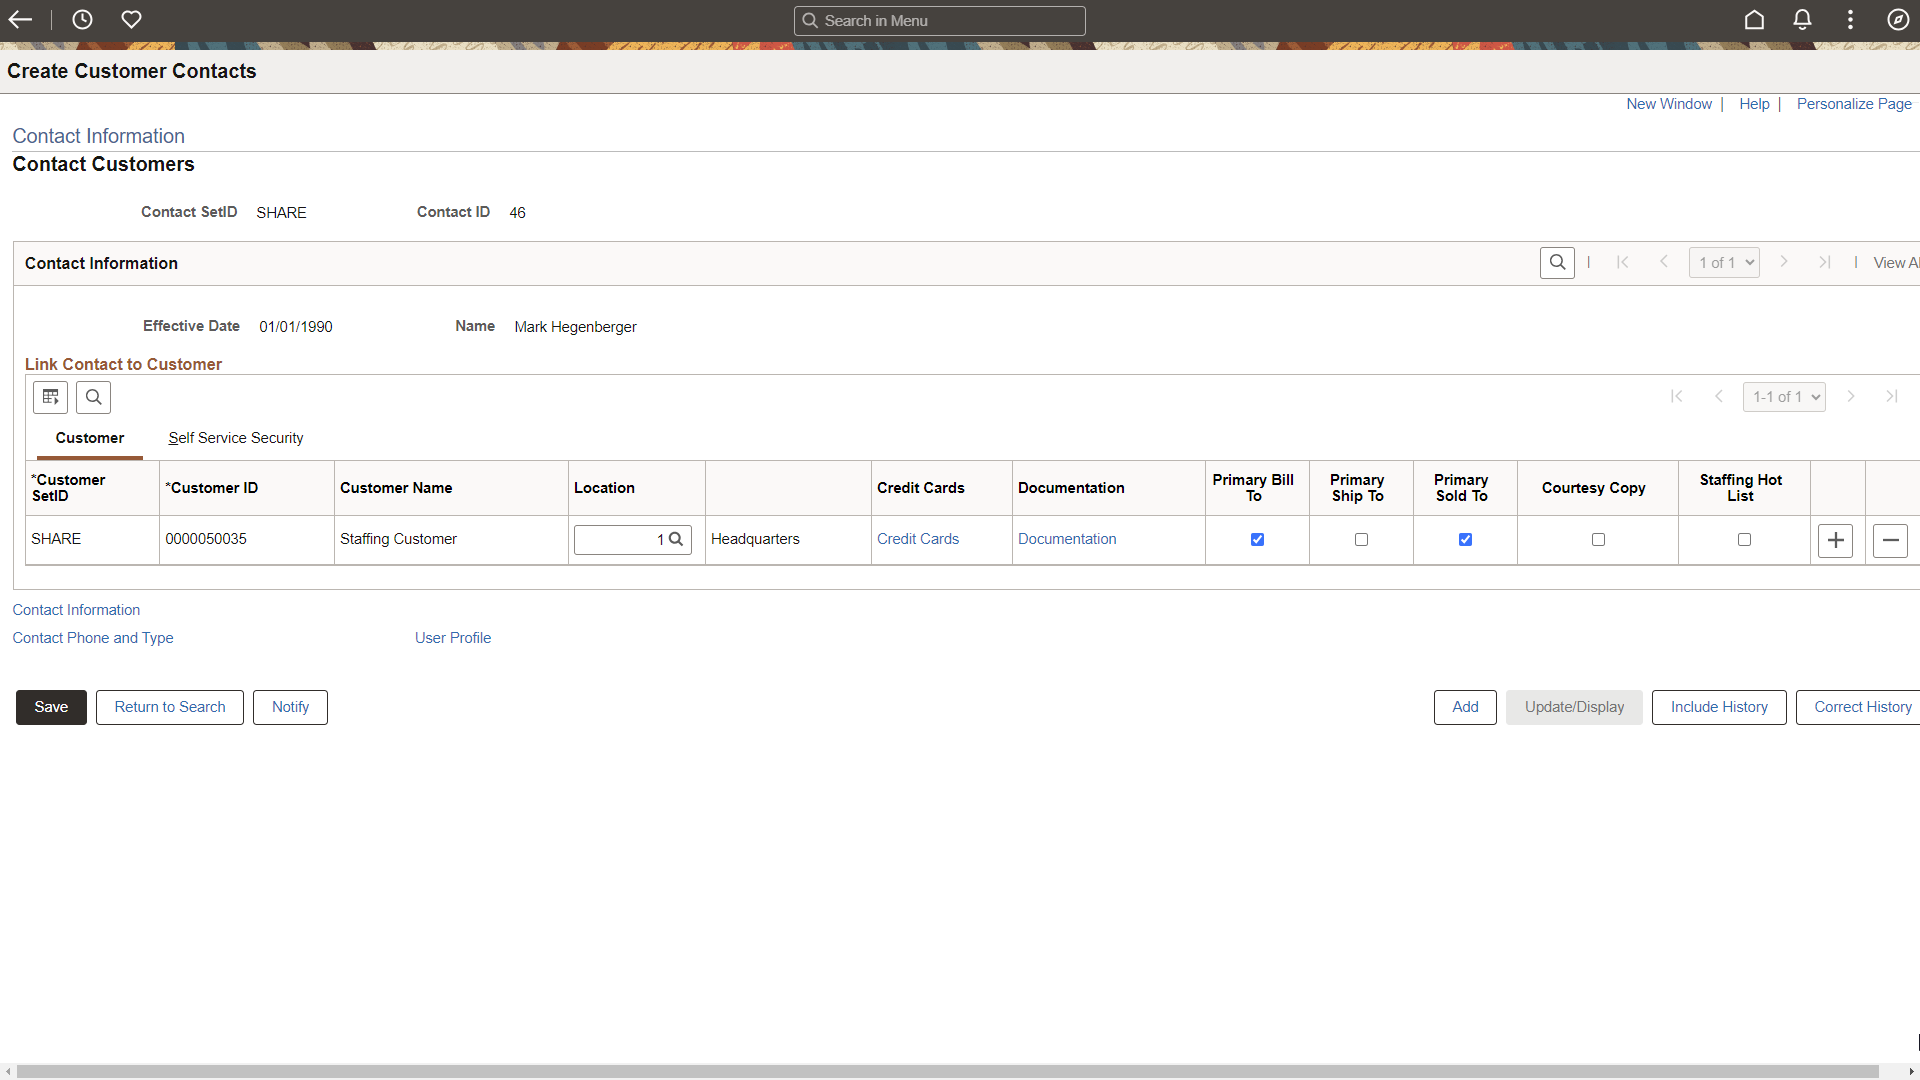
Customer Tab
Field or Control |
Description |
|---|---|
Location |
Select the address number to use for the corresponding contact. Set up customer addresses on the General Information - Address page. |
Credit Cards |
Click the Credit Cards link associated with a customer name to view the credit card information on file for the customer. In a system that uses a traditional credit card implementation, the Contact Customers - Credit Cards page appears. In a system that uses a hosted credit card implementation, the Contact Customers - Credit Card Profiles page appears. |
Documentation |
Select to access the Contact Customers - Documentation Page to add or view documents for the customer to receive and the preferred communication for that type of documentation. |
Primary Bill To, Primary Ship To, Primary Sold To, and Primary IPAC |
Select the check boxes that apply to this customer contact. Customers must be selected as bill-to, ship-to, sold-to, or IPAC customers on the General Info page for the associated check box to be available. Note: You can have numerous current contacts for a customer, but you must designate one of them as the primary contact for each role. The primary sold-to contact appears as the default on sales orders, contracts, return material authorizations, and quotes. You can override the primary contact by selecting another contact. Warning! If you select a Primary Bill To, Primary Ship To, or Primary Sold To value that was not selected as a primary bill-to, ship-to, or sold-to value on the General Information - Address page, this information will be overwritten on the Address page. |
|
Courtesy Copy |
Select to indicate that a courtesy copy of a bill should be sent to this contact. This applies to consolidated and non-consolidated invoices and standard bills, express bills, and Billing Interface tables. Note: When selecting this check box, you must complete the Contact Customers - Documentation Page. Use Document Code INCC for a courtesy copy. |
Staffing Hot List |
Select to indicate that this contact should appear on the Contact Hot List pagelet. |
Self Service Security Tab
Field or Control |
Description |
|---|---|
View All Orders |
In the case of brokers, select this option so they can view all of the orders placed on behalf of a customer instead of only the orders they create. |
Bill To, Ship To, Sold To, Broker Customer, and Correspondence |
Select customer roles and types that the contact can use. You can select only customer roles and types that are already set up for the customer on the General Info page. |
The credit card information for a customer that is created and maintained in a PeopleSoft system depends on whether the system is set up with a traditional credit card implementation or a hosted credit card implementation. The Credit Cards page indicates that credit card data is locally stored and processed, that is, part of a traditional credit card implementation. The Credit Card Profiles page is used to store only enough credit card information to create a profile that can be referenced between the PeopleSoft system that utilizes a hosted credit card implementation and the external credit card host.
Using the Contact Customers - Credit Cards Page in a Traditional Implementation
Use the Contact Customers - Credit Cards page (CONTACT_CCARD_INFO) to view, add, or delete credit card data associated with this customer.
Navigation:
Click the Credit Cards link for a customer on the Contact Customers page.
This example illustrates the fields and controls on the Contact Customers - Credit Cards page. You can find definitions for the fields and controls later on this page.
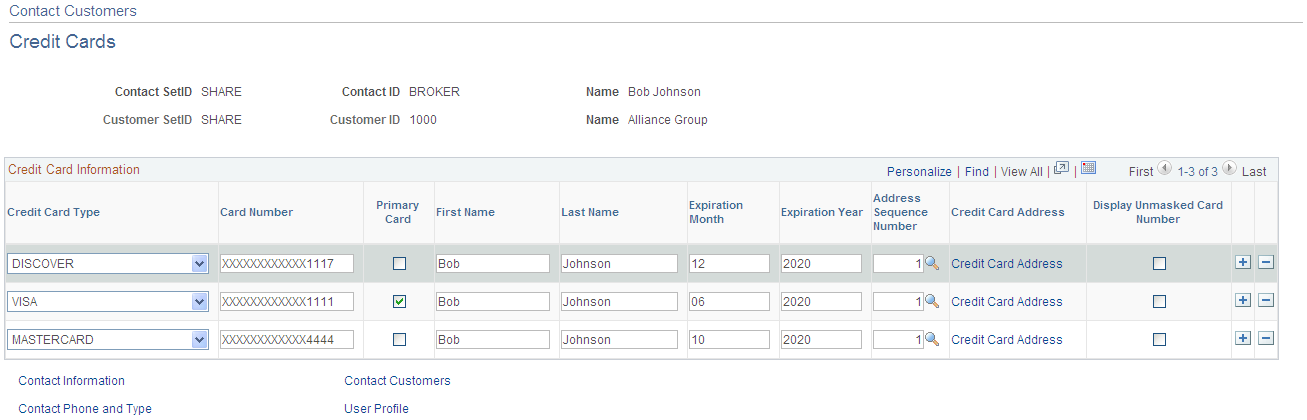
Field or Control |
Description |
|---|---|
SetID and Contact ID |
Displays the value defined on the Maintain Contacts page. |
Customer SetID and Customer ID |
Displays the value defined on the Contact Customers page. |
Credit Card Type |
Select the type of credit card the contact will use. These values must already be set up on the Card Type page (). See Card Type Page and |
Card Number |
Enter the credit card number. The system performs a number of validations that are specified by the parameters you set up on the Credit Card Type page and Note: Security access should not be granted to the Credit Card Info page if it violates country-specific or legislative legal requirements about storing credit card numbers with customer records in the database. This practice is illegal in some European countries. |
Primary Card |
View the default credit card number that appears on the Credit Card Data page during sales order entry. |
First Name and Last Name |
Enter the cardholder's name in the two name fields. If the name on the card includes a middle initial, include the middle initial in the First Name field. |
Expiration Month and Expiration Year |
Use MM and YYYY formats. For example, if the credit card expires in March 2002, enter 03 in the Credit Card Expiration Month field and 2002 in the Credit Card Expiration Year field. |
Address Sequence Number |
Displays the value established on the General Information - Address page. |
Credit Card Address |
Click the link associated with a credit card to access the Contact Customer Address page (CONTACT_CUST_ADDR) and view the customer who is associated with the contact and who will be used as the payment address for the credit card. |
Display Unmasked Card Number |
If the user has access to the credit card security component, this field appears. If this option is selected, the system displays the unencrypted credit card number. You may need to grant users access if they must verify the entire credit card number. |
Using the Contact Customers - Credit Card Profiles Page in a Hosted Implementation
Use the Contact Customers - Credit Card Profiles page (CONTACT_CCARD_INFO) view, add, and delete permanent credit card profiles for use on systems that use a hosted credit card implementation. A credit card profile indicates that complete credit card data is stored and processed on a third-party system.
Navigation:
Click the Credit Cards link for a customer on the Contact Customers page.
This example illustrates the fields and controls on the Contact Customers - Credit Card Profiles page. You can find definitions for the fields and controls later on this page.
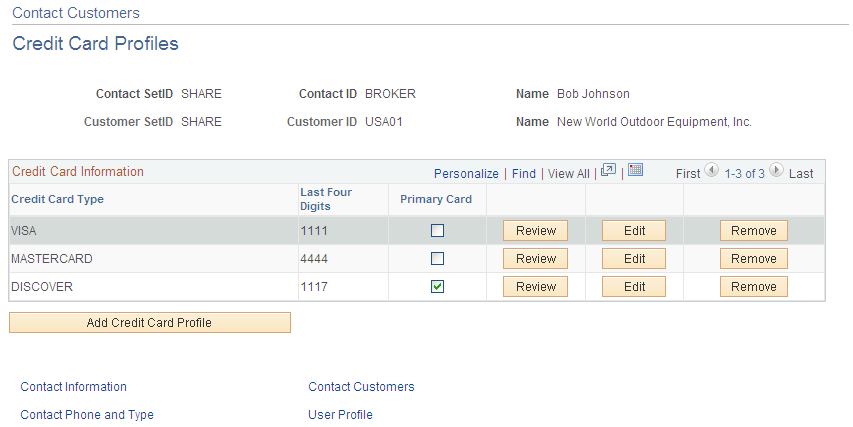
Field or Control |
Description |
|---|---|
Credit Card Type |
Displays the type of credit card. These values must already be set up on the Credit Card Type page in Enterprise Components. See Card Type Page and Prerequisites. |
Last Four Digits |
Displays the last four digits of the credit card number. The complete credit card number is stored and processed by the third-party payment service. |
Primary Card |
Select one credit card profile as the default profile. |
Review |
Click this button to review the credit card profile information on file in the PeopleSoft system. |
Edit |
Click this button to edit the credit card profile information on file in the PeopleSoft system. |
Remove |
Click this button to remove this credit card profile information from the PeopleSoft system. |
Add Credit Card Profile |
Click this button to add a permanent credit card profile on the Credit Card Profiles - Add Credit Card page. The complete credit card information is stored and processed by the third-party payment service. |
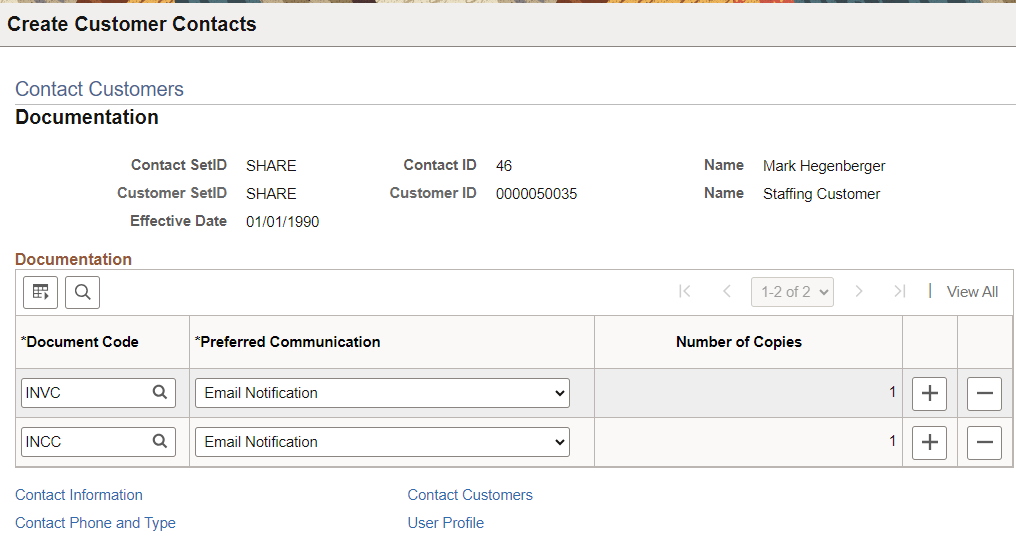
Use the Contact Customers - Documentation page (CONTACT_ADDTL_INFO) to select the type of documents for the external customer to receive, and the preferred communication method.
Navigation:
Select the Documentation link for a customer on the Contact Customers page.
This example illustrates the fields and controls on the Contact Customers - Documentation page. You can find definitions for the fields and controls later on this page.
Field or Control |
Description |
|---|---|
Document Code |
Select the code for the documents that the contact should receive. |
Preferred Communication |
For each document, select the preferred communication method: Call: Contact by telephone. Enter the phone number on the Contact Phone and Type page. Email Invoice as Attachment: Send an email message with a PDF attachment of the invoice. Email Notification: Contact by email. Enter the email address on the Maintain Contacts page. Fax: Contact by fax. Enter the phone number on the Contact Phone page. Standard Mail: Contact by standard mail through the post office. XML & Print: Print the communication in addition to sending it using XML. XML only: Contact using XML. Note: If you select any value other than P (print) or XML for any PeopleSoft Order Management documents, you must configure the system to interface to a fax or email report delivery system. This configuration is not delivered as a standard feature in PeopleSoft Order Management or PeopleSoft Billing. Note: For order acknowledgments in PeopleSoft Order Management to be processed using XML, at least one contact for the sold-to customer must have a document with a code of Order Acknowledgment and a preferred communication method of XML. Similarly, for a quote to be processed using XML, at least one contact for the sold-to customer must have a document with a code of Quote and a preferred communication method of XML. |
Number of Copies |
Enter the number of copies, when applicable. For example, a contact may want you to send a fax containing three copies of the shipping order and to mail one copy of the invoice. The preferred communication method you specify for the contact automatically appears, by default, as the preferred communication method for each document. You can override this value. |
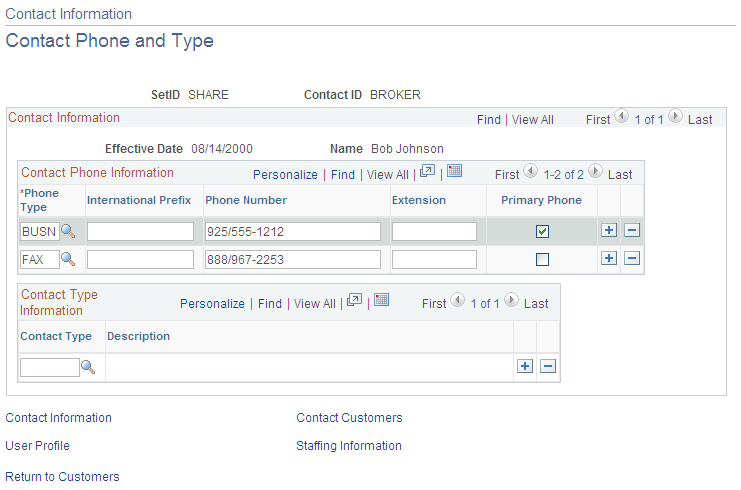
Use the Contact Information - Contact Phone and Type page (CONTACT_PHONE_PAGE) to enter phone information and contact types for internal and external contacts.
Navigation:
Click the Contact Phone and Type link on the Maintain Contacts page.
Click the Contact Phone and Type link on the other pages in the Contact Info component.
This example illustrates the fields and controls on the Contact Information - Contact Phone and Type page. You can find definitions for the fields and controls later on this page.
Field or Control |
Description |
|---|---|
Phone Type |
Use the lookup prompt to select a phone type. Select from values such as FAX or BUSN (business phone). |
Phone Number |
You can enter multiple combinations of phone numbers for each contact. You can flag one phone number as the primary. Note: If you are performing credit card processing using a traditional credit card implementation, third-party credit card authorization and payment applications require a telephone number. The telephone number appears on the Credit Card Data page during sales order entry if the customer is paying by credit card. If the contact has a business or home phone number on file, the business phone appears first; if the contact has no business phone, the home phone appears by default. |
Contact Type |
Classifies contacts according to the department in which they work or the function they perform. Some examples of contact types within the customer's business include billing, sales, or executive management. Because a contact person may perform several roles at once, you can assign multiple contact type codes to each contact. You establish contact codes on the Contact Type Code page. |
Use the Contact Information - User Profile page (CONTACT_USER_PROF) to enter the information that enables contacts to access self-service transactions, and enter the roles to which the contact will be assigned.
Click the User Profile link on the Maintain Contacts page.
Click the User Profile link on the other pages in the Contact Info component.
Use the Contact User Profile page to establish security for self-service transactions. Enter a password, add security permissions, and identify the role that the contact can access during self-service transactions.
Logon Information
Field or Control |
Description |
|---|---|
User ID, Password, and Confirm Password |
Enter these values for external contacts who must access self-service transactions. |
Locked Out? |
Select to disable the contact's access to the system. For example, you may want to disable system access while the individual is out on disability leave but retain the contact as a User Profile so that the person can access the system upon returning to work. |
Process Profile |
Select to enable customers to run a PeopleSoft batch process. |
Primary Permission List |
Associate with the new user role you select. Primary permissions control all but page-based permissions (business interlinks, messaging, and so forth). |
Role Name |
A role is an intermediate object between users and permission lists. You assign multiple permission lists to a role, and multiple roles to a user. The role manages to which applications the contact has access as well as the type of work routed to the contact. You establish roles on the Roles page. As part of the role definition, CSRs can select only roles to which they can grant access, and they can delete only roles they are authorized to grant. Establish roles the CSRs can grant on the Role Grant page. Note: CSRs or other users should also be authorized to run the Component Interfaces (USER_PROFILE and CUSTOMER_CONTACT) so that the appropriate tables are updated when the contact and user profile information is created or updated. The ID type CNT must be marked as Enabled on the User Profile Types page so that the user profile information can be saved. |
Use the Contact Information - Staffing Information page (CONT_STAF_INFO) to enter contact information for use in Staffing Front Office.
Navigation:
Click the Staffing Information link on the Maintain Contacts page.
Field or Control |
Description |
|---|---|
Preferred First Name |
Enter the name the contact prefers to be called. |
Birthday |
Enter contact's date of birth to help you to remember to contact the person on that day. |
Best Time To Call |
Enter Early Morning, Mid Morning, Noon/Lunch, Afternoon, or Evening to define when to best contact this person. |
Agenda Events
Field or Control |
Description |
|---|---|
Auto Plan User |
Enter the user who is primarily responsible for keeping in touch with this contact. Any agenda items that you establish for this contact are assigned to this user by default. |
Recurring Event Days |
Specify the number of days that are to elapse before contacting this person again when recurring events are set up. |
Order Event Group |
Select the type of agenda items that you want to automatically add to the user's agenda when assignments are made for orders belonging to this contact. |
Order Events Hold |
Select this check box to prevent the system from automatically creating agenda items when users create assignments for orders belonging to this contact. |
Contact Owners
Field or Control |
Description |
|---|---|
User ID |
Enter the ID of the individual most closely related to and responsible for acquiring or servicing the contact. |
Owner Type |
Enter Other, Sales User, or Service User to indicate the owner role in relation to the contact. |
Owner Priority |
Indicate how important this contact is for a particular owner by associating it with a priority level. You can use this information when planning sales calls to contacts. |
The Go To drop-down list options enable you to access pages documented in subsequent sections of this topic.
Use the Order page (FO_ORDER_HDR) to view and add orders associated with this contact.
Navigation:
Select 010 - View Orders from the Go To drop-down list on the Staffing Info page.
Select 020 - Add Order from the Go To drop-down list on the Staffing Info page.
Use the Marketing Activity page (CONT_MRKTNG_ACTIV) to enter the type of marketing events for which you want this contact to be included.
Navigation:
Select 030 - Marketing Activities from the Go To drop-down list on the Staffing Information page.
Field or Control |
Description |
|---|---|
Contact Event Type |
Enter the name of the marketing event that you want to associate with a contact. |
Contact Event Frequency |
The event frequency will populate based upon the setup for the event type selected. |
Use the Review History page (FO_HISTORY) to review the history items associated with the contact.
Navigation:
Select 040 - View History in the Go To drop-down list on the Staffing Info page.
View history for this contact, including customer name and end date time.
Use the Agenda Detail page (FO_AGENDA_DETAIL) to view agenda details and add agenda items for contacts.
Navigation:
Select 050 - Add Agenda from the Go To drop-down list on the Staffing Info page.
Add an agenda item for this contact by completing as many of the Agenda Detail fields as possible for which you have information.
Use the History Detail page (FO_HISTORY_DTL) to view history details.
Navigation:
Select 060 - Add History from the Go To drop-down list on the Staffing Info page.
Add a history item for the contact.
Use the Related Employees page (CONTACT_EMP) to enter the IDs of the employees that the contact usually requests for staffing services.
Navigation:
Select 070 - Related Employees from the Go To drop-down list on the Staffing Info page.
Field or Control |
Description |
|---|---|
Employee ID |
Enter the ID of the employee who is related to the contact. |
Comments |
Enter a description of how the employee is related to the contact. For example, you may state that the contact requested this employee for many assignments due to excellent work performance. |
Use the Target Qualifications page (CONT_QUALIFS) to enter the target qualifications that the contact requests most often.
This information can be used in Opportunity searches.
Navigation:
Select 080 - Target Qualifications from the Go To drop-down list on the Staffing Information page.
This page view changes depending on which button you click. Each of the resulting pages functions similarly to corresponding pages described in the customer qualifications sections.
Use the Target Job Title page (CONT_JOBTITLE) to enter the job titles that the individual contacts request most often.
This information can be used for Opportunity searches.
Navigation:
Select 090 - Target Job Titles from the Go To drop-down list on the Staffing Information page.
Field or Control |
Description |
|---|---|
Job Category |
Select a category that represents the general classification for which the customer is looking. Each job category has multiple job titles associated with it. For example, if you select the job category of Secretaries, only the job titles belonging to that category appear. |
Job Title Code |
Select a job title frequently requested by the customer. Only the job titles that belong to the category selected will appear in the search results. |
Use the Forms page (CONT_FORMS) to review the forms associated with the contact.
Navigation:
Select 100 - Forms from the Go To drop-down list on the Staffing Information page.
This page lists all the forms previously associated with a contact record. From this page you can associate additional forms by clicking the Add a New Form button.
Field or Control |
Description |
|---|---|
Form Code |
Displays the code of the forms associated with a contact record. |
Form Description |
Displays the form associated with the contact record. Click the description to view the values for each form field. |
View Form |
Click the View Form link to view the detail of a previously added form. |
Add New Form |
Click the Add New Form button to associate additional forms with a contact record. |
Use the Forms Detail page (CONT_FORMS_DTL) to associate a new form with the contact record and enter the appropriate values for the fields in the form.
Forms enable you to capture information that is not already captured in other fields in the component. The fields in each form are defined through system configuration.
Navigation:
Click the Add New Form button on the Forms page.
Field or Control |
Description |
|---|---|
Form Type |
Displays the form type of CONT (contact form) by default for this component. |
Form Code |
Enter the code of the form that you want to associate with a contact. After you select a code, the system automatically loads the form definition. The form field names are automatically populated by Staffing Front Office from the form configuration. |
Sequence |
When the same form is associated multiple times with a contact, displays the sequence number of each form of the same code that was added. |
Date |
Enter the date that the form detail is effective, and then complete the form detail information. |
Form Field Values |
Enter the value of the form field. |
Insert Row |
Click the Insert Row button if another effective-dated row about details is needed. |
Use the Attachments page (CONT_ATTACHMENT) to add attachments to contacts.
Navigation:
Select 110 - Attachments from the Go To drop-down list on the Staffing Information page.
Field or Control |
Description |
|---|---|
Add |
Click the Add link to browse for and upload attachments such as driving directions to the contact work site, contact work policy manuals, and so on. |
View |
Click the View link to view the attachments associated with the contacts. |
Attached File |
Enter the name or description of the attachment. |
Attachment Type |
Enter the type of attachment that you want to add for the contact. Attachment types are defined through system configuration. |