Making and Scheduling Offers to Candidates
The assignment process involves selecting a candidate from your PeopleMatch results, offering him or her the position defined on the resource request, and the candidate accepting the offer. The Candidate Events page details the agenda items associated with the offer, including the date and time the offer was extended as well as when it was accepted or rejected. The Contact Events page details the agenda items associated with the acceptance as they relate to the order contact person. The information on this page is display-only.
|
Page Name |
Definition Name |
Usage |
|---|---|---|
|
FO_ORDR_MGR_CNDTE |
Review and enter candidate information related to an open job order. |
|
|
FO_EMPL_OVW |
View a candidate's personal data and job related information. |
|
|
FO_MAKE_OFFER |
Make an offer to a candidate. |
|
|
FO_ORDR_MGR_CNTCT |
Review contact information related to an open job order. |
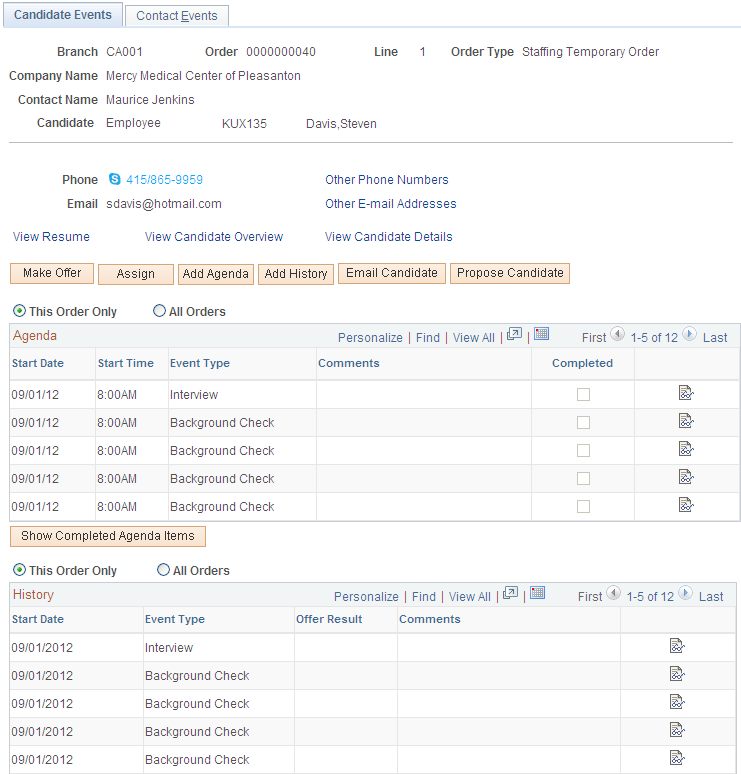
Use the Candidate Events page (FO_ORDR_MGR_CNDTE) to review and enter candidate information related to an open job order.
Navigation:
Click the Order Manager button on the PeopleMatch page.
This example illustrates the fields and controls on the Candidate Events page. You can find definitions for the fields and controls later on this page.
Field or Control |
Description |
|---|---|
Branch, Order, Line, and Order Type |
Displays order information. |
Candidate |
Displays candidate information. |
Cust. Name (customer name) and Contact Name |
Displays the customer and the contact for this order. |
View Other Phone Numbers and View Other Email Addresses |
Click these links to view the candidate's contact information. |
View Resume |
Click this link to view the candidate's resume. Note: The resume must have been previously uploaded through the Applicant or Employee component. |
View Candidate Overview |
Click this link to view the candidate's personal data, competencies, and job-related information. |
View Candidate Details |
Click this link to view the candidate's applicant or employee data. |
Make Offer |
Click this button to make an offer to the candidate. Note: This button becomes the Update Offer button if the candidate is considering the offer. |
Assign |
Click this button to assign the candidate to the resource request. Note: The candidate must have accepted the offer and be hired before he or she can be assigned to a temporary order. Candidates do not need to be hired to be assigned to a career order. |
Add Agenda |
Click this button to add an agenda item. |
Add History |
Click this button to add history items to an order. |
Email Candidate |
Click this button to send an email to the candidate about the resource request. |
Propose Candidate |
Click this button to send an email to the contact about the candidate. |
This Order Only and All Orders |
Select the respective option to view agenda or history events for the current order or for all orders associated with this candidate. |
Show Completed Agenda Items and Hide Completed Agenda Items |
Click the respective button to display or hide agenda items that have been marked complete for the order. |
|
Click this icon to access the Agenda Detail page and add an agenda item. |
|
Click this icon to access the History Details page and add a history item. |

Use the Candidate Overview page (FO_EMPL_OVW) to View a candidate's personal data and job related information.
Navigation:
Click the View Candidate Overview link on the Candidate Events page.
Here you can view details about the candidate's Availability, Competencies, Tests, References, Assignments, Job Titles, Lines of Business, and Recruiting Funnel Data.Each section is expandable.
Use the Make Offer to Candidate page (FO_MAKE_OFFER) to make an offer to a candidate.
Navigation:
Click the Make Offer button on the Candidate Events page.
Field or Control |
Description |
|---|---|
Start On Date and Start Time |
Select the date and enter the time of day the candidate is to start the job. |
Offer Result |
Select the candidate's response to the offer: Accepted, Considering, Declined, or Other. If the candidate Accepted the offer, when you click OK the system transfers you to the assignment pages to enter the details of the assignment. Note: For temporary orders, candidates must be hired before they can be placed in assignments. |
Comment Text |
Enter any comments about the offer or the job. |
Note: You can also use the Other status when an offer is made to a candidate, but it is neither accepted nor declined. When you select the Other status, the system displays the Other Reason field. You can then select a reason such as Phone Busy or No Answer. The system records the Other status along with the reason as a history item.
Use the Contact Events page (FO_ORDR_MGR_CNTCT) to review contact information related to an open job order.
Navigation:
Click the Order Manager button on the PeopleMatch page.
Select the Contact Events tab.
Use the Contact Events page to view history and agenda items associated with the acceptance or rejection of an assignment as they relate to the contact person on the order.
To view agenda or history events for all orders associated with the contact person, select the All Orders option in the appropriate section.