Defining Items at the SetID Level
Before processing an inventory item in a PeopleSoft application, you must define the item within the system. Items are defined at the SetID level first; then they are defined at the business unit level.
To establish an item ID and the corresponding attributes for a SetID, use the Define Item (ITEM_DEFIN) component. You can either define new item attributes or modify item-attribute default or template information, which you set up by using the pages that are accessed from the Define Controls menu.
Use the Define Item component to establish lot-controlled or serial-controlled components.
This topic discusses how to define Items at the SetID Level:
|
Page Name |
Definition Name |
Usage |
|---|---|---|
|
INV_ITEMS_DEFIN1 |
Define general item information at the SetID level. |
|
|
Define Item - Item Image Page |
INV_ITEM_IMAGE_SEC |
Maintain an image of an item. |
|
Define Item - Manufacturer's Item Page |
ITM_MFG_SP |
Define information about the item's manufacturer. |
|
INV_ITEMS_DEFIN4 |
Define additional item attributes. |
|
|
GS1_CLAS2_INV_DEF |
Define healthcare item attributes. |
|
|
INV_ITEMS_DEFIN3 |
Define item dimensions such as weight, volume, size and color. |
|
|
INV_ITEMS_DEFIN8 |
Define material usage attributes for an item at the SetID level. |
|
|
INV_ITEMS_DEFIN2 |
Establish tracking item and lot-control attributes. |
|
|
INV_ITEMS_DEFIN5 |
Establish item shipping and handling attributes. |
|
|
Define Item - Substitutes Page |
INV_ITEMS_DEFIN7 |
Establish or maintain substitute items. |
|
INV_ITEMS_DEFIN6 |
Define configuration attributes for an item if you are using PeopleSoft Product Configurator. |
|
|
Define Item - Custom1: Character Page |
INV_ITEMS_DEFIN9 |
Define alphanumeric field values at the SetID level for item attributes that are unique to the enterprise. |
|
Define Item - Custom1: Numeric Page |
INV_ITEMS_DEFIN10 |
Define numeric field values at the SetID level for item attributes that are unique to the enterprise. |
|
Define Item - Custom2: Character Page |
INV_ITEMS_DEFIN11 |
Define additional alphanumeric field values at the SetID level for item attributes that are unique to the enterprise. |
|
Define Item - Custom2: Numeric Page |
INV_ITEMS_DEFIN12 |
Define additional numeric field values at the SetID level for item attributes that are unique to the enterprise. |
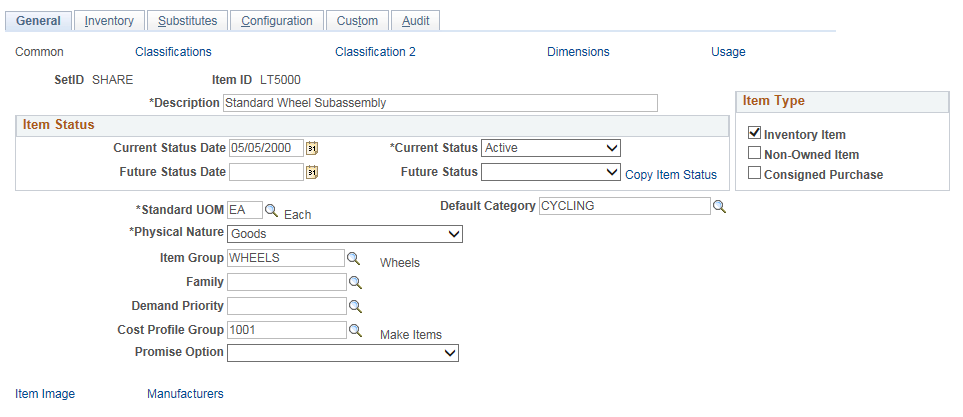
Use the Define Item - General: Common page (INV_ITEMS_DEFIN1) to define general item information at the SetID level.
Navigation:
This example illustrates the fields and controls on the Define Item - General: Common page. You can find definitions for the fields and controls later on this page.
Field or Control |
Description |
|---|---|
Item ID |
Item IDs cannot have embedded spaces or special characters. If you use automatic numbering for items, leave the item ID as NEXT, to assign the next sequential number, or enter an item ID manually. PeopleSoft Inventory uses the item ID as its primary search key for the item master file. |
Current Status Date |
If you modify the item status, the current status date is automatically updated to reflect the date of the change. |
Current Status |
Select a value: Under Initialization, Pending Approval, Denied Approval, Active, Hold, Discontinue, or Inactive. However, you can select only a subset of these status values. If the item is Under Initialization, you can set the Current Status field to Pending Approval. After the item definition is approved, either automatically or manually, you can set the status to Hold or Discontinue. |
Future Status Date and Future Status |
Enter a date and a status that the Change Item Status (RUN_INS4000) process implements. Note: You cannot select a future status of Inactive for certain items. If an item is defined for a business unit and used in PeopleSoft Manufacturing on the Define Business Unit Item - General: Costing page (Used for MFG option), it cannot be inactivated at the business unit or the SetID level. |
Copy Item Status |
Click to access the Copy SetID to BU Item Status page, where you can copy the item status for the SetID to any of the business units for which the item is defined. |
Inventory Item |
Select this check box to define this item ID as an inventory item type. An inventory item can be physically stocked in a PeopleSoft Inventory business unit and used on a material stock request. Deselect this check box to define this item ID to a non-inventory item type. You cannot create transactions in PeopleSoft Inventory for non-inventory items. The attributes that you enter for a non-inventory item at the business unit level are to support PeopleSoft Order Management, Purchasing, Maintenance Management, Manufacturing and PeopleSoft Supply Planning. Both inventory and non-inventory items can be:
After you have used an item ID in the PeopleSoft system, you may want to change the item from an inventory item type to a non-inventory item type or conversely, change from a non-inventory to an inventory item type. There are certain restrictions to changing the inventory item type once you have used the item ID on transactions in the PeopleSoft system. For more information, see the "Working with Items" topic, "Changing the Item Type" topic of this product documentation. |
Non-Owned Item |
This selection can be overridden on the Define Business Unit Item - General: Common page. PeopleSoft Inventory does not create accounting entries for non-owned item transactions. To identify the owner of the stock, you must also indicate the stock type on the Define Item - General: Classifications page. You can change the selection at the time of putaway by using the Manual Staging page or the Express Putaway page. |
Consigned Purchase |
This option is available if the item is non-owned. The selection that you make is supplied by default at the business unit level, and you cannot override it on the Define Business Unit Item - General: Common page. |
Standard UOM |
Select the standard UOM for this item ID. PeopleSoft Inventory maintains the quantity on hand for an item and its cost in the standard UOM. It is recommended that you select the smallest valid UOM for the item. Keep in mind the following points when selecting a standard UOM:
Warning! To minimize rounding discrepancies when using multiple UOMs, use the smallest valid UOM for the item as the standard UOM, and use whole number as the quantity precision on the item's Unit of Measure page. |
Default Category |
You must select a value if you have PeopleSoft Purchasing installed to categorize the item appropriately for the purchasing catalogs. |
Physical Nature |
Select the option of Goods or Services, which classifies the item for intransit reporting requirements between countries. |
Item Group and Family |
These are categorizations for reporting or alternate search keys. Item groups can be used when you are defining transaction accounting rules, and item families can be used during cycle counting. |
Demand Priority |
If you are using PeopleSoft Supply Planning, this option enables you to group like items to establish a common priority for all items within a single group. The demand priorities can then be established for both planning applications. You define demand priority families by using the Demand Priority Family page. |
Cost Profile Group |
Assigning an item to a cost profile group determines the books that the item uses when accounting for the item. When you add this item to a business unit, the Define Business Unit Item - General: Costing page uses this field to determine the cost profile of the item within each book that the business unit uses. Be aware of these conditions: If the item is not serial controlled, the cost profile group that you assign to the item cannot be associated with any profiles that have serial ID as the deplete cost method or the cost flow. If the item is not lot controlled, the cost profile group that you assign to the item cannot be associated with any profiles that have lot ID as the deplete cost method or the cost flow. |
Promise Option |
(Optional) Select a value: Perform ATP Reservations (perform available-to-promise reservations): Select this option to enable customer service representatives who are using PeopleSoft Order Management to promise the item at the time of order, or to enable the Reserve Materials process (IN_FUL_RSV) in PeopleSoft Inventory to promise demand for the item based on anticipated supply. Important! To ensure accurate validation, you must complete item definition at the SetID and business unit levels and specify non-soft-reservations processing for the item before you select the Perform ATP Reservations value. For step-by-step procedures for setting up ATP-reserved items, see Understanding ATP-Reservations. |
Create Product |
Select if the enterprise uses product IDs, and you want the system to create a product ID when you save the item definition. |
Use Item ID |
Select to use the item ID as the product ID in PeopleSoft Order Management. |
Product ID |
If you do not select the Use Item ID option, you can enter a value in this field or, if you set up automatic numbering for products, you can enter a value of NEXT. These options are available only if PeopleSoft Order Management is installed and you are in Add mode or if you are updating an item that has a status of Under Initialization. |
Item Image |
Click to access the Item Image page, where you can add, remove, or view a picture of the item. |
Manufacturers |
Click to access the Manufacturer's Item page, where you can define information about the items' manufacturer. |
Purchasing Item Attributes |
Click to access the Purchasing Attributes (ITM_TBL_PUR) component, where you can specify purchasing information for the item. You can access the Purchasing Attributes component only after the item is initially saved. |
Units of Measure |
Click to access the Units of Measure (INV_ITEM_UOM) component, where you can assign additional UOMs to the item. You can access the Unit of Measure component only after the item is initially saved. |
Use the Define Item - General: Classifications page (INV_ITEMS_DEFIN4) to define additional item attributes.
Navigation:
Field or Control |
Description |
|---|---|
Template ID |
Select a value to use default values from a static item template that you define on the Static Item Templates page. Selecting a value causes all of the template values to be supplied as this item's values, but you can override any attributes. |
Grade |
The value in this field is the default on the Lot Control Information page when you create new lots. This field is informational only. |
Item Type |
Select a value to define the functional group for this item. You can use this information as a search key for reports and inquiries. Establish item types on the Item Types page, which you access from the Define Controls menu. |
Potency Code and UPC Code (universal product code) |
These fields are informational only. |
Stock Type |
If the item is non-owned, select a value to identify the type of stock and the stock owner. The stock type is supplied to the business unit level and can be modified on the Define Business Unit Item - Inventory: Shipping/Handling page. |
Commodity Code |
Select a value to use on bills of lading to group and identify products that are being shipped for freight rating and insurance purposes. Establish commodity codes, also known as freight classes, on the Commodity Code page under the Common Definitions menu. |
EU Commodity Code |
PeopleSoft Inventory uses this code for Intrastat Reporting purposes. |
Use the Define Item - General: Classifications 2 page (GS1_CLAS2_INV_DEF) to define healthcare item attributes.
Navigation:
This example illustrates the fields and controls on the Define Item - General: Classifications 2 Page. You can find definitions for the fields and controls later on this page.

Field or Control |
Description |
|---|---|
SetID |
Enter an identification code that represents a set of control table information or TableSets. |
Item ID |
Enter an identification code for the associated item. |
Standard Unit of Measure |
Enter the most common and smallest valid unit of measure for the associated item. |
GDSN Information Provider |
Enter the name of the party who owns the data. |
FDA Listing Number |
Enter the 7 digit FDA listing number associated with the medical device. |
GDSN Information Provider GLN |
Enter the Global Location Number (GLN) of the information provider. |
FDA Marketing Authorization Type |
Enter the FDA Marketing Authorization Type. |
Target Country |
Enter the code that identifies the target market. |
FDA Marketing Authorization Code |
Enter the numeric code of the FDA authorizing labeler to market the associated device in the USA ( for K & P). |
Global Product Classification |
Enter the global EAN.UCC classification category code; this is a unique 8 digit numerical key. |
FDA Product Code |
Enter the alphanumeric FDA product code of the associated item. |
Brand Name |
Enter the brand name of the associated item. |
GMDN Code |
Enter the Global Medical Device Nomenclature preferred code used to identify the associated device at a global level. |
Alternate Item Number Type |
Enter the type of alternate item number provided like GTIN, HIBC etc. |
Expiration Date Controlled |
Select if the expiration date is controlled. |
Returnable Packaging |
Select if returnable packaging is required. |
Packaged Sterile |
Select if the associated item is packaged sterile. |
Manufacturing Date Controlled |
Select if the manufacturing date is controlled. |
Labeled Single Use |
Select if the associated item is labelled for single use. |
Sterilize Before Use |
Select if you must sterilize the associated item before use, when not packaged sterile. |
Contains DEHP |
Select to indicate if the item contains Di (2 – ethylhexyl) phthalate. |
Sterilization Method |
Enter the name of the sterilization method applicable before the associated item is used. |
Use the Define Item - General: Dimensions page (INV_ITEMS_DEFIN3) to define item dimensions such as weight, volume, size and color.
Navigation:
Field or Control |
Description |
|---|---|
Length, Height, Width, Dimension UOM |
The system uses dimension information on the Alternate Plan page for putaway and capacity checking if you enable capacity checking by volume for the business unit and storage locations. |
Weight, Weight UOM, Volume, Volume UOM |
Indicate weight and volume values that the system uses when creating bills of lading, creating delivery IDs in delivery management, and load planning. The system uses these values if shipping and packing weights and volumes are not defined on the Define Business Unit Item - Inventory: Weight/Volume page. The system also uses weight and volume for capacity checking when you enable capacity checking for the business unit and storage locations. Base the weight and volume that you enter on the item's standard UOM. Note: When you change the weight and volume, recalculate capacity for the storage locations where you track capacity. For each item storage location, select the Calc capacity at save time (calculate capacity at save time) option on the Volume/Weight Capacity Checking page. |
Item Size and Item Color |
These fields are informational only. |
Use the Define Item - General: Usage page (INV_ITEMS_DEFIN8) to define material usage attributes for an item at the SetID level.
Navigation:
This example illustrates the fields and controls on the Define Item - General: Usage page. You can find definitions for the fields and controls later on this page.
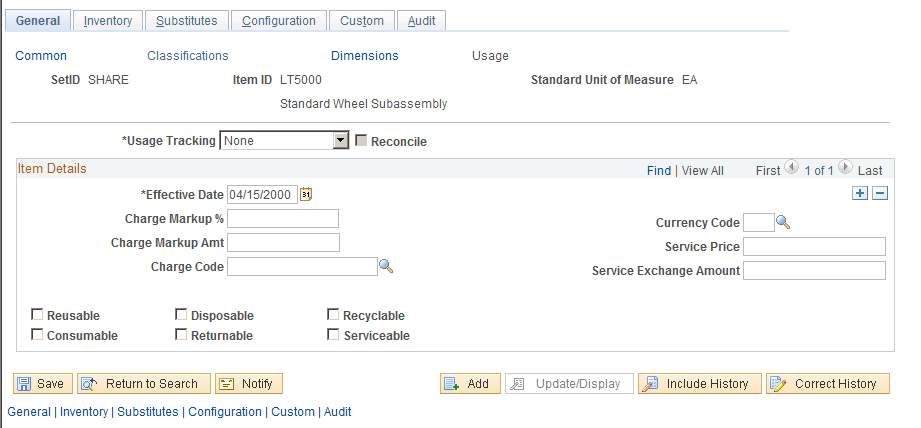
Note: The values that you enter on this page become default values on the Define Business Unit Item - General: Usage page.
Field or Control |
Description |
|---|---|
Usage Tracking |
Select a method to track the item for billing or costing purposes. Note: The process for collecting this information and communicating it to the third-party billing system is the same for each value. The difference is in the methodology that the third-party system uses when billing the consumer. Values are: Billing: Tracks the usage of the item for billing. This method compiles consumer usage information to bill the consumer directly for items that are used. Costing: Tracks the usage of the item for cost accounting. This method compiles the consumer usage information to set the cost of a procedure accurately. After the cost is set, you can determine the charge for that procedure. Over time, monitor procedure costs to ensure that the procedure price remains competitive and covers actual costs. |
Reconcile |
Select to include the item in the material usage reconciliation of its par location. You can reconcile only items that are tracked for billing or costing. You must set up reconciled items that are replenished to their par location (the Not Replenished check box is deselected on the Define Par Location Groups page and Define Par Location - Line page) with a replenishment control selection of Par or Min/Max on the Define Par Location - Line page. |
Charge Markup % (charge markup percentage) and Charge Markup Amt (charge markup amount) |
Enter the markup percentage and flat markup on the item. The system applies the markup to the cost of the item. |
Charge Code |
The charge code is for informational purposes only. Use this code to assist in consumer billing. Set up this internal code on the Charge Codes page. |
Currency Code |
Enter the currency code that represents the values in the Service Price and Service Exchange Amount fields. |
Service Price and Service Exchange Amount |
Enter the service part price and the part exchange price. These values are used with PeopleSoft Customer Relations Management. |
Reusable, Disposable, Recyclable, Consumable, Returnable, or Serviceable |
Select for reporting and inquiry purposes only. |
Use the Define Item - Inventory: Tracking/Description page (INV_ITEMS_DEFIN2) to establish tracking item and lot-control attributes.
Navigation:
This example illustrates the fields and controls on the Define Item - Inventory: Tracking/Description page. You can find definitions for the fields and controls later on this page.
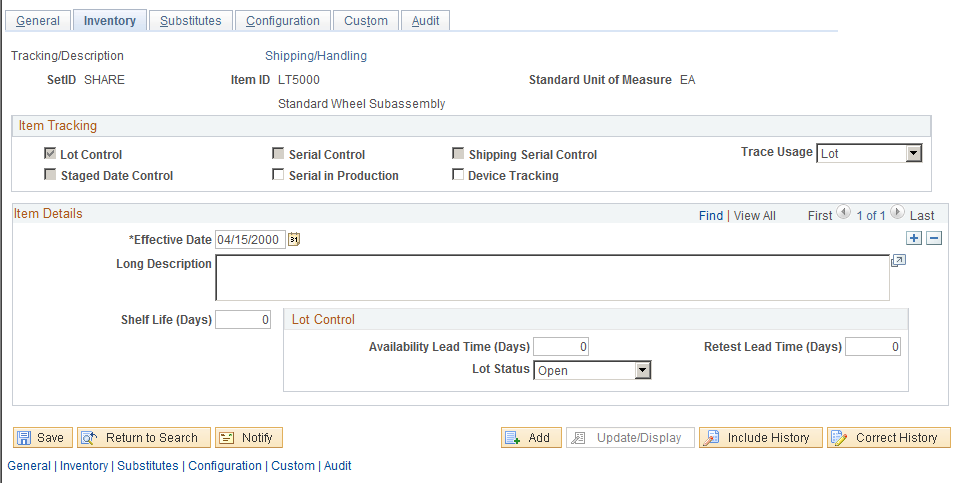
The values for Lot Control, Serial Control, and Ship Serial Control are entered as default values from the Item Default Values page.
Warning! After lot, serial, ship-serial, and stage-date control flags are set and you begin to put stock away, these fields are unavailable for entry—you cannot modify them.
Field or Control |
Description |
|---|---|
Lot Control |
Select to indicate that a quantity of inventory items is produced as a group or otherwise collected into an identifiable unit. Lots often represent production runs. For lot-controlled items, the lot ID is entered at the time of receipt and putaway and for inventory movement transactions. A default filler value for lot ID is entered on the Installation Options - Inventory page and is used by items that are not lot controlled. |
Serial Control |
Select to indicate that a unique identifier is assigned to each item that is in stock. The system manages serial-controlled inventory items in units of one, based on the standard UOM. For serial-controlled items, enter the serial ID at the time of receipt and putaway and for all inventory movement transactions. A default filler value for serial number is entered on the Installation Options - Inventory page and is used by items that are not serial controlled. |
Shipping Serial Control |
Select to indicate that serial tracking is required only at the time of shipment. You move ship-serial items through the warehouse without entering serial information into the system, which simplifies transaction processing and entry. You assign serial numbers when the item is shipped, which provides serial tracking on products that are shipped to customers, internal locations, and other inventory business units. |
Trace Usage |
Select the Serial value to track the components of this assembly. If existing inventory transactions have occurred, you will receive a warning message that future genealogy tracking will be affected but the change will be allowed. This option is used for component items and enables you to associate the component's serial ID or lot ID with a higher-level assembly item whose Serial in Production option is equal to Yes. Values are: Serial: Select to enable this component's serial ID to be tracked in a higher level assembly whose Serial in Production option is selected. If the component's Lot Control option is selected, then both the serial ID and lot ID will be tracked. Lot: Select to enable this component's lot ID to be tracked in a higher level assembly whose serial in production option is Yes. None: Select if you do not want to track this item. Similar to serial in production, trace usage can be used in conjunction with the Serial Control option. If the Serial Control option is selected, then the serial ID will be identified in inventory, and this serial ID remains with the item throughout the entire manufacturing process. If Serial Control is deselected, then serial ID will not be identified in inventory, but a serial ID will be specified when the item is associated with a serial assembly. This allows tracking the genealogy without requiring the need to track the serial ID in inventory. Important! The source code for serial-controlled items must be Make or Buy. |
Staged Date Control |
Select to indicate that the system tracks an item by the date that it is staged into inventory. This check box is available when you select the Staged Date Control check box on the Installation Options - Inventory page. If it is selected, it is used as a default for the SetID/item, but you can override it. If the item is not tracked by its staging date, the staged date fields do not appear on any of the item transaction pages. The stage date is used as the default for the business unit-item level, which is the level that the system uses to determine staged-dated tracking. For stage date-controlled items, you must enter the stage date at the time of receipt and putaway and for all inventory movement transactions. |
Serial in Production |
Select this option if you want to track the key serial and lot components that make up this assembly item. You will assign a serial ID to the item during the manufacturing process. You will also identify serial and lot components that are used to produce this item. This field can be used with and without the serial control option. If you do select serial control, then you will enter the serial ID for all material movement transactions. If you do not select the serial control option, then the system tracks the serial ID during the production process. This means that you assign a serial ID to the item during production and associate serial and lot components with this serial assembly. During completions, you will complete the serial ID to inventory. Note: If you select serial in production and not serial control, during subsequent inventory movements of this item, you will not need to enter the serial ID. |
Device Tracking |
Select to provide PeopleSoft Purchasing with item visibility throughout the procurement cycle. |
Shelf Life (Days) |
Enter the number of days that the item can remain in inventory before it is no longer usable. |
Availability Lead Time (Days) and Retest Lead Time (Days) |
Enter values for lot-controlled items. The availability lead time is the number of days between the lot's creation date and the date that it becomes available; the retest lead time is the number of days between a lot's creation date and the date that it needs to be retested. |
Lot Status |
Select a default value to assign to newly created lots for lot-controlled items. You can update lot status at any time on the Lot Control Information page. Values are: Hold: Prevents material transactions for the item-lot combination temporarily. Open: Enables regular processing of the lot. You cannot change an Open lot status if quantity for the item-lot combination is allocated to a demand line. Rejected: Prevents material transactions for the item-lot combination. Restricted: Provides a warning message when you use the lot in an inventory transaction. Note: Because hold, rejected, and restricted lots are not available for picking plans or for lot allocations, their available quantity is 0. You can, however, use restricted lots in picking transactions on the Picking Feedback page. |
Note: The shelf life, availability lead time, and retest lead time are default values for the business unit level. You can modify these values on the Define Business Unit Item - Inventory: Shipping/Handling page.
Use the Define Item - Inventory: Shipping/Handling page (INV_ITEMS_DEFIN5) to establish item shipping and handling attributes.
Navigation:
Field or Control |
Description |
|---|---|
Storage Rule |
Select a rule that will appear on both the Putaway Plan and on the Review Plan. |
MSDS ID (material safety data sheet ID) |
Select the appropriate ID, for informational purposes, if the item requires one. Establish MSDS IDs on the MSDS Identifiers page. |
Storage Temp, Storage Humidity |
These fields are informational only. |
Max Capacity (maximum capacity) |
Enter the maximum capacity at which this inventory item can be stored in a designated material storage bin. Track maximum capacity when storage locations in an inventory business unit are assigned exclusively to particular inventory items. This field reflects the standard UOM and is informational only. |
Packing Code |
Select a value. Establish packing codes on the Packing Codes page, which you access from the Define Controls menu. |
Ship Via |
Select a shipping code. Establish shipping codes on the Ship Via Codes page under the Common Definitions menu. The value that you select appears by default for the business unit; you can modify it on the Define Business Unit Item - Inventory: Shipping/Handling page. The ship via value for the item at the business unit level appears by default on the order line when you enter a request for this item by using the Create/Update Stock Request (EZ_ISSUE_INV_GBL) component. The default hierarchy for the ship via value depends on the type of order that you create. The hierarchy for an outbound sales order is:
The hierarchy for an outbound material stock request is:
The hierarchy for an Interunit transfer is:
The hierarchy for an inbound purchase order is:
|
Tariff Cd (tariff code) |
Select the harmonized tariff code for the item. Establish harmonized tariff codes on the Harmonized Tariff Code page under the Common Definitions menu. Various documents that accompany shipments across international borders require harmonized tariff codes. Customs officials use these codes to determine duty on shipped commodities. The system uses this information on export bills of lading for export sales orders that are defined in PeopleSoft Order Management or export intercompany transfers in PeopleSoft Inventory. |
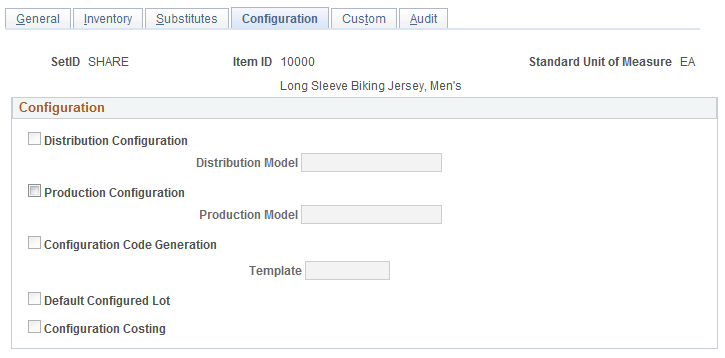
Use the Define Item - Configuration page (INV_ITEMS_DEFIN6) to define configuration attributes for an item.
Navigation:
This example illustrates the fields and controls on the Define Item - Configuration page. You can find definitions for the fields and controls later on this page.
Field or Control |
Description |
|---|---|
Distribution Configuration |
Select to enable distribution configuration processing, which enables the system to capture dynamic option and pricing information. |
Distribution Model |
If you select Distribution Configuration, the system uses the model to select the configuration rules that are used to configure this item. |
Production Configuration |
Select to enable production configuration processing, which enables the system to:
|
Production Model |
If you select Production Configuration, the system uses the model to select the configuration rules that are used to configure this item. |
Configuration Code Generation |
Select to indicate that the configuration template will be used to generate a configuration code. This option is valid only for lot controlled items that have distribution configuration. |
Template |
Select a template for configuration code generation. The system creates configuration codes based on the template that you select. You cannot change an item to use configuration codes if system activity exists for the item (such as inventory balances, customer orders, and so on). |
Default Configured Lot |
Select to indicate that the default value is the last lot with the same configuration code (during receipts and issues). This check box is available when you select Configuration Code Generation. |
Configuration Costing |
Select to generate costs for each unique configuration code during production order creation. Also, you can recalculate the cost of a configured item to reflect cost changes in standard items. This check box is available when you select Configuration Code Generation. |