Defining the Data Source and Target
After you have defined PeopleSoft documents for the source and target, and have set up document relationships for records and fields, use the Map Definition (FS_MAPPER_DEF_WIZ) component to set up the transformation from data source to target output.
|
Page Name |
Definition Name |
Usage |
|---|---|---|
|
FS_MAP_DEF_WIZ |
Create identifying information for the map definition. |
|
|
FS_MAP_SRC_DEF_WIZ |
Identify the source, which can be a PeopleSoft document, a delimited file, or a fixed format file. |
|
|
FS_MAP_TRG_DEF_WIZ |
Identify the target, which can be a PeopleSoft document, a delimited file, or a fixed format file. |
|
|
FS_MAP_DTL_WIZ |
Define map detail for source and target fields as well as the transformation type. |
|
|
FS_MAP_FILTER_WIZ |
Add filter criteria. |
|
|
FS_MAP_SUMMARY_WIZ |
Review and submit the map definition. |
Create a map definition to do this:
Link the formats for the data source and target output.
Define the mapping detail, that is, how each field is exported or imported and using which transformation rule.
Define the data filter criteria.
The horizontal navigation, also known as train stops, guides you through these pages for creating a map definition:
Map - Step 1 of 6: Create a map ID and define high level map attributes and map security options.
Source - Step 2 of 6: Identify the source data structure and fields.
Target - Step 3 of 6: Identify the target data structure and fields.
Detail - Step 4 of 6: Define field-to-field mappings and data transformation rules.
Filter - Step 5 of 6: Define data filter criteria.
Summary - Step 6 of 6: Review and submit the map definition.
After creating a map definition, you can run the Data Export Import Utility process to move the data. A run control page allows you to initiate the process that reads the data maps in order to generate the specified output. The run control page generates prompts as defined in the filter criteria of the wizard, allowing users to narrow the data set for processing. The wizard also allows for hard-coded filter criteria that do not need to be entered on the run control page.
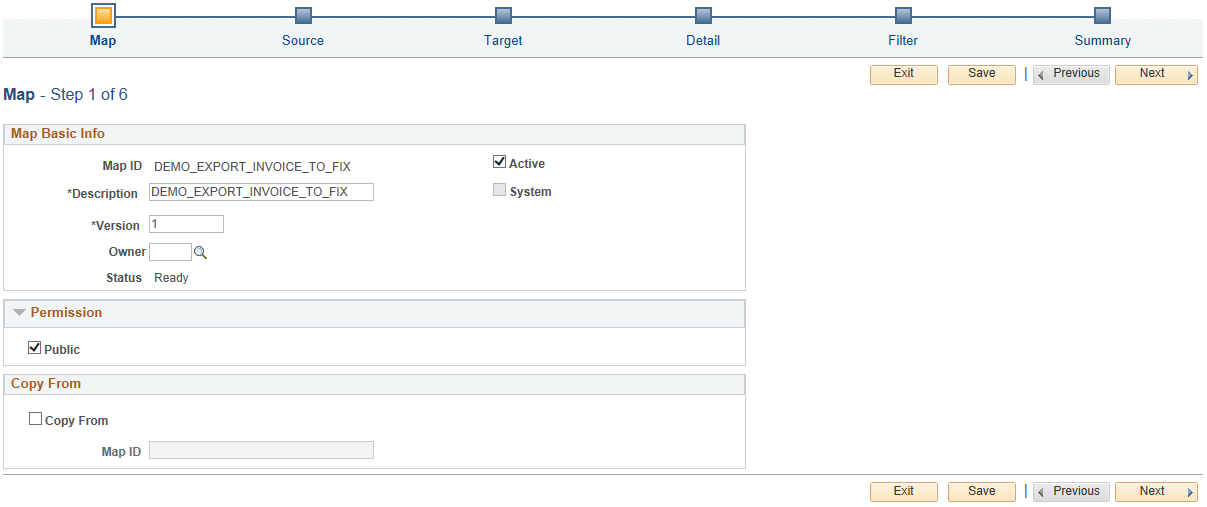
Use the Map Definition - Map (Step 1 of 6) page (FS_MAP_DEF_WIZ) to create identifying information for the map definition.
Navigation:
This example illustrates the fields and controls on the Map Definition - Map (Step 1 of 6) page.
Field or Control |
Description |
|---|---|
Active |
Select to indicate this map definition can be requested from the run control page and copied to create new map definitions. |
System |
Displays as selected to identify this map definition as provided by the Oracle system. Displays as deselected to indicate the map is defined by the user. |
Version |
Enter a value to identify the historical version of the map definition. The same map definition can have several versions. |
Owner |
Enter the owner ID for the owner of the map definition. |
Public |
Indicates that all system users can request DEIU processing based on this map definition. If deselected, enter the roles of users authorized to execute the map. |
Copy From |
Select to copy from an existing map definition. If selected, enter the map ID of the map definition to copy. Only Active map IDs can be selected. |
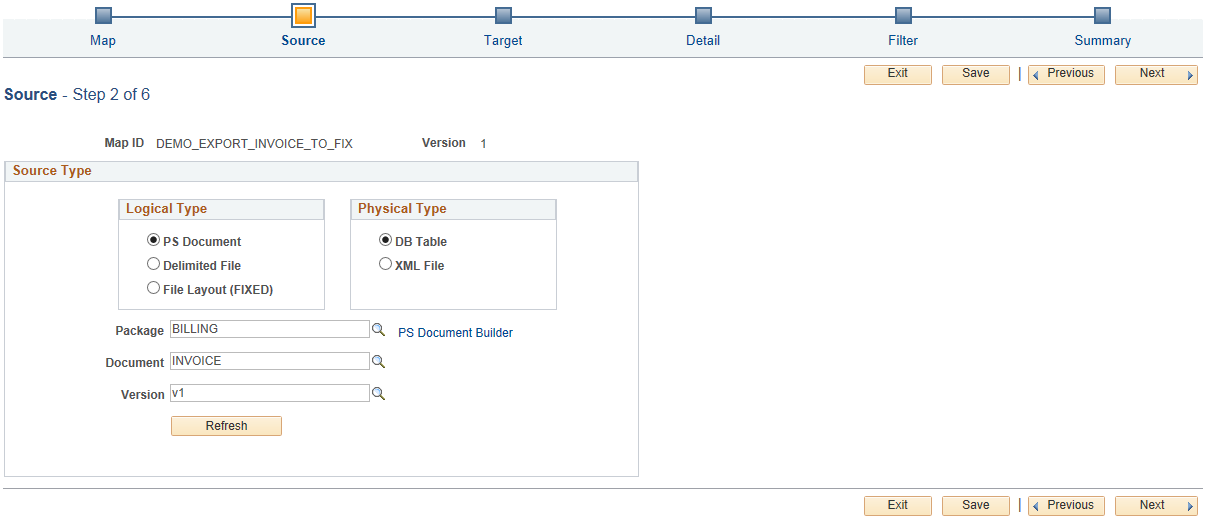
Use the Map Definition - Source (Step 2 of 6) page (FS_MAP_SRC_DEF_WIZ) to identify the source, which can be a PeopleSoft document or a delimited file.
To export data, select a PeopleSoft document or a database table as the source and identify the corresponding PeopleSoft document.
Navigation:
Click the Next button on the Map - Step 1 of 6 page.
This example illustrates the fields and controls on the Map Definition - Source (Step 2 of 6) page.
Field or Control |
Description |
|---|---|
PS Document |
Select to indicate that the source type is a PeopleSoft document. You must indicate whether the physical type of the document is a DB Table (database table) or an XML File and enter the Package, Document, and Version that identify the PeopleSoft document. When you select XML File, you must also enter a character set. Select from UTF-8 or GBK18030. |
Delimited File |
Select to indicate that the source type is a delimited file. Enter values in these fields:
|
File Layout (FIXED) |
Select to indicate that the source type uses a fixed file layout format. Enter values in these fields:
|
PS Document Builder |
Click this link to access the Document Builder - Document page, where you can review the selected PeopleSoft document. |
Use the Map Definition - Target (Step 3 of 6) page (FS_MAP_TRG_DEF_WIZ) to identify the target, which can be a PeopleSoft document or a delimited file.
To export data to an XML file, select the option for an XML-formatted PeopleSoft document and identify the target PeopleSoft document.
Navigation:
Click the Next button on the Source - Step 2 of 6 page.
This example illustrates the fields and controls on the Map Definition - Target (Step 3 of 6) page.

This page uses the same fields as the Map Definition - Source (Step 2 of 6) page, except for defining the character set and the option to update only existing data in the database.
Field or Control |
Description |
|---|---|
Character Set |
Select the character set. This value appears in the XML header of the output. |
Update Only Flag |
Select this check box to update only existing data by matching key fields in the database. The default value is deselected. When this field is deselected, the system concurrently inserts new and updates existing data in the table. Any data that has no matching key fields can be listed in a log file. This option is available only when the Target Type is a PS Document with a physical type of DB Table. |
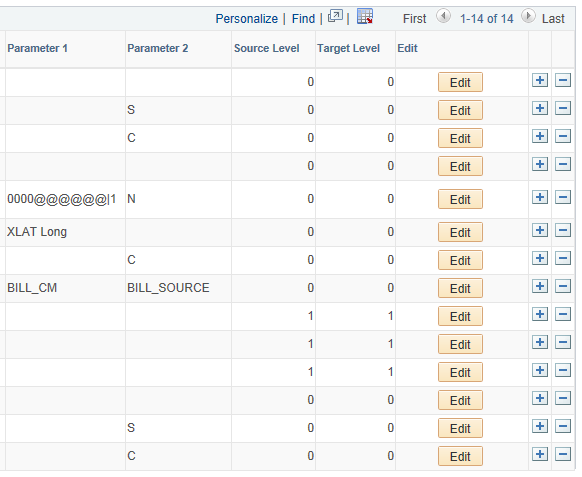
Use the Map Definition - Detail (Step 4 of 6) page (FS_MAP_DTL_WIZ) to define map detail for source and target fields as well as the transformation type.
Navigation:
Click the Next button on the Target - Step 3 of 6 page.
This example illustrates the fields and controls on the Map Definition - Detail (Step 4 of 6) page.
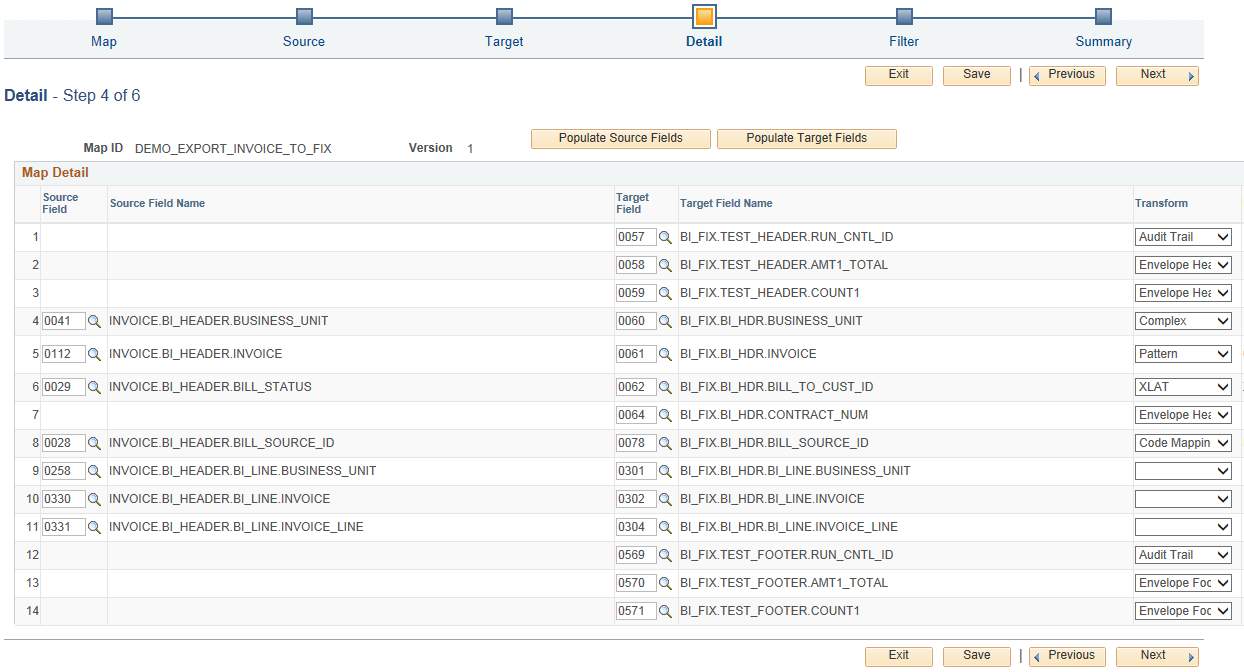
This example illustrates the fields and controls on the Map Definition - Detail (Step 4 of 6) page, continued.
Field or Control |
Description |
|---|---|
Populate Source Fields |
Click to automatically populate the source fields in the Map Detail grid. Alternatively, you can add fields manually. When the map detail list contains more than one record, this button is not available. |
Populate Target Fields |
Click to automatically populate the target fields in the Map Detail grid. Alternatively, you can add fields manually. When the map detail list contains more than one record, this button is not available. |
Source Field and Target Field |
Enter a pair of one source field and one target field for each row. The following exceptions apply:
|
Transform |
Select one of the following transformation rules for each source/target field pair:
|
Edit |
Click the Edit button to access the Edit Transform Property secondary page, where you can edit the parameters for the selected transform value. See the next section for more information. |
Editing Format Transformation Properties
Click the Edit button to access the Edit Transform Property secondary page, where you can edit the parameters for the selected transform rule.
In the Choose Transform Type field on the secondary page, select from the following options. The parameter fields shown vary depending on the selected transformation type. The system returns an error message when required field values are missing.
Field or Control |
Description |
|---|---|
Code Mappings |
Select an available Code Map Group and Mapping Group using the lookup prompts. |
Related Field |
Select an available related field using the lookup prompt. |
XLAT |
Select an XLAT type from the drop-down list. Values are:
|
Calculate |
Define the calculation rule. Select the Multiplier operator and enter a factor. |
Constant |
Define the constant. |
DateTime |
Define the date/date time format.
|
Concatenate |
Enter fields that should be concatenated into one output string. The delimiter is an interval character that appears between each field value. Use \b to insert a space between fields in the output string. |
Trim |
Select Left Trim or Right Trim to remove characters starting at the left or the right, respectively. In the Remain Chars (remaining characters) field, enter the number of characters that should remain in the output string. |
Pad |
Select Left Pad or Right Pad to add characters starting at the left or the right, respectively. In the Char field, enter the character that the transformation adds to the source string. In the Length field, enter the total number of characters desired in the target string. |
Pattern |
Use this transformation type to match a substring with a pattern that you want to replace in the output. Add the wildcard character “@” to the pattern to identify the length of the entire string to include in the output. For example, when you enter abc@@@ in the Pattern field, you want to find substrings with “abc” and include three trailing characters in the output. If the entered source string is dfabc123kkyabc456, DEIU processing identifies the pattern “abc” and inserts “123” in the target field.
|
Extract |
Enter From and To values to extract a substring beginning with a specified location and ending with a specified location. Use the Without field to specify a character or character sequence that should be excluded from the extracted substring. Select the Check Match Value check box to determine whether the extracted substring matches a string entered in the Match Value grid. If a string is an exact match with one of the values, the string appears in the output, otherwise the output is empty. |
Envelope Header |
Use this transformation type to include an envelope header in the output. This transformation type is for use only when the target field is defined and the corresponding source field is blank in the map definition. The Envelope Header is not supported with Complex transformation. Select an operator from the drop-down list:
The envelope header is executed once for each parent node record. |
Envelope Footer |
Use this transformation type to include an envelope footer in the output. This transformation type is for use only when the target field is defined and the corresponding source field is blank in the map definition. The Envelope Footer is not supported with Complex transformation. Select an operator from the drop-down list:
The envelope footer node is designated as a special node. When the output for the parent target node record is complete, the transformation automatically adds the envelope footer node. |
Using the Complex Format Transformation Method
Use Complex format transformation rule to define a series of transformation actions that are executed when specified conditions are met. You can select Complex in the Transform column for a field mapping that includes only a target field. Add filter criteria and transformation types for operations on the Edit Transform Property secondary page:
This example illustrates the fields and controls on the Edit Transform Property page for Complex transformation.
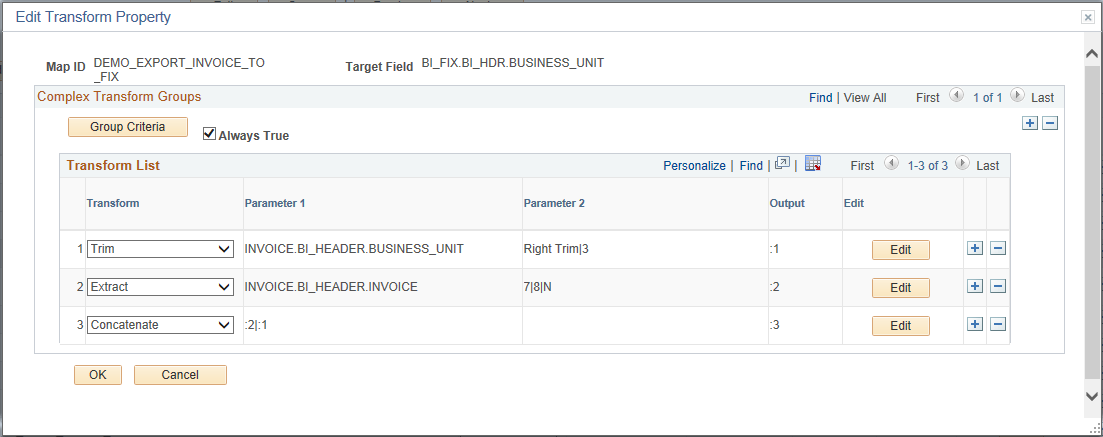
Complex format transformation contains several branches or transformation groups, and each group includes two parts: Criteria and Transform List. Data Export Import Utility processing executes for the first branch or group where the criteria are true.
For example, a customer defines three groups in the complex transformation, each with its own criteria. The processing for the first group returns false, the second group returns true, and the third group returns true. Because the criteria for the second group are true, and the second group is the first group where the criteria are true, the system executes the second group for the complex transformation. The last output of the group is used in the target field.
Field or Control |
Description |
|---|---|
Group Criteria |
Click the this button to access the Edit Criteria Grouping page, where you can insert the opening parenthesis just before one criterion and the closing parenthesis just after the last criterion in the grouping. For more information about criteria grouping, see the product documentation for PeopleTools: Query. |
Always True |
Select this check box to clear all criteria in the Criteria grid. In this case the filter criteria do not apply and the branch is always included in the transformation. |
Criteria grid |
Enter criteria for each complex transformation group. The criteria fields are the same as the fields on the Map Definition - Detail (Step 4 of 6) Page. If the Always True check box is selected, this grid is inactive and all groups are true. |
Transform List grid |
Enter the transformation method and operations as shown on the Map Definition - Detail (Step 4 of 6) Page. The output is generated in sequence as shown in the Output column. The transformation method can use the source field for its process, and the transformation method can also use the output variable generated before it. |
Using the Date/Date Time Format
The format field uses a string value, which indicates how you want the DateTime or Date value converted.
This table shows the valid values for the Output Format field.
Note: The values for format are case-sensitive. For example, if you specify a lowercase m, the system displays minutes, whereas an uppercase M displays the month.
|
Symbol |
Definition |
Type |
Example |
|---|---|---|---|
|
G |
Era designator |
Text |
AD |
|
y |
Year |
Number |
1996 |
|
M |
Month in year |
Text&Number |
July&07 |
|
d |
Day in month |
Number |
10 |
|
h |
Hour in am/pm |
Number (1-12) |
12 |
|
H |
Hour in day |
Number (0-23) |
0 |
|
m |
Minute in hour |
Number |
30 |
|
s |
Second in minute |
Number |
55 |
|
S |
Millisecond |
Number |
978 |
|
E |
Day in week |
Text |
Tuesday |
|
a |
am/pm marker |
Text |
PM |
|
k |
Hour in day |
Number (1-24) |
24 |
|
K |
Hour in am/pm |
Number (0-11) |
0 |
|
' |
Escape for text |
Delimiter |
|
|
'' |
Single quote |
Literal |
' |
The number of letters determines the format, as explained in the following table:
|
Type |
Format |
|---|---|
|
Text |
If 4 or more pattern letters are used, the full form is used. If fewer than 4 pattern letters are used, the short or abbreviated form is used, if one exists. |
|
Number |
Use the minimum number of digits. Shorter numbers are zero-padded to this amount. The system uses special handling for the year; that is, if the count of y is 2 (as in, yy), the year is truncated to 2 digits. |
|
Text&Number |
If 3 or more pattern letters are used, text is used. Otherwise, a number is used. |
Characters in the format field that are not in the ranges of ['a'..'z'] and ['A'..'Z'] are treated as quoted text. For example, characters such as colon, period, blank, pound or hash, and at symbol (':', '.', ' ', '#' and '@', respectively) appear in the resulting string even though they are not within single quotes.
A format that contains invalid letters results in a runtime error.
This table presents examples using a locale in the United States:
|
Format |
Result |
|---|---|
|
"yyyy.MM.dd G 'at' hh:mm:ss" |
1996.07.10 AD at 15:08:56 |
|
"EEE, MMM d, ''yy" |
Wed, July 10, '96 |
|
"h:mm a" |
12:08 PM |
|
"hh 'o''clock' a" |
12 o'clock PM |
|
"K:mm a" |
0:00 PM |
|
"yyyyy.MMMMM.dd GGG hh:mm aaa" |
1996.July.10 AD 12:08 PM |
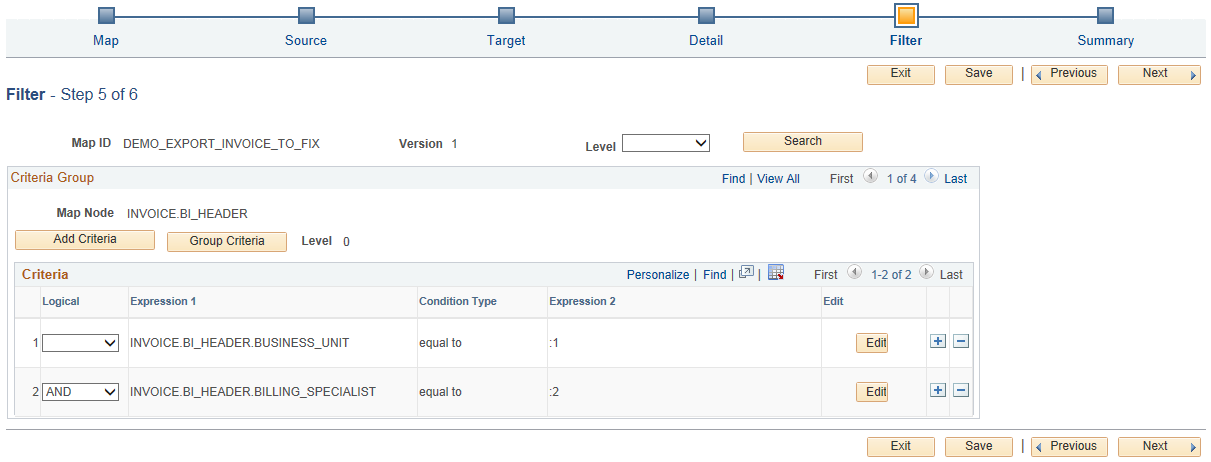
Use the Map Definition - Filter (Step 5 of 6) page (FS_MAP_FILTER_WIZ) to add filter criteria.
The Filter page is available only when you have selected the PeopleSoft document source and the Physical Type is DB Table. The DEIU processing applies the filter to source data to retrieve a subset of the source data, and it controls which subset of the source data will be output to the target.
Navigation:
Click the Next button on the Detail - Step 4 of 6 page.
This example illustrates the fields and controls on the Map Definition - Filter (Step 5 of 6) page.
Field or Control |
Description |
|---|---|
Add Criteria and Edit |
Click the Add Criteria button to add filter criteria or click the Edit button to modify the criteria properties on the Edit Criteria Property page. |
Logical |
Select AND, AND NOT, OR, or OR NOT. If you use multiple filter criteria, leave the first Logical value blank. |
Expression 1 |
Enter a source field. |
Condition Type |
Select equal to, not equal to, like, greater than, less than, not greater than, not less than, or not like. |
Expression 2 |
Enter a constant string, a source field, or a variable (:1, :2,…). If Expression 2 is a variable, the actual values for the criteria will be chosen at the time of execution. If Expression 2 is a source field, the record with this field must inherit or indirectly inherit the source field corresponding record. |
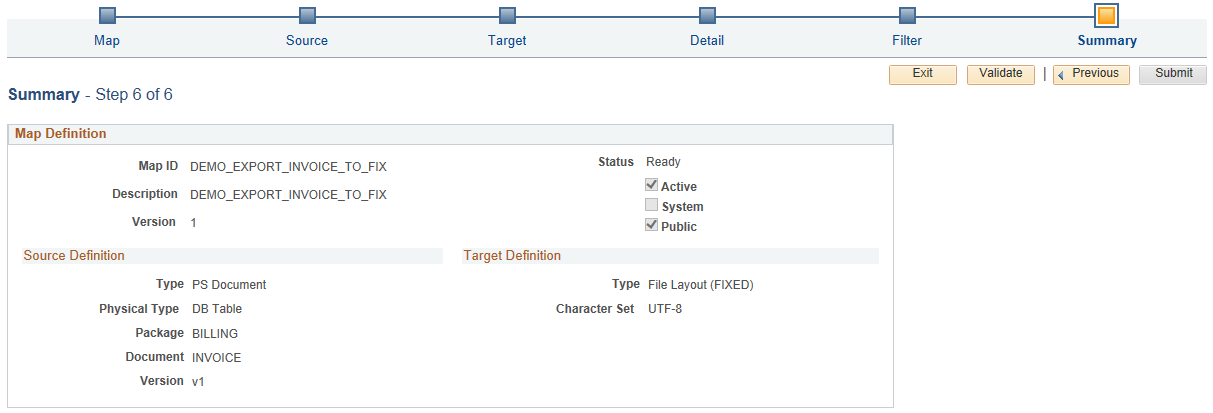
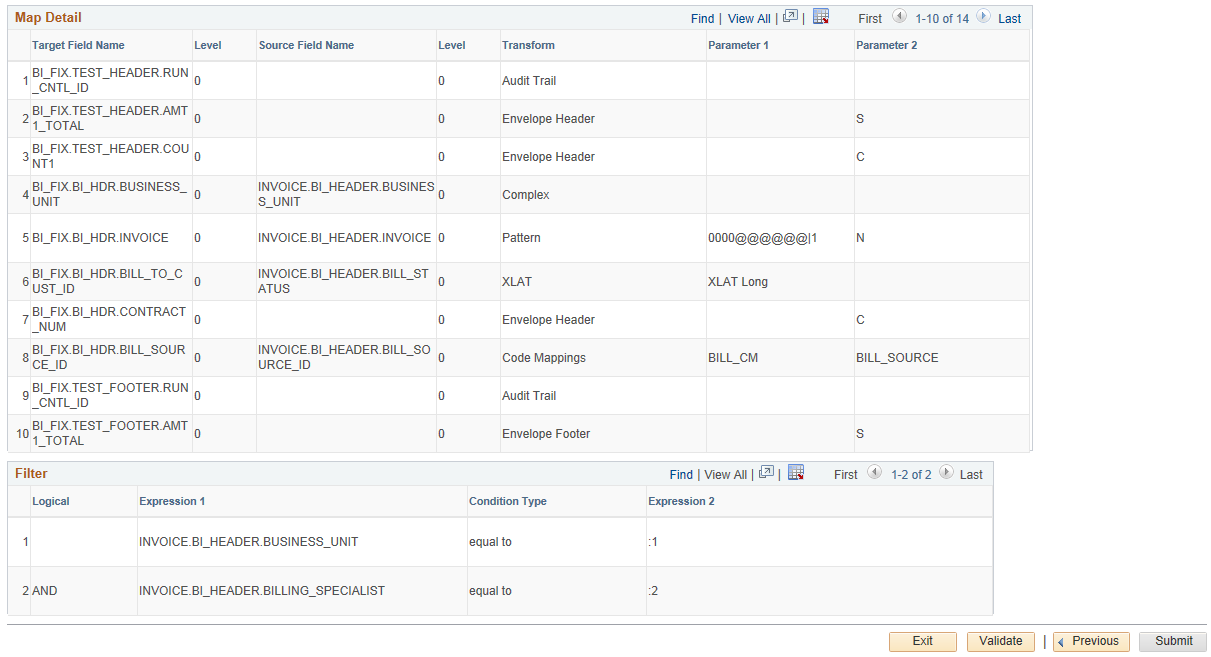
Use the Map Definition - Summary (Step 6 of 6) page (FS_MAP_SUMMARY_WIZ) to review and submit the map definition.
Navigation:
Click the Next button on the Filter - Step 5 of 6 page.
This example illustrates the fields and controls on the Map Definition - Summary (Step 6 of 6) page.
This example illustrates the fields and controls on the Map Definition - Summary (Step 6 of 6) page, continued.
Field or Control |
Description |
|---|---|
Validate |
Click this button to run a validation that verifies whether this map is defined correctly. Clicking the Submit button will change the map status to Ready, which means it is available for use in a DEIU processing request. |
Submit |
Click this button to make this map definition available for use in a DEIU processing request. |