Defining Basic Event Information
This topic provides an overview of event types and formats for defining basic Event information.
|
Page Name |
Definition Name |
Usage |
|---|---|---|
|
AUC_CREATE_PG |
Enter header information for auction events. |
|
|
AUC_COMM_SEC |
Upload and view attachments |
|
|
AUC_EVNT_REMIND_PG |
Define the configuration settings for sending reminder notifications. |
|
|
AUC_COPY_SEC |
Use a previous event, requisition, purchase order, contract, PeopleSoft Engineering BOM, PeopleSoft Manufacturing BOM, PeopleSoft Supply Planning planned order, template, or RFI as the template for a new event. |
|
|
Contract Lines to Copy Page |
AUC_COPY_CNTRCT |
Select contract lines to copy to an event. |
|
Enter Copy Criteria Page |
AUC_COPY_SEC |
Select the delimited file that you want to import. This file should currently reside on your FTP server. |
|
Lines to Import Page |
AUC_COPY_FILE |
Select the line information that will be imported from the delimited file. |
|
Import File Errors Page Import File Errors and Warnings Page |
AUC_COPY_FILE_MSG |
Review errors and warning messages encountered during the import process. |
|
Bill of Material Lines to Copy Page |
AUC_BOM_SUMMARY2 |
Select PeopleSoft Manufacturing or PeopleSoft Engineering BOM components to copy to an event. |
|
Event Lines to Copy Page |
AUC_COPY_PLN |
Select planned order lines to copy to an event. |
|
Purchase Order Lines to Copy Page |
AUC_COPY_PO |
Select purchase order lines to copy to an event. |
|
RFI Lines to Copy Page |
AUC_COPY_RFI |
Select RFI (request for information) lines to copy to an event. |
|
Requisition Lines to Copy Page |
AUC_COPY_REQ |
Select requisition lines to copy to an event. |
|
Sourcing Event Lines to Copy Page |
AUC_COPY_AUC |
Select event lines to copy to a new event. |
|
Sourcing Template Lines to Copy Page |
AUC_COPY_SEC |
Select sourcing template lines to copy to an event. |
|
AUC_OPTIONS_PG |
Specify the rules related to an event, as well as what information can appear to bidders. For auction events, specify event extension criteria. |
|
|
AUC_CONTACT_PG |
Specify payment and currency information, as well as information about the event contact. |
|
|
Sourcing Exchange Rate Inquiry Page |
EXCH_RT_DTL_INQ |
View the rate of exchange against the event's currency. |
|
Sourcing Document Status Inquiry Page |
AUC_DOC_STATUS |
View document status associated with sourcing events. |
|
AUC_EVENT_LOT_SEC |
Link an event to a preceding event. This page is available only for auction events. |
|
|
AUC_PLN_RQEV_WRK |
Associate a sourcing event with sourcing project plan tasks. |
This section discusses PeopleSoft Strategic Sourcing event types and formats.
Request for Information (RFI)
You can quickly create an RFI before you issue a request for proposal (RFP) or request for quote (RFx). You use RFIs to gather information before issuing an RFP or RFQ event. The RFI includes header bid factors and no line items. No preview dates exist for RFI events. Bidders can respond to the RFI, and the RFI creator can review the RFI responses. RFIs aren't awarded, but instead are marked as Reviewed. You can, however, score an RFI. You can copy an RFI into a future RFP or RFx, and the related RFI responses are accessible from the Analyze Bids component for bidders who respond to both the RFI and RFP or RFx.
RFI functionality enables event creators and bidders to:
Copy from existing RFIs and RFI templates.
Select options for the RFI, such as whether bidders can edit posted responses, whether responses are required for all bid factors, and whether bid factor weightings should appear to bidders.
Create a PDF version and optionally an XML version of the posted RFI response and send an email with the PDF to the bidder.
Enable bidders to view and respond to RFIs either online or by uploading the XML file.
Analyze RFI responses, optionally assign scores manually to text-based responses, and perform what-if analysis.
Enable creation of buy events by copying an RFI, and maintain a reference of the RFI on the related buy event.
View the related RFI bidder response when analyzing buy events.
Event Templates
You can save events as templates to reuse in future events, and associate an event template with business units, departments, or a specified user, based on the user's security. You can also create templates by selecting In addition, users with the appropriate security can modify templates. PeopleSoft Strategic Sourcing users can copy templates to expedite the event creation process.
You can save a template as a business unit, department, or personal template. If a template is marked as a business unit template, it is available to all users who have access to that business unit. If a template is marked as a department template, you can associate one or more departments with the template. Only users assigned to the associated departments can copy from department templates. If a template is marked as a personal template, only the user who created the template can access it.
Event Lotting
You can create multiple auction events and link them together as lots within an overall auction process. Each lot is treated as a unique event, but is tied to other events. As the bidding on one event lot ends, the bidding on another event lot immediately begins. This continues until all of the linked event lots have finished. You link auction events to other events from the Create Event pages by selecting a preceding event to link to the current event. The start date and time of one event lot depends on the end date and time of the previous lot; therefore, any change to the end date and time of one event lot can change the end date and time of any subsequent event lots. The system recreates the PDF and XML documents for each affected event to ensure that the documents reflect the most current preview, start, and end dates and times.
Bidders can navigate between event lots to view and enter bids. During analysis, you can navigate between event lots to analyze all linked events.
PDF Creation
You can create PDF versions of sourcing events. You can generate PDFs at different stages of the sourcing event process:
Creating an event.
You can select to preview the PDF file during creation of the event to review it before posting the event.
Posting an event.
The PDF file is automatically generated when an event is posted.
Modifying an event.
You can recreate the PDF file after making modifications to the event.
Posting a new version or round of an event.
The PDF file is automatically generated when a new version or round is posted.
Updating event lots.
If the start and end dates are automatically updated on an event lot due to an extension to a linked auction lot, the PDF is automatically recreated and sent to the invited bidders.
If you are using PeopleSoft Supplier Contract Management and have associated contract clauses with bid factors in the event, the contract clauses will be included in the PDF file. Clauses at the header level (event) are contained in an appendix section. However, line-level clauses are included in the Line Details section.
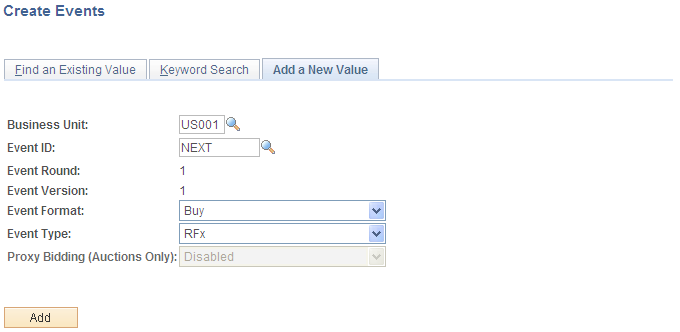
Use the Create Events search page (AUC_CREATE_COMP search) to find an existing event, search by keyword, or add a new event.
Navigation:
This example illustrates the fields and controls on the Create Events search page. You can find definitions for the fields and controls later on this page.
Field or Control |
Description |
|---|---|
Event Round and Event Version |
When creating a new sourcing event, these fields are display-only and have a value of 1. |
Event Format |
Select Buy, RFI, or Sell. |
Event Type |
Select Auction or RFx. If you are creating an auction event and want to enable bidders to use the automatic proxy bidding feature, you must select Auction. |
Proxy Bidding (Auctions Only) |
Select Enabled or Disabled to indicate whether to enable bidders to submit proxy bids automatically. This field is available for auction events only. You can update this setting on the Event Settings and Options page. |
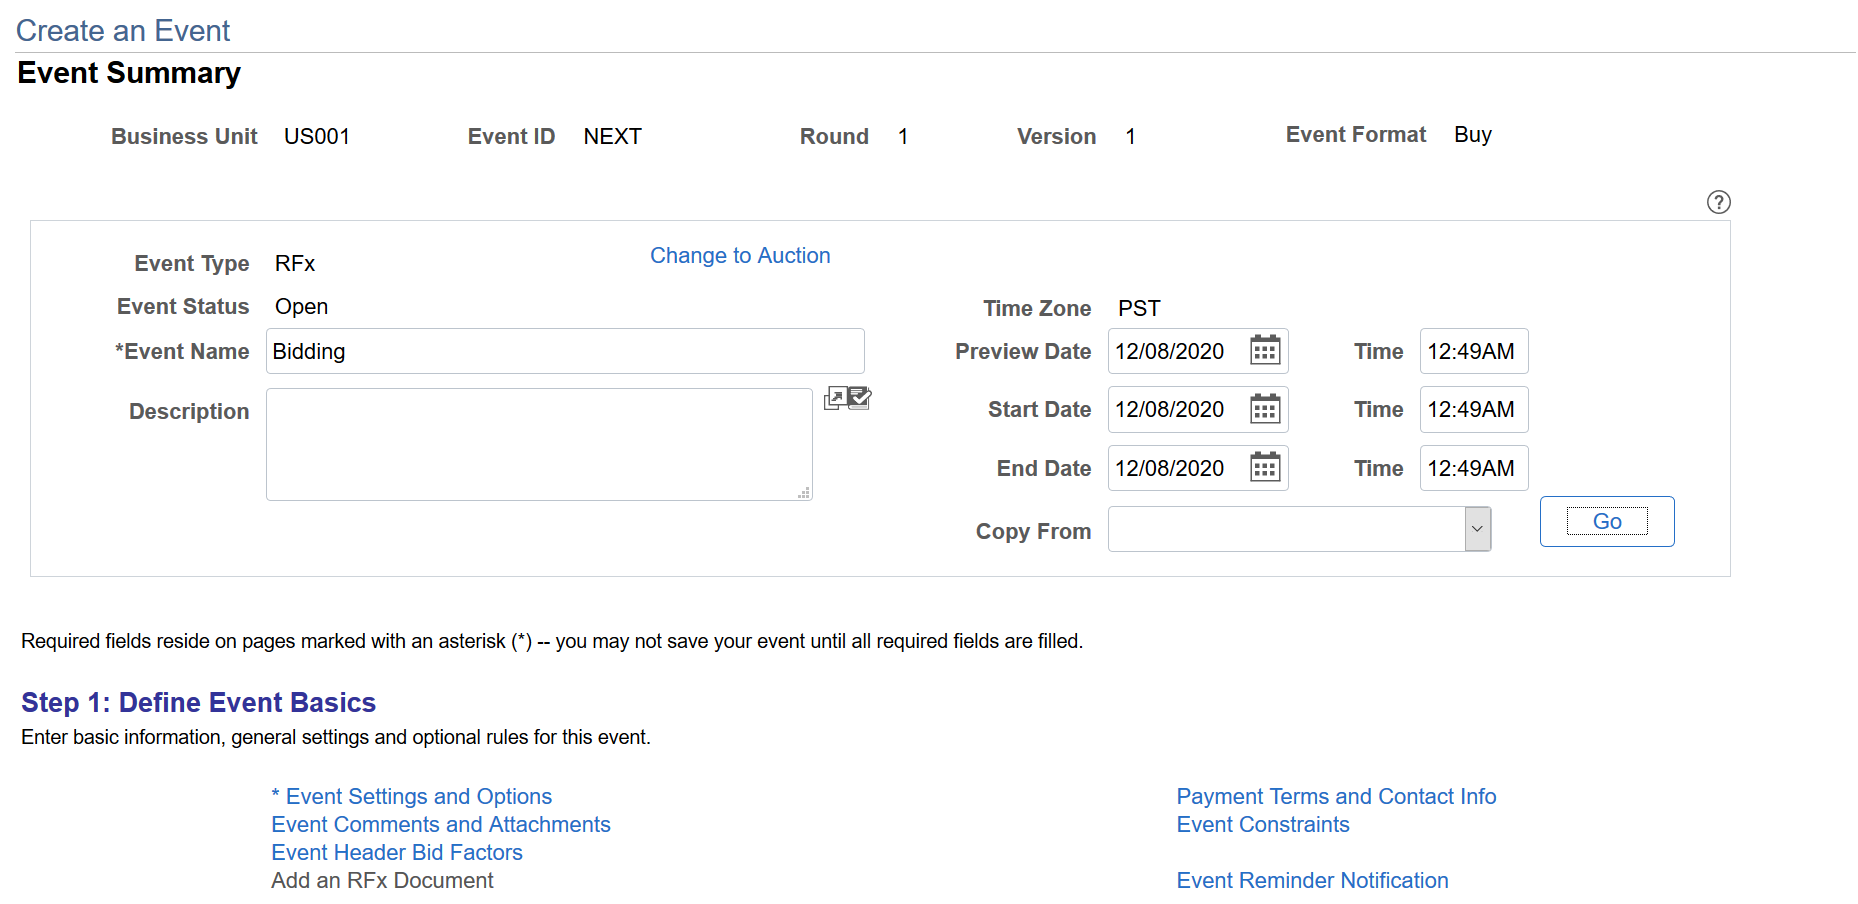
Use the Event Summary page (AUC_CREATE_PG) to enter header information for auction events.
Navigation:
This example illustrates the fields and controls on the Event Summary Page (1 of 3). You can find definitions for the fields and controls later on this page.
This example illustrates the fields and controls on the Event Summary Page (2 of 3). You can find definitions for the fields and controls later on this page.
This example illustrates the fields and controls on the Event Summary Page (3 of 3). You can find definitions for the fields and controls later on this page.
Add header details such as event name, description, preview, and start and end dates for the sourcing event.
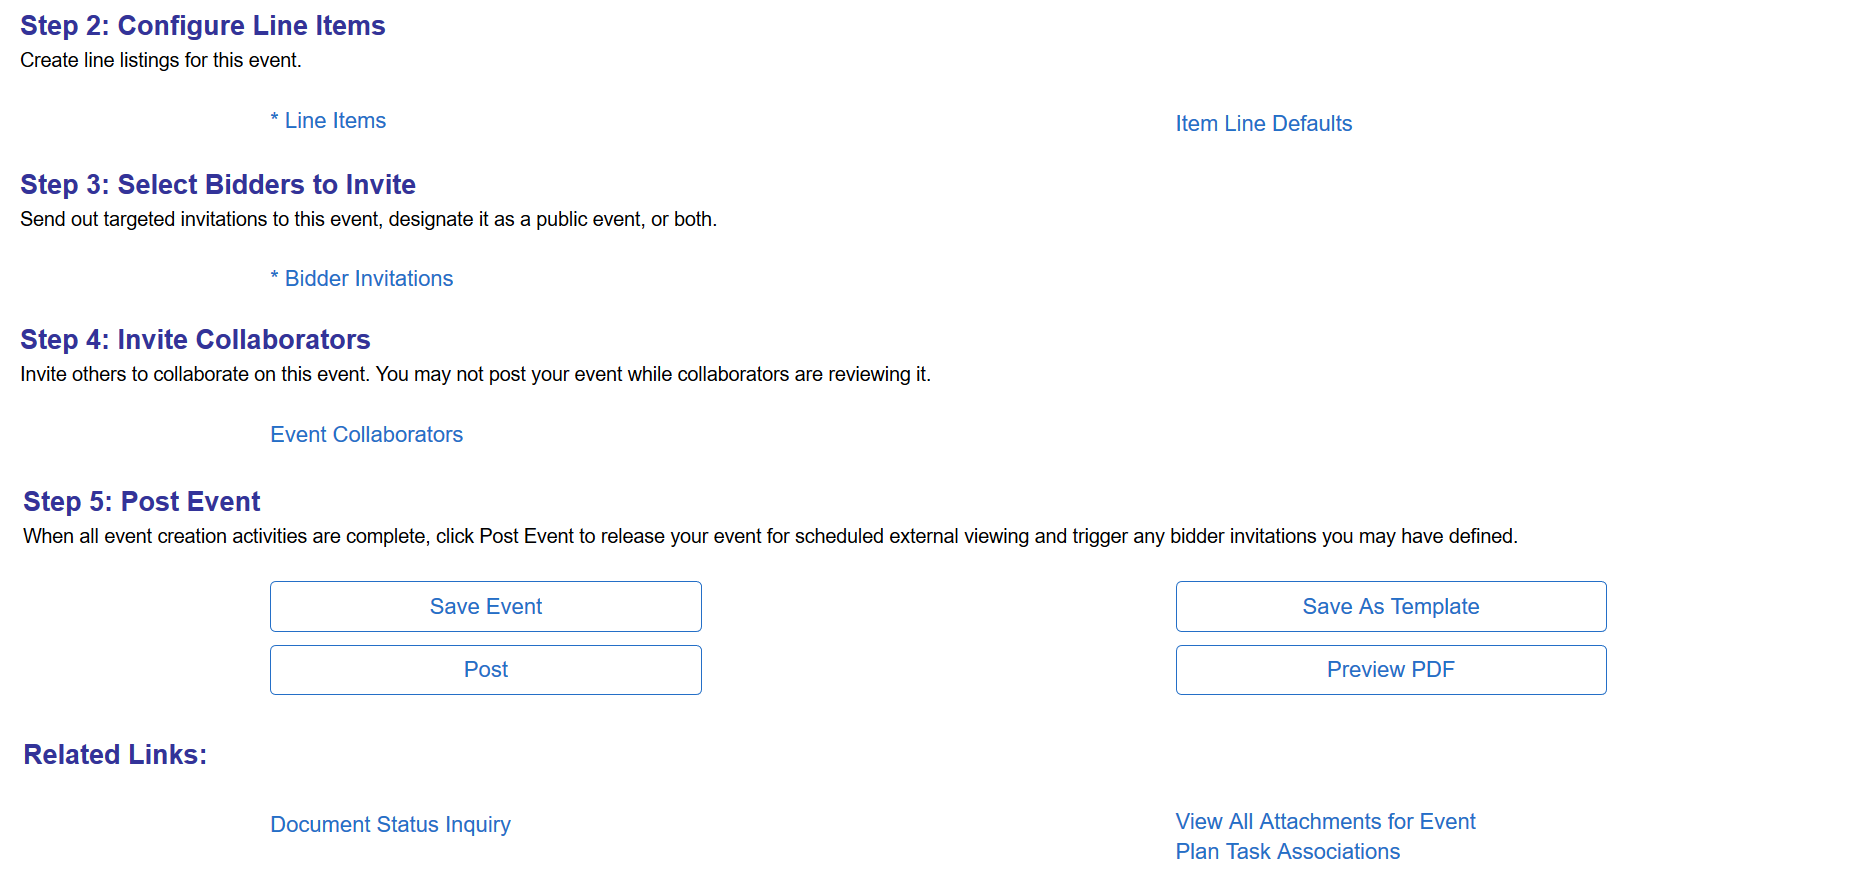
Step 1: Define Event Basis
Field or Control |
Description |
|---|---|
Add an RFx Document |
Select to access the Document Management page in Supplier Contract Management. This link is active only when the event type is RFx and the event is saved successfully. This link is disabled when the event is posted to bidders. This link launches a page that enables you to create the initial authored Sourcing RFx document for the event. When the authored document is created, the Authored Document group box is displayed when re-entering the event. This enables the event collaborators and event specialist to view and edit (if permitted) the authored RFx. The authored RFx can be viewed by bidders and if the Allow RFx Edit check box is selected they can view, change , and upload a bidder-specific RFx document using an external portal. |
Event Reminder Notification |
Click this link to navigate to the Event Reminder Notification page, where you can define the Event Reminder Notification Options. Note: If the End Date and the Current Date are the same, an error message displays when you click the Event Reminder Notification link. You must change the End Date to open the link. |
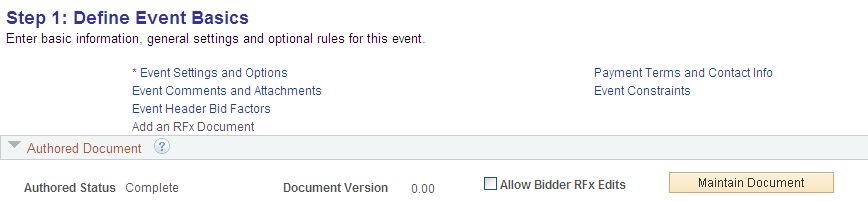
Authored Document
This group box is visible when the document is created in Supplier Contract Management.
Field or Control |
Description |
|---|---|
Authored Status |
Displays the status of the RFx document. |
Document Version |
Displays the version number of the RFx document. |
Allow Bidder RFx Edits |
Select to indicate that the bidder can edit the RFx document in the bid response page. |
Maintain Document |
Click to access the Document Management page where you can edit the RFx document. |
Use the Event Comments and Attachments page (AUC_COMM_SEC) to upload/view the attachments and view RFx documents. An event creator can add up to 99 attachments at a time, if the PeopleTools version is 8.59 or above.
Navigation:
Click the Event Comments and Attachments button on the Event Summary page.
This example illustrates the fields and controls on the Event Comments and Attachments Page. You can find definitions for the fields and controls later on this page.
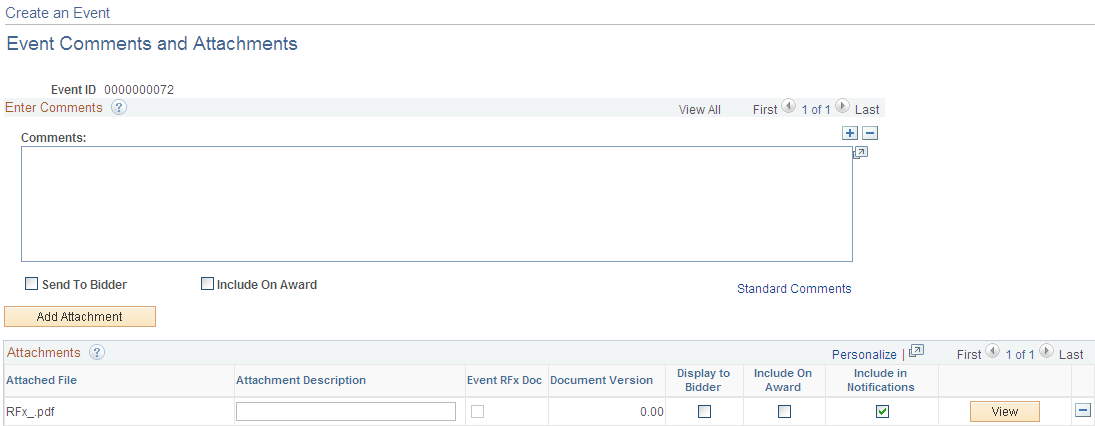
For RFx documents, use this page to view RFx documents after an authored document is generated.
Enter Comments
Field or Control |
Description |
|---|---|
Bidder RFx Document |
Click to access the Bidder RFx Document page. This link is enabled if bid responses exist for the event and when the event version is greater than zero or the event round is greater than zero. |
Attachments
Field or Control |
Description |
|---|---|
Event RFx Doc |
Displays a selected check box, which indicates that the attachment is a RFx document. |
Document Version |
Displays the version of the RFx document. |
View |
Click to access the Bidder RFx Document page for the attachment. |
Use the Event Reminder Notification page (AUC_EVNT_REMIND_PG) to define the configuration settings for sending notifications. By default, the page displays the details specified on the Sourcing - Business Unit Definition page, if specified. You can modify the values, if required.
Uncheck the Allow Event Reminder Notification check box at the event creation level to disable this option.
Navigation:
. Click the Event Reminder Notification link.
This example illustrates the fields and controls on the Event Reminder Notification page.
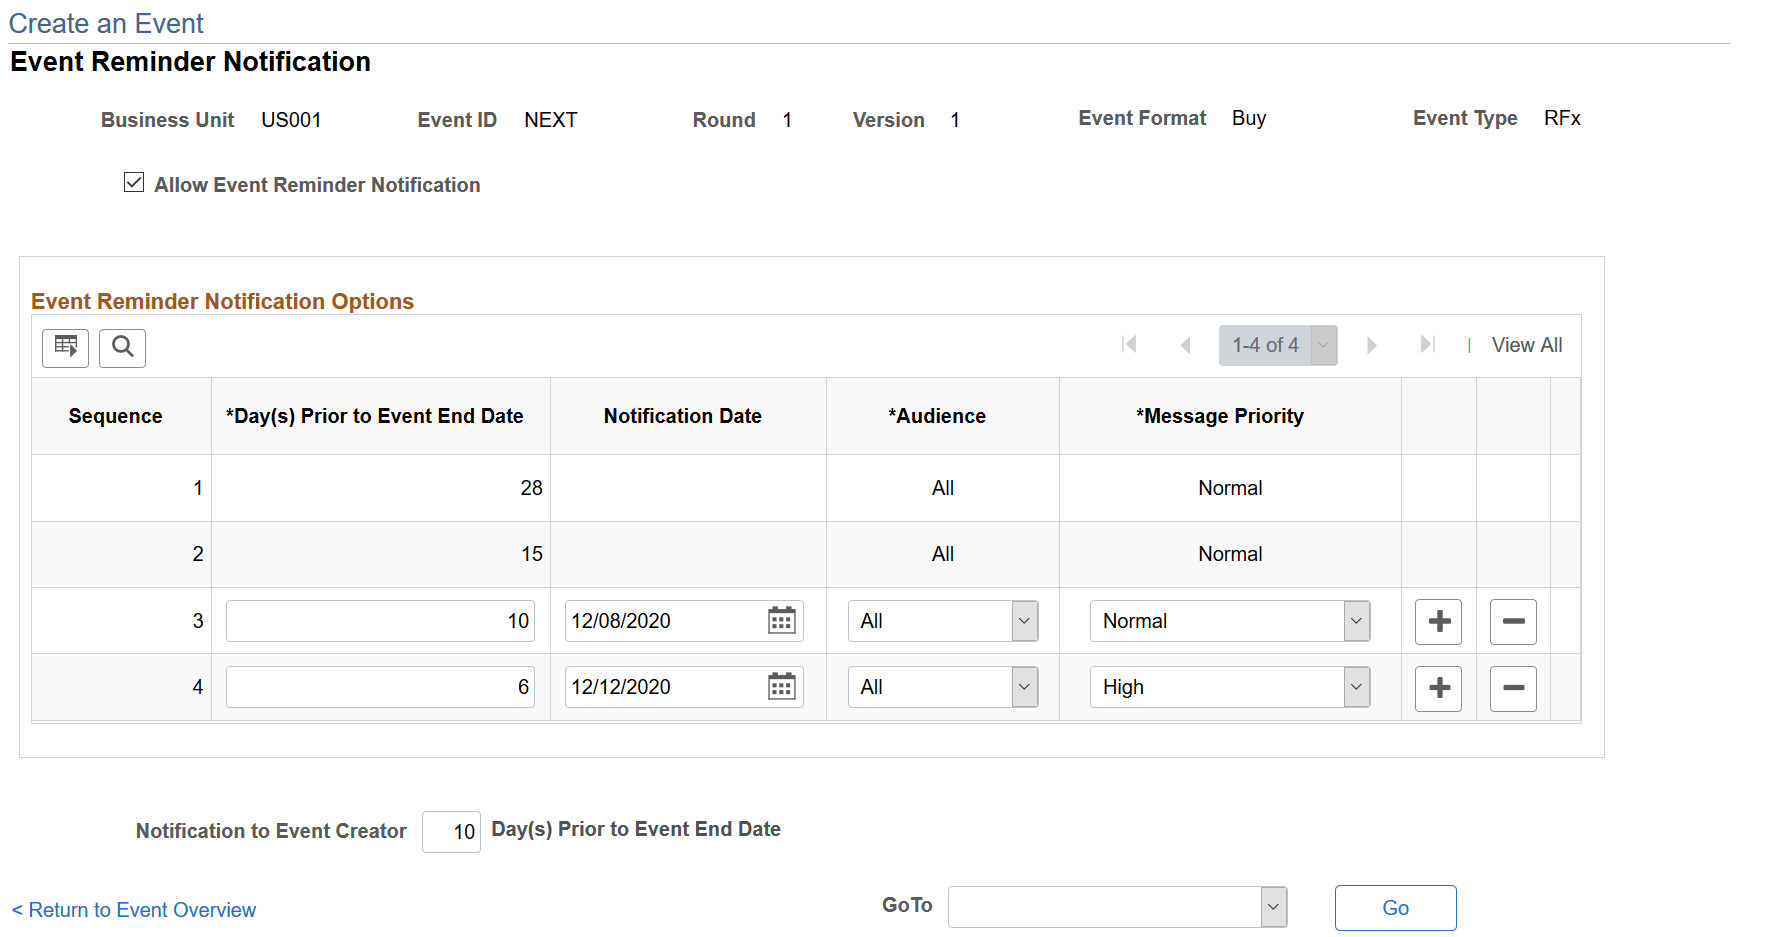
For already sent notifications, the particular row is displayed as read only.
Select the required option from the GoTo drop-down list and click the Go button and proceed with creating the event details.
You can save and post the created event. If the event end date is less than the Event Notification dates, a message displays when you save it. You can either modify the notification date or proceed with the existing date. If you have not modified the end date, the same message displays again when you post the event.
The bidders or suppliers receive a notification mail when the process request is submitted successfully.
This example illustrates the fields and controls on the An example for Event Reminder Notification Mail.

The notification contains the notification priority, event ID, round, and version, a brief description about the reminder with event start and end dates, and a link to view the event details. If logged in, the link opens the Event Details page, where bidders and suppliers can continue with the bidding process.
The alerts can also be seen by clicking the Notifications icon on the Home page and selecting the Alerts option.
An event creator also receives a similar notification X days before the event end date. This helps them to route events to collaborators or to extend the end date with the new version, if no sufficient bids are received.
Use the Enter Copy Criteria page (AUC_COPY_SEC) to use a previous event, requisition, purchase order, contract, PeopleSoft Engineering BOM, PeopleSoft Manufacturing BOM, PeopleSoft Supply Planning planned order, template, or RFI as the template for a new event.
Navigation:
Click the Copy From link on the Event Summary page.
You use the Strategic Sourcing User Preferences page to specify the transactions from which users can copy.
You can use several documents to create one event. The system consolidates identical line items. For example, if you copy from three different requisitions that all contain an identical line item, that line item appears only once on the new event.
Note: If you selected External PO Integration on the Business Unit Definition page and are awarding events to an external purchasing system, you can copy only from sourcing events, sourcing templates, and RFIs.
See Defining Strategic Sourcing Business Units.
Required Fields for Delimited File Import
The following table lists and describes the required fields for importing delimited files into PeopleSoft Strategic Sourcing using the Copy From feature.
Warning! These fields must appear in this order in the delimited file.
|
Field Name |
Description |
Maximum Data Length (Type) |
|---|---|---|
|
INV_ITEM_ID |
The item ID associated with the line item. If it is a buy event, then this is the inventory item ID. If it is a sell event, this is the asset ID. Note: This field is not required if you are defining an item by description. |
18 characters |
|
DESCR254_MIXED |
The description of the line item. If you are using an item ID, the description will be the default value for the line based on the item ID. |
245 characters |
|
CATEGORY_CD |
The category code associated with the item. If it is a buy event, this is the item category. If it is a sell event, this is the asset category. If you are using an item ID, the category will be the default value for the line based on the item ID. |
18 characters |
|
UNIT_OF_MEASURE |
The unit of measure (UOM) code associated with the line. If you are using an item ID, the UOM will be the default value for the line based on the default UOM associated with the item. |
3 characters |
|
QTY_AUC |
The requested line quantity for the line. |
11.4 numeric |
|
AUC_PRICE |
The starting price for the line item. If you are using an item ID, the start price should be entered on the line by default based on the standard price associated with the item. |
11.5 numeric |
|
WEIGHTING |
The line weighting associated with the line. If this field is left blank, all lines should be weighted equally when imported into the event. |
3.5 signed |
|
COMMENTS_2000 |
Comments associated with the line. |
Long field |
|
DUE_DATE |
The due date for the item. |
10 date |
|
SHIPTO_ID |
The ship to location code for the item. |
10 characters |
|
FREIGHT_TERMS |
The freight terms code for the item. |
10 characters |
|
SHIP_TYPE_ID |
The ship via code for the item. |
10 characters |
|
SHIP_FROM_LOC |
The ship from location code for the item. |
10 characters |
This table contains optional fields that can be included in the delimited file.
|
Field Name |
Description |
Maximum Data Length (Type) |
|---|---|---|
|
MFG_ID |
The ID of the manufacturer of the item. |
50 characters |
|
MFG_ITM_ID |
The manufacturer's ID for the item. |
50 characters |
|
AUC_ITEM_LENGTH |
The length of the item. |
11.4 signed |
|
AUC_ITEM_WIDTH |
The width of the item. |
11.4 signed |
|
AUC_ITEM_WEIGHT |
The weight of the item. |
11.4 signed |
|
AUC_ITEM_VOLUME |
The volume of the item. |
11.4 signed |
|
AUC_ITEM_HEIGHT |
The height of the item. |
11.4 signed |
|
AUC_ITEM_SIZE |
The size of the item. |
5 characters |
|
AUC_ITEM_COLOR |
The color of the item. |
15 characters |
|
AUC_WEIGHT_UOM |
The unit of measure code associated with the weight. |
3 characters |
|
AUC_VOLUME_UOM |
The unit of measure code associated with the volume. |
3 characters |
|
AUC_DIMENSION_UOM |
The unit of measure code associated with the width. |
3 characters |
Copy Template
Field or Control |
Description |
|---|---|
Copy From |
Select the source from which to copy. Values are:
|
Select Criteria
Field or Control |
Description |
|---|---|
Copy Method |
Select the way the system copies the information. Values are:
|
Other fields that appear in the Select Criteria group box depend on the selection in the Copy From field.
Copy Criteria
Enter identifying information into a field to search for a template. Narrow the search response by entering criteria in more than one field.
Copying from a Delimited File
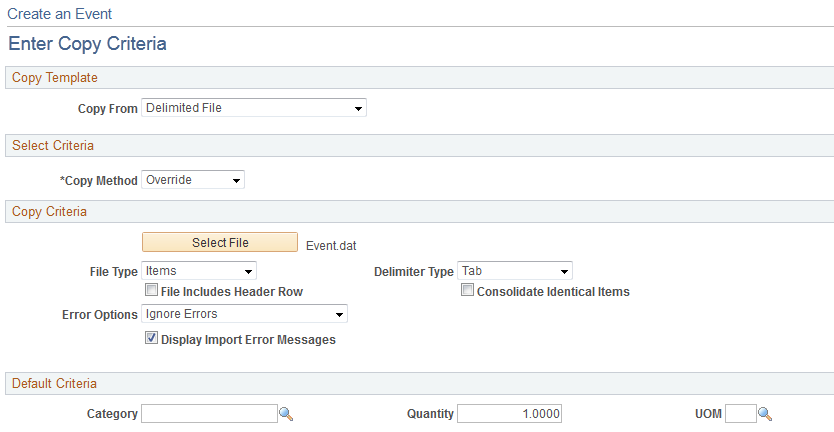
Use the Enter Copy Criteria page (AUC_COPY_SEC) to select the delimited file that you want to import.
This file should currently reside on your FTP server.
Navigation:
Click the Copy From link on the Event Summary page. Select Delimited File.
Click the Line Items link on the Event Summary page, and select Delimited File from the Copy From drop-down list box.
Access the Enter Copy Criteria page (select the Copy From option on the Event Summary page).
This example illustrates the fields and controls on the Enter Copy Criteria page (copy from delimited file). You can find definitions for the fields and controls later on this page.
Field or Control |
Description |
|---|---|
Copy From |
If you selected Delimited File on the Event Summary page, then the default value is Delimited File. |
Copy Method |
Select Append or Override. |
Select File |
Click this button to select the delimited file that you want to copy into the sourcing event. Click the Browse button to locate the file, and then click the Upload button. The file is uploaded, and you will then be returned to the Enter Copy Criteria page. |
Selected File |
The system displays the name of the file you uploaded. |
File Includes Header Row |
Select this option if the delimited file contains a header row. If this option is selected, the system ignores the first row of the file. Do not select this option if you want the system to import the file beginning with row 1. |
Consolidate Identical Items |
Select this option if you want the system to consolidate identical items into one event line. |
Delimiter Type |
The system displays the type of delimiter that was used for the uploaded file. Values are:
|
Specify Delimiter |
Enter the delimited character used in the import file. This is a required field used with the Other value in the Delimiter Type field. The length of this field is two characters |
Display Import Error Messages |
Select this check box if you want the system to display a list of all error messages encountered during the import process. |
Error Handling Options |
Select how you want to handle any errors received during the import process. Values are:
|
Category |
The system populates the line or item with the default value. This value comes from the AUC_LINE record. |
UOM (unit of measure) |
The default UOM associated with the line or item. |
Quantity |
The default quantity associated with the line or item. |
OK |
Click to access the Lines to Import page. |
Selecting Lines to Import from the Delimited File
Use the Lines to Import page (AUC_COPY_FILE ) to select the line information that will be imported from the delimited file.
Navigation:
Click the Line Items link on the Event Summary page, and select Delimited File from the Copy From list.
Select the delimited file that you want to copy, and click the OK button.
All fields on the tabs are display-only except for the Sel (select) column. You can view item details, shipping details, specifications, and comments associated with the line items.
Field or Control |
Description |
|---|---|
Sel (select) |
Select the check box for the lines that you want to copy. |
OK |
Click to copy the selected lines from the delimited file. |
Viewing Import File Errors
Use the Import File Errors page (AUC_COPY_FILE_MSG) to review errors and warning messages encountered during the import process.
Navigation:
Select the delimited file that you want to copy on the Enter Copy Criteria page, and then click the OK button.
Select the lines to copy on the Lines to Import page, and then click the OK button.
This page displays errors and warnings encountered during the import process.
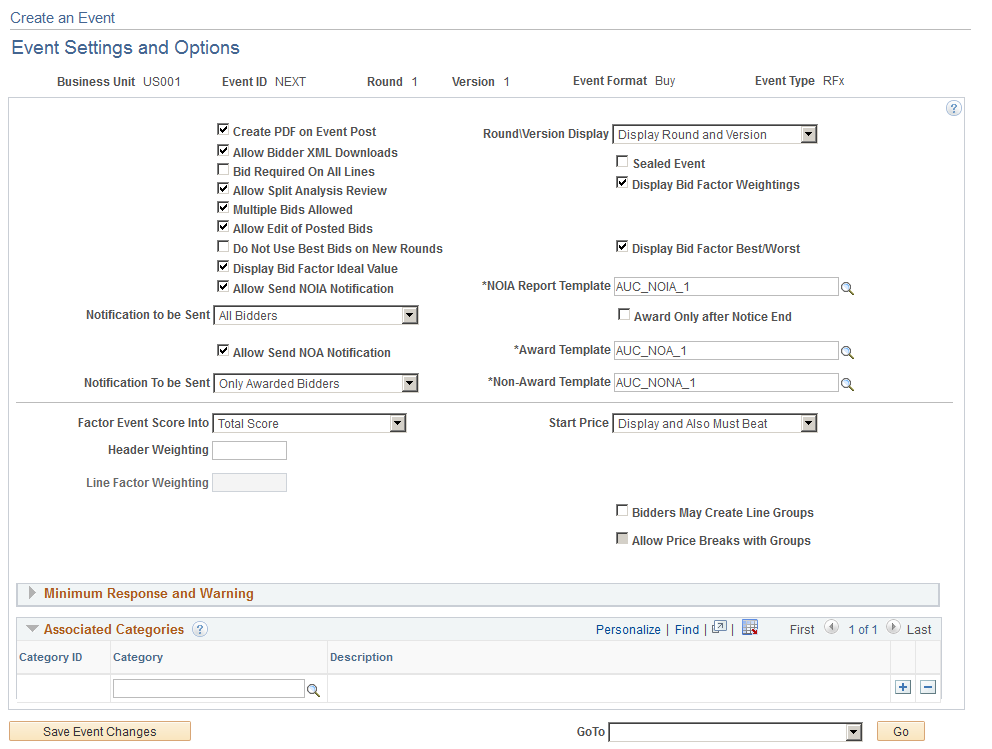
Use the Event Settings and Options page (AUC_OPTIONS_PG) to specify the rules related to an event, as well as what information can appear to bidders.
For auction events, specify event extension criteria.
Navigation:
Click the Event Settings and Options link on the Event Summary page.
This example illustrates the fields and controls on the Event Settings and Options page (RFx). You can find definitions for the fields and controls later on this page.
This example illustrates the fields and controls on the Event Settings and Options page (Auction). You can find definitions for the fields and controls later on this page.
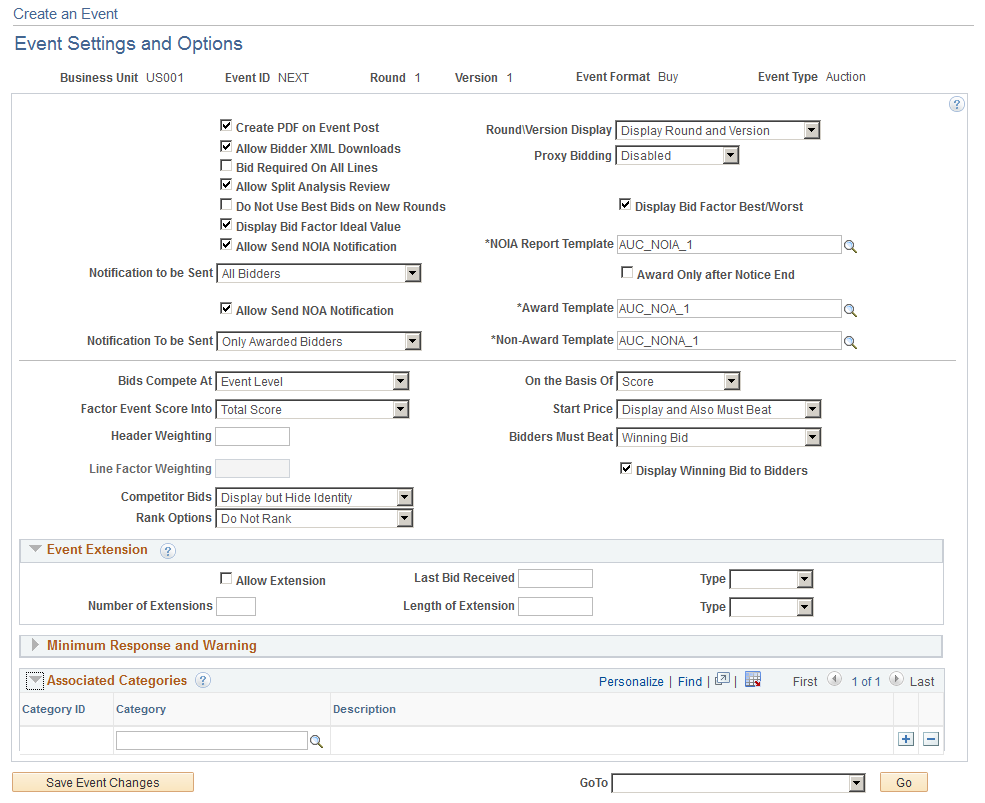
Some fields are common to RFx and auction sourcing events. Any differences between the two event types are noted.
Field or Control |
Description |
|---|---|
Create PDF on Event Post |
Select to create a PDF version of the sourcing event. If this option is not selected, PDF creation is suppressed. The value will default from the Business Unit Definition page (Set Up Financials/Supply Chain, Business United Related, Sourcing, Business Unit Definition), but you can override this option for the event. |
Allow Bidder XML Downloads |
Select to enable bidders to download events to an XML file. If this option is not selected, a PDF version of the sourcing event is created; however, an XML version is not created when the events are posted. |
Bid Required On All Lines |
Select this check box if you require bidders to bid on all lines on the event. The default value comes from the Sourcing Business Unit Definition page but you can change it here. |
Allow Split Analysis Review |
Select this check box to enable split analysis for this event. This check box must be selected to enable the Bid Analysis Review Sections link on the Event Summary page. Note: This field is available only if split analysis is enabled on the Sourcing - Business Unit Definition page. |
Post Events to Third Party |
Select to allow this event to be posted to third-party bid management systems. Note: This field is available only if posting to third-party systems is allowed by the business unit. |
Send PDF and XML Files |
Select to enable the system to send the PDF and XML files that are generated on event post to third-party systems. Note: This field is available only if posting to third-party systems is allowed by the business unit. |
Round/Version Display |
Select one of these options:
The default value comes from the Sourcing Business Unit Definition page, but you can change it here. |
Allow send NOIA Notification |
Select to send a communication to the bidders that they have been identified for awarding a PO or contract. This check box is selected if you have selected this check box for your business unit in the Sourcing - Business Unit Definition Page. If you do not want to use the (Notice of Intent to Award) NOIA feature for the event, you may deselect this check box. However, this check box has not been selected in the Sourcing - Business Unit Definition Page, then you cannot use the NOIA on the event. If this check box is selected, all the related fields for NOIA is available. An email is necessary, and an NOIA report template must be populated to use the NOIA feature. |
Notification to be Sent |
Displays the option set in the Sourcing - Business Unit Definition Page. You may choose other bidders. |
NOIA Report Template |
Displays the option set in the Sourcing - Business Unit Definition Page. You may select another report template. This adds a new NOIA report template to the BI report. The report template file will then be used to generate a PDF which will be attached to the NOIA email. |
Award Only after Notice End Date |
Use this check box to prevent a user from posting an Award to Purchase order or Contract provided before the notice period has ended. |
Allow send NOA Notification |
Select this option for sending NOA email to the awarded bidders and non-awarded bidders. This check box will be selected if you have selected this check box for your business unit in the Sourcing - Business Unit Definition Page. If you do not want to use NOA for the event, you may deselect this check box. However, if this check box has not been selected in the Sourcing - Business Unit Definition Page, then you cannot use the NOA feature on the event. If this check box is selected, all the related fields for NOA is available. The Notice of Award (NOA) template and a Non-Award template along with a standard email template must be setup to use this feature. |
Notification to be Sent |
Displays the option set in the Sourcing - Business Unit Definition Page. You may select other bidders. |
Award Template |
Displays the option set in the Sourcing - Business Unit Definition Page Select an award template. This template will be added to the BI report. The award template of type RTF will then be used to generate a PDF which will be attached to a standard email notification and sent to the Awarded bidder. |
Non- Award Template |
Displays the option set in the Sourcing - Business Unit Definition Page Select a non-award template. This template will be added to the BI report . The non-award template of type RTF will be used to generate PDF report file which will be attached along with a standard email template and sent to the non-awarded bidder. |
Factor Event Score Into |
Select to indicate that you want the system to factor the header score into the total score for the event or the individual line score. If you plan to award an entire event to one bidder, you would likely want to factor the header score into the total score. If you intend to award lines to different bidders, Oracle recommends that you factor the header score into the individual line score. The default value comes from the Sourcing Business Unit Definition page, but you can change it here. Note: If you are using the Optimization Engine to determine the ideal award allocation for events, you should factor the header score into the individual line score. Optimization uses each line's price and score, not the total price or score, to determine an ideal award allocation. |
Header Weighting |
Enter a default weighting for how the system weights the header score in relation to the total score. The default value comes from the Sourcing Business Unit Definition page, but you can change it here. For example, assume that you set the default event header weighting to 20 percent, and then you create an event with three lines. Line 1 is weighted 50 percent, line 2 is weighted 20 percent, and line 3 is weighted 10 percent. The total weighting of the lines is 80 percent plus the defaulted weighting of the header (20 percent), totalling 100 percent if you selected to factor the header score into the total score. If you selected to factor the header score into the individual line score and your default event header weighting was 20 percent, then the weighting for the other bid factors for each line must total 80 percent. For example, you could have price weighted at 50 percent, warranty weighted at 30 percent, and the header score weighted at 20 percent for a total weighting of 100 percent for the line item. Note: If you select to factor the header score into the individual line score, a header bid factor is automatically added to each line within the event. This bid factor is not displayed to bidders but is used to calculate the score of the line based on the event header score plus the score for the line bid factors. |
Start Price |
Select a value to indicate the basis for pricing:
|
Do Not Use Best Bids on New Rounds |
This setting defaults from the Sourcing Business Unit Definition page based on the business unit. However, you can change the setting at the event level here. Select to indicate that new rounds should not be created using best bids when the bids are countered. If you select this option, then bidders will not be able to accept the counter offer on the Create Bid Response page; bidders will be forced to rebid. In this scenario, bidders will still be able to either counter or withdraw the bid. |
Display Bid Factor Best/Worst and Display Bid Factor Ideal Value |
These settings default from the Sourcing Business Unit Definition page based on the business unit. However, you can change the settings at the event level here. Select to show the best and worst values for the bid factor or the ideal value for the bid factor on the Create Bid Response page. If you deselect these options, then bidders will not be able to see the best and worst values or the ideal value for a bid factor on the Create Bid Response page. |
RFx Only Fields
Field or Control |
Description |
|---|---|
Multiple Bids Allowed |
Indicates whether bidders (for RFx events) can post multiple bids on the same event. The default value comes from the Sourcing Business Unit Definition page, but you can change it here. |
Allow Edit of Posted Bids |
Indicates whether bidders (for RFx events) can edit their posted bids until the event ends. The default value comes from the Sourcing Business Unit Definition page, but you can change it here. |
Sealed Event |
If this option is selected, the system hides all bid response information from the event creator until the event ends. Users cannot see any bid information while the event is still open for bidding. The default value comes from the Sourcing Business Unit Definition page, but you can change it here. |
Display Bid Factor Weightings |
Select to display to bidders the weightings associated with bid factors. The default value comes from the Sourcing Business Unit Definition page, but you can change it here. |
Auction Only Fields
For auction events, you can specify an event end date to be extended automatically if a bid is posted within the specified time period before the event end date. You can specify how many extensions can take place and the length of time that the event should be extended. If an auction event is extended and has subsequent event lots, the preview, start, and end dates for the subsequent lots are also updated.
Field or Control |
Description |
|---|---|
Proxy Bidding |
If automatic proxy bidding is enabled, this field appears. Select Enabled or Disabled to indicate whether proxy bids are to be allowed on this auction event. The default value comes from the Sourcing Business Unit Definition page, but you can change it here. In addition, you can override the proxy bidding setting from the Create Events (add) page. |
Bidders Compete at |
Select either Event Level or Line Level. If Event Level is selected, bidders compete based on the total price or total score for the entire event. In some cases, a bidder may have a worse price or score on one or more lines but still be the winning bidder as long as the bidder's total price or score beats the other bids. If Line Level is selected, bidders compete based on each line's price or score. The default value comes from the Sourcing Business Unit Definition page, but you can change it here. Note: If automatic proxy bidding is enabled, bidders must compete at the line level; therefore, this field is unavailable for selection. |
Competitor Bids |
Select a value to indicate whether to display the bids of competitors. Values are:
|
Rank Options |
Select a value:
The default value comes from the Sourcing Business Unit Definition page, but you can change it here. Note: If automatic proxy bidding is enabled, the only option is Do Not Rank, and the system selects it as the default value. |
On the Basis of |
Select a value to indicate the basis on which the auction event is based. Values are Price and Score. If Price is selected, the bidders will compete solely on price, either total or per line, and no other bid factors can be added to the event. If Score is selected, the bidders will compete based on score, either total or per line, and the user can add as many bid factors to the event. The default value comes from the Sourcing Business Unit Definition page, but you can change it here. Note: If automatic proxy bidding is enabled, the system selects the value of Price because automatic proxy bids are based on price only. |
Bidders Must Beat |
Select Own Bid or Winning Bid. If Own Bid is selected, a bidder must beat his last posted bid on the event. If Winning Bid is selected, a bidder must beat the current winning bid. The default value comes from the Sourcing Business Unit Definition page, but you can change it here. Note: If automatic proxy bidding is enabled, the value of Winning Bid is selected. |
Display Winning Bid to Bidders |
Select if you want the winning bid to appear to all bidders. This option must be selected if you require bidders to beat the winning bid. The default value comes from the Sourcing Business Unit Definition page, but you can change it here. Note: If automatic proxy bidding is enabled, this field is not available. |
Allow Extension |
Select to activate the extension function for the event that you are creating. |
Last Bid Received and Type |
Enter a time period, relative to the end time of the event, during which bidding is extended for the event. For example, if the Last Bid Received field has the value 1 and the type is Hours, then the event is extended when a bid is received within one hour before the scheduled end time. Note: The extension begins at the scheduled end time, not at the time of the last bid. |
Number of Extensions |
Enter the number of times that the event can be extended. An extension occurs if the Last Bid Received and Type field criteria are met for as many extensions as you allow. The event ends either when no bid is received before the time for the last bid expires or the number of extensions is reached (regardless of when the last bid is entered). |
Length of Extension and Type |
Enter the amount of time to enable bidding to continue after each extension starts. For example, if the length of extension is 4, and the type is Hours, then the event extended four hours after the scheduled end time. Note: The extension begins at the scheduled end time, not at the time of the last bid. |
Minimum Number of Bid Responses |
Enter a number. If the number of bidders’ responses is less than the value specified in this field, then an alert will be displayed on the Procurement Operations Home Fluid pages under the My Sourcing Events tile and on the Navigation bar. If this field is left blank, no Alerts will be displayed for this event. |
Number of Days Warning Prior |
Enter a number (in days) in this field only if you entered a number in the Minimum Number of Bid Responses field. This option enables you to validate Invited Bidders against the Bid Responses and check if the invited bidder number is equal to bidder responded number. If it is not, an Alert is raised. A warning is also is displayed on the My Sourcing Event page. For Example: You enter Minimum Number of Bid Responses as 10 and Number of Days Warning Prior as 5 days. If the event has 25 Bidders invitation, and you only have 5 responses with event due to end in 5 days, then an alert will be triggered. |
Use the Event Contact Details page (AUC_CONTACT_PG) to specify payment and currency information, as well as information about the event contact.
Navigation:
Click the Payment Terms and Contact Info link on the Event Summary page.
This example illustrates the fields and controls on the Event Contact Details page. You can find definitions for the fields and controls later on this page.
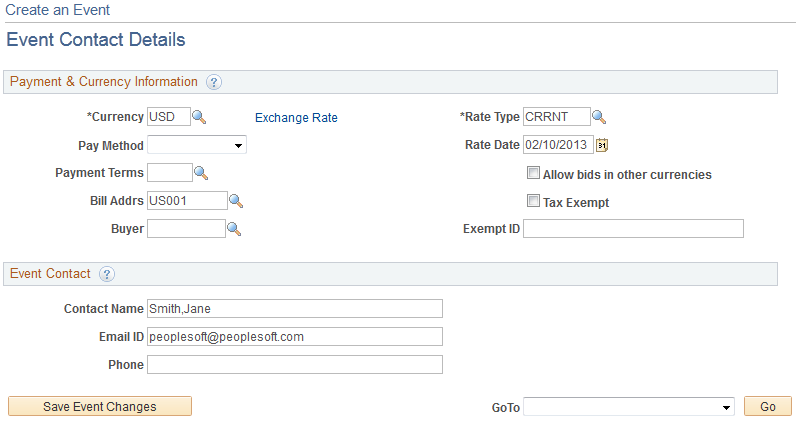
Payment & Currency Information
Field or Control |
Description |
|---|---|
Currency |
Select the currency to be used for payment. This is a required field. |
Exchange Rate |
Click to access the Sourcing Exchange Rate Inquiry page to view conversion rate information. |
Pay Method |
Select a method for payment that will be accepted. Values are Cash, Check, Credit Card, DD (Direct Deposit), Draft, EFT (Electronics Fund Transfer, and Giro-EFT. |
Payment Terms |
Select a value to indicate the payment terms for the event. |
Bill Addrs (billing address) |
Select the address to which all invoices should be sent. |
Buyer |
(Optional) Select a value to be assigned to this event. |
Rate Type |
Select a rate type for the event. This field is required. The default value comes from the Sourcing Business Unit Definition page but you can change it here. |
Rate Date |
Enter an effective date for the rate type. This is a required field. |
Allow Bids in Other Currencies |
Select to permit bidders to enter bids in currencies other than the event currency. |
Tax Exempt |
Select if your company is tax exempt. |
Exempt ID |
Enter your company's tax exemption identification number. This field works with the Tax Exempt field. |
Event Contact
Enter information such as name, email address, and phone number for the individual to be contacted in connection with this event.
Use the Event Lots page (AUC_EVENT_LOT_SEC) to link an event to a preceding event.
This page is available only for auction events.
Navigation:
Click the Event Lots link on the Event Summary page.
This example illustrates the fields and controls on the Event Lots page. You can find definitions for the fields and controls later on this page.
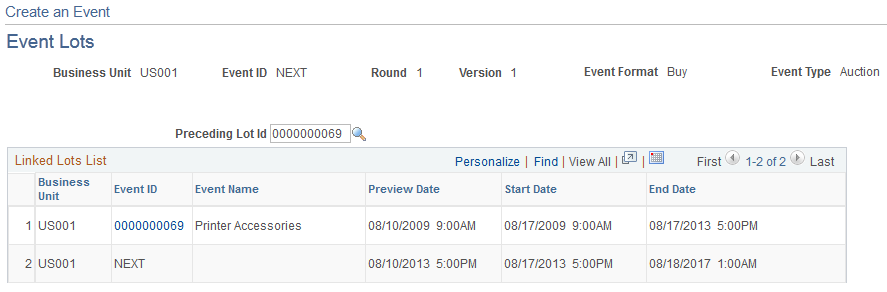
Note: This page is available only for auction events.
To create lotting events, select a preceding lot ID to associate this event with one scheduled to occur before it. The second event does not begin until the first event has ended.
When you change an event end date for which subsequent event lots exist, the system:
Updates all subsequent event lot dates based on the original increments set for the preview and end dates.
Regenerates the PDF and XML documents for all affected events.
Generates an email notification to the invited bidders notifying them of the changes in the event dates and times.
Use the Associate Plan Tasks page (AUC_PLN_RQEV_WRK) to associate a sourcing event with sourcing project plan tasks.
Navigation:
Click the Plan Tasks Associations link on the Event Summary page.
This example illustrates the fields and controls on the Associate Plan Tasks page. You can find definitions for the fields and controls later on this page.
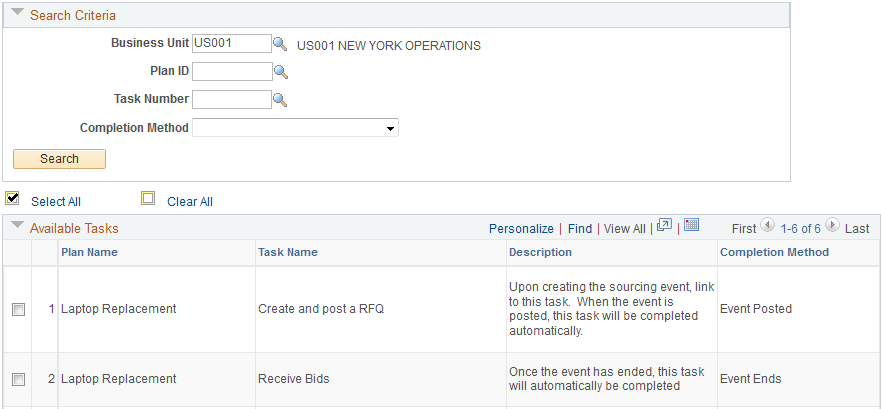
Search Criteria
Field or Control |
Description |
|---|---|
Business Unit |
Select the business unit for the sourcing plan. |
Plan ID |
Select the sourcing plan. |
Task Number |
Select a specific task number associated with the sourcing plan. If you want to view all tasks associated with the sourcing plan, leave this field blank. |
Completion Method |
Select a value to indicate the method that could cause the status of the event to be updated:
|
Search |
Click the search button to retrieve the sourcing plan. |
Select All |
Select to indicate that you want to add all tasks associated with the sourcing plan. |
Clear All |
Select to deselect all selected tasks. |
Available Tasks
Select the check box for each task that you want to use.