Editing and Maintaining Documents Using Content Controls
These topics are discussed:
You can insert text between clause and section content controls. To do this:
Click the tab on the Content Control (clause) after the point in which you want to insert the text.
Click the scroll-up arrow.
If you want to insert text and there are no blank lines in between content controls, then you need to position your cursor at the beginning, or end, of the content control and use arrow key to move outside of the control.
To tag content using content controls within a new Microsoft Word document:
Highlight the clause text.
Select the Developer tab and click on the Rich Text content control 'Aa' icon.
The highlighted text is wrapped in a box:
This example illustrates the fields and controls on the Rich Text Content. You can find definitions for the fields and controls later on this page.
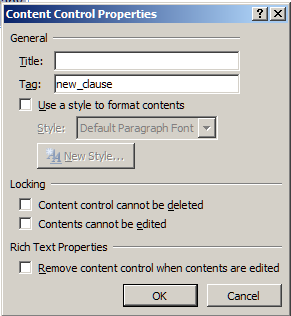
From the Developer tab, click on the Properties option.
In the Tag field, enter new_clause.
This example illustrates the fields and controls on the Content Control Properties window from the Developer tab. You can find definitions for the fields and controls later on this page.
Continue step three and four for id, title, full_text, and by_reference.
If you only add a content control using the new_clause tag to a clause with no other content controls within the new_clause tag, then all text in the content control will be imported as full text.
If you have many clauses to import, you can streamline this process by adding custom buttons to the Quick Access Tool bar in Word. This enables you to highlight various sections of a clause and use these buttons to tag clauses with a single click for each property: new_clause, id, title, full_text, and by_reference.
Using custom buttons enables you to streamline the tagging process for large documents. Adding buttons that insert a rich text Content Control and set properties for the selected control can be performed on a two-step process:
Record the macro.
Add the recorded macro to the Quick Access Toolbar
Note: This information is suggested based on Microsoft Word functionality and is not controlled by Oracle functionality.
Recording the Macro
To record the macro:
Open Word and click on the Developer tab.
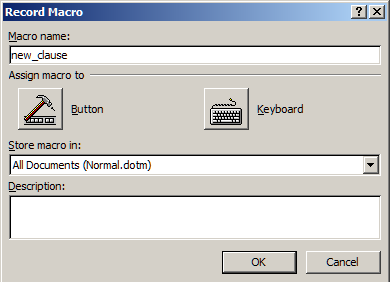
In the Code group box, click the Record Macro button.
In the Record Macro window, enter new_clause in the Macro name field.
In the Store macro in field, select All Documents (Normal.dotm).
This example illustrates the fields and controls on the Record Macro window. You can find definitions for the fields and controls later on this page.
Click the OK button to begin recording.
In the Controls group box, click the Rich Text (Aa) icon
In the Controls group box, click the Properties icon.
In the Content Control Properties window, enter new_clause in the Tag field.
This example illustrates the fields and controls on the Content Control Properties window when recording a macro. You can find definitions for the fields and controls later on this page.
On the Content Control Properties window, click the OK button.
In the Code group box, click on the Stop Recording button.
Adding a Recorded Macro to the Quick Access Toolbar
The Quick Access Toolbar is located in the upper-left portion of the Word window. It is a customizable toolbar where you can place buttons for frequently used commands or macros.
To add a recorded macro to the Quick Access Toolbar:
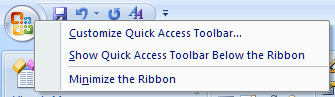
Right-click on the Quick Access toolbar and select Customize Quick Access Toolbar.
This example illustrates the fields and controls on the Quick Access Toolbar - right click. You can find definitions for the fields and controls later on this page.
This opens the Word Options window.
From the left pane, click the Choose commands from drop-down and select Macros.
This example illustrates the fields and controls on the Word Options window - Macros. You can find definitions for the fields and controls later on this page.
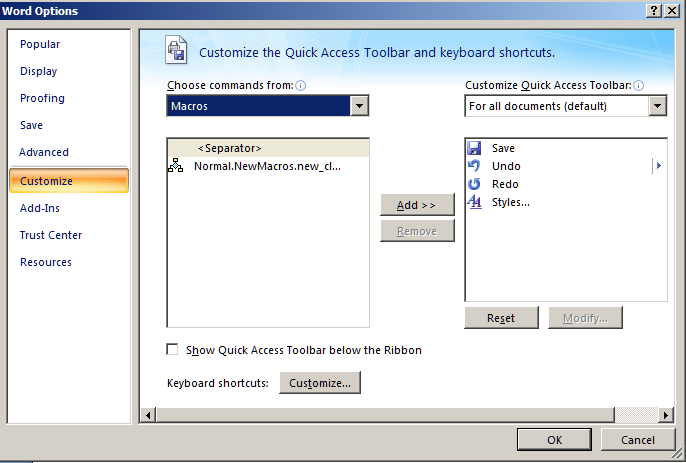
From the left pane, click one time on the macro name Normal.NewMacros.new_clause.
In the center of the two panes, click the Add >> button.
This moves the Normal.NewMacros.new_clause to the right pane.
This example illustrates the fields and controls on the Word Options window - Add. You can find definitions for the fields and controls later on this page.
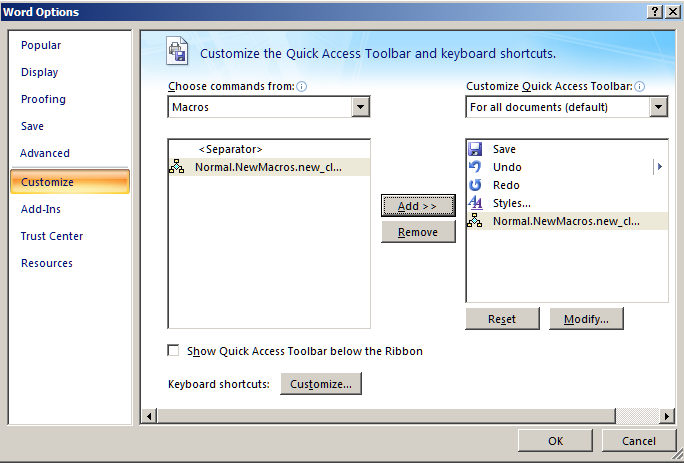
Below the right pane, click the Modify button to apply an icon of your choice to this button.
This example illustrates the fields and controls on the Modify Button window. You can find definitions for the fields and controls later on this page.
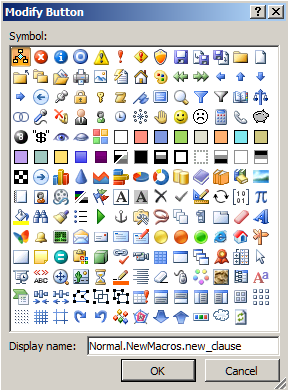
From the Modify Button window, select a button and enter new_clause in the Display name field.
This enables this name to appear when you hover your mouse pointer over the icon from the Quick Access Toolbar.
Click the OK button.
The macro button for the new_clause macro is now located in the Quick Access Toolbar. When you want to tag a section of a clause as a new_clause, highlight the text and click the button. The clause section will be tagged with the content control tags showing a new_clause.
Repeat these steps to create macro buttons for these remaining content control tags: id, title, full_text, and by_reference.
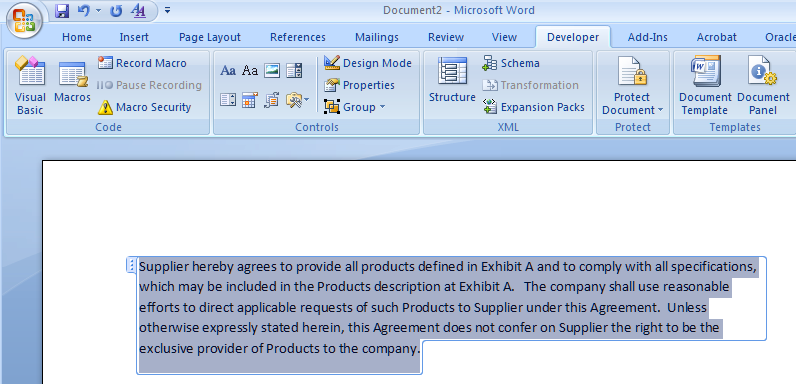
Example of a Clause Tagged with Multiple Content Controls
This is an example of a clause that is tagged with multiple content controls for clause title and full text. This is how your clauses should appear in your Word document:
This example illustrates the fields and controls on the Tagged Clause. You can find definitions for the fields and controls later on this page.
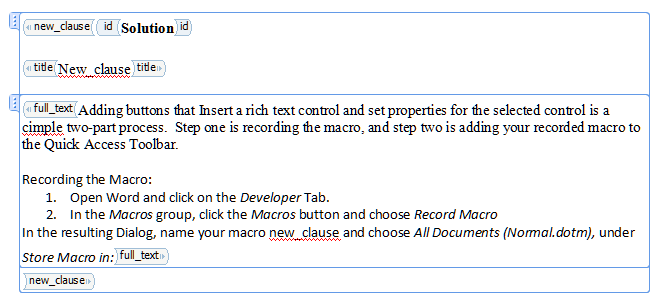
Note: To view the tab on the left side, you must click on the text. To view the tags, such as new_clause and title, you must be in Design Mode (Developer, Design Mode).