Registering Components and iScripts
In PeopleSoft Application Designer, open the component definition that you want to register. If you are creating a new component, make sure that you save it before opening the Registration Wizard. For iScripts, open the record definition that holds the iScript function. By convention, such records begin with a WEBLIB_ prefix.
You can access the Registration Wizard using any of these methods:
Field or Control |
Description |
|---|---|
|
Click the Register Component or Register iScript icon in the toolbar. |
Pop-up menu |
Select Register Component from the pop-up menu after right-clicking the component. |
Tools menu |
Select Register Component or Register iScript from the Tools menu. |

Note: All settings in the Registration Wizard are provided by default from those referenced in the previous wizard session.
To register a component or iScript:
Open the component or iScript you want to register.
You can also launch the Registration Wizard from the menu definition by right-clicking a menu item that points to a component.
Open the Registration Wizard.
Select or click the icon on the Toolbar.
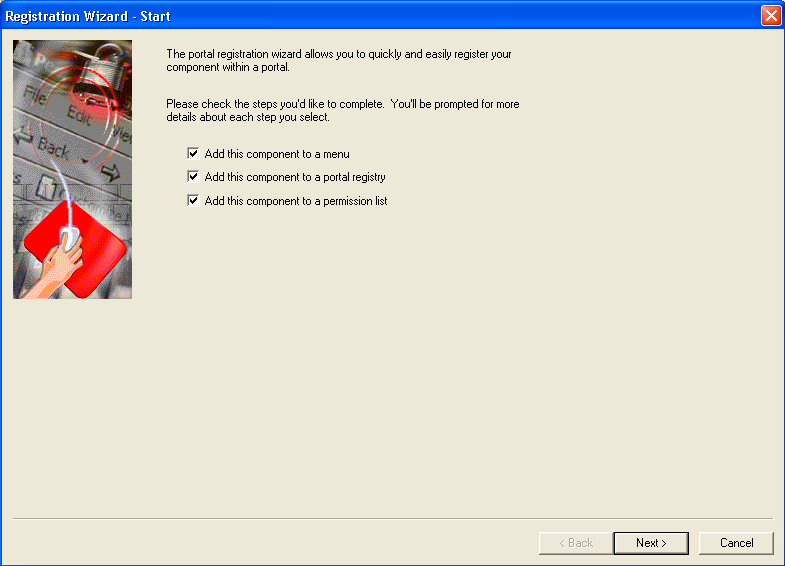
The Start screen of the Registration Wizard provides the option of adding the component to a menu, a portal registry, a permission list, or a combination of the three. If the component is new and you are running the wizard for the first time, you should select all three options. If you have already run the wizard on this particular component and just need to add it to an additional permission list or portal, deselect the other option, Add this component to a menu.
This example illustrates the fields and controls on the Registration Wizard - Start dialog box. You can find definitions for the fields and controls later on this page.
Field or Control
Description
Add this component to a menu
Select to add the component to a menu. You must create the menu definition first if it does not already exist. You specify the menu on the following screen of the Registration Wizard. If you do not select this option, you will need to add the component to the menu manually using the Menu designer.
Add this component to a portal registry
Select if you want to create a content reference for the component and add it to the portal registry you specified on the Create Content Reference screen of the Registration Wizard.
Add this component to a permission list
Select if you want to specify the permission list on the final screen of the Registration Wizard.
If the component or iScript is new and you are running the Registration Wizard for the first time, you will probably want to select all three options. If you are rerunning the wizard to add the component to an additional permission list or another portal, you would deselect the other option, , Add this component to a menu.
The wizard remembers the selection that you made the last time that you ran the wizard and selects those values by default.
Click the Next button.
If you selected to add the component to a menu, then the next screen, Add to Menu and Bar, opens.
This example illustrates the fields and controls on the Registration Wizard - Add to Menu and Bar dialog box. You can find definitions for the fields and controls later on this page.
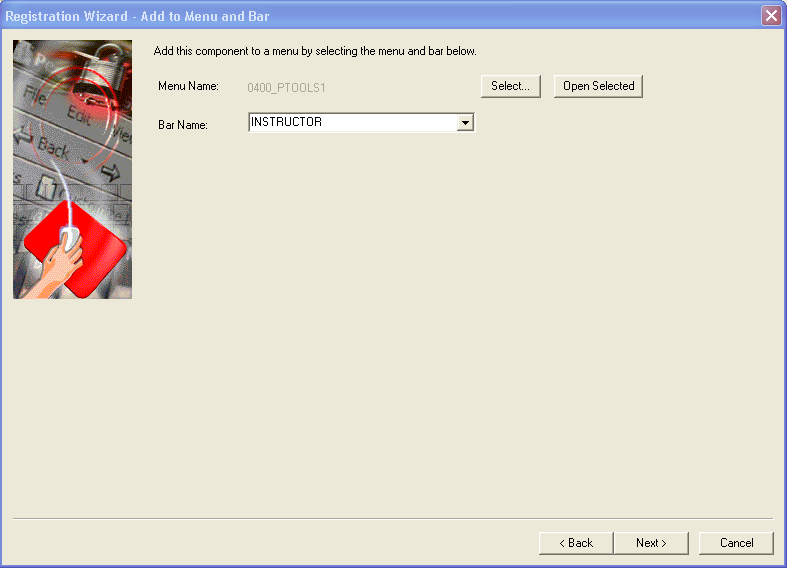
Click the Select button to find the menu name, click the Bar Name drop-down list box to assign the bar name, and then click the Next button.
These names are not exposed to users, but they are required for internal location purposes. Click the Open Selected button to open the menu that you selected in PeopleSoft Application Designer. To view the menu definition without closing the wizard, drag the Registration Wizard to the side.
On the Create Content Reference page, select Target Content or Homepage Pagelet.
If the component is a standard transaction, register it as Target Content.
This example illustrates the fields and controls on the Registration Wizard - Create Content Reference dialog box. You can find definitions for the fields and controls later on this page.
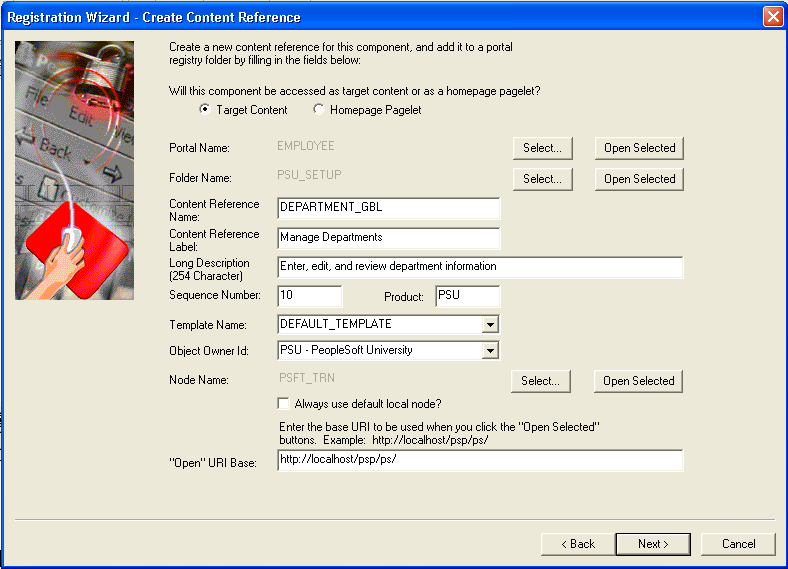
Complete all fields in the Create Content Reference page.
Field or Control
Description
Target Content
Select this check box to register all forms of target content (excluding the homepage).
Homepage Pagelet
Select to register a new homepage pagelet. The system applies the homepage template automatically.
Portal Name and Folder Name
Click the Select button to change the portal or folder name. Click the Open Selected button to launch a browser that will take you to the administration page to create a new folder, if necessary. The default values are the last ones referenced by the wizard.
Content Reference Name
The name is automatically generated, including the market code as the suffix.
Content Reference Label
Enter the name of the CREF hyperlink that the user sees as the registry entry.
Long Description
Enter hover text for the CREF link.
Sequence Number
Enter a numeral to control the order in which the component appears within the chosen folder.
Product
Enter a two-character product code.
Template Name
Specify the template to be used from the drop-down menu.
If you specified that the target content should be accessed as a homepage pagelet, then this field will not appear and the system will apply the homepage template automatically.
Object Owner Id
Select the application development group that owns the object.
Node Name
Click Select to change the Node name, or click the Open Selected button to launch the administration page to view the properties of the node.
Always use default local node
Select to always override the selected node name with the specified default local node.
"Open" URI Base
Enter the Universal Resource Identifier (URI) that specifies for PeopleSoft Application Designer the location of your PeopleSoft Pure Internet Architecture site. This entry is for informational purposes only. It is used only for the Open Selected button and not stored to the database.
If you entered a base URI on the Browser tab of the Options dialog box, that value appears in this field.
The URI you enter in this field is reflected on the remaining pages of the Registration Wizard. If you make a change to this field on any page, the change is reflected throughout.
Click the Next button.
You see the Add to Permission List page.
This example illustrates the fields and controls on the Registration Wizard - Add to Permission List dialog box. You can find definitions for the fields and controls later on this page.
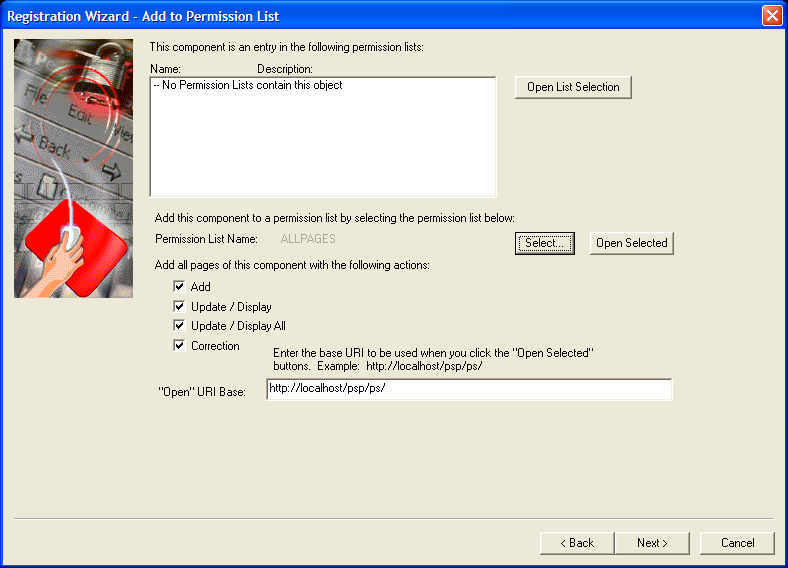
Click the Select button to find the menu name, and then use the drop-down list box to select the name that appears in the bar.
Menus are used as logical groupings to which you can apply security. PeopleSoft components are addressed by menu name (the URL includes the menu name). To add this component to a menu, specify the menu name and bar name.
If you did not select the Add this component to a menu check box on the Prompt page, this page displays the menu name and the Select button only. You then must select the correct menu that already contains the component.
If you are working with an iScript, you must select the iScript function to register.
Click the Next button.
Select Target Content if your component is a standard transaction and complete the appropriate fields.
The previous term table defines each of these fields.
If you did not select Add this Component to a Portal Registry on the Prompt page, this page does not appear.
Click the Next button.
Select the appropriate permission list, select all the actions that you want to grant this component or iScript, and enter the base URI.
Use the Select button to view and select a permission list.
If you did not select Add this Component to a Permission List, this page does not appear.
Click the Next button.
Use the Finish page to review the selections made so far. If you need to change anything, use the Back button to edit your entries.
Select the options in the Add to project area to place your item into an active PeopleTools project. This is cumulative behavior: the more times you run the wizard while the project is active, the more menus, registry structures, and permission lists are added to that project.
Click Finish to complete the registry process into the specified portal.
If you click Cancel all of the entries that you have made in the wizard will be lost and no changes will be made.