Configuring the System for Push Notifications
This topic contains an overview and discusses:
Configuring an application server domain for push notifications.
(Optional) Configuring the Process Scheduler domain for push notifications.
(Optional) Completing inter-domain configuration.
(Optional) Configuring Process Scheduler system settings for push notifications.
(Optional) Adding a PeopleTools option to disable and re-enable push notifications.
(Optional) Configuring push notifications in a cluster.
Troubleshooting the notifications configuration.
To receive push notifications on a PeopleSoft system, you have to enable push notifications for the server domains where the events are being published. Events are published from the application server domain and optionally from the Process Scheduler domain. By enabling push notifications within a domain, the Tuxedo Event Broker will be started in the domain, which is the TMUSREVT server process.
As of PeopleTools 8.58, you do not need to explicitly configure the web server for push notifications. The EnablePNSubscriptions custom web profile property is no longer used, and is ignored regardless of its setting.
Note: Events raised in a Process Scheduler domain are ultimately routed through an application server domain. For these inter-domain events, you have to set inter-domain configurations for both the application server and the Process Scheduler.
This topic assumes you have a working knowledge of PeopleSoft server administration. For more information on managing PeopleSoft servers, see Using PSADMIN.
Each application server domain that will trigger and publish events must be configured for push notifications using psadmin.
To enable push notifications in an application server domain:
Run psadmin.exe.
Select the application server domain.
Select Configure this domain.
Enter 13 (Push Notifications) to enable push notifications from the Quick-configure menu.
The push notifications option is set to No (disabled) by default.
Optionally, if the Process Scheduler domain will also trigger and publish events, then inter-domain configuration between the server domains is also required. Enter 12 (Domains Gateway) on the quick-configure menu.
Enter 14 to load the modified configurations settings.
Boot (or reboot) the domain and verify that the TMUSREVT server process starts along with the other domain server processes. In addition, if the domains gateway was enabled, verify that the GWTDOMAIN process is also started.
Each Process Scheduler server domain that will trigger and publish events must also be configured for push notifications using psadmin.
To enable push notifications in a Process Scheduler domain:
Run psadmin.exe.
Select the Process Scheduler domain.
Select Configure this domain.
Enter 4 (Domains Gateway) on the quick-configure menu.
Enter 5 (Push Notifications) to enable push notifications from the Quick-configure menu.
Enter 6 to load the modified configurations settings.
Boot (or reboot) the domain and verify that the TMUSREVT and GWTDOMAIN server processes start along with the other domain server processes.
Note: After the Process Scheduler server is configured with a Domains Gateway, additional configuration of both servers is required to complete inter-domain configuration.
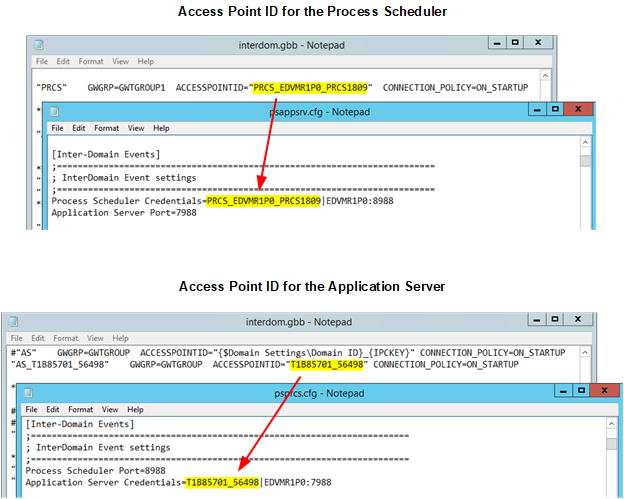
To complete the inter-domain configuration, you need to copy the Process Scheduler access point ID to each application server’s configuration. Then, you need to copy the application server access point ID to the Process Scheduler’s configuration. By default on PeopleSoft systems, the Process Scheduler listens on port 8988 for inter-domain connections; and the application server listens on port 7988. After rebooting both domains, check the Tuxedo log files to ensure that the inter-domain connection has been established.
An application server domain can be configured to receive push notification events from one or more Process Scheduler domains simultaneously. While a Process Scheduler domain can be configured with more than one application server domain, the Process Scheduler domain connects to only one application server domain the when the Process Scheduler domain is booted. The other configured application server domains remain available as fail-over servers. However, the configuration does not specify a primary server and fail-over servers explicitly. When the Process Scheduler domain is booted, a connection is established by Tuxedo to one of the available servers.
As a first step as described in previous tasks, you must configure the application server and Process Scheduler domains to generate the inter-domain events configuration (interdom.gbb files for each domain).
This example illustrates how the configuration settings for inter-domain events can be coped from a Process Scheduler domain to an application server domain and vice versa. The access point IDs and port values must match on both domains to ensure successful transactions.
Configuring the Application Server Domain for Inter-Domain Events
Note: When your environment consists of multiple application server domains, you can configure any one of the application server domains for inter-domain events.
To configure inter-domain events for the application server domain:
Run psadmin.exe.
Select the Process Scheduler domain.
Select Configure this domain.
Enter the 15 the Custom configuration option.
Press the Enter key for Do you want to change any values (y/n/q)? [n], and continue to press the Enter key until the Values for config section – Inter-Domain Events appear.
Review and modify as needed the values in inter-domain events:
Process Scheduler Credentials=PRCS1|localhost:8988
Application Server Port=7988
Field or Control
Description
Process Scheduler Credentials
Specify the credentials for each Process Scheduler domain from which notifications will be received in the format:
Process Scheduler Credentials=ACCESSPOINTID|HOST_NAME:PS_portACCESS_POINT_ID: Open the PS_CFG_HOME\appserv\prcs\DOMAIN_ID\interdom.gbb file for the Process Scheduler domain. Locate the section in the file that is similar to the following::
*DM_LOCAL
"PRCS" GWGRP=GWTGROUP1 ACCESSPOINTID="PRCS_SERVER01_PSNT1234"
Note: The ACCESSPOINTID must be 30 bytes or fewer in length—that is, it must be 30 characters or fewer (including the trailing Null character).
HOST_NAME: The host name of the machine that is running Process Scheduler domain.
PS_port: The port number provided in the interdom.gbb file for the Process Scheduler domain. Each Process Scheduler domain must have a unique port number.
The completed configuration values for the Process Scheduler domain will look similar to the following example:
Process Scheduler Credentials=PRCS_SERVER01_PSNT1234|SERVER01:8988Note: If there are multiple Process Scheduler domains from which you want to receive push notifications, then provide the configuration for each domain separated by a comma. For example:
Process
                                                  Scheduler
                                                  Credentials=PRCS_SERVER01_PSNT1234|SERVER01:8988,PRCS_SERVER01_PSNT5678|SERVER01:8999
Application Server Port
You can retain the port number as is.
Enter q to return to the PeopleSoft Domain Administration menu, and load any configuration changes.
Boot the application server domain.
Configuring the Process Scheduler Domain for Inter-Domain Events
To enable inter-domain events for a Process Scheduler domain:
Run psadmin.exe.
Select the Process Scheduler domain.
Select Configure this domain.
Enter the 7 the Custom configuration option.
Press the Enter key for Do you want to change any values (y/n/q)? [n], and continue to press the Enter key until the Values for config section – Inter-Domain Events appear.
Review and modify as needed the values in inter-domain events:
Values for config section - Inter-Domain Events
    Process Scheduler Port=8988
    Application Server Credentials=APPDOM1|localhost:7988
Field or Control
Description
Process Scheduler Port
Specify the port through which this Process Scheduler domain sends event notifications.
Note: You can leave the port value as is if you are configuring a single Process Scheduler domain. If you are configuring inter-domain events for multiple Process Scheduler domains on the same machine, then specify a unique port number for each domain.
Application Server Credentials
Specify each application server domain to which this Process Scheduler domain can connect in the following format:
Application Server Credentials=ACCESSPOINTID|HOST_NAME:AS_portACCESS_POINT_ID: Open the PS_CFG_HOME\appserv\DOMAIN_ID\interdom.gbb file for the application server domain. Locate the section in the file that is similar to the following:
*DM_LOCAL
"AS_T85704AA_41162" GWGRP=GWTGROUP ACCESSPOINTID="T85704AA_41162"
Note: The ACCESSPOINTID must be 30 bytes or fewer in length—that is, it must be 30 characters or fewer (including the trailing Null character).
HOST_NAME: The host name of the machine, which is running application server domain.
AS_port: The port number provided in the interdom.gbb file for the application server domain. You can leave the default value of the port as is.
The completed configuration values for the application server will look similar to the following example:
Application Server Credentials=T85704AA_41162|SERVER01:7988Enter q to return to the PeopleSoft Domain Administration menu and load any configuration changes.
Boot the Process Scheduler domain.
View the TUXLOG files to verify that the inter-domain configuration is valid and that the domains are connected to each other:
PS_CFG_HOME\appserv\DOMAIN_ID\LOGS\TUXLOG.TODAYPS_CFG_HOME\appserv\prcs\DOMAIN_ID\LOGS\TUXLOG.TODAY
Search for GWTDOMAIN nearest the end of the log file and evaluate the log entry to determine the status of the connection. The following examples are from a Process Scheduler log file:
Success:
192615.EDVMR1P0!GWTDOMAIN.4560.2512.0: LIBGWT_CAT:1129: INFO: Connection established with domain (domainid=<T1B85701_42446>)Failure:
192356.EDVMR1P0!GWTDOMAIN.6700.6724.0: LIBGWT_CAT:1073: ERROR: Unable to obtain remote domain id (T1B85701_32872) information from shared memory
192356.EDVMR1P0!GWTDOMAIN.6700.6724.0: LIBGWT_CAT:1509: ERROR: Error occurred during security negotiation - closing connection
Note: If you have multiple Process Scheduler domains on the same machine, then this configuration needs to be completed on each of the Process Scheduler domains.
Note: If you do not create this personalization option, push notifications remain enabled system wide.
You can add a PeopleTools personalization option to disable or re-enable push notifications system wide:
Select
Search for and select PPTL.
Add a row to the grid with the following values:
Field or Control
Description
User Option
PNSUBSCR
Description
Push Notifications Enabled
Option Category Group
PS Internet Architecture
Option Category
General Options
User Option Type
System
Record (Table) Name
PSXLATITEM
Field Name
PSYESNO
Option Default Value
Click the Set Option Default Value link and select:
Yes — Push notifications remain enabled system wide.
No — Push notifications are disabled system wide until they are re-enabled by this personalization option.
Save your changes.
Use the Notification Configuration page to enable or disable notifications for specific Process Scheduler status changes on a system-wide basis.
Navigation:
This example illustrates the fields and controls on the Process Scheduler - Notification Configuration page. You can find definitions for the fields and controls later on this page.
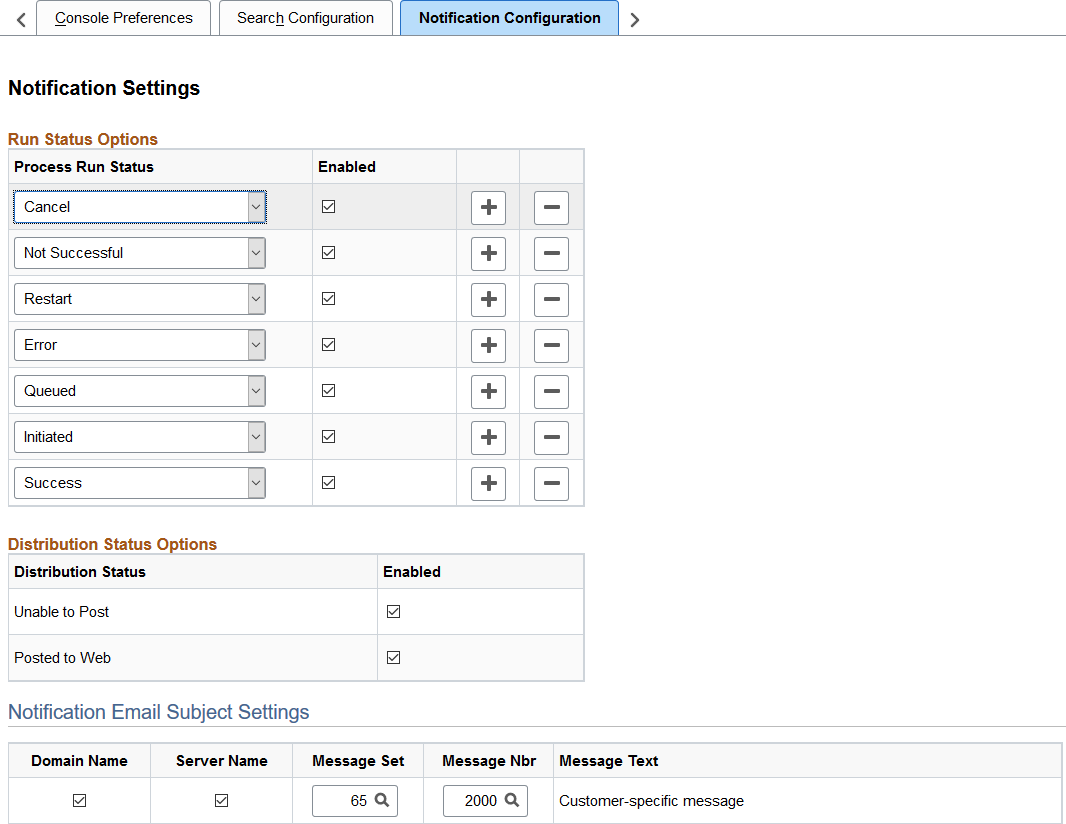
When a status option is enabled and inter-domain communication has been configured, the notifications for that status change are propagated from the Process Scheduler server through the application server to the following channels: Notification window, pop-up notifications, and email.
For pop-up notifications, in addition to system-wide settings, each user must enable pop-up notifications as well as specific status options in My Preferences. However, each user does not need to configure the Notification window to receive notifications from the Process Scheduler.
A cluster of PeopleSoft systems consists of:
A system designated as the portal (or hub).
One or more content provider systems.
As of PeopleTools 8.56, any PeopleSoft application can be designated the portal system for configuration of unified navigation. PeopleSoft Interaction Hub is no longer required.
To create a cluster configuration:
Configure the integration gateway on each system.
Configure the integration network on each system.
Configure single signon (SSO) on each system.
See the steps outlined in Configure Unified Navigation Fluid Navigation Collection for information on how to create a cluster configuration.
Then, configure the cluster so that push notifications are propagated from the content providers to the designated portal system:
Add the ps_theme custom property to the active web profile on each content provider system to point to the default local node and URL for the portal system. Use the following format to set the value of this property:
DEFAULT_LOCAL_NODE:http://my_server.my_domain:port_no/psp/SITE_NAME/For example:
PS_NODE:http://server01.example.com:8000/psp/MYSITE01/For more information on setting custom web profile properties, see Configuring Custom Properties,
Configure routings for the PTPN_ASYNC_PUBLISH service operation on each system:
On each content provider system, outbound routing as local to the portal system.
On the portal system, inbound routing as any to local.
For more information on configuring service operations, see Adding Routing Definitions.
Finally, synchronize notification preferences across the cluster:
Configure the PTPN_NOT_PREF_ASYNC service operation on each system:
Add the PTPT1000 permission list for service operation security.
On the portal system, configure outbound routings to be local (portal system) to each content provider; inbound routing as any to local.
On the each content provider system, configure the outbound routing to be local to the portal system; inbound routing as any to local.
On each content provider system only, run the PTPN_NOTCONF Application Engine program using the System Process Requests page.
If events are not appearing in the Notification window, check the following items:
Verify that the web profile passwords are consistent between the web server domain and the application server domain.
Verify that your browser, web server, and any reverse proxy servers used all support WebSocket technology.
To troubleshoot the notification configuration for push notifications published from a Process Scheduler domain, you also need to consider the following:
After booting up the domains, you can verify the configuration by ensuring that the domains have connected to each other. To verify the connection, you need to open the TUXLOG file for application server and Process Scheduler domains from their respective domain LOGS folders. You will see an entry in the file that the connection is established between the domains.
If you do not see connections being established, then reboot the domains after clearing IPC resources for the domains. Use the Clean IPC resources of this domain option in psadmin and then reboot the domains.
Testing Push Notifications Published from the Application Server Domain
To test the push notifications published from an application server domain:
Select
Search and select Portal Object Name: PTSVRTESTEVENTS_GBL.
In the Content Reference Message Events grid, click the Map icon for SERVEREVENTTESTA.
On the Map Event Data to Page Elements Modal window, click OK, and click Save.
Note: You need to complete this only once on a new installation.
Using two different browser sessions navigate to
Enter test values in the Event Data field and click Publish on one browser session.
On the other browser session, confirm that the values you just entered appear in the Event Targets fields.