Implementing Primary-Secondary Dispatchers
This section provides an overview of primary-secondary dispatching and describes how to:
Configure dynamic secondary dispatchers.
Configure static secondary dispatchers.
Create template secondary domains.
Implement primary-secondary load balancing.
Implement deferred primary domain processing.
Primary-Secondary dispatching is where a master domain allocates messages to one or more secondary dispatchers for processing. This section provides an overview of primary-secondary dispatcher processing.
Primary-Secondary Dispatcher Processing
A secondary dispatcher processes service operations assigned to it by a primary dispatcher.
A primary domain allocates service operations to a secondary for processing when:
The primary detects that a secondary dispatcher is active and not busy processing service operations.
The secondary has an active queue on which the primary is currently processing service operations.
The dispatcher(s) processing in secondary mode then process the allocated service operations.
Primary and secondary dispatchers can reside on the same or on different machines.
Note: When primary-secondary processing is implemented, there can be only one primary domain at a given time.
You can create a domain consisting of only dedicated secondary pub/sub servers. These servers register themselves as secondaries, along with additional configurable information, such as the number of process handlers booted, so that the appropriate primary server can use that information to allocate work (service operations to process) to the secondary server(s).
The primary domain can allocate work to one or more secondary domains.
Secondary Types
There are two types of dispatcher secondaries:
Term |
Definition |
|---|---|
Dynamic secondaries |
A dynamic secondary can change from a primary to a secondary. Dynamic secondaries are configured in conjunction with domain failover. If a secondary domain has the highest priority within a failover group, it can dynamically change to a primary during failover. You configure dynamic secondaries in the Failover Configuration page in the Service Operations Monitor. |
Static secondaries |
Static secondaries are those that cannot become primaries without manual configuration. You configure static secondary domains in PSADMIN. |
Template secondaries |
A template secondary is an already-configured primary domain that you import into PSADMIN an save as a secondary domain. Template secondaries enable you to dynamically add secondary domains without performing any configuration changes in PSADMIN. You use the Import Domain Configuration command in PSADMIN to import a primary domain configuration and then save it as a static secondary domain. The secondary domain created uses all the Pub/Sub processes and queue lists configured for the primary domain on which the secondary template is based. If dedicated servers are configured for the primary domain, they are also imported an available on the secondary domain. |
Failover and Primary-Secondary Dispatchers
You can create a secondary domain for use in domain failover.
The domain with the highest priority dynamically becomes the active domain (primary domain) in each group during failover. The next domain in priority will be programmatically configured as an active secondary domain.
When a failover occurs the domain that failed becomes inactive. The failover domain specified goes from an active secondary to an active primary. The next domain in priority then becomes an active secondary.
You can set failover for secondary dispatchers. However, secondary dispatchers cannot be part of any group and you cannot prioritize them.
Use the Failover Configuration page in the Service Operations Monitor to configure dynamic secondary dispatchers.
This section discusses how to:
Import domain configurations from application domains.
Import domain configurations from files.
View template secondary domains.
Add and delete dispatcher queues from template secondary domains.
Restore dispatcher queue lists.
Understanding Template Secondary Domains
Template secondary enable you to dynamically add secondary domains without performing any configuration changes in PSADMIN.
When you create a template secondary domain you import a domain configuration and save it as a template for the secondary domain. This process creates a static secondary domain that uses all of the pub/sub processes and queue lists configured for the domain that you import. If dedicated servers are configured for the domain that you import, they are imported and available on the secondary domain. After you import a domain configuration and save it as a secondary domain, you can add or remove dispatcher queues from the secondary domain as needed.
All template secondary domains must be based on the same primary domain configuration.
Template Secondary Domain Types
There are two options for importing a domain as a template:
Field or Control |
Description |
|---|---|
IB Secondary Basic |
When the configuration is imported, all the Pub/Sub processes are configured identically to the domain on which the secondary template is based, including the PSWATCHSRV and PSMONITOR server processes. Other process, such as PSAPPSRV, PSSAMSRV, and so on, are not included in the template secondary domain. However, you can modify the template secondary domain configuration file to include these processes if needed |
IB Sync Secondary |
As in the IB Secondary Basic template, when the configuration is imported, all the Pub/Sub processes are configured identically to the domain on which the secondary template is based, including the PSWATCHSRV and PSMONITOR server processes. However, unlike the IB Secondary Basic template, this option imports the PSAPPSRV, JSL, and JREPSVR processes from the domain on which the template is based. In addition you have the option to change the default Jolt port (Jolt port taken from the primary configuration file). |
Understanding Importing Domain Configurations
To import the domain configuration on which the template secondary domain is based, you use the Import Domain Configuration command in PSADMIN. You can import a domain that is already configured in PSADMIN or you can import a domain configuration from a file.
To import a domain configuration from an application domain you specify the location of <PS_CFG_HOME> for the domain that you want to import. For example, the location might be c:\documents and settings\admin\psft\ps\<PS_CFG_HOME>.
To import a PeopleTools 8.49 or earlier application domain you must specify the <PS_HOME> location for <PS_CFG_HOME>. For example, the location might be c:\documents and settings\<PS_HOME>\<PS_CFG_HOME>.
Prerequisites for Importing Domain Configurations
If you are importing a domain that is already configured in PSADMIN, you must first set the PS_FILEDIR environment variable equal to the PS_HOME location of the domain you importing.
If importing a domain configuration from a file, you must first set the PS_FILEDIR environment variable to the location where you are importing the file.
See Understanding Setting PS_FILEDIR, PS_SERVDIR, and PS_TREEBASEDIR Environment Variables.
Importing Domain Configurations from Files
To import a domain configuration from a file:
Open PSADMIN.
The PeopleSoft Server Administration menu appears.
Enter 1 for Application Server and press the ENTER key.
The PeopleSoft Application Server Administration menu appears.
Enter 4 for Import Domain Configuration and press the ENTER key.
The PeopleSoft Import Application Server Configuration menu appears.
Enter 2 for Import IB Primary Configuration and press the ENTER key.
A Configuration Templates prompt appears.
Select one of the following options:
Enter 1 to import the domain as an IB Secondary Basic template and press the ENTER key.
Enter 2 to import the domain as an IB Sync Secondary template and press the ENTER key.
The PeopleSoft Import Application Server Configuration menu appears.
Enter 1 for Import from file and press theENTER key.
A prompt displays to enter the full path to the domain configuration file to import.
Enter the full path to the domain configuration file to import and press the ENTER key.
A prompt displays to enter a name for the new domain.
Enter a name for the new domain and press the ENTER key.
The system merges the domain configuration with the new template secondary domain and creates the new configuration and loads it on the application server. Upon completion, the PeopleSoft Domain Administration menu appears, where you may boot the template secondary domain, configure the template secondary domain or perform other administrative tasks.
Importing Domain Configurations from Application Domains
To import a domain configuration from an application domain:
Open PSADMIN.
The PeopleSoft Server Administration menu appears.
Enter 1 for Application Server and press the ENTER key.
The PeopleSoft Application Server Administration menu appears.
Enter 4 for Import Domain Configuration and press the ENTER key.
The PeopleSoft Import Application Server Configuration menu appears.
Enter 2 for Import IB Primary Configuration and press the ENTER key.
A Configuration Templates prompt appears.
Select one of the following options:
Enter 1 to import the domain as an IB Secondary Basic template and press the ENTER key.
Enter 2 to import the domain as an IB Sync Secondary template and press the ENTER key.
The PeopleSoft Import Application Server Configuration menu appears.
Enter 2 to for Import from application domain and press theENTER key.
A prompt displays to enter the location of <PS_CFG_HOME>.
Enter the location of <PS_CFG_HOME> and press theENTER key.
The Tuxedo Domain List appears that lists the application domains that you can import.
Enter the number that corresponds to the application domain to import.
A prompt displays to enter a name for the new domain.
Enter a name for the new domain and press the ENTER key.
The system merges the domain configuration with the new template secondary domain and creates the new configuration and loads it on the application server. Upon completion, the PeopleSoft Domain Administration menu appears, where you may boot the template secondary domain, configure the template secondary domain or perform other administrative tasks.
Adding and Removing Dispatcher Queues from Template Secondary Domains
This section applies only to asynchronous secondary templates.
Template secondary domains contain all of the dispatcher queues that exist on the domain on which it is based. However, you can add and remove queues to configure the template secondary domain to suit your requirements.
Note: Before you can add or remove queues from a template secondary, you must inactivate all domains.
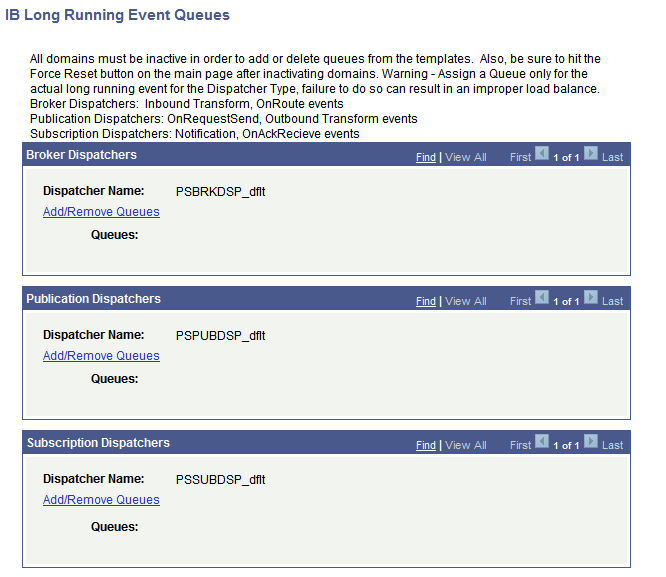
The Secondary Templates page (IB_DOMAIN2_SEC) lists the dispatcher queues assigned to each dispatcher process of the template secondary.
This example illustrates the Secondary Templates page. Use this page to view the queues assigned to each dispatcher process of a template secondary.
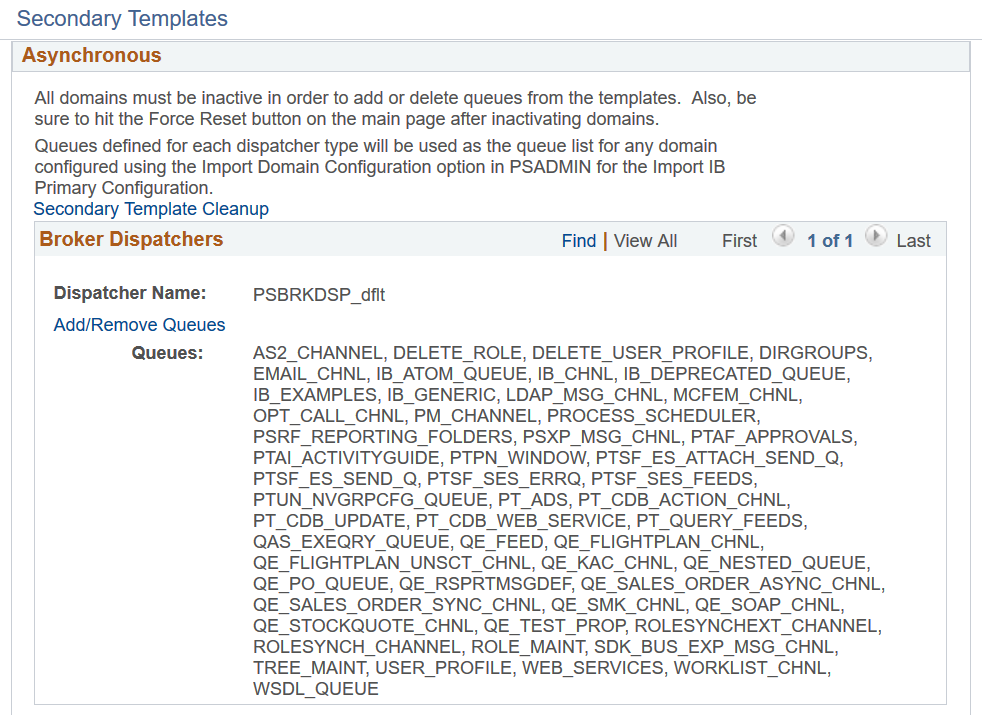
From the Secondary Templates page, you can use the Add/Remove Queues link located under each dispatcher process name to access the Add/Remove Queues page to add or remove queues assigned to the dispatcher.
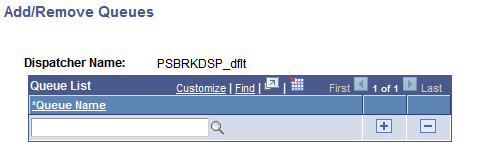
This example illustrates the Add/Remove Queues page. Use this page to add or remove queues for a dispatcher process of a template secondary.
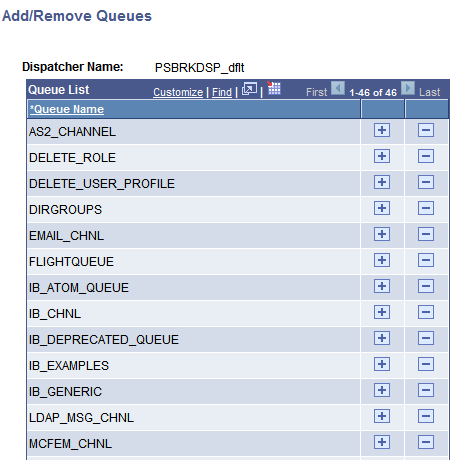
Note that this example shows a partial queue list for the domain.
On the Add/Remove Queues page you can use the plus (+) button to add a queue to the queue list. Use the minus (-) button to remove a queue from the list.
To add or remove dispatcher queues for template secondary:
Access the Domain Status page ().
Check the All Domains Inactive box and click the Update button.
The Force Reset button appears.
Click the Force Reset button to reset any contacts that are in a Started or Working state.
Click the Secondary Templates link.
The Secondary Templates page appears.
Click the Add/Remove Queues link for a queue dispatcher.
The Add/Remove Queues page appears and displays the queue list for the dispatcher.
To add a queue:
Click the plus (+) button to insert a new row into the list.
Click the Lookup button to search for a queue to add.
Click the OK button at the bottom of the Add/Remove Queues page.
The Secondary Templates page appears.
Click the Update button.
The Domain Status page appears.
To delete a queue:
Click the minus (-) button next to the queue to delete.
Click the OK button in the dialog box to confirm the delete action.
Click the OK button at the bottom of the Add/Remove Queues page.
The Secondary Templates page appears.
Click the Update button.
The Domain Status page appears.
Activate the domains in the messaging system.
Check the All Domains Active box and click the Update button to activate the domains.
Restoring Template Secondary Dispatcher Queue Lists
Restoring a queue list deletes any changes you have made to a template secondary dispatcher queue list, and restores it to the queue list that you originally imported from the primary domain.
To restore a template secondary queue list, use the Secondary Template Cleanup page (IB_DOMAIN3_SEC).
This example illustrates the Secondary Template Cleanup page. Use this page to restore dispatcher queue lists to the default settings from the primary domain.
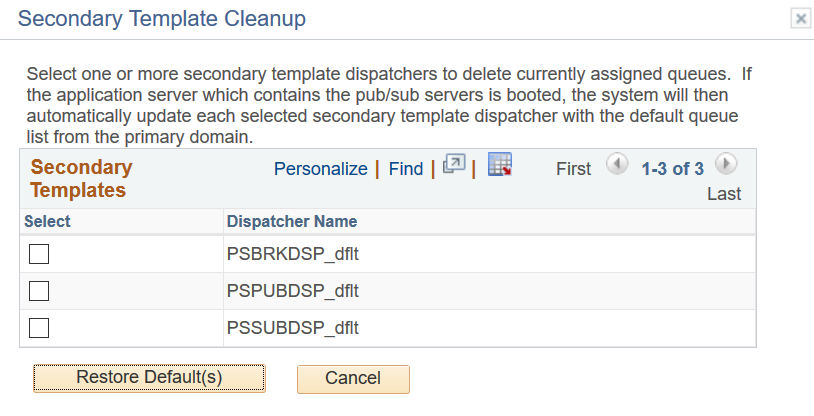
In the previous example, PSBRKDSP_dflt appears in the Dispatcher Name field, meaning that additions or deletions have been made to the queue. In this example, you could use the page to restore the default template secondary dispatcher list for PSBRKDSP_dflt.
To restore a template secondary dispatcher queue list, you must first inactivate all domains on the system.
To restore a template secondary dispatcher queue list:
Inactivate the domains on the messaging system:
Access the Domain Status page ().
Check the All Domains Inactive box and click the Update button.
The Force Reset button appears.
Click the Force Reset button to reset any contacts that are in a Started or Working state.
Access the Secondary Template Cleanup page:
From the Domain Status page, click the Secondary Templates link.
The Secondary Templates page appears.
On the Secondary Templates page, click the Secondary Template Cleanup link.
The Secondary Template Cleanup page appears.
Check the box next to each dispatcher process name for which you want to restore the default queue list.
Click the Restore Default(s) button.
The Domain Status page appears.
Activate the domains in the messaging system.
Check the All Domains Active box and click the Update button to activate the domains.
This section provides and overview of primary-secondary load balancing and discusses how to set up primary-secondary load balancing on the PeopleSoft system.
Understanding Primary-Secondary Load Balancing
You can implement primary-secondary load balancing on the integration system to compensate for processing capabilities of various machines on which primary domains and secondary domains run.
As an example, you might have a domain on machine that is also running the PeopleSoft Pure Internet Architecture. In this case, you could configure primary-secondary load balancing such that the machine that is running the PeopleSoft Pure Internet Architecture processes fewer requests than other machines on which domains reside.
Another example is a situation where the machines on which you are running domains have different processing capabilities due to the hardware installed in them. In this situation you can configure the machines with the most process power to process the greater number of requests.
To configure primary-secondary load balancing, you assign a weight between 1 and 10 to each domain to distribute request processing. A domain assigned a weighted value of 1 processes the fewest requests; a domain assigned a weighted value of 10 processes the greatest number of requests.
Setting Up Primary-Secondary Load Balancing
You set up primary-secondary load balancing using the Primary/Secondary Load Balancing page (IB_DOMAIN_SEC).
To set up primary-secondary load balancing, you assign a processing weight value to each domain. The domain with the lowest number processes the fewest number of requests and is the primary domain. The domains with the higher numbers are the secondary domains and process the greatest number of requests.
This example illustrates the Primary/Secondary Load Balance page. The example shows primary-secondary load balancing set up for the system.
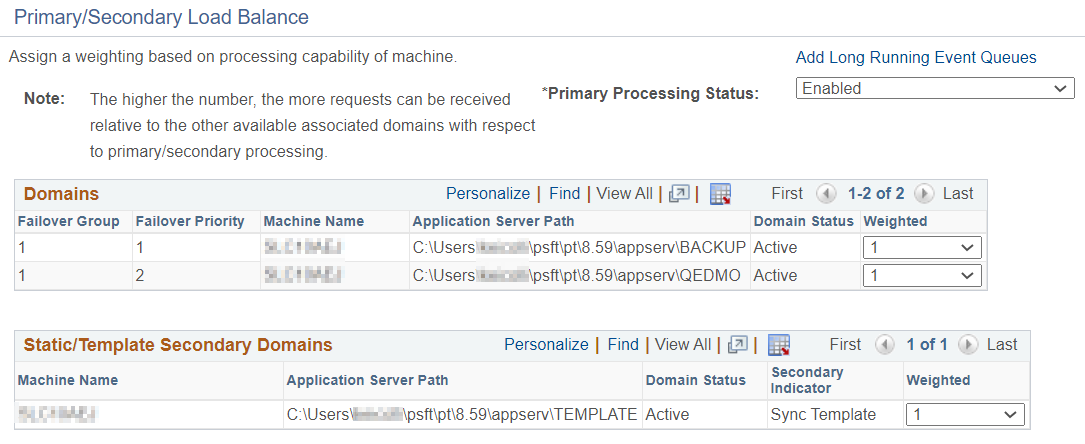
The Domain section on the page lists information for the primary domain, while the Static/Template Secondary Domains section lists information about static secondary domains.
The example shows two domains configured on one machine. The domains listed in the Domains section, BACKUP and QEDMO, are the primary domains and have a load balance weight of 1 assigned to it. Given the load balance weight assigned to the domains, they processes the fewest number of requests.
The domain listed in the Static/Template Secondary Domains section, TEMPLATE, has a load balance weight of 1 assigned to it. It processes the same number of requests as the master domain.
To set up primary-secondary load balancing:
Access the Primary/Secondary Load Balance page ( and click the Primary/Secondary Load Balance link.).
For each domain select a value from the Weighted drop-down list box to assign a load balancing weight for the domain.
Click the OK button.
Setting Up Primary-Secondary Load Balancing for Long-Running Events
Typical primary-secondary load balancing usually focuses on normal events running at a high throughput. However, there are some instances where there are low volume service operation that contain long-running events. For better performance, you can assign these types of service operation to long-running event queues, where the processing is spread across all potential master and Secondary handlers.
You use the IB Long Running Event Queues page (IB_DOMAIN4_SEC) to assign service operations to long-running event queues.
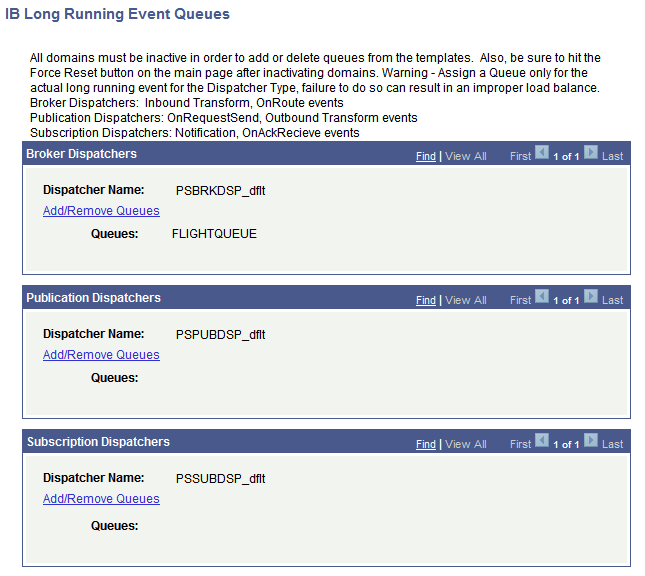
This example illustrates the IB Long Running Event Queues page.
To assign a service operation to a long-running event queue, you add the service operation queue that is currently defined on the service operation definition to one of the dispatcher queues on the page. When you click the Add/Remove Queues link for one of the dispatchers, the Add/Remove Queues page (PSIBQUEUE_SEC) appears.
This example illustrates the Add/Remove Queue page.
You use the Lookup button on the page to search for the service operation queue to which the service operation is assigned. When you click the OK button, the IB Long Running Event Queues page appears and the queue you specified appears in the dispatcher Queue field.
This example illustrates the IB Long Running Event Queues page. The example shows the service operation queue FLIGHTQUEUE added to the Broker Dispatcher queue.
The following table describes the proper dispatchers to which to assign service operation queues based on the type of processing required:
|
Dispatcher |
Processing |
|---|---|
|
Broker Dispatcher |
|
|
Publication Dispatcher |
|
|
Subscription Dispatcher |
|
Important! Do not assign service operations that contain long-running events to the same queues as those that do not contain long-running events. Processing performance for the normal high-volume service operations can be impacted.
To assign a service operation to a long-running event queue:
Access the Domain Status page ().
The Domain Status page appears.
Inactivate the domain.
In the Domains grid, locate the Domain Status drop-down list box and select Inactive.
Click the Force Reset button.
Click the Primary/Secondary Load Balance link.
The Primary/Secondary Load Balance page appears.
Click the Add Long Running Event Queues link.
The IB Long Running Event Queues page appears.
Click the Add/Delete Queue link for the dispatcher to which to add the service operation queue.
The Add/Remove Queues page appears.
Enter a name or use the Lookup button to search for the name of the queue to which the service operation is assigned.
Click the Update button.
The Primary/Secondary Load Balance page appears.
Click the OK button.
The Domain Status page appears.
Activate the domain by selecting Active from the Domain Status drop-down list in the Domains grid.
Click the Update button.
This section provides an overview of deferred master domain processing and discusses how to set up deferred primary domain processing.
Understanding Deferred Primary Processing
PeopleSoft Integration Broker enables you to defer request processing on primary domain to secondary domains that are available for processing. Configuring deferred primary processing enables you to free processing resources on the primary domain machine due to hardware or processing power limitations, or so it can run other processes.
The Primary/Secondary Load Balance page features a Primary Processing Status drop-down list box where you set the processing status for the primary domain. The following table lists the primary processing statuses and their descriptions.
|
Master Domain Processing Status |
Description |
|---|---|
|
Enabled |
The primary domain processes its appropriate share of requests. (Default.) |
|
Deferred – All Queues |
The primary domain does not send any requests to its respective process handler(s) as long as there is at least one active secondary domain that can be used for the dispatch cycle. |
|
Deferred – Unordered Queues |
The primary domain does not send any requests in an unordered queue to its respective process handler(s) as long as there is at least one active secondary domain that can be used for the dispatch cycle. When you select this option the primary domain dispatchers only send requests to a secondary domain for processing if the queue being processed is defined as unordered queue. If the queue is not unordered, the primary domain sends the request to its own process handler for processing not to the secondary domain. |
If the system is set to any of the deferred modes the primary will process requests if no secondary dispatchers are available. In each of the deferred modes, the primary assigns processing to secondary dispatchers based on the load balancing weight value assigned to the secondary dispatcher.
Setting Up Deferred Primary Domain Processing
To set up deferred primary domain processing:
Select .
The Domain Status page appears.
Click the Primary/Secondary Load Balance link.
The Primary/Secondary Load Balance page appears.
From the Primary Processing Status drop-down list box, select a primary domain processing status.
The valid values are:
Enabled
Deferred — All Queues
Deferred — Unordered Queues
Click the OK button.