Installing Digital Certificates
Digital certificates are required to provide client and server authentication in Real-time Event Notification (REN) server using SSL. A digital certificate is an electronic means of establishing your credentials for web or business transactions that are issued by a certification authority (CA). The CA is a trusted third party who signs and issues the certificates for users after verifying their authentication using secure means.
The Installing for REN SSL topic presents a sample way of installing and configuring REN using SSL. PeopleSoft customers may have their own means of obtaining and installing for REN server with SSL enabled.
This section outlines the basic steps to install. Before installing, you must create the application server domain.
Note: The application server domain must have write permissions. All certificates are stored under <PS_HOME>/appserv/<domain name>. The cacerts file has write permissions under <PS_HOME>/JRE/lib/security.
The following overview lists the steps that are required to install. The subsequent sections describe each step in detail.
To install and configure REN SSL:
Install the CA server certificate.
Install the REN server certificate.
Configure .
Import certificates into the Java keystore for any REN Java Clients.
See Importing Certificates in Java Keystore for REN Java Clients.
Configure the REN server.
Configure REN clusters.
Install certificates for local node.
Generate the client certificate.
Install PSMCAPI certificates.
Configure an external keystore.
Configuring UQSRV and MCFLOG logs.
To install the CA server certificate:
Generate the RSA private key for the certificate authority.
Generate the Certificate Signing Request (CSR) for the certificate authority.
Generate the PEM file.
Note: If a CA certificate already exists in PEM format, the preceding three steps can be omitted.
Import the CA Certificate in PEM format using
The preceding steps are explained in detail in the section Configuring Digital Certificates.
See Configuring Digital Certificates, Implementing Client Authentication.
To install the REN server certificate:
Generate REN server CSR using
Get the CSR signed by a CA.
Note: The certificate must be in PEM format.
Import the certificate into
The preceding steps are explained in detail in the section Configuring Digital Certificates.
Before configuring digital certificates, you must generate the private keys, CSR, and PEM file.
To configure digital certificates:
Select
Click +.
Select ROOTCA from the Type drop-down list box.
Enter an alias name for the CA in Alias, and click Add Root.
The Add Root Certificate dialog box appears.
Open the ca.pem file.
The root CA certificate is generated.
Copy the contents of the ca.pem file, paste them into the Add Root Certificate dialog box, and click OK.
Click +.
Select Cert from the Type drop-down list box.
Enter an alias name in Alias, such as PSFTCA.
Click Add Root.
Select the CA certificate alias of step 4 from the Issuer Alias lookup button.
Click Request.
The Request New Certificate dialog box appears.
Complete the Common Name, Org Unit (organization unit), Organization, Locality, State/Province, Country, Algorithm, Key Size, Email Address, and Challenge Pswdfields.
Note: The common name must be the machine name of the REN server machine, for example, PTA112.example.com, where PTA112 is the machine name and .example.com is the domain name.
Click OK.
The Certificates Signing Request dialog box appears.
Copy and paste the text from the Certificates Signing Request dialog box, and save the text in a file named ren.csr in <PS_HOME>\appserv\<domain name>\.
Click OK.
The Import link appears.
Submit ren.csr to the CA that issued the selected root certificate.
The CA may send you the signed public key certificate by email or require you to download it from a specified web page.
Open the saved certificate file in a text editor, and then highlight and copy its entire contents.
Select
Click Import.
The Import Certificate page appears.
Paste the copied certificate content into the long edit box, and click OK.
See Implementing Node Authentication, Implementing Nonrepudiation.
In order for REN Java clients, such as a queue server, MCF Log server, or CTI adapter, to communicate with an SSL-enabled REN server, these clients need to have SSL certificates available in a Java keystore. You must import the REN server certificates into the keystore used by each REN Java client. For the Queue servers and MCF Log servers, this will be the keystore used by the JRE in the PeopleSoft domain where the queue server and MCF Log server are running. For CTI adapters, this will be the JRE used by the adapter.
The following example shows how to install the REN server certificates into the JRE trust store for a queue server and MCF log server. You will need to repeat this procedure for every queue server domain being used. You will also need to perform a similar procedure for CTI adapters or any other REN Java client, if you are using them.
Note: If you have configured client authentication, you will need to import client certificates into the JRE keystore.
To import certificates in Java keystore:
Open a command prompt.
Enter the following command:
<PS_HOME>\jre\bin\keytool -import -trustcacerts -alias <alias-name>
-file <CA Certificate Pem file> -keystore <full path to keystore used by the REN Java client>
-storepass <password>
Example:
<PS_HOME>\jre\bin\keytool -import -trustcacerts -alias PSFTCA -file ca.pem
-keystore <PS_HOME>\jre\lib\security\cacerts -storepass changeit
Note: You will get an error message, sslv3 alert certificate unknown, if the certificate is not imported correctly.
To configure the REN server for SSL:
Select
The REN Server Definition page appears.
Select the SSL Only check box.
Select your REN Server certificate from the Certificate Alias drop-down list box.
Click Save.
To configure REN clusters:
Select
The REN Server Cluster page appears.
Update the REN server cluster URL using https and the SSL port.
Update the REN server browser URL using https and the SSL port.
Click Save.
Apart from the CA and REN server certificates, client authentication requires local node certificates, a client certificate for the browser, and a PSMCAPI certificate.
To install certificates for the local node:
Select
Click +.
Select Local Node from the Type drop-down list box.
Enter the local node name in Alias, and click Add Root.
Select the alias of the CA certificate from the Issuer Alias lookup button.
Click Request.
Complete the Common Name, Org Unit, Organization, Locality, State/Province, Country, Algorithm, Key Size, Email Address, and Challenge Pswd fields.
Note: The common name must be the machine name of the REN server machine, for example, PTA112.example.com, where PTA112 is the machine name and .example.com is the domain name.
Click OK.
The Certificates Signing Request dialog box appears.
Copy and paste the text from the Certificates Signing Request dialog box, and save the text in a file.
Click OK.
The Import link appears.
To obtain your local node certificate, submit the certificate request text to the CA that issued the selected root certificate.
The process of obtaining digital certificates varies, depending on the CA. Typically, a CA requires you to paste the content of the PEM-formatted CSR into a form that you submit online. The CA may send you the signed public key certificate by email or require you to download it from a specified web page.
Open the saved certificate file in a text editor, and then highlight and copy its entire contents.
Select
Click the Import link.
The Import Certificate page appears.
Paste the copied certificate content into the long edit box, and click OK.
See Implementing Node Authentication, Implementing Nonrepudiation.
You can generate the client certificate by openssl or keytool in P12 format and import it in the browser. Importing the certificates depends on the browser.
The following steps are an example of generating a client certificate using openssl. Clients can also use keytool or Microsoft CA to generate the client certificate
To generate the client certificate using openssl:
Generate the private key
openssl genrsa -aes256 -out renclient.keyUse the private key to generate a certificate request. When you create this request, ensure that the certificate is issued to your identity. This may mean using your email address as the common name when prompted.
openssl req -new -key renclient.key -days 365 -out renclient.csrSend the CSR file to CA to get the certificate.
Download the certificate as a base64-encoded renclient.cer file. Note that base64-encoded cer files are PEM files.
Also download the CA's certificate as RootCA.cer, which is also base64-encoded.
Generate a p12 archive containing the downloaded certificates and the private key.
openssl pkcs12 -export -out renclient.pfx -inkey renclient.key -in RootCA.cer -in renclient.cerThe renclient.pfx contains the private key.
Note: The files created when you follow steps 1 through 4 are renclient.key, renclient.csr, renclient.cer, RootCA.cer, and renclient.pfx.
Next, install the RootCA certificate. On Windows-based machines, this is done with certmgr.
Install the renclient.pfx file.
Note: Similar to step 5, on Windows-based machine, you can install renclient.pfx file with certmgr by remembering to use the appropriate certificate storage for personal certificates.
Go to the REN Server Buffer Test page, with client certificates enabled for the REN server. The browser will prompt you to choose a client certificate to use.
To install PSMCAPI certificates:
Generate a private key in the keystore using the following command:
keytool -genkeypair -alias <fully qualified machine name> -keystore <full path to the psmcapi keystore>You will be prompted to enter various inputs. Ensure that the name field is fully qualified name of the machine where psmcapi is running. This command creates the keystore if it does not already exist.
Example:
>keytool -genkeypair -alias example.oracle.com -keystore psmcapi_keystore
Enter keystore password:
Re-enter new password:
What is your first and last name?
  [Unknown]:  example.oracle.com
What is the name of your organizational unit?
  [Unknown]:  PeopleTools
What is the name of your organization?
  [Unknown]:  PeopleSoft
What is the name of your City or Locality?
  [Unknown]:  Pleasanton
What is the name of your State or Province?
  [Unknown]:  CA
What is the two-letter country code for this unit?
  [Unknown]:  US
Is CN=example.oracle.com, OU=PeopleTools, O=PeopleSoft, L=Pleasanton, ST=CA, C=US correct?
  [no]:  yes

Enter key password for <example.oracle.com>
        (RETURN if same as keystore password):
Generate the certificate request using the following command:
keytool -certreq -alias <same alias as in step 1> -file <output filename> -keystore <full path to the Java keystore used by the CTI adapter>You will be prompted for the keystore password.
Example:
>keytool -certreq -alias example.oracle.com -file example.csr -keystore psmcapi_keystore
Enter keystore password:

>cat example.csr
-----BEGIN NEW CERTIFICATE REQUEST-----
MIICsDCCAm4CAQAwezELMAkGA1UEBhMCVVMxCzAJBgNVBAgTAkNBMRMwEQYDVQQHEwpQbGVhc2Fu
dG9uMRMwEQYDVQQKEwpQZW9wbGVTb2Z0MRQwEgYDVQQLEwtQZW9wbGVUb29sczEfMB0GA1UEAxMW
...
yYcbMAsGByqGSM44BAMFAAMvADAsAhRAU7bb602ca7ifVVHk1hwAJkTSNgIUCJP2oI3Sf4eD/7Ri
gbHVPF4jnY4=
-----END NEW CERTIFICATE REQUEST-----
To obtain your certificate, submit the CSR to the CA that issued the selected root certificate.
If necessary, import the Root CA certificate into the keystore. It is necessary if this certificate is not already in the Java truststore.
keytool -import -alias <Root CA alias> -file <Root CA cert> -keystore <full path to the Java keystore used by the CTI adapter>You will be prompted for the keystore password. Respond with yes when asked if you wish to trust this certificate.
Example:
>keytool -import -file RootCA.cer -alias RootCA -keystore psmcapi_keystore
Enter keystore password:
Owner: CN=example.oracle.com, OU=PeopleTools, O=PeopleSoft, L=Pleasanton, ST=CA, C=US
...
Trust this certificate? [no]:  yes
Certificate was added to keystore
Import the signed certificates into the psmcapi keystore using the following command:
keytool -import -alias <same alias as in step 1> -file <certificate file> -keystore <full path to the Java keystore used by the CTI adapter> -trustcacertsYou will be prompted for the keystore password.
Example:
>keytool -import -file abc.cer -alias example.oracle.com -keystore psmcapi_keystore -trustcacerts
Enter keystore password:
Certificate reply was installed in keystore
These are the certificates needed in your psmcapi keystore. The client certificate (in this example, example.oracle.com) and the root CA certificate. The root CA certificate can also be stored in a separate truststore.
>keytool -list -keystore psmcapi_keystore
Enter keystore password:
Keystore type: PKCS12
Keystore provider: SUN

Your keystore contains 2 entries

example.oracle.com, Oct 14, 2020, PrivateKeyEntry,
Certificate fingerprint (SHA-256): AC:24:48:06:64:C8:F4:45:B3:92:39:72:DB:64:70:C1:FE
rootca, Oct 23, 2020, trustedCertEntry,
Certificate fingerprint (SHA-256): AE:34:20:21:A2:3B:5A:79:77:AD:46:E8:E6:78:B0:3A:5ECertificates that are used to secure a Web server can be reused to secure a REN server. The Java keystore that stores these certificates can be converted to a PKCS #12 keystore. Subsequently, you can configure the REN server to use the newly created external PKCS #12 keystore when you define a REN server the SSL and the UseExternalKeystore options are selected.
To convert a Java keystore to a PKCS #12 keystore, you can use the PSExportToPKCS12.bat file that is delivered by Oracle.
Access the piabin directory in your web server installation and locate the PSExportToPKCS12.bat file.
Note: Ensure that the JAVA_HOME environment variable is set correctly.
Run the PSExportToPKCS12.bat in Windows or PSExportToPKCS12.sh in UNIX.
Note: The PSExportToPKCS12.bat and PSExportToPKCS12.sh scripts must be run using a version of the Sun Java Runtime environment compatible with your PeopleTools installation.
This example illustrates the conversion of Java keystore to PKCS #12 keystore using the PSExportToPKCS12.bat file.
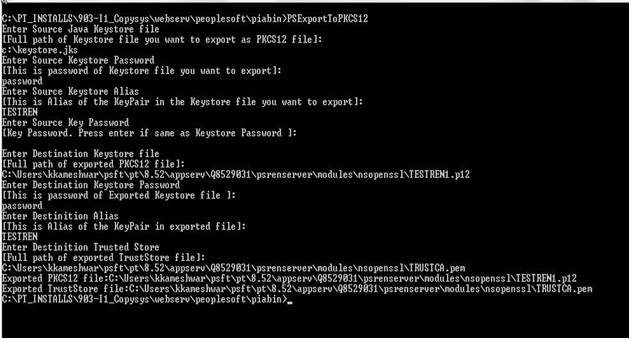
Note: The PSExportToPKCS12.bat file must be run prior to defining a REN server in the REN Server Configuration page. The file must not be run during the boot sequence of the application server.
Enter values for the following:
Source Java Keystore — the full path of Java Keystore.
Source Keystore Password — the password of the Java Keystore
Source Keystore Alias — alias of the KeyPair in the Java Keystore.
Source Key Password — if the password is the same as Source Keystore Password, you can leave it blank.
Destination Keystore — the full path of exported PKCS #12 keystore including the file extension (.p12 is preferred).
Destination Keystore Password — the password of exported keystore.
Destination Alias — alias of the KeyPair in exported keystore.
Destination Trusted Store — the full path of the exported TrustStore file including the file extension (.pem is preferred).
The Java Keystore is converted to PKCS #12 keystore.
Server authentications involving SSL may encounter errors that are not logged in the generic error logs. Additional logging can be activated from the Tuxedo domain.
The new logging will be sent to a new UQ server and MCFLog server log, controlled by the JVM command line in the psappsrv.cfg file. Additionally, other REN Java clients, such as CTI adaptors can use the same logging structure.
There are two new sections in the psappsrv.cfg file, one for PSUQSRV and one for PSMCFLOG. Inside those sections are instructions for this new logging:
    ;To turn on SSL and other additional logging, add

    ; -DRENClient.log=true -DRENClient.log.level=All

    ;Available log levels are:

    ; None, Emergency, Alert, Critical, Error, Warning, Notice, Info, Debug,and All

    ;For example: JavaVM Options=-Xmx256m -Xms512m

    JavaVM Options=-Dxdo.ConfigFile=%PS_HOME%/appserv/xdo.cfg -Xms256m -Xmx512m
Add -DRENClient.log=true to turn on logging. Then -DRENClient.log.level can be set to one of the listed debugging levels to capture more or less debugging information. For most debugging purposes, "All" is the appropriate choice.
Add -Dhttps.protocols=TLSv1.3 to require the UQ and MCF Log servers to communicate with the REN server in TLSv1.3, after updating the REN server configuration files.
For example: JavaVM Options=-Dxdo.ConfigFile=%PS_HOME%/appserv/xdo.cfg -Xms256m -Xmx512m -Dhttps.protocols=TLSv1.3.