Working with Sample Pages
To demonstrate MCF tools and functionality, use the MCF Sample Pages (MCF_DEMO_CMP) component.
Access the Customer Chat page using the following navigation path:
Note: This page is available using both queue server and third-party routing server.
This example illustrates the fields and controls on the Customer Chat page.
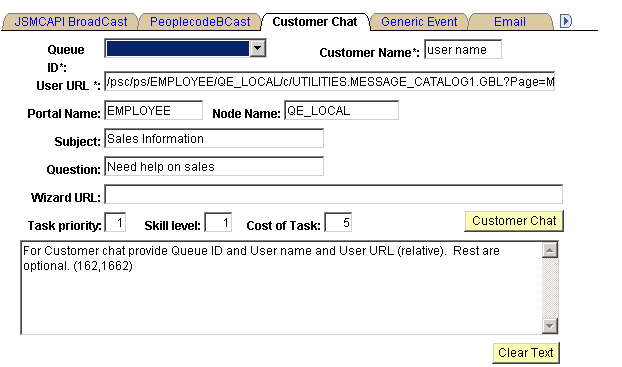
This page demonstrates the InitChat() built-in function, including required and optional parameters.
This page is not intended for production use. On a typical application page, the developer includes a Live Help or Customer Chat button that calls the InitChat() built-in function and passes required parameters, including the context of the chat request. The sample customer chat page demonstrates values that can be included in the InitChat() parameters. The user may not be prompted for any information.
To run a sample chat:
Access the MultiChannel Console.
Open the Customer Chat page.
Open the Queue ID drop-down list box and select the queue that you are logged on to.
The other fields are automatically populated with values that generate a sample chat session. You can change the values as long as valid required values are included.
The User URL is a required field that contains the application page URL to send to the agent chat browser.
The optional Wizard URL field represents a grab URL; the actual page that appears is determined by InitChat() parameters.
The text box displays error messages and additional information for using the sample page.
Click Customer Chat.
The customer chat window appears.
On the MultiChannel Console, click the flashing chat notification icon to accept the chat session.
The agent chat window appears.
You can enter text as both agent and customer to demonstrate chat functionality.
Click Select from the agent chat window during a chat session to open the URL wizard:
This example illustrates the fields and controls on the URL Wizard page. You can find definitions for the fields and controls later on this page.
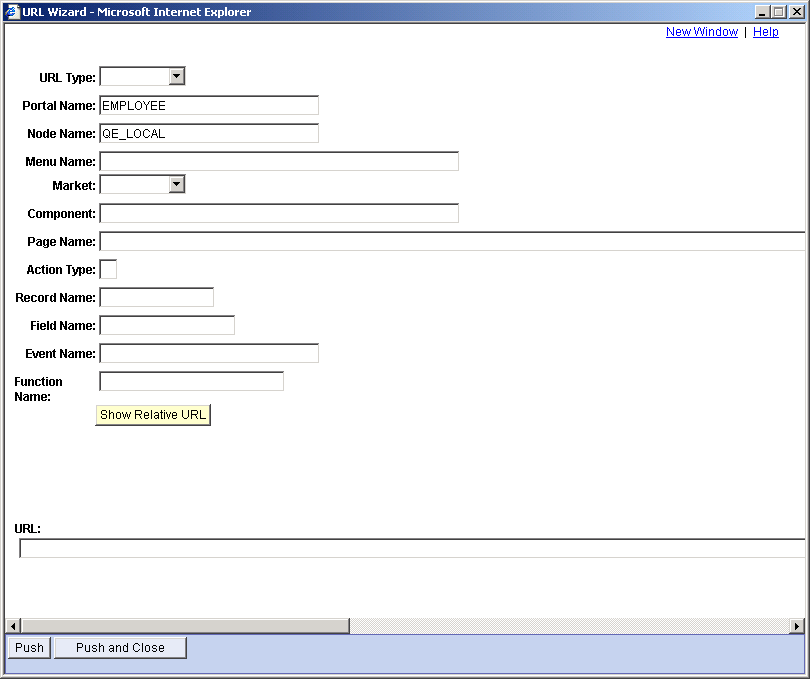
Use the wizard to form a URL to send to the customer. The URL Wizard page is a template that demonstrates constructing a URL and sending it to a customer. The URL wizard can be used as is or as the basis for developing URL generation for your application.
Field or Control |
Description |
|---|---|
URL Type |
Select the type of URL that is being accessed. Values are:
Fields that are not required by the selected URL type are not available. |
Show Relative URL |
Click to display the relative URL that is generated by the values that you have entered into the page's fields. |
URL |
Displays the generated relative URL. |
Push |
Click to send the generated relative URL to the customer's chat window. The Push button demonstrates functionality that must be included in an application-specific URL wizard. |
Push and Close |
Click to send the generated relative URL to the customer's chat window and close the URL wizard. The Push and Close button demonstrates functionality that must be included in an application-specific URL wizard. |
Access the Generic Event page using the following navigation path:
Note: This page is available using both queue server and third-party routing server.
This example illustrates the fields and controls on the Generic Event page.
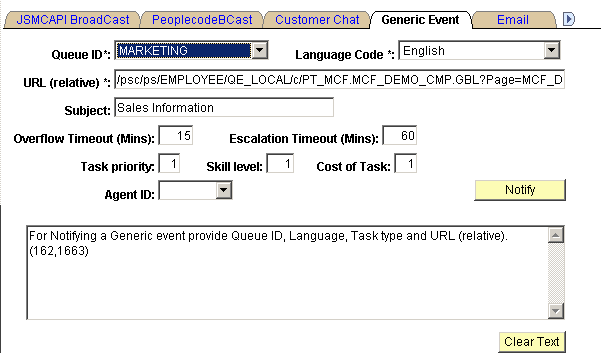
This page demonstrates a generic persistent event using the EnQueue() and NotifyQ() built-in functions, including required and optional parameters.
This page is not intended for production use. On a typical application page, the developer includes an Enqueue or similar button that calls the EnQueue() built-in function and passes required parameters, including the context of the request. The sample customer chat page demonstrates values that can be included in the EnQueue() parameters. The user may not be prompted for any information.
To run a sample generic event:
Access the MultiChannel Console.
Open the Generic Event page.
Open the Queue ID drop-down list box, and select the queue that you are logged on to.
Open the Agent ID drop-down list box, and select the agent ID that you are logged on with.
Select Generic for the task type.
Click Notify.
On the MultiChannel Console, click the flashing event notification icon to accept the event.
The Generic Event window appears.
The format of the generic event window is determined by application developers. PeopleSoft supplies a sample generic event window to demonstrate the available functionality, including the DeQueue() built-in.
Configure the size and initial location of the generic event window on the Agent Window Configuration page:
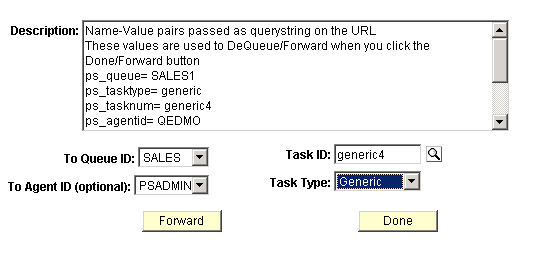
This example illustrates the fields and controls on the Generic Event window. You can find definitions for the fields and controls later on this page.
Field or Control |
Description |
|---|---|
Description |
Displays text from the generic event. |
To Queue ID |
Select a queue to which the generic event will be forwarded. |
Task ID |
Select the task ID of the generic event to forward. |
To Agent ID |
Select the agent ID to whom the generic event will be forwarded. |
Task Type |
Select the task type of the generic event to be forwarded. |
Forward |
Click to send the generic event to the selected agent or queue. This button demonstrates the functionality of the Forward() built-in function. |
Done |
Click to notify the real-time event notification (REN) server that you are done with this task. A message asks if you want to close the window. The Done button demonstrates the functionality of the DeQueue() built-in function. |
Access the Email page using the following navigation path:
Note: This page is available using both queue server and third-party routing server.
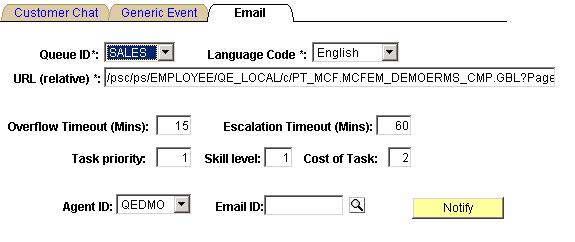
This example illustrates the fields and controls on the Email page.
The email sample pages are intended for demonstration purposes and should not be used in production.
EnQueue() and NotifyQ() can also be called from PeopleSoft Application Engine batch programs.
Note: For you to fully demonstrate the functionality of the Email sample page, an email must be read and written to the email database using the GetMail - Server sample page.
To process a sample email:
Open the Queue ID drop-down list box and select the queue that you are logged on to.
Open the Agent ID drop-down list box and select the agent ID that you are logged on with.
Click Notify.
On the MultiChannel Console, click the flashing email notification icon to accept the email.
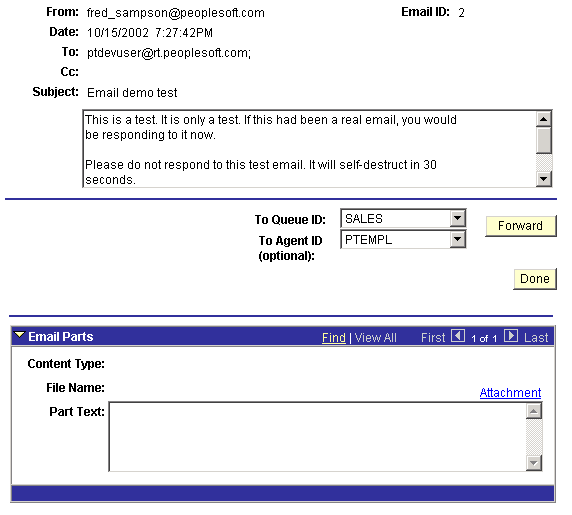
The email window appears.
The format of the email window is determined by application developers. PeopleSoft supplies a sample email event window to demonstrate available functionality.
Configure the size and initial location of the email event window on the agent's Window Configuration page.
This example illustrates the fields and controls on the Email window. You can find definitions for the fields and controls later on this page.
Field or Control |
Description |
|---|---|
To Queue ID |
To forward the email to another queue, select a queue ID from the drop-down list box and click Forward. |
To Agent ID |
To forward the email to another agent, select an agent ID from the drop-down list box and click Forward. |
Forward |
Click to forward the email to the specified queue or agent. This button demonstrates the functionality of the Forward() built-in function. |
Done |
Click to quit the email and remove it from the queue. The Done button demonstrates the functionality of the DeQueue() built-in. |
Email Parts
If an email has been divided into parts stored in the email database, or has an attachment, they can be accessed here.