Defining Worklist Messages
This section provides an overview of worklist messages and discusses how to send and receive worklist messages.
PeopleSoft Workflow administrators frequently communicate information to system users. For example, an administrator might send everyone the backup schedule or send managers a weekly update about the work that their groups performed. Workflow Administrator provides a page for creating and sending this kind of general message. You can send the message by email or to the users’ worklists.
For standard messages that you send out regularly to the same people, Workflow Administrator enables you to define default messages and default routings for those messages so that you need only type them once.
A default message is a saved version of a common message that you can use over and over. When you open the Worklist/Email Message page to send a message, you can select from the list of default messages. Then, you can add to or change the message before sending it.
Default messages are also a good way of defining standard mailing lists. You can define default messages without default text, but they are addressed to a default list of users, such as all managers. When you are ready to send a message to the managers, you select the default message and add the text; thus, you do not have to select the managers individually each time.
To access the Default Message page, select PeopleTools, Workflow, Defaults and Messages, Define Worklist/Email Messages.
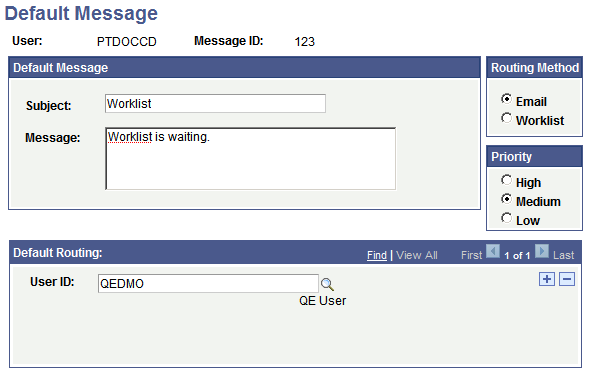
This example illustrates the fields and controls on the Default Message page.
To define a default message:
Search for an existing message ID or add a new one.
Use the standard search or add method to enter the message ID and access the Default Message page.
Note: Messages are keyed by user ID and message ID.
Enter a subject line and message text in the Subject and Message fields.
You can enter as much or as little of this information as necessary. You can enter the remaining information when you actually send the message.
Specify whether to send the message by email or to a worklist.
Assign a routing priority to the message.
Select High, Medium, or Low.
If you always send this message to the same set of users, select their role user names in the Default Routing field.
Click the plus button to add additional role users. You can enter as many or as few users as needed. You can change the list when you actually send the message.
Save the page.
To access the Worklist/Email Message page, select PeopleTools, Workflow, Defaults and Messages, Send Worklist/Email Messages.
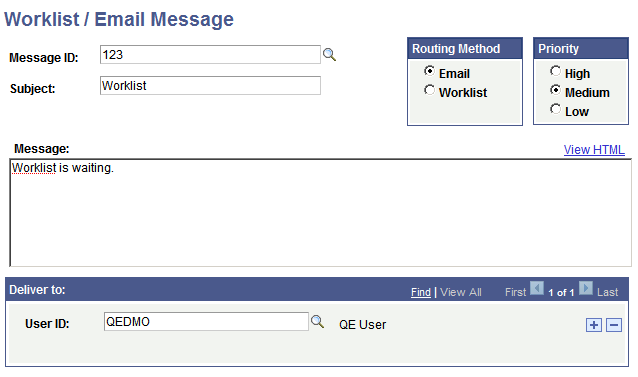
This example illustrates the fields and controls on the Worklist/Email Message page.
To send a message (either by default or for a particular purpose):
If a default message contains the text to deliver to users, select its message ID.
The information from the default message appears on the page. You can add or change this information without affecting the default message.
Enter a subject and message text.
The subject that you enter appears as the subject line of an email message or the description of a worklist entry.
Select a routing option and priority.
Select the role users to whom you want to send the message.
Click the plus button to add (or the minus button to remove) role users from the list.
You can enter as many or as few users as needed.
To preview a message, click View HTML.
To send the message, save the page.
To receive and respond to worklist messages:
In your worklist, select the message to answer.
You can also access the message from the Worklist/Email Reply page.
The Worklist/Email Reply page appears.
To reply to the original sender, click the Reply button and complete the message on the Reply to Message page.
By using the Reply button, rather than the alternate means of navigation, you populate the Subject and Reply To fields based on the original message. Normally, you accept the default Subject and Reply To values. If they don’t appear properly, or if you prefer different values, make the necessary changes.
To forward the message to another user, click the Forward button and complete the message on the Forward Message page.
By using the Forward button, rather than the alternate means of navigation, you populate the Subject field based on the original message. Normally you accept the default subject. If it doesn’t appear properly, or if you prefer a different subject, make the necessary changes.
Click Save to send the message.