Banks may require to have a Service Level Agreement (SLA) with its customers or as an internal policy of the Bank. This User Manual lists the SLA maintenance requirements in OBTFPM and other Mid-office Applications
SLA Maintenance is available based on the Business Process-Stage- Priority combination.
SLA Maintenance to have two screens, one screen for Definition of SLA and another for Authorization/ Edit/ Delete.
SLA maintenance screens are used to calculate SLA. The user can Create SLA, and View SLA (for Edit, Copy, Delete).
The user can view the tasks that are either nearing SLA breach or that have already breached SLA in the Free Task and My Task queue. The status should be indicated for tasks at both the stage as well as process level by colours such as Red and Amber.
This section contains the following topics:
This process allows the user to create SLA, let’s look at the steps of creating a Checklist process:
1. Using the entitled login credentials for Registration stage, login to the OBTFPM application.
2. On login, user must be able to view the dashboard screen with widgets as mapped to the user.
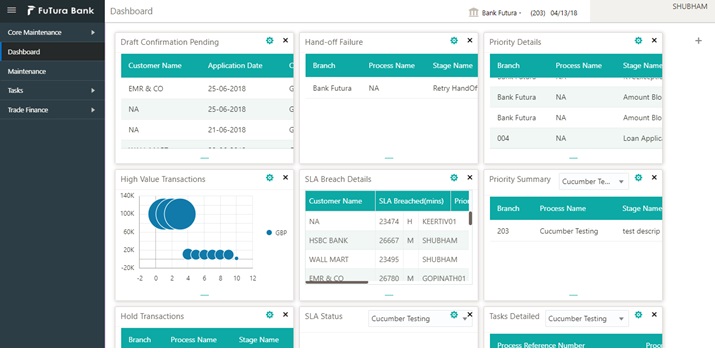
3. Click Core Maintenance > SLA Maintenance > Create SLA.
The Create SLA screen appears.
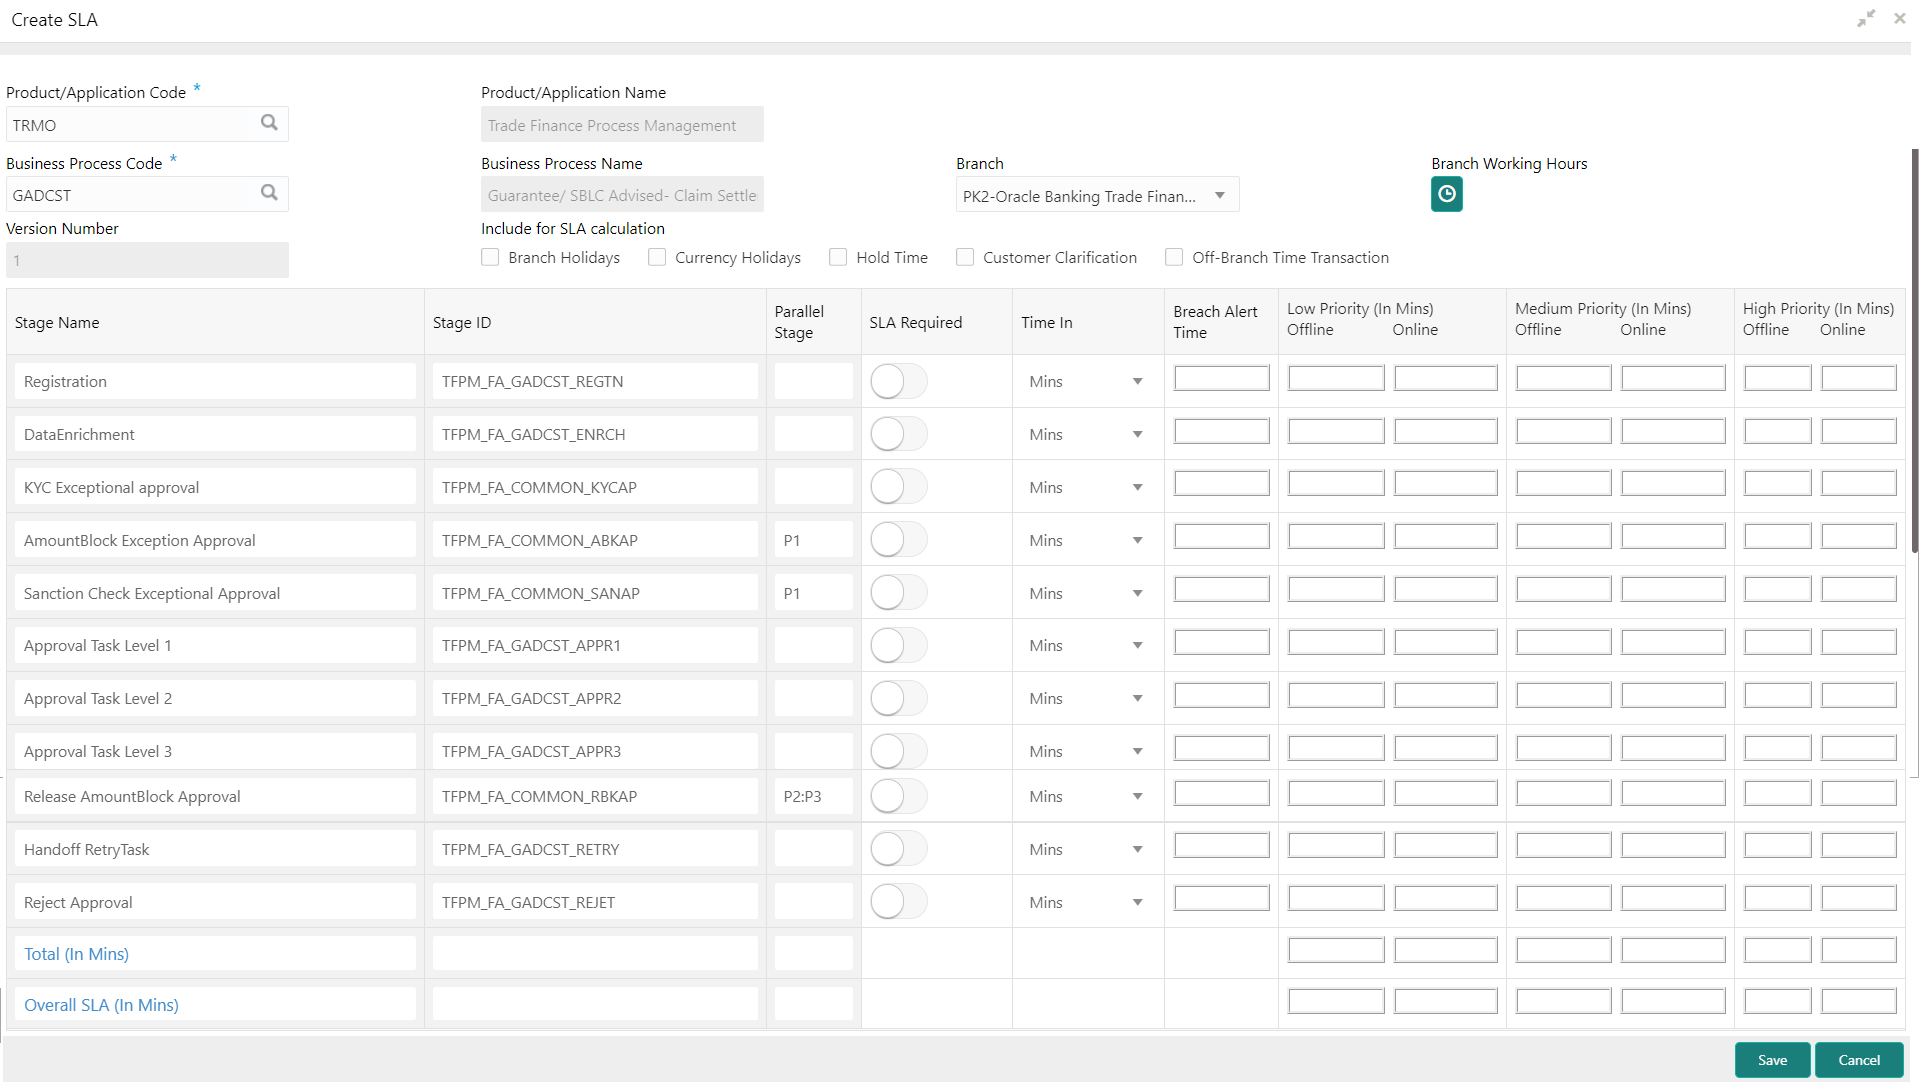
Provide the field description based on the following table.
|
Field |
Description |
|---|---|
|
Product/Application Code |
User can select the Product or Application Code. |
|
Product/Application Name |
System displays the name of the Product/Application (Example Oracle Banking Trade Finance Process Management). |
|
Business Process Code |
User can select the Business Process Code for which the SLA maintenance has to be made. |
|
Business Process Name |
The Business Process name pertaining to the Business Process code selected is defaulted. |
|
Branch |
User can select the branch code for which SLA maintenance has to be done. There is also an option to select All as a value which will enable the SLA to be applicable for all branches in the bank. |
|
Branch Working Hours |
System populates the branch working hours. |
|
Version Number |
System defaults the version number on creating/updating the screen. |
|
Include for SLA calculation |
For calculation of SLA the user can include: l Branch Holidays: User can select this check box, if branch holidays is to be considered for SLA calculation l Currency Holidays: User can select this check box, if currency holidays is to be considered for SLA calculation l Hold Time: User can select this check box, if hold time is to be considered for SLA calculation. l Customer Clarification: User can select this check box, if Customer Clarification items is to be considered for SLA calculation l Off Branch Time Transactions: User can select this check box, if SLA should be calculated after branch hours. |
|
Below fields appear on tab out after entering the above information. |
|
|
Stage Name |
On selection of the process code, the various stages available for the process should be defaulted. |
|
Stage ID |
System defaults the stage ID based on the stage name. |
|
Parallel Stage |
System defaults the various stages available for the process, on selection of the process code. |
|
SLA Required |
This toggle indicates whether SLA calculation is required for this stage. By Default, the toggle should be set to Yes. User can change the value to No. If the toggle is changed to No, user input should be disabled and the SLA values for the stage should be blank. |
|
Time In |
User can select the drop-down and system displays a pop-up UI for input of the Stage SLA in Days/Hours/Minutes combination. System converts this into minutes and display in the respective fields. Alternatively, user can directly input the SLA in Minutes. |
|
Breach Alert Time |
User can input the SLA Breach Alert time in minutes for the Stage. This will indicate the minutes before which a user needs to be alerted for likely SLA breach for the stage. This is the same for all the different priority combinations for a stage irrespective of the individual SLA times. |
|
Low Priority (In Mins) Offline |
User can input the SLA time in minutes. |
|
Low Priority (In Mins) Online |
User can input the SLA time in minutes. System validates that the time in minutes is not more than value input for offline. |
|
Medium Priority (In Mins) Offline |
User can input the SLA time in minutes. System validates that the time in minutes is not more than value input for offline. |
|
Medium Priority (In Mins) Online |
User can input the SLA time in minutes. System validates that the time in minutes is not more than value input for offline. System validates the time in minutes is not more than value for Low Priority. |
|
High Priority (In Mins) Offline |
User can input the SLA time in minutes System validates that the time in minutes is not more than value input for offline. System validates the time in minutes is not more than value for Low Priority |
|
High Priority (In Mins) Online |
User can input the SLA time in minutes System validates that the time in minutes is not more than value input for offline. System validates the time in minutes is not more than value for Low Priority |
Action Buttons
|
Field |
Description |
|---|---|
|
Save |
Click to save the to close the task and reopen it to work later. |
|
Cancel |
Click to cancel the SLA Maintenance window and return to dashboard. The data input will not be saved. |
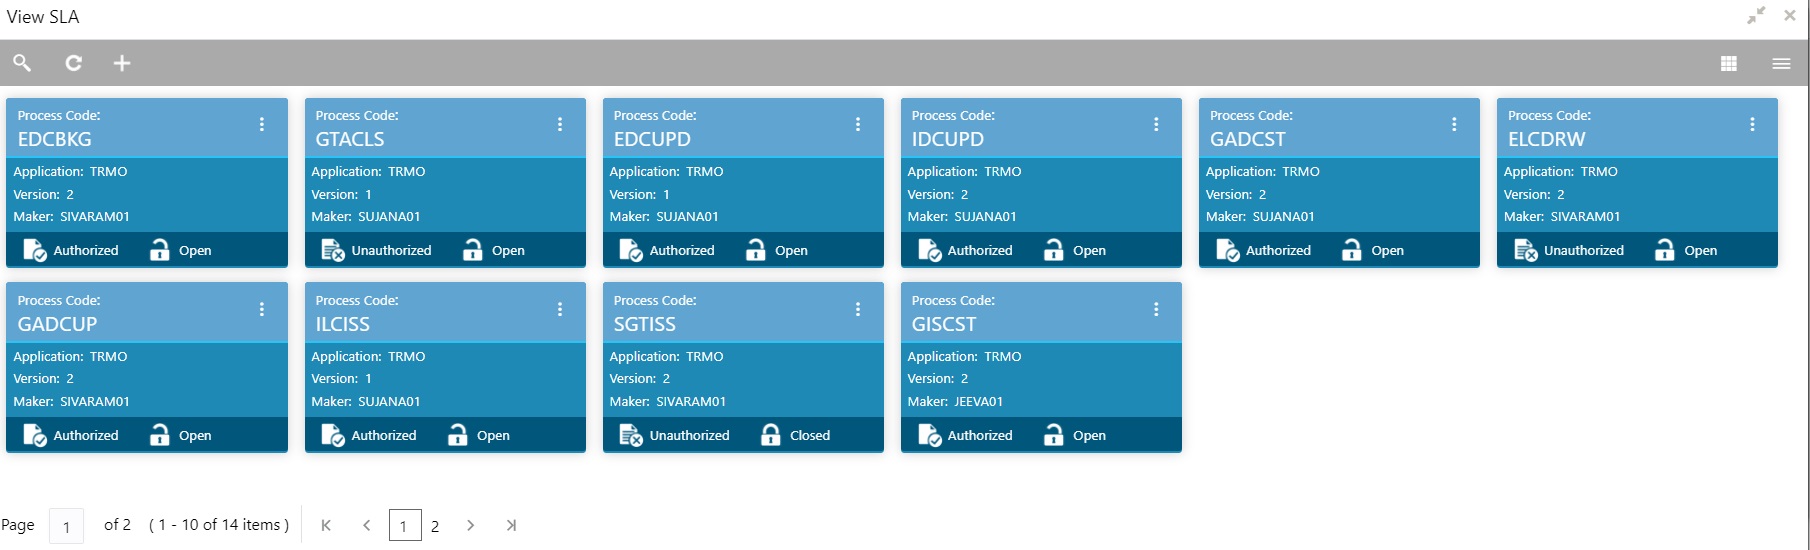
4. Click Save to save the created SLA. The new SLA is displayed as tile in the View SLA screen.
The user can view the summary of SLAs maintained in the form of tiles. The user can view the maintained SLA, if the SLA is already created in the system. The user can also create a new SLA using View SLA screen, by clicking the ‘+’ icon.
1. Click Core Maintenance > SLA Maintenance > View SLA.
|
Field |
Description |
|---|---|
|
Process Code |
The process code. |
|
Product/Application Name |
System displays the name of the Product/Application (Example Oracle Banking Trade Finance Process Management). |
|
Version |
System defaults the version number on creating/updating the screen. |
|
Maker |
System displays the maker ID. |
|
Status |
Displays the status of the record. Values are Authorized and Unauthorized. |
2. Click the icon, and then click Authorize to Authorize the SLA
or Delete to delete the SLA or view the SLA.
or View to view the SLA Standard Maintenance screen.
The user can search the SLA already created, by entering the search criteria such as Process Code, Authorization status and Record Status. Blank search is also allowed.
1. In the View SLA screen, click the search icon.

|
Field |
Description |
|---|---|
|
Process Code |
The user can enter the Process Code. |
|
Status |
Displays the authorization status of the SLA. Values are Authorized and Unauthorized. |
|
Record Status |
Displays the status of the record. Values are Open and Closed. |
2.2.2 SLA Standard Maintenance
This maintenance should enable the bank user to define the SLA at the Process- Stage-Priority level. This section provides a quick snapshot of SLA details. All fields displayed under in this screen, would be read only. Refer to 2.1 Creating SLA for more information of the fields.
1. In the View SLA screen, click the icon on the SLA tile and then click View. The SLA Standard Maintenance screen appear.
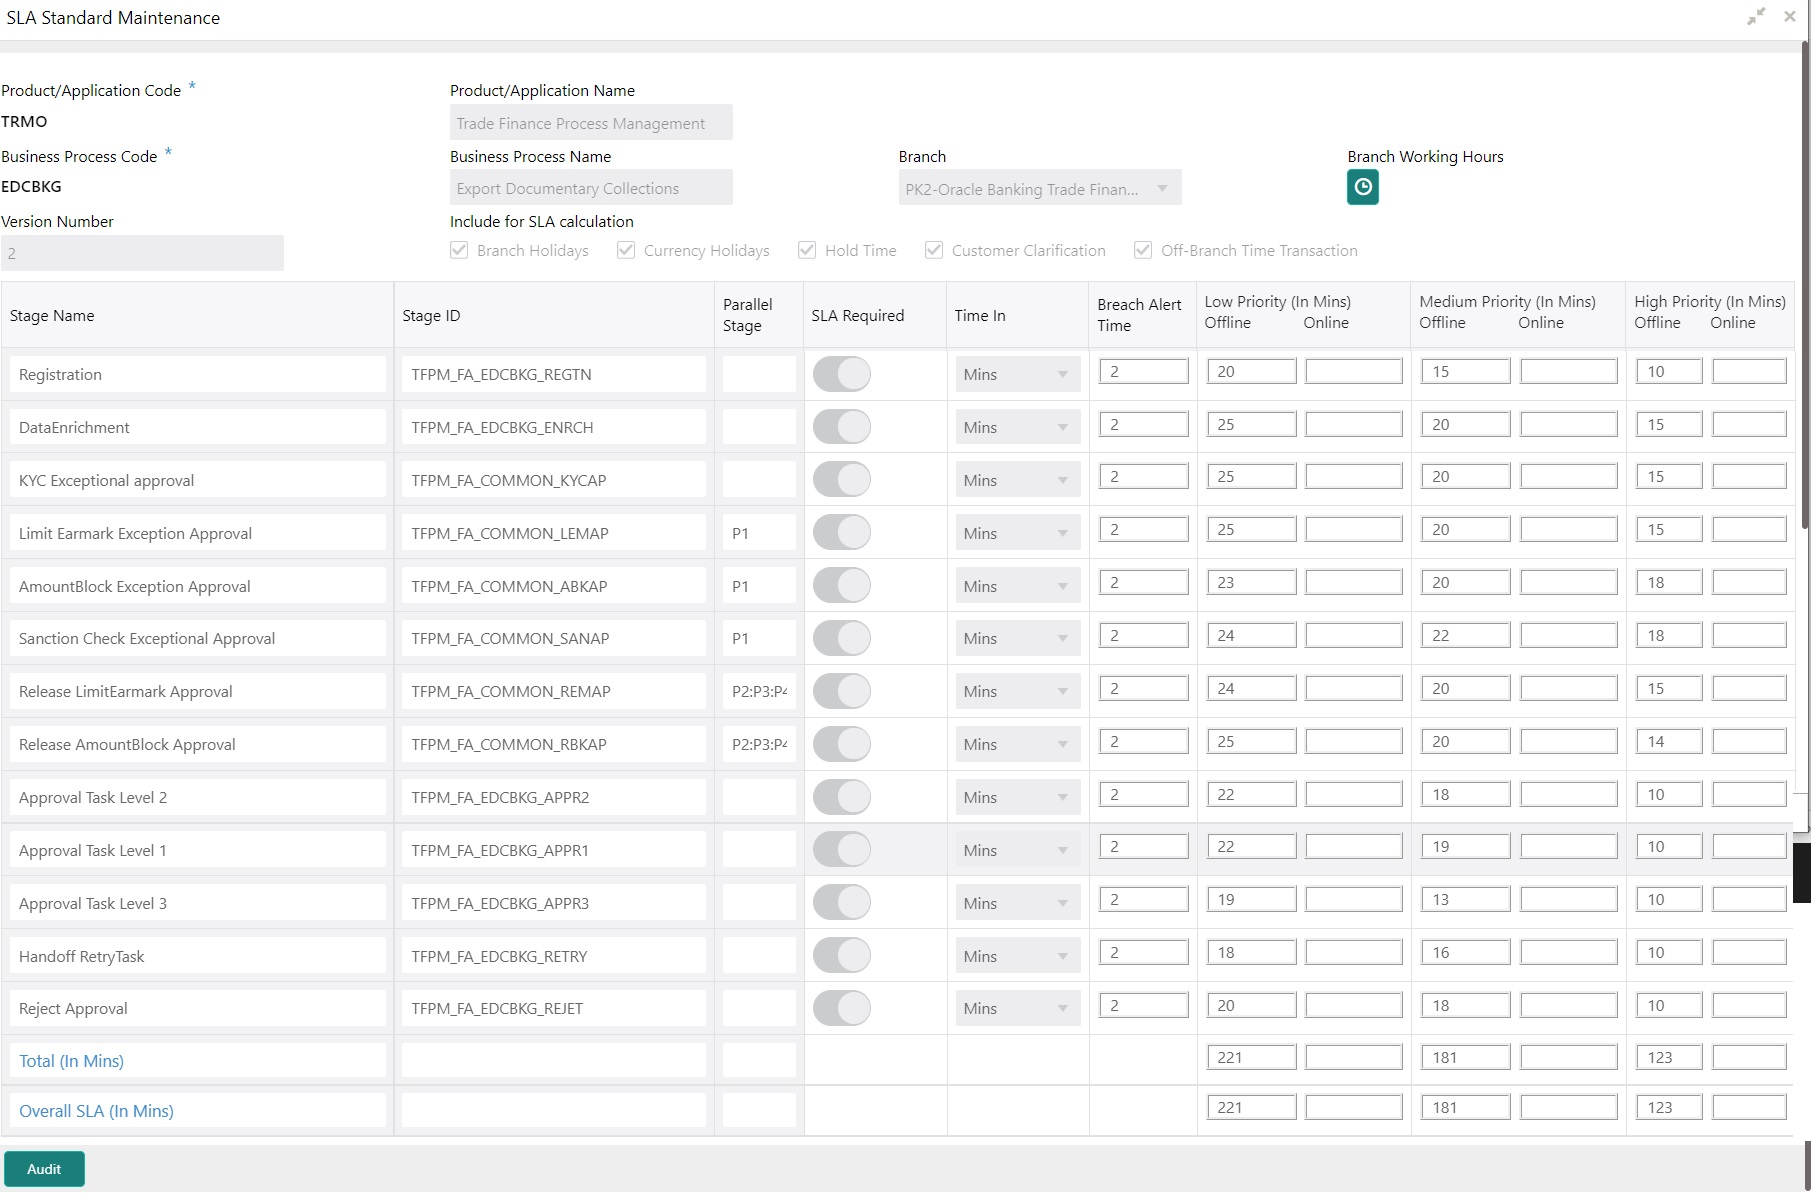
Provide the field description based on the following table.
|
Field |
Description |
|---|---|
|
Process Code |
Select the process code to which this checklist has to be mapped from LOV. |
|
Process Name |
The process name is populated based on selected process code. |
|
Application Category Code |
Select the application category code. |
|
Application Category Name |
The application category name is populated based on selected process code. |
|
Stage Code |
Select the stage code in process to which this checklist has to be mapped. |
|
Stage Name |
The stage name is populated based on selected process code. |
|
Checklist Code |
|
|
Component |
Select the unique checklist component from the LOV and link checklist code. |
|
Mandatory |
Select the check box, if the checklist is to be maintained as a mandatory Checklist item. |
|
Field |
Description |
|---|---|
|
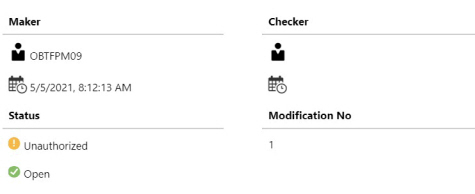
Maker ID |
System displays the maker ID. |
|
Checker |
System displays the checker ID. |
|
Time stamp |
System displays the maker id date and time stamp. |
|
Time stamp |
System displays the checker id date and time stamp. |
|
Modification No. |
Displays the modification number. |
|
Status |
Displays the status of the record. Values are Authorized and Unauthorized. |
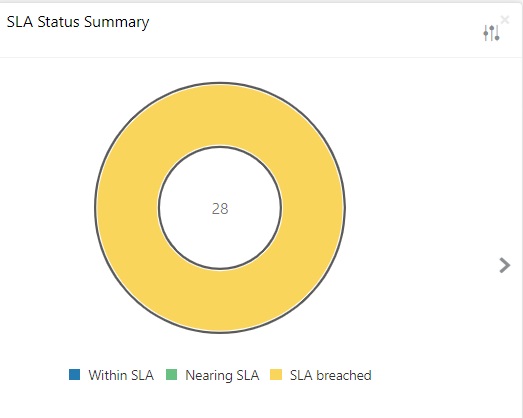
The SLA status widget is available in the Dashboard and is accessible as per user credentials. The Widget displays the SLA status maintained at the process level. The Widget displays only those tasks that are not being handed off to Back Office system.
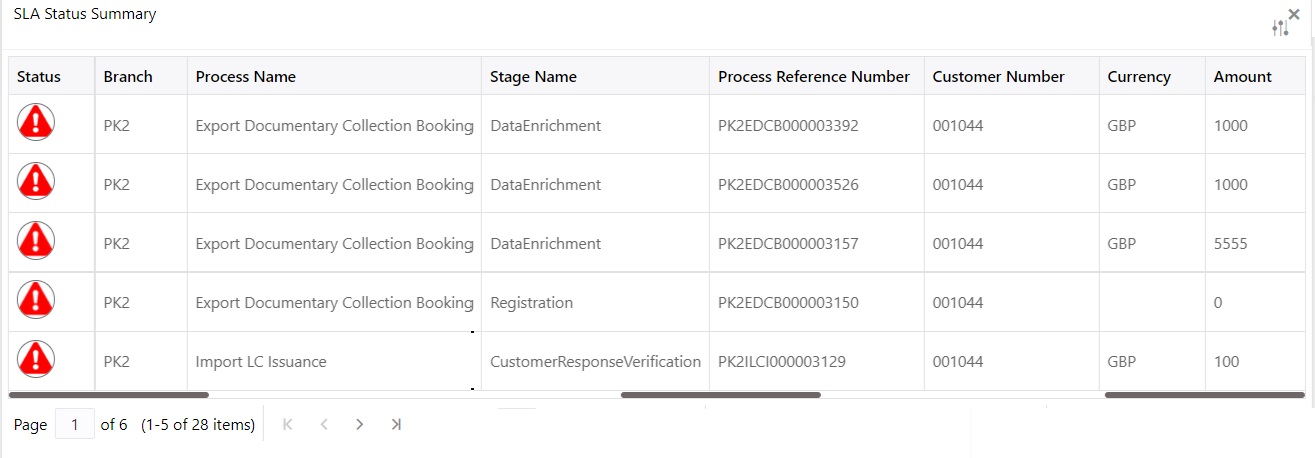
The user can view the SLA Widget in a graphical chart (doughnut chart) as well as in Tabular form by clicking the right arrow on the widget. The tabular form displays the Status, Branch, name of the Process, Stage Name, Process Reference Number, Customer Number, Currency and Amount.
The Widget should be designed in such a way that the user should be able to view the number of items in each status for all the processes. The widget also has filter option to view the details as per filter criteria.
The SLA Status Widget highlight the tasks that are within SLA (in green), approaching SLA breach (in amber) and that have breached SLA (in red).
The user can view the tasks that are either nearing SLA breach or that have already breached SLA in the Free Task and My Task queue. The status should be indicated for tasks at both the stage as well as process level by colours such as Red and Amber.
The following table indicates the status for tasks at both the stage as well as process level:
|
SLA Status (Stage) |
SLA Status (Process) |
Indicator |
|---|---|---|
|
Not Breached |
Not Breached |
No |
|
Breached |
Not Breached |
Red |
|
Not Breached |
Breached |
Red |
|
Breached |
Breached |
Red |
|
Near Breach |
Near Breach |
Amber |
|
Near Breach |
Not Breached |
Amber |
|
Near Breach |
Breached |
Red |
|
Breached |
Near Breach |
Red |
|
Not Breached |
Near Breach |
Amber |
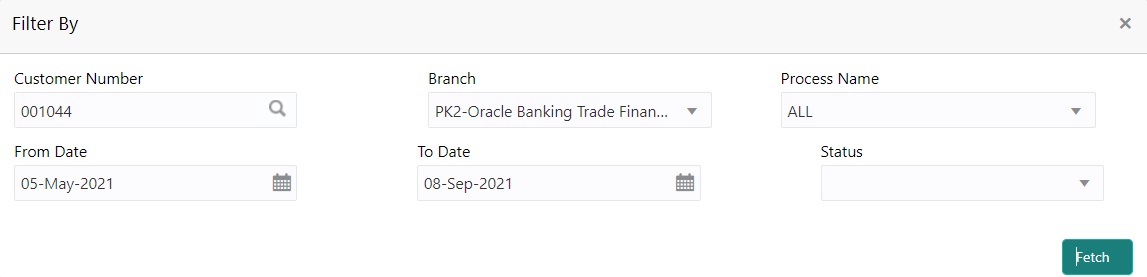
2.4.1 SLA Widget - SLA Status Summary
1. Using the entitled login credentials for Registration stage, login to the OBTFPM application.
2. On login, user can view the SLA Widget on the dashboard screen as mapped to the user.
3. Click the Filter By icon on top corner of the Widget.
|
Field |
Description |
|---|---|
|
Customer Number |
User can select the customer number from the LOV. |
|
Branch |
User can select the branch code and name. |
|
Process Name |
User can select the process name. |
|
From Date |
The From date defaults as the branch date, user can enter a back date. |
|
To Date |
The To date defaults as the branch date. |
|
Status |
User can select the SLA status from the drop-down list. The values are: l Within SLA l Near Breach l Breached |
|
Action Button |
|
|
Fetch |
Click Fetch to view a detailed table of the task. |
|
Field |
Description |
|---|---|
|
Status |
The system displays the SLA status. |
|
Branch |
The system displays the branch code. |
|
Process Name |
The system displays the process name. |
|
Stage Name |
The system displays the stage name of the process. |
|
Process Reference Number |
The system displays the process reference number. |
|
Customer Number |
The system displays the customer number from the LOV. |
|
Currency |
The system displays the process currency. |
|
Amount |
The system displays the process amount. |