Automatically Applying Updates Using Manage Updates
The Automated Cloud Manager Update feature facilitates automatic self-update to the latest Cloud Manager Update Image and automatic PeopleTools update or upgrade when required for the latest Cloud Manager Update Image. This feature is also used to apply PRPs to the Cloud Manager environment.
The update process will:
Provision a new PUM Source instance and a Windows Client
Apply PRPs (if any) on the PUM Source
Upgrade PeopleTools
Install and Configure Change Assistant on Windows Client
Define a Change Package
Create Change Package
Apply Change Package
Reboot domains (as needed)
Whenever there is a new Interaction Hub (IH) Update Image, or new PRPs are available, Cloud Manager will show a notification on the Cloud Manager Settings tile on the home page, and on the Manage Updates page. You need to click on the Apply button, which will ask for a set of credentials and spin up an IH PUM Source instance. Once the PUM source is up and running, the new updates will be applied to the Cloud Manager instance.
This example illustrates the fields and controls on the Manage Updates page showing the status of update steps. You can find definitions for the fields and controls later on this page.
You need to perform the following steps prior to triggering the update:
Subscribe to the Interaction Hub (IH) download channel. The latest updates for IH must be downloaded before starting the upgrade process.
See Download Subscriptions Page.
Important! The latest updates for the IH channel will be downloaded based on the download interval (see Changing Download Interval). To download the updates immediately, unsubscribe and re-subscribe to the IH download channel.
Subscribe to PeopleTools version of the IH PUM source.
Note: The Update Image manifest for the IH PUM source image will list the PeopleTools version. See the PeopleSoft Update Manager (PUM) Home Page, My Oracle Support, Doc ID 1641843.2.
Ensure to take a backup of any customizations done on these permission lists:
PACL_001
PACL_002
PACL_003
These permission lists are applied to the target Cloud Manager as part of the automatic self-update process and the existing instances of these permission lists are overwritten. Back up any customization done on the permission lists before starting the automatic self-update process, and re-apply them after the update is complete.
Ensure that the PUM Fulltier topology is available and that shapes have been specified for the Full Tier and PeopleSoft Client nodes.
Ensure a Windows Image is available in your account.
Configure Windows Image OCID in Cloud Manager Settings page.
Inform users that Cloud Manager will not be available during the upgrade.
Ensure to take a backup of Cloud Manager before updating.
Note: If the Cloud Manager update is initiated with jobs currently running, those jobs may fail. The administrator must clean up and resubmit any jobs that failed.
To trigger automated Cloud Manager application update, perform the following steps:
Log in to Cloud Manager as a user having PACL_CAD user role.
Click the Cloud Manager Settings tile, then select Manage Updates.
To review the details of the PRPs listed, click the right arrow (>).
This example illustrates the fields and controls on the Manage Updates page showing that updates are available.
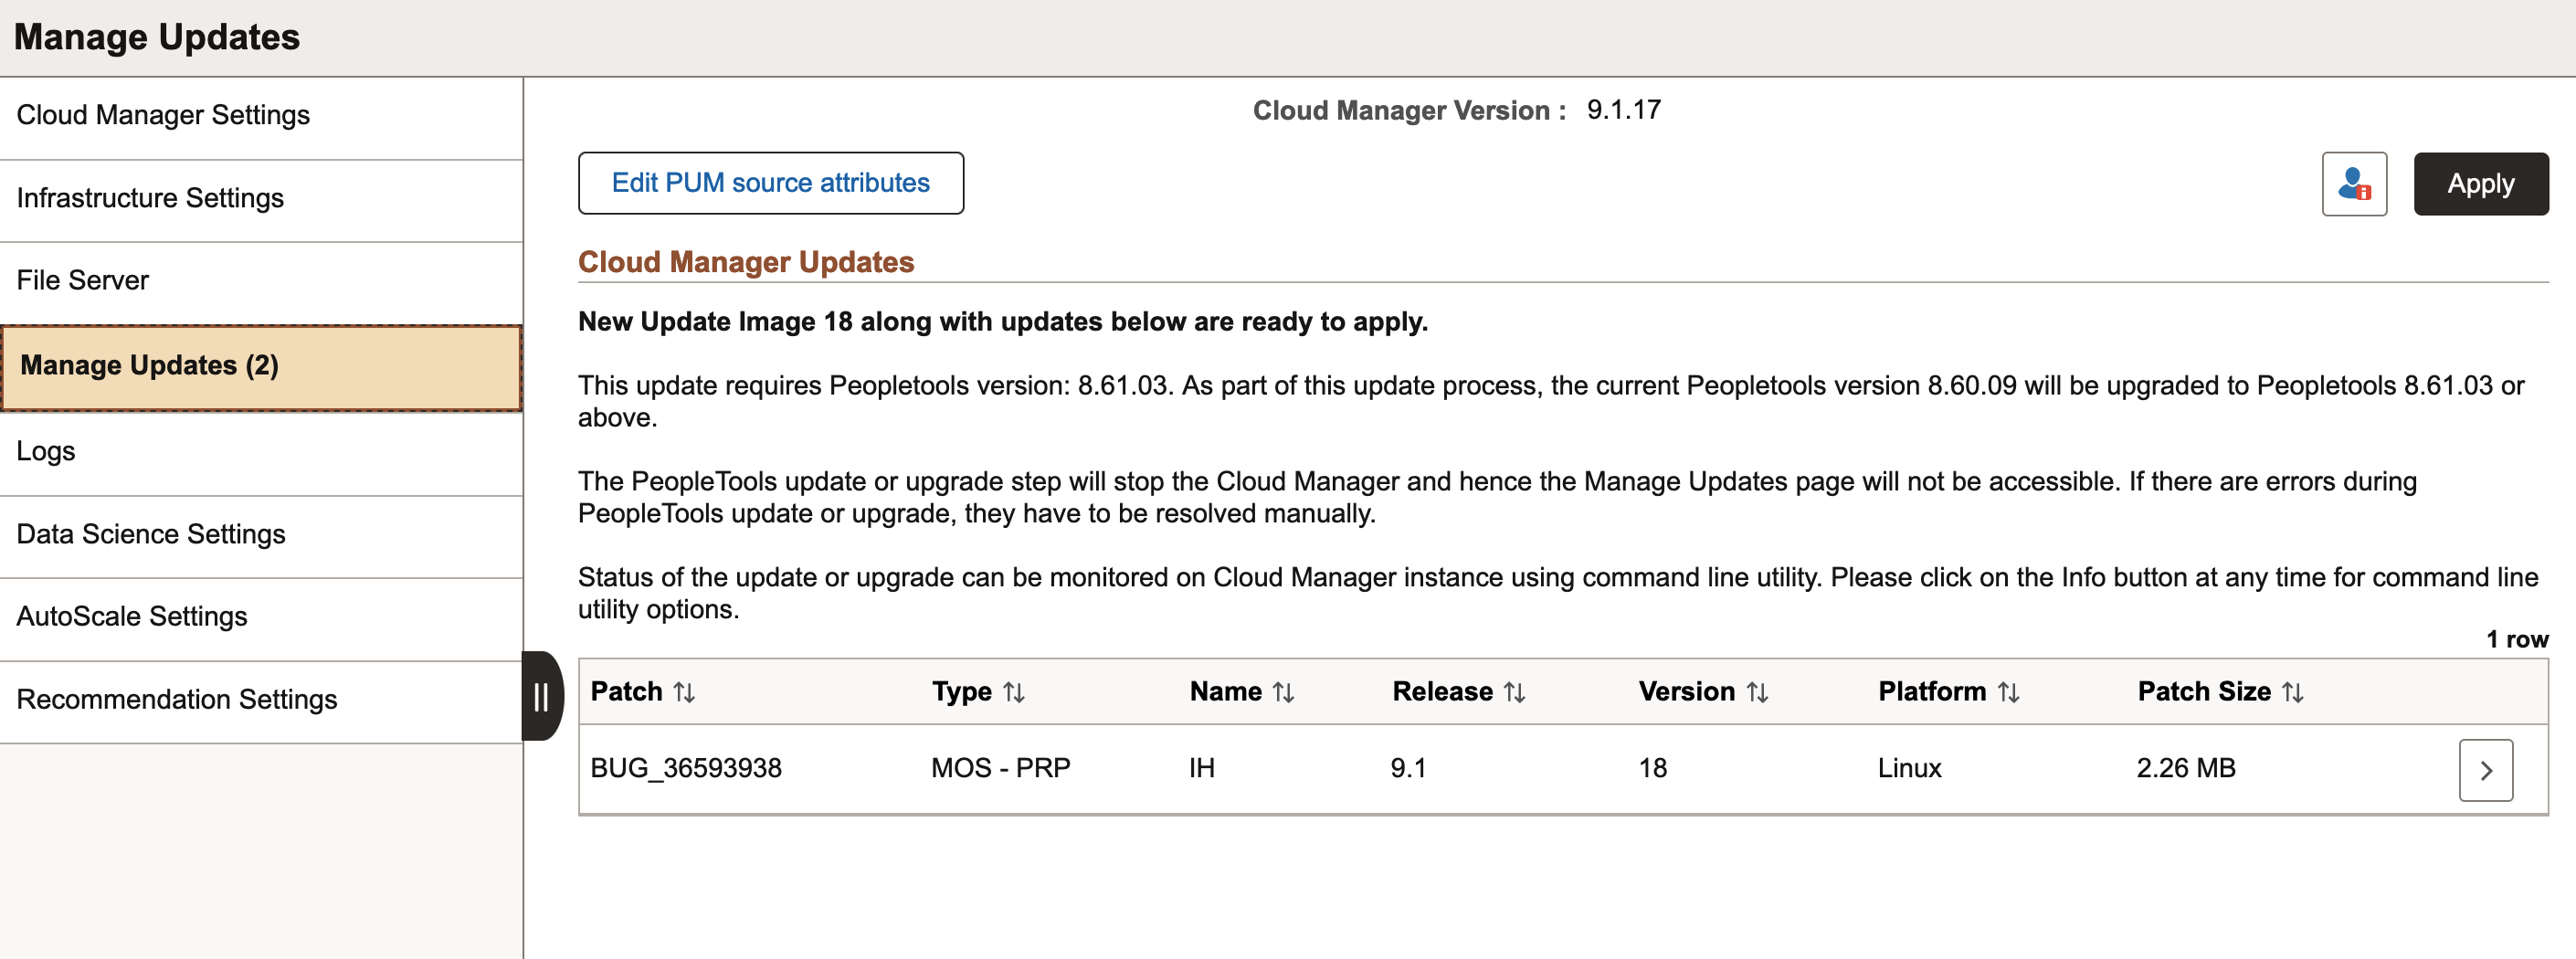
Click the Edit PUM source attributes button to input credentials that will be used to deploy a PUM Source environment.
The fields are defined in Updating Custom Attributes.
Note: The Database Operator Id field value should always be set as VP1.
This example illustrates the fields and controls on the Environment Update Attribute page.
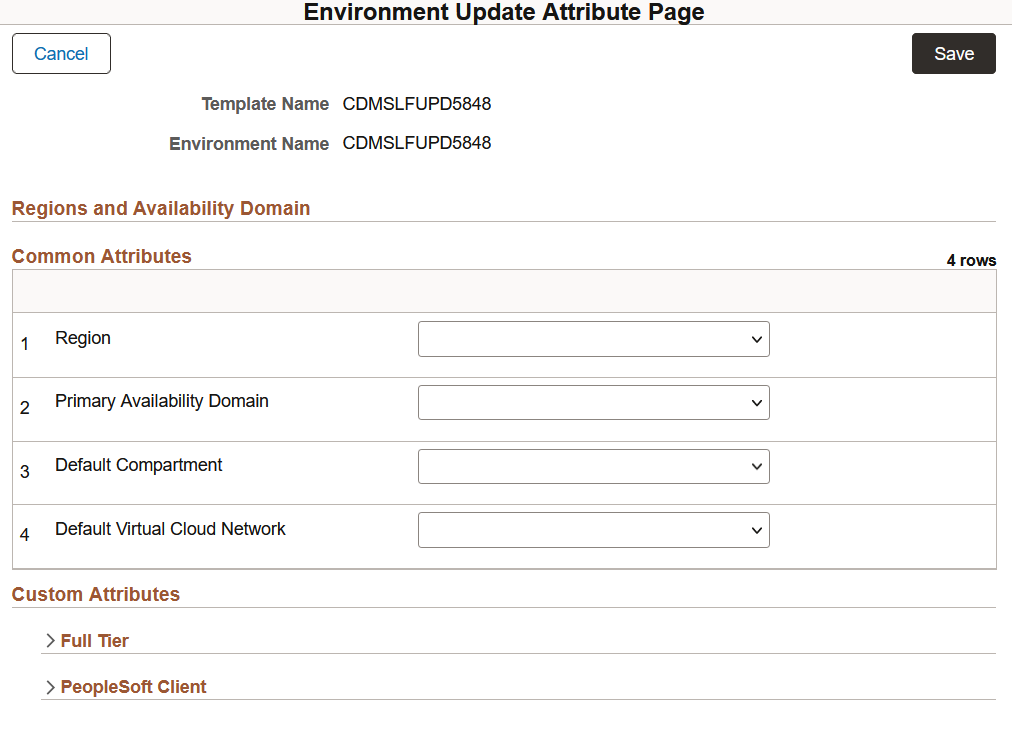
Note: Starting with Cloud Manager Update Image 12, the Virtual Cloud Network for Full Tier and PeopleSoft Client will default to the Default Virtual Cloud Network specified in the Region and Availability Domain section. If VCN peering is set up, the VCN can be changed for the Full Tier or PeopleSoft Client. See the tutorial Use Custom or Private Network Resources with PeopleSoft Cloud Manager (Optional).
Click Save.
If you are upgrading Cloud Manager to a new update image, along with a PeopleTools upgrade, or if any PUM source attribute is not set, the Environment Updates Attributes page appears again. Select the PeopleTools release for the upgraded Cloud Manager, and specify any missing attributes.
Verify the common attributes, and the custom attributes for the Full Tier and PeopleSoft Client.
Click Save.
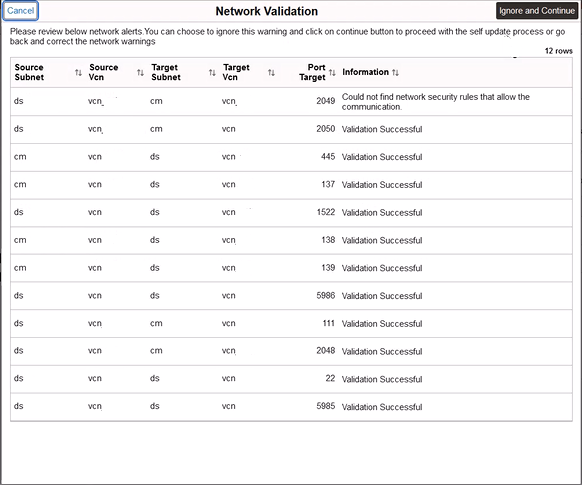
Review the results on the Network Validation page.
Cloud Manager validates port access between subnets that is required during the automatic self-upgrade process. If a warning is shown, click Cancel to correct the issue, or click Ignore and Continue if you are confident that the network settings are correct.
For information on the ports that Cloud Manager requires, see the tutorial Plan the Virtual Cloud Network for PeopleSoft Cloud Manager (Optional) at https://docs.oracle.com/en/applications/peoplesoft/cloud-manager/index.html#InstallationTutorials.
This example illustrates the Network Validation page.
Click Apply to initiate Cloud Manager Update. The update steps and status are displayed.
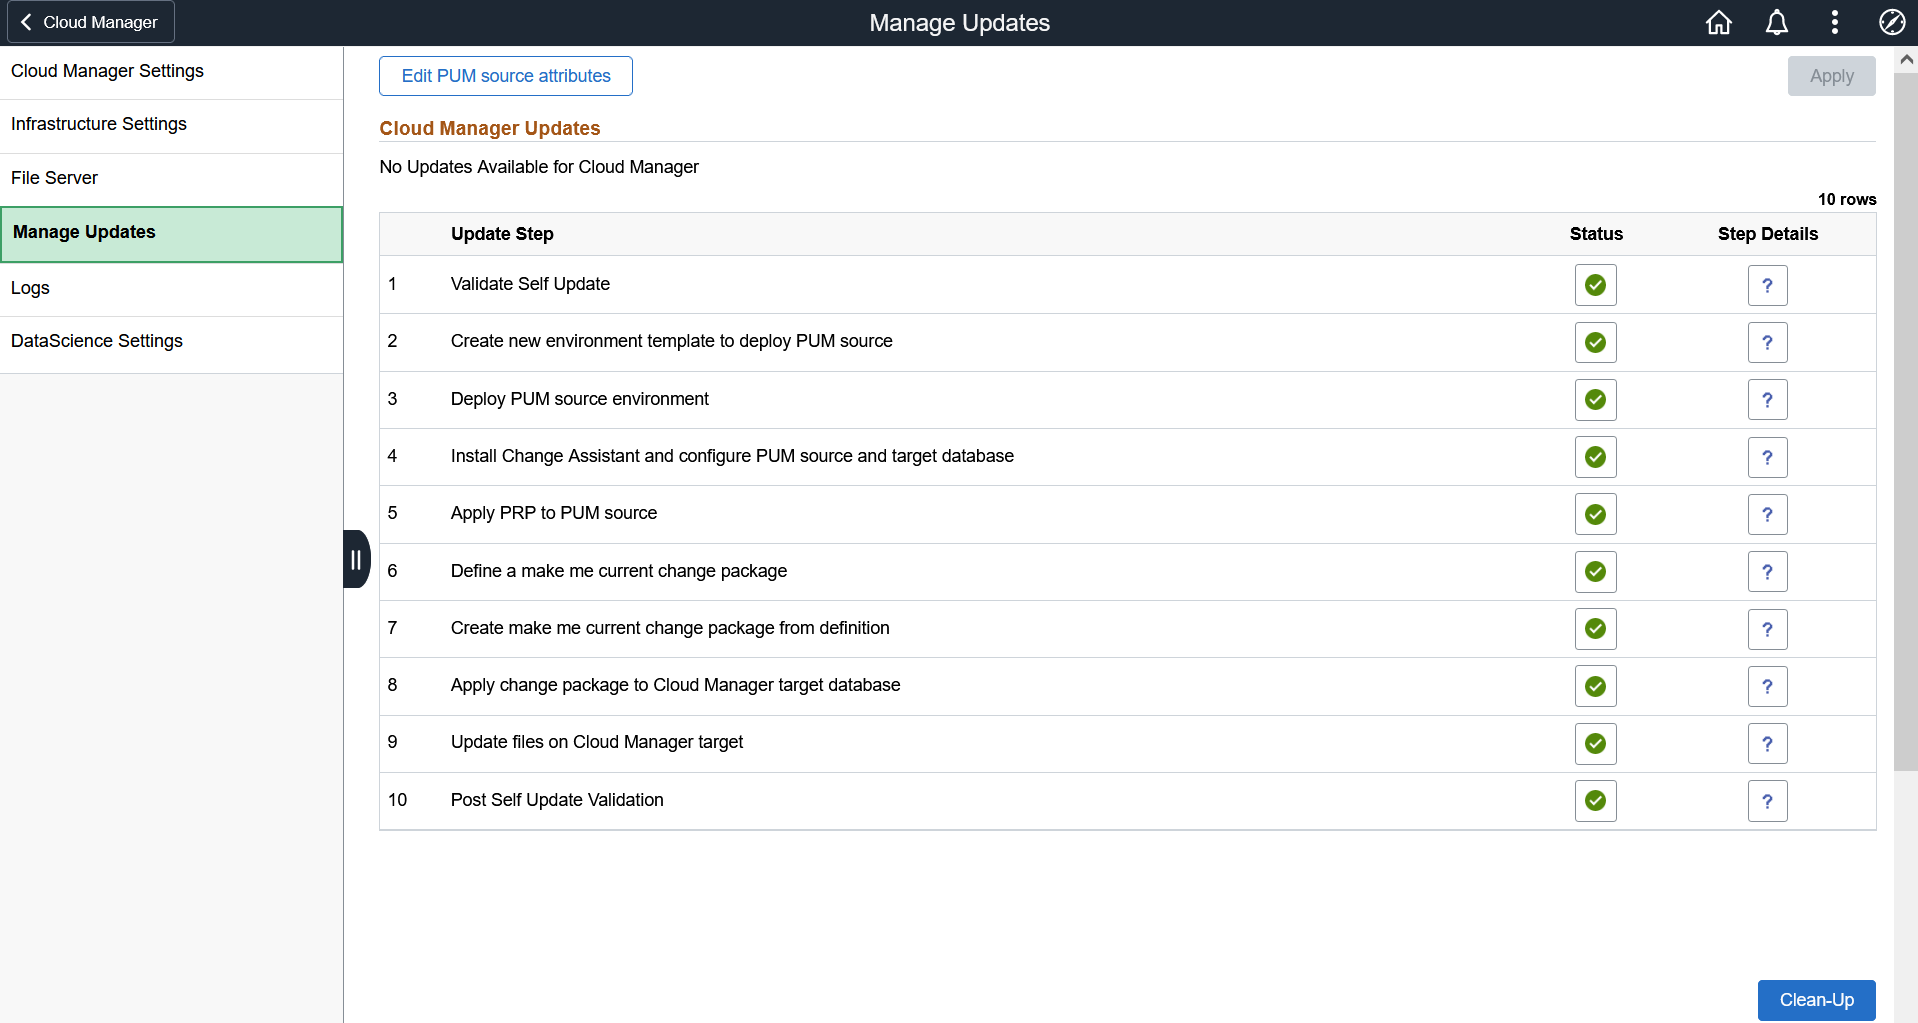
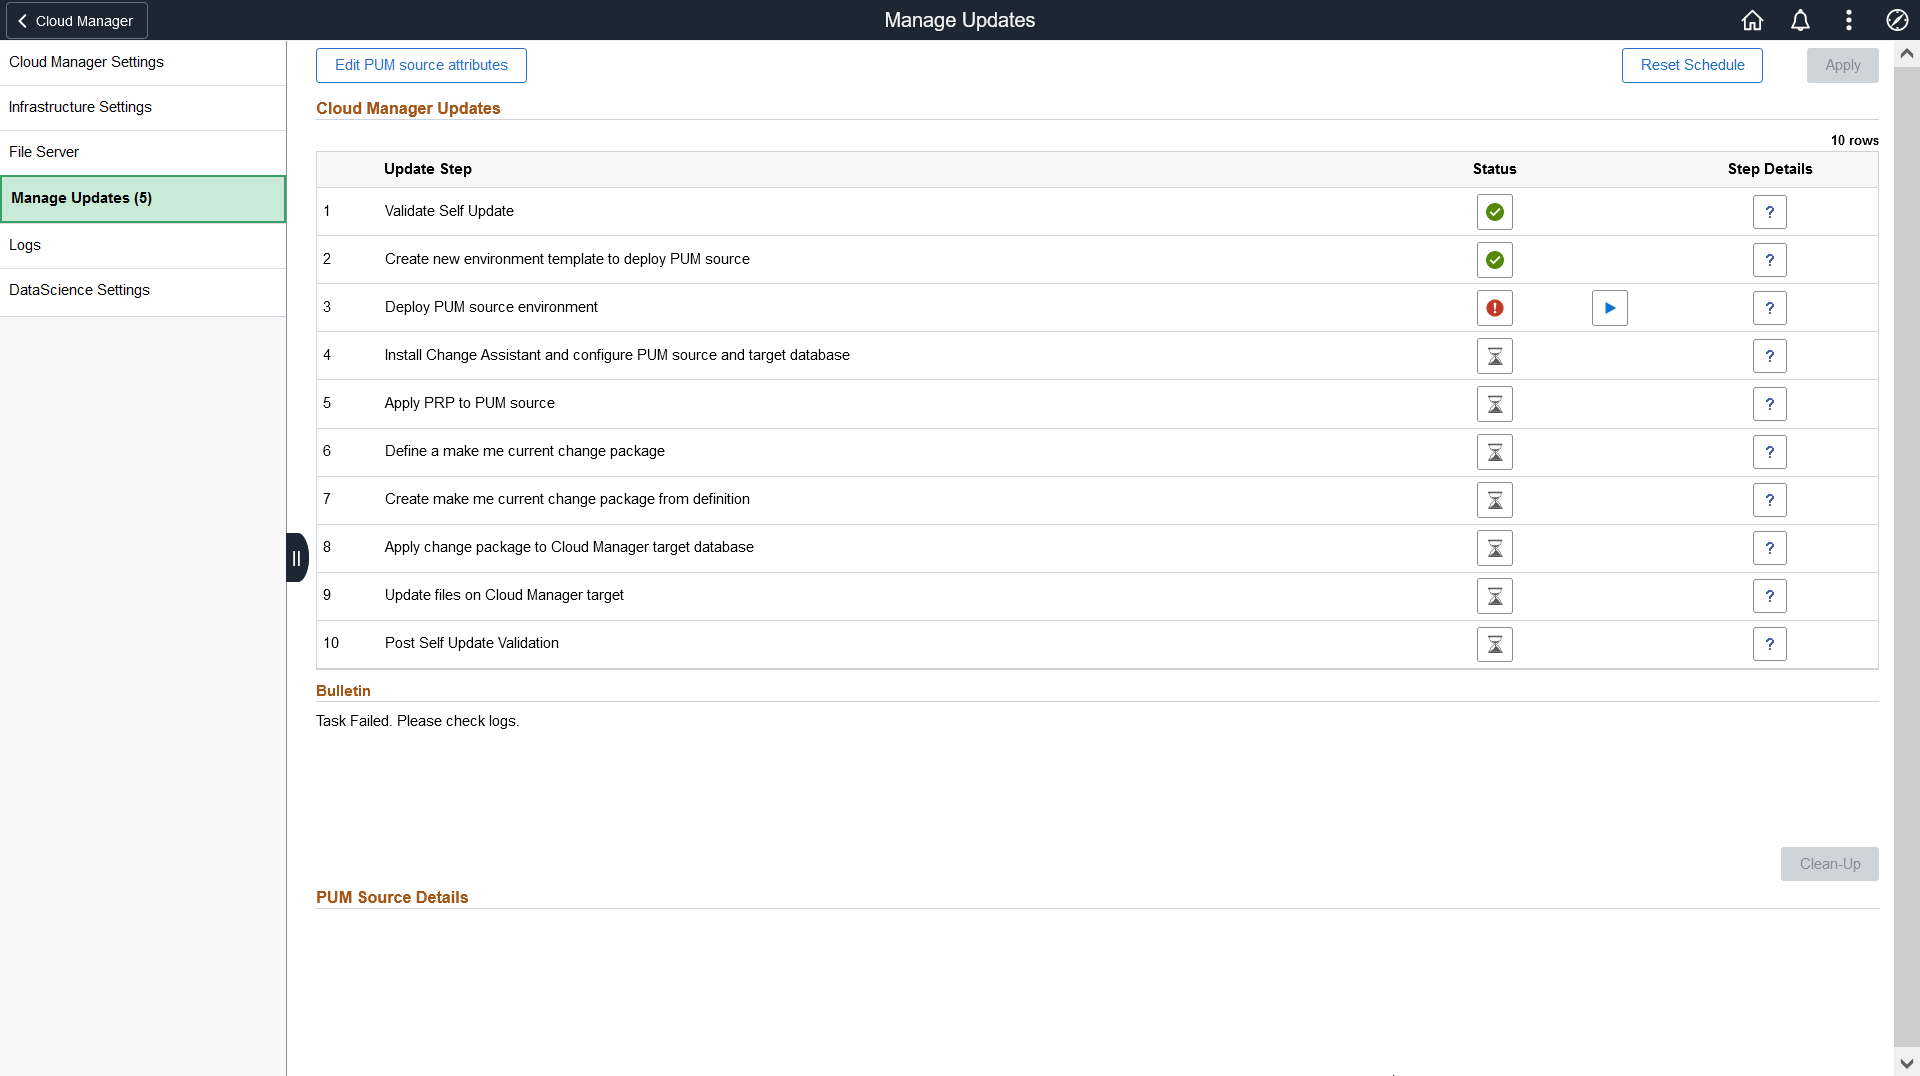
This example illustrates the Manage Updates page showing Cloud Manager Update Steps.
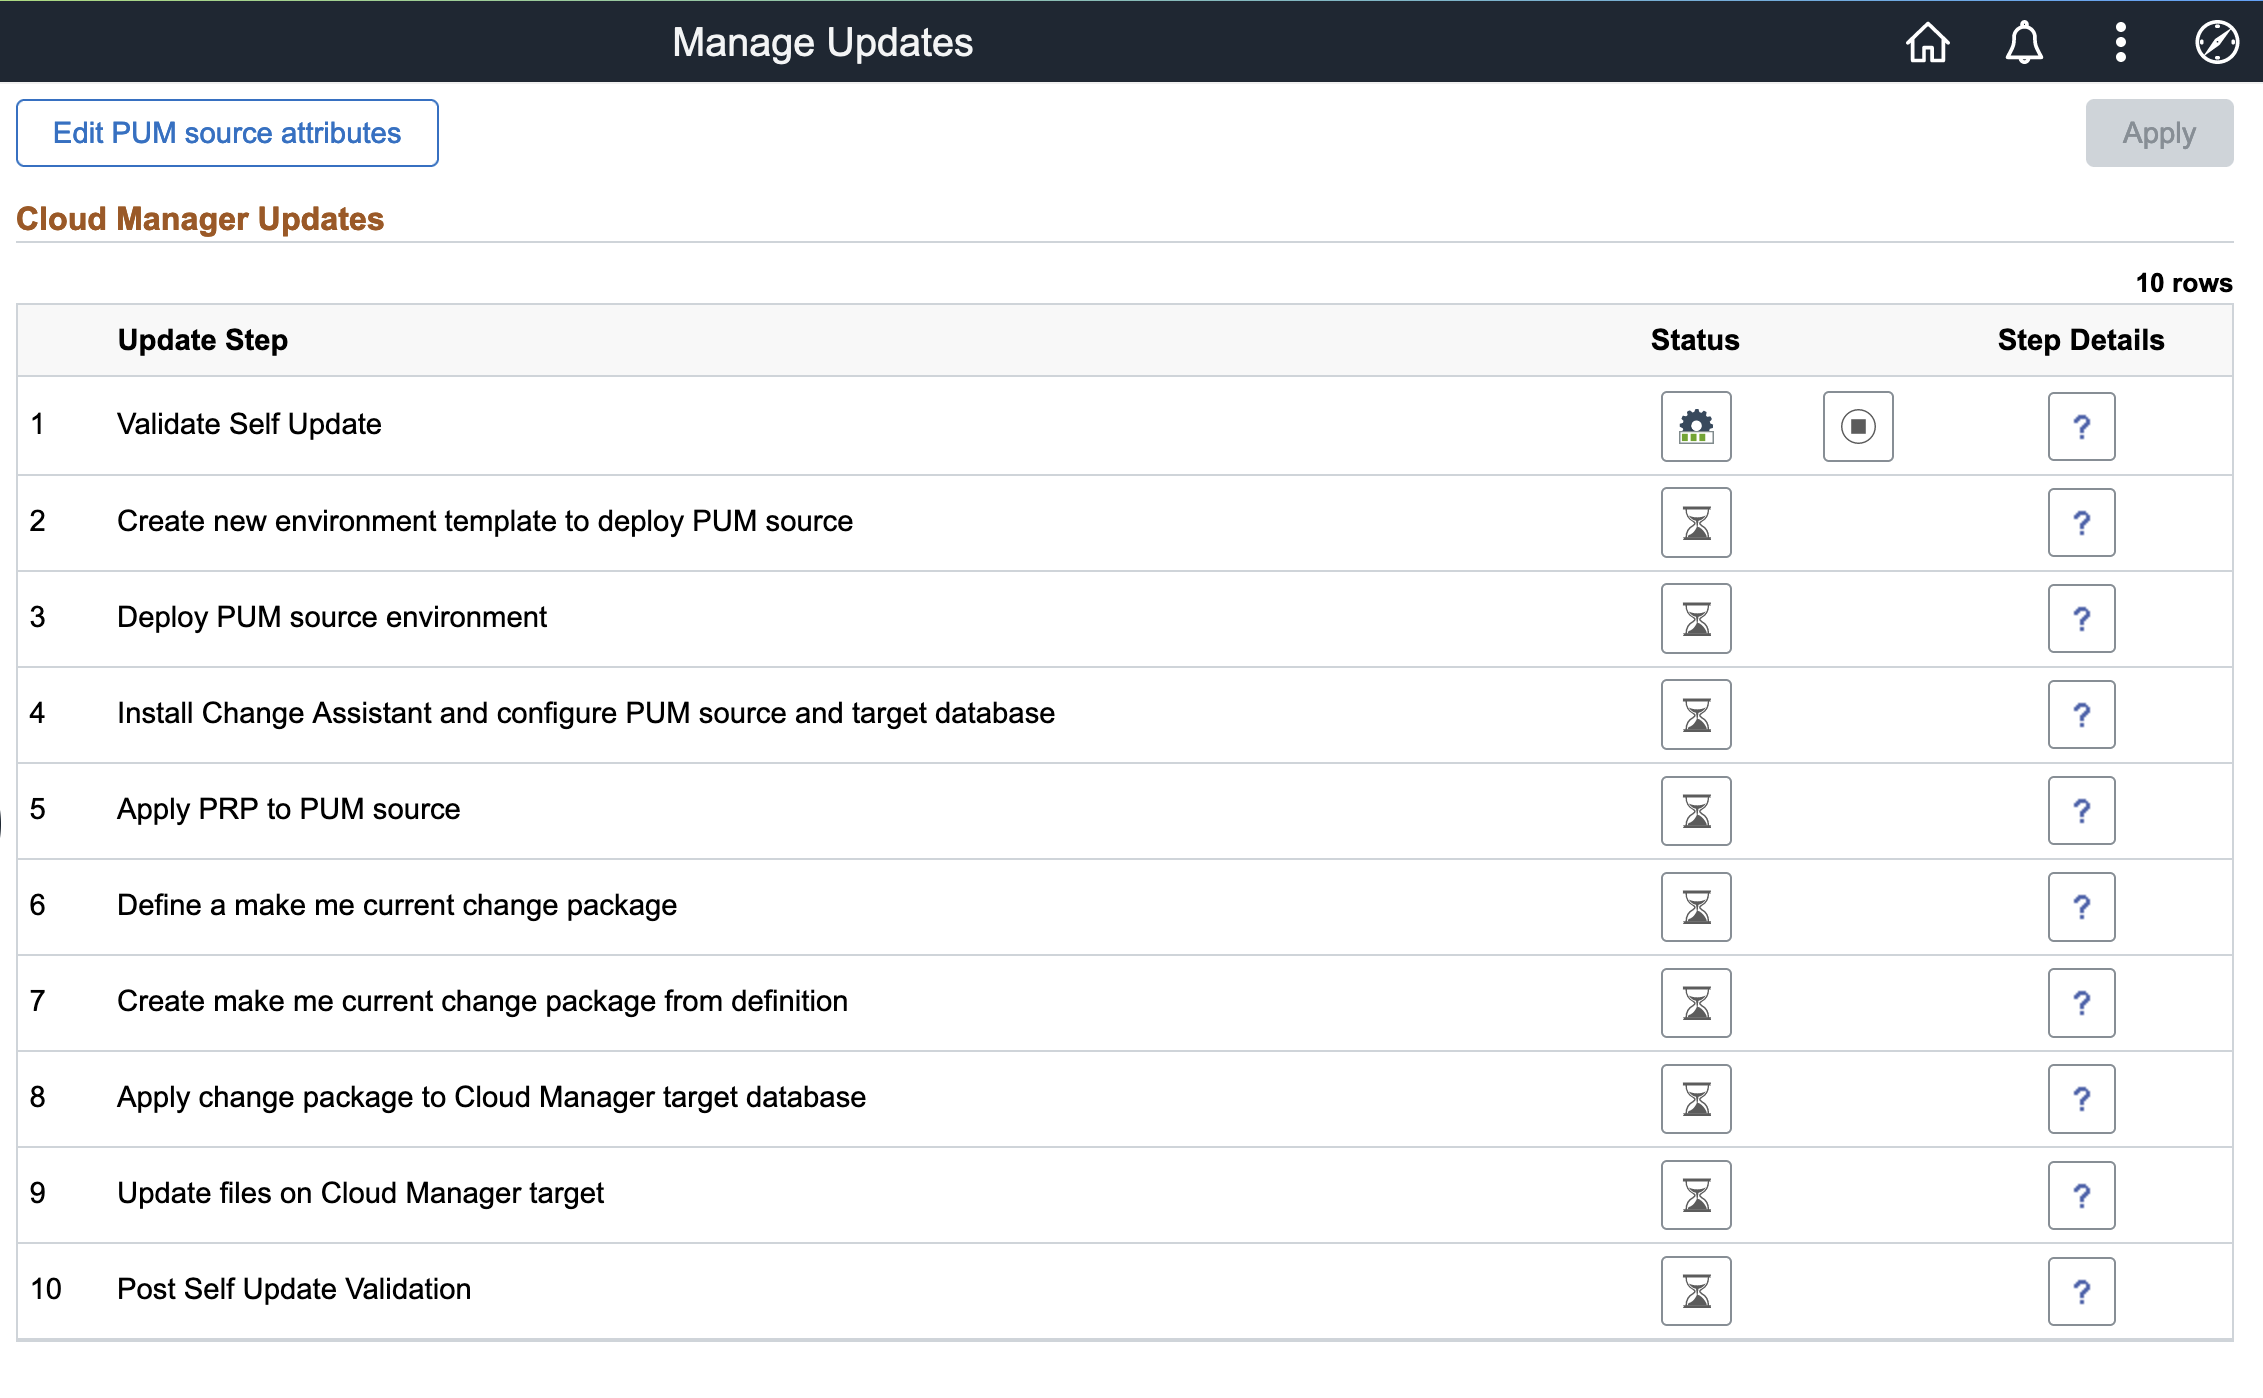
This table lists the update steps:
Step
Description
Validate Self Update
This step validates that all of the dependencies for the automation are available and the system is ready to begin the update process.
Create new environment template to deploy PUM source
In this step, a new environment template CDMSLFUPD<randomly selected number> is created that will be used to deploy PUM source environment using the latest PeopleSoft Update Image. The template name can be obtained from the Edit Attributes page.
If the status is Success — A new template was successfully created.
If the status is Failure — Template creation failed. In this case, the Retry is enabled. You can delete the template if it was created incorrectly and retry the step.
Deploy PUM source environment
In this step, a new PUM source environment named CDMSLFUPD1<randomly selected number> is created using the template that was created in the previous step.
If the status is Success — A new PUM source is created and the details are provided in the PUM Source Details section.
If the status is Failure — Creating a new PUM source environment failed. In this case, the Retry is enabled.
Remedial Action — Clean up the failed environment and any instances from both Cloud Manager UI and Oracle Cloud Infrastructure Console that were created and retry the step. The Continue option is disabled until the clean up is complete.
Manual Step
This step is not always present.
If present, this step pauses the self update and provides instructions in the task list. After completing the instructions, select to mark the task as Manually Completed.
Pre Tools update or upgrade validation
This step performs validations on the existing PeopleTools.
Install Change Assistant and configure PUM source and target database
This step carries out the processes such as installing Change Assistant on the PeopleSoft Client VM instance, configuring Change Assistant to add source and target database, and uploading target database information to PUM source.
If the status is Success — Change Assistant is installed and configured with source and target database information.
If the status is Failure — Failed to install or configure Change Assistant. In this case, the Retry is enabled.
Remedial Action — Retry step. Alternatively choose to skip this step after configuring the source and target database manually using Change Assistant and retry.
Apply PRPs on PUM source
In this step, any PRPs that were downloaded are applied and available in Repository on the PUM source.
If the status is Success — All PRPs were successfully applied on the PUM source environment.
If the status is Failure — Failed to apply one or more PRPs. In this case, the Retry is enabled.
Remedial Action — Retry step. Alternatively choose to skip this step after manually applying all PRPs using Change Assistant. The required PRPs will be available on the PeopleSoft Client VM, if not copy from File Server PRP share.
Define make me current change package
In this step, a new change package is defined.
If the status is Success — Successfully defined a change package which includes all bugs for CM product code.
If the status is Failure — Failed to define a change package. In this case, the Retry is enabled.
Remedial Action — Login to Update Manager PIA of PUM source and delete the change package definition in error and retry step. The name of the definition is in the format CMCHGPKG[n], where n is the sequence number. Alternatively, create the make me current change package definition in Change Assistant. Name the change package CMCHGPKG[n], where n is the sequence number. Mark the failed step as COMPLETED MANUALLY.
Create make me current change package from definition
In this step, a change package using the definition that was created in previous step.
If the status is Success — Successfully created a change package.
If the status is Failure — Failed to create a change package. In this case, the Retry is enabled.
Remedial Action — Retry step. Alternatively, skip the step after creating the change package manually using Change Assistant with the same name as the definition created in previous step.
Apply change package to Cloud Manager target database
In this step, the change package that was created in the previous step is applied.
If the status is Success — Successfully applied the change package.
If the status is Failure — Failed to apply the change package.
Remedial Action — Complete the apply step manually using the Change Assistant and continue with next step.
Warning! Reapplying a change package is not recommended as it may apply the fix again.
Update files on Cloud Manager target
In this step, the new and updated files are copied to Cloud Manager target.
If the status is Success — Successfully copied all file updates.
Failure — Failed to copy one or more files. In this case, the Retry is enabled.
Remedial Action — Retry step.
Post Self Update Validation
This step validates that the update is complete and the newly created domains are running.
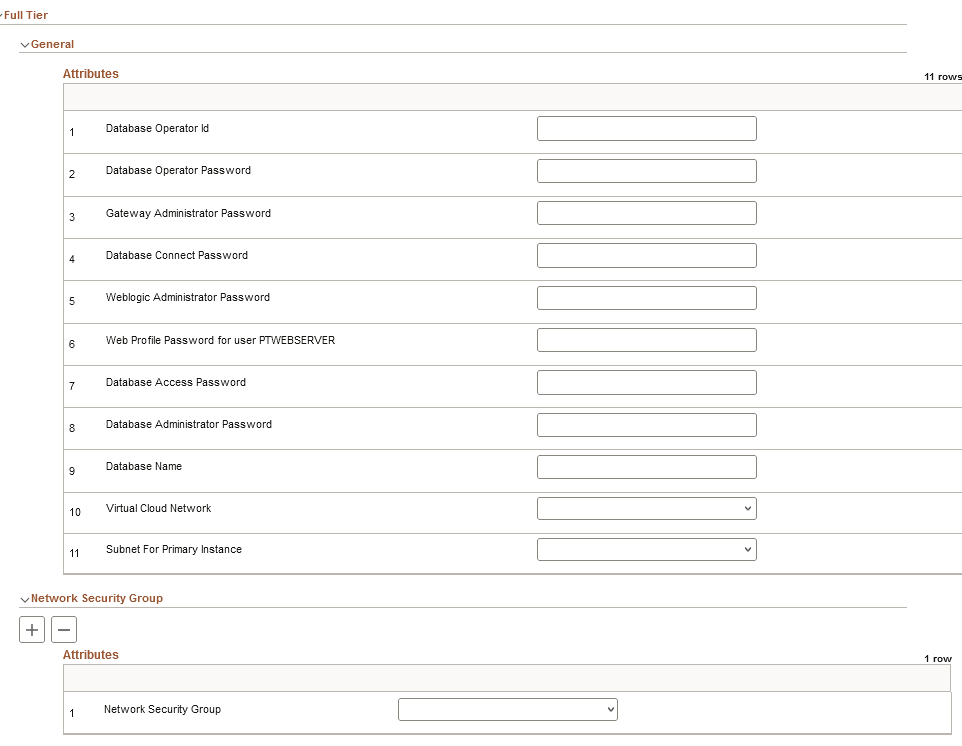
You must update the Full Tier and PeopleSoft Client Settings as part of the Custom Attributes.
This example illustrates the fields and controls in the Full Tier section on Environment Update Attribute page.
|
Field or Control |
Description |
|---|---|
|
Database Operator Id |
Enter the database operator ID. |
|
Database Operator Password |
Enter the database operator password. |
|
Gateway Administrator Password |
Enter the password of gateway administrator. |
|
Database Connect Password |
Enter the database connect password. |
|
Weblogic Administrator Password |
Enter the WebLogic administrator password. |
|
Web Profile Password for user PTWEBSERVER |
Enter the web profile password for the user PTWEBSERVER. |
|
Database Access Password |
Enter the database access password. |
|
Database Administrator Password |
Enter the database administrator password. |
|
Database Name |
Enter the database name. The database name must begin with an uppercase letter. |
|
Virtual Cloud Network |
Select the Virtual Cloud Network. |
|
Subnet for Primary Instance |
Select the subnet within the VCN for primary instance. |
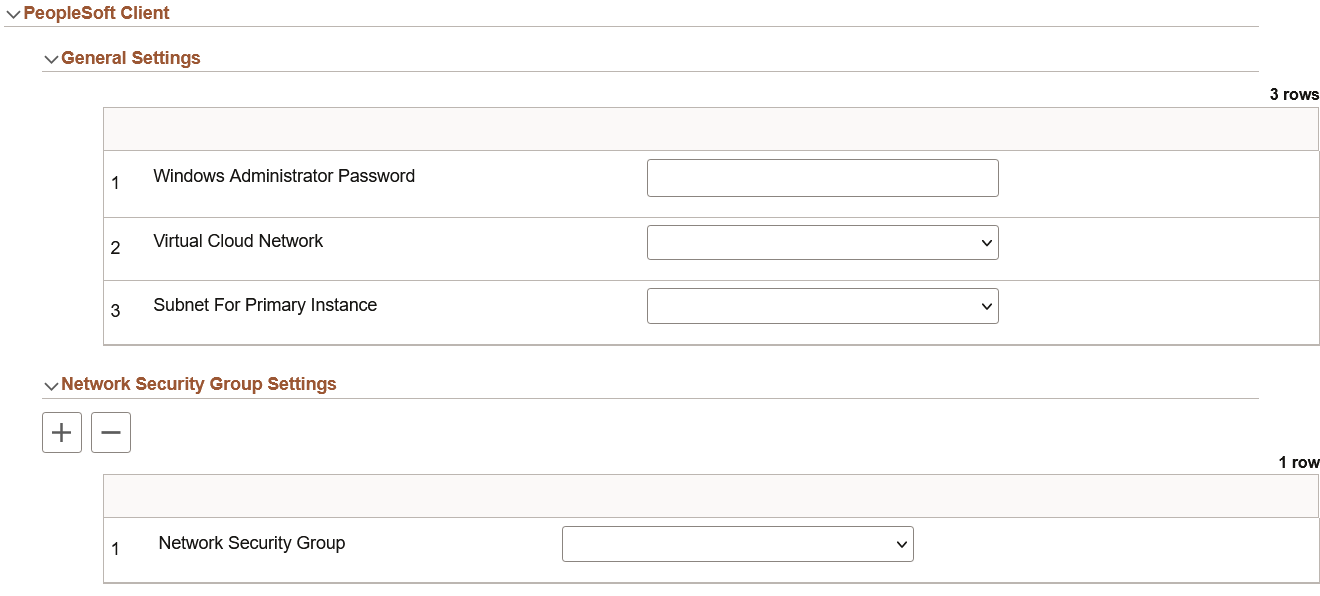
This example illustrates the fields and controls in the PeopleSoft Client section on Environment Update Attribute page.
|
Field or Control |
Description |
|---|---|
|
Windows Administrator Password |
Enter the Windows administrator password. |
|
Virtual Cloud Network |
Select the Virtual Cloud Network. |
|
Subnet for Primary Instance |
Select the subnet within the VCN for primary instance. |
For configuring Network Security Group settings related to Full Tier or PeopleSoft Client, see Configuring Network Security Group Settings.
When the update is complete, perform the following steps:
Note: Do not run the post update script if you are only applying PRPs to the current Cloud Manager update image. The post update script is only required when updating Cloud Manager to a new Update Image.
Run as root the script post_upgrade_script.sh in $PS_APP_HOME/cloud/ .
$> ./ post_upgrade_script.shUsing PSADMIN, restart application server domain, process scheduler domain and web domain on the Cloud Manager instance to ensure the latest updates are running.
Navigate to Cloud Manager Settings > Infrastructure Setting and click the Refresh OCI Metadata button. This will update the Fault Domain Settings.
The PUM Source environment can then be cleaned up using the Clean-up button.
Important! The post update script must be run prior to selecting Clean-up.
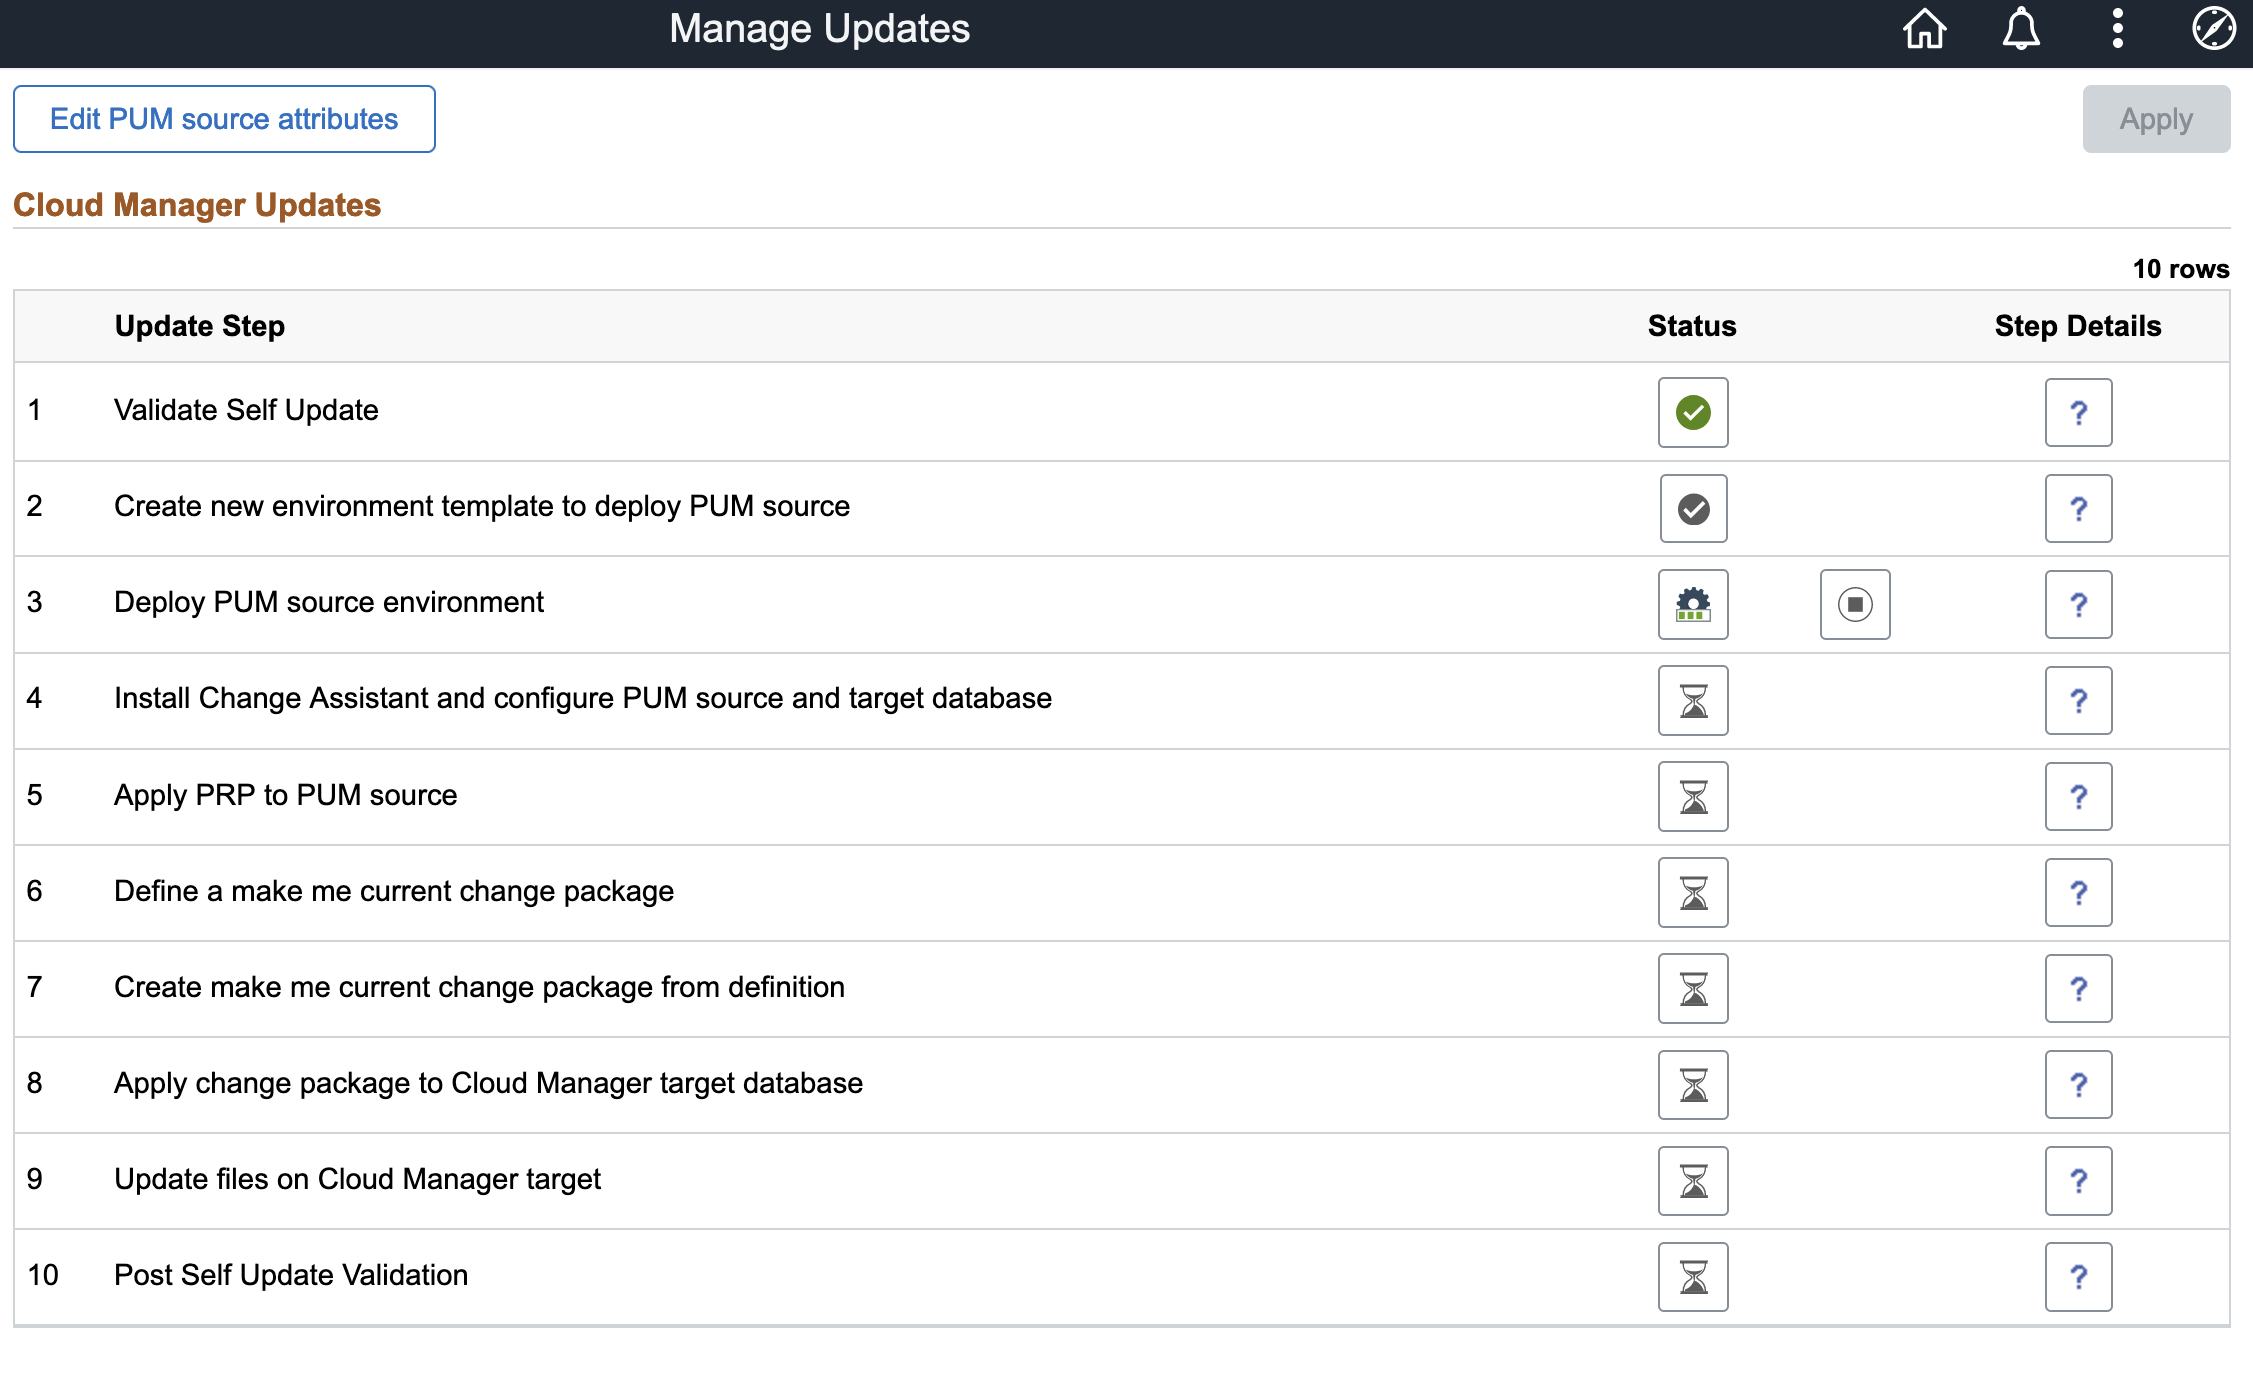
The status of the update is displayed on the Manage Updates page.
This example illustrates the fields and controls on the Manage Updates page when the steps are running.
Status Icons
Field or Control |
Description |
|---|---|
|
Pending |
|
Success |
|
In Progress |
|
Failed |
|
Continue |
|
Abort |
|
Step details |
|
Pause |


The Abort icon is shown when a step is running. When you click the Abort icon, the modal window is displayed.
This example illustrates the Abort Modal window.
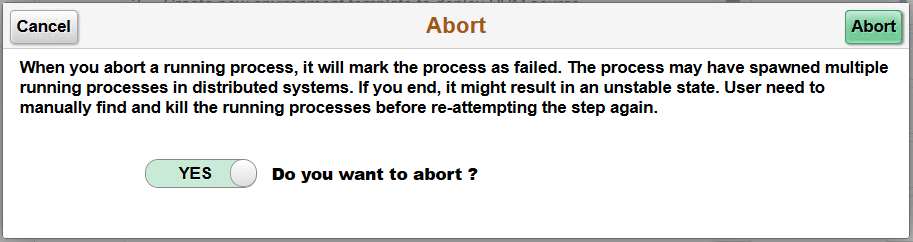
Caution should be used when aborting a step, it is possible that not all processes that were spawned will be aborted. It is recommended to reboot the Cloud Manager instance after aborting a process.
Failed Steps
If a step fails, the process will stop and the Continue icon will appear.
An administrator must resolve the issue and come back to Cloud Manager to continue the update process. For example, if applying change package failed, then the administrator must connect to the Windows Client VM, launch Change Assistant and run the update job to completion. The administrator will then return to the Cloud Manager Update page and continue the automated update process.
All reported errors must be resolved manually by the user. After fixing or manually completing the failed step, click the Continue icon.
This example illustrates a failed step in the Cloud Manager Update process.
On clicking the Continue button, three options are shown as below:
This example illustrates the options for the failed step. You can find definitions for the fields and controls later on this page.
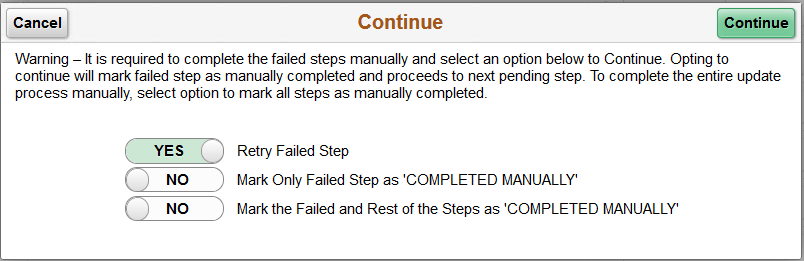
Retry Failed Step — retry the step again.
Mark only failed step as 'Completed Manually' — skip the failed step and continue from subsequent step to completion.
Mark the failed and rest of the pending steps as 'Completed Manually' — skip all steps and set update as complete.
After selecting Yes in the Retry Failed Step field, a Continue button is displayed in the top right corner of the Continue modal window.
The automated Cloud Manager update process will trigger PeopleTools upgrade when the newly released Cloud Manager (IH) Update Image has a dependency on a particular PeopleTools version. During the update process, when it reaches the step to upgrade PeopleTools, the Cloud Manager PIA user interface will be shut down and the status of PeopleTools upgrade is no longer available on the user interface.
To monitor the PeopleTools upgrade, you need to SSH into the Cloud Manager instance and use the PeopleTools upgrade command line.
The Information icon, at the top right on the Manage Updates page, displays the command line options to use for monitoring the PeopleTools upgrade. This page also appears when you initiate the upgrade.
This example illustrates the fields and controls on the Updating Cloud Manager modal window.
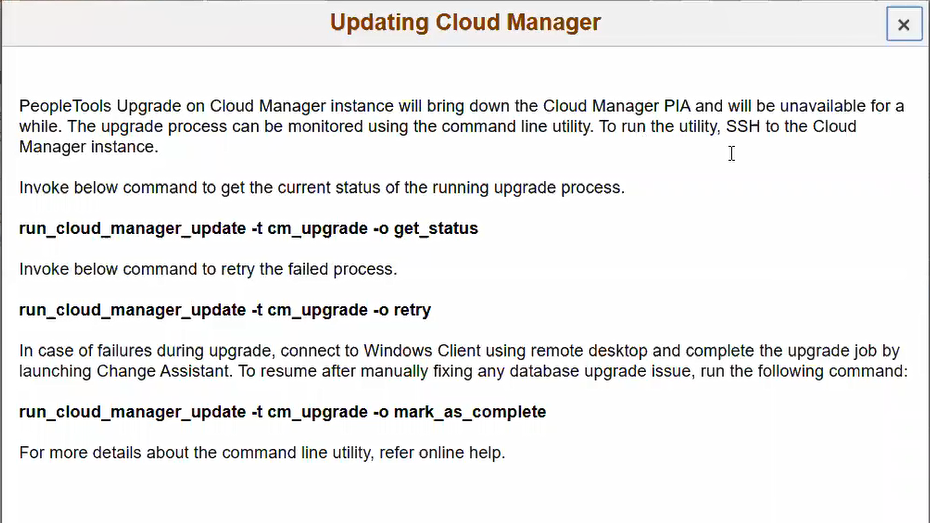
See Command Line Operations for cm_upgrade for additional information.