Using Automated Backup and Restore Utility
The automated backup and restore utility provides the ability to create a backup of the Cloud Manager instance. This backup/restore utility provides the following options:
Backup and restore Cloud Manager Instance block volume.
Backup Cloud Manager Instance boot volume.
Delete backups.
List Cloud Manager backups in OCI.
Create an OCI config file.
To run the automated backup and restore utility:
Log into Cloud Manager instance using SSH as user opc.
Change the directory to /home/opc/bootstrap/cm_backup_and_restore.
Copy 2 files (cm_backup_restore.py and cm_backup_restore.sh) from /opt/oracle/psft/pt/ps_app_home/cloud/psc_cloud/psc_utils/ to /home/opc/bootstrap/cm_backup_and_restore.
Run the shell script cm_backup_restore.sh.
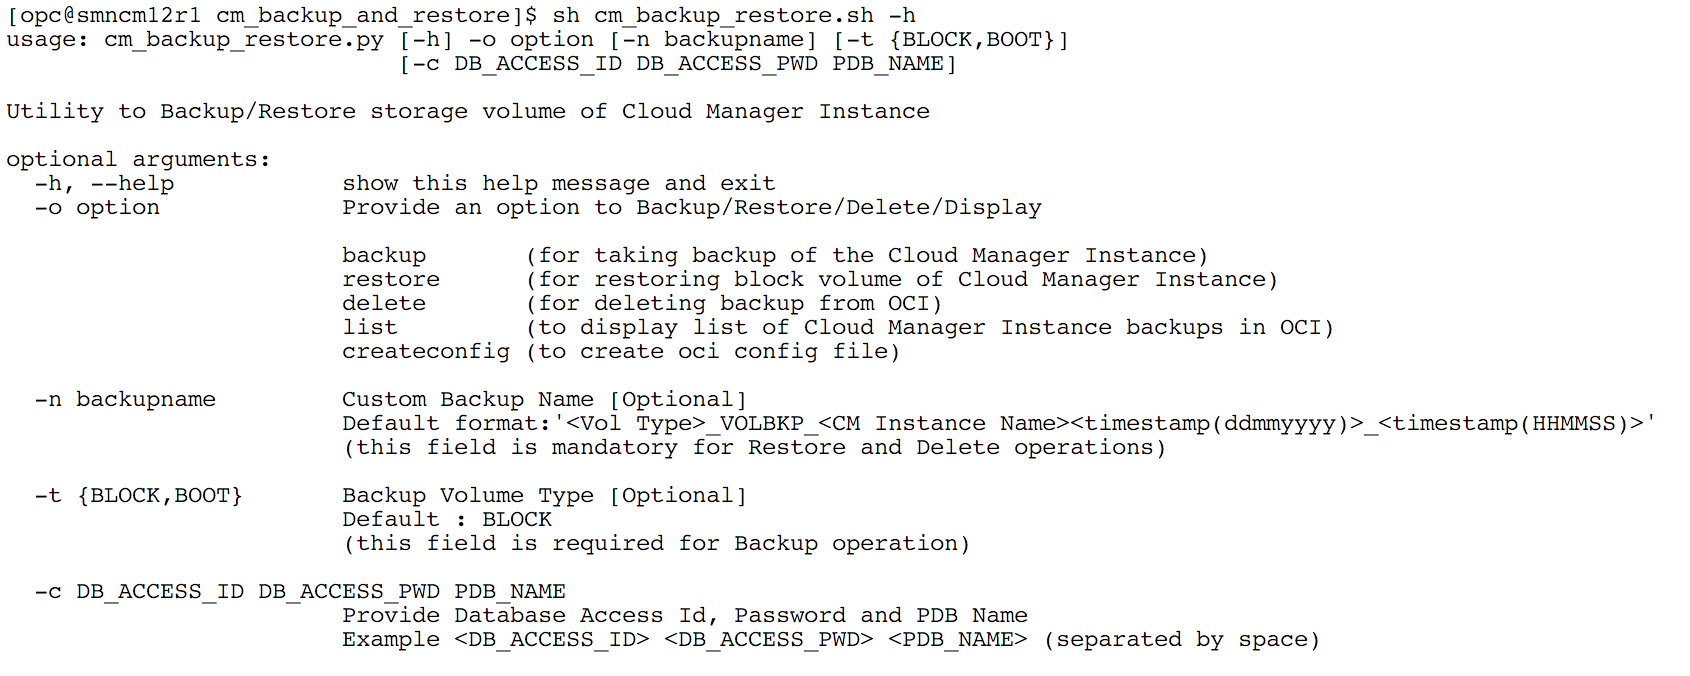
For a summary of the usage and optional arguments for shell script cm_backup_restore.sh, use the -h option.
This is an example of the help.
This example illustrates running cm_backup_restore.sh -h.
You need to create a config file if:
This is the first time you are running the automated backup and restore utility.
You want to run the utility with different OCI user credentials.
To create the Config file:
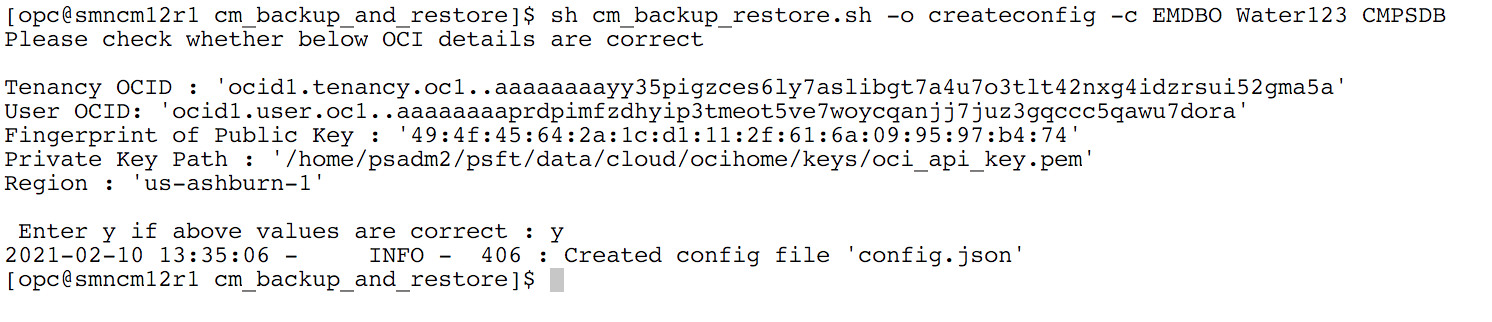
Run the utility with the createconfig option and provide the Cloud Manager database Access ID and password.
sh cm_backup_restore.sh -o createconfig -c <DB_ACCESS_ID> <DB_ACCESS_PWD> <PDB_NAME>This option will read OCI User ID, Tenancy ID, Fingerprint and Private Key File Path from database and display on screen.
Check the displayed values.
If the values are correct, press y to confirm and the configuration file will be created.
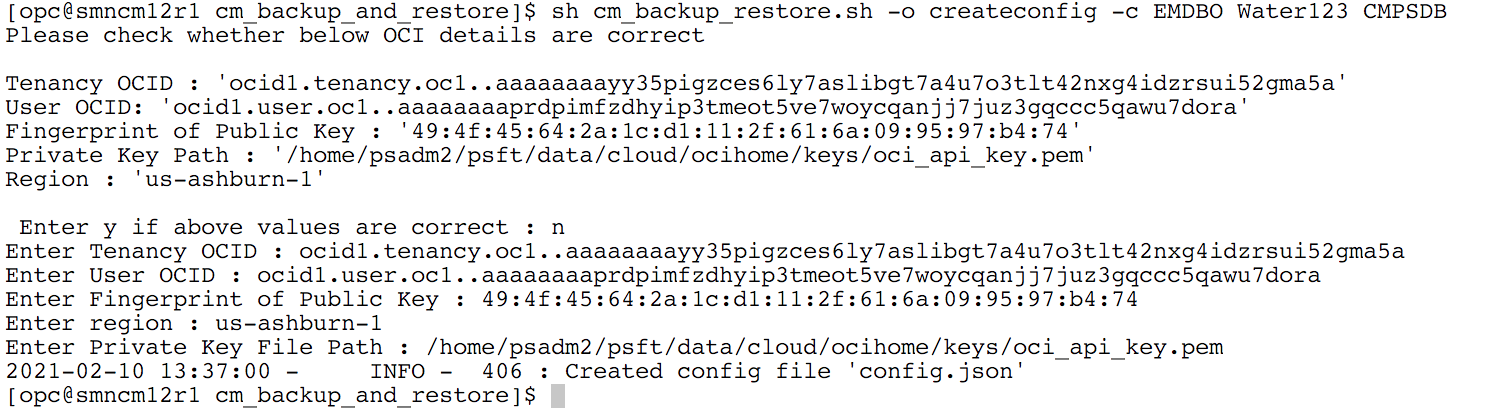
If you want to change the values, press n and provide Tenancy ID, User ID, Fingerprint, Private Key File Path, Region details to create config file.
This example illustrates accepting default values.
This example illustrates modifying default values.
Note: If config.json is already present, this utility will replace the existing one.
When creating a backup of Cloud Manager, backup both block (data) volume and the boot volume. This will ensure creating a pair of time consistent backups that can be restored together when restoring the entire Cloud Manager instance in case of boot volume issues or failures.
Backups can be created using the default name which is <Vol Type>_VOLBKP_<CM Instance Name>_<timestamp(ddmmyyyy)>_<timestamp(HHMMSS)> or you can provide a custom name for the backup. Use the optional argument -n <Custom Backup Name> to create a backup with a custom name.
The default backup type is BLOCK.
Cloud Manager data is saved in two locations: Oracle Database files on data volume and configuration files on boot volume. Both must be backed-up to restore to a consistent point. The backup utility creates a full backup of both data volume as well as files on boot volume automatically.
Creating the Block Volume Backup
To create the block volume backup:
Run the utility with the backup option.
sh cm_backup_restore.sh -o backupNote: Default value for volume type (-t) is BLOCK.
Optional arguments include name (-n) and volume type (-t).
sh cm_backup_restore.sh -o backup -n SMNCM_CST_BKP_BLKIn the above example the backup name is SMNCM_CST_BKP_BLK.
User will be prompted that the backup task will stop Database, Application Server, Process Scheduler and PIA services. Press y to continue.
User will be prompted to enter a passphrase for the private API signing key.
Enter the passphrase if it exists or press enter.
The backup automation process will:
Shut down the database and domains.
Backup files on boot volume and save them on data volume as /opt/oracle/psft/dpks/cm_boot_vol_files.tar.gz. Files backed up include:
All files under PS_CFG_HOME
/home/psadm1/.bashrc
/home/psadm2/.bashrc
/home/psadm3/.bashrc
/home/oracle2/.bashrc
/home/esadm1/.bashrc
/etc/profile
/etc/bashrc
/usr/lib/systemd/system/psft-db-<DB_NAME>.service
/usr/lib/systemd/system/psft-appserver-APPDOM.service
/usr/lib/systemd/system/psft-prcs-PRCSDOM.service
/usr/lib/systemd/system/psft-pia-peoplesoft.service
Create a backup of data volume.
Restart the database and domains.
Example:
[opc@smncm cm_backup_and_restore]$ sh cm_backup_restore.sh -o backup
Backup task will stop Database, Application Server, Process Scheduler and PIA services
Do you want to continue (y/n) ? y
Please Enter Private Key Pass Phrase :
2019-04-19 08:36:22 -     INFO -  408 : Compressing BOOT volume directories/files '/home/psadm1/.bashrc,/home/psadm2/.bashrc,/home/psadm3/.bashrc,/home/oracle2/.bashrc,/home/esadm1/.bashrc,/etc/profile,/etc/bashrc,/etc/init.d/psft-db,/etc/init.d/psft-appserver,/etc/init.d/psft-prcs,/etc/init.d/psft-pia' and moving to '/opt/oracle/psft/dpks/cm_boot_vol_files.tar.gz'
2019-04-19 08:36:22 -     INFO -  418 : $PS_CFG_HOME directory '/home/psadm2/psft/pt/8.57'
2019-04-19 08:36:22 -     INFO -  427 : Compressed BOOT volume directories/files '/home/psadm1/.bashrc,/home/psadm2/.bashrc,/home/psadm3/.bashrc,/home/oracle2/.bashrc,/home/esadm1/.bashrc,/etc/profile,/etc/bashrc,/etc/init.d/psft-db,/etc/init.d/psft-appserver,/etc/init.d/psft-prcs,/etc/init.d/psft-pia,/home/psadm2/psft/pt/8.57' and moving to '/opt/oracle/psft/dpks/cm_boot_vol_files.tar.gz'
2019-04-19 08:37:00 -     INFO -  598 : Cloud Manager Instance Backup Volume Id :ocid1.volume.oc1.iad.xxxxxxxxxxxxxxxxxxxxxxxxxxxxxxxxxxxxxxxxxxxxxxxxxxxxxxxxxxxx
2019-04-19 08:37:00 -     INFO -  448 : Changing DB service state to 'Stop'
2019-04-19 08:37:27 -     INFO -  481 : DB service is in 'Stop' state
2019-04-19 08:37:27 -     INFO -  448 : Changing APPSERVER service state to 'Stop'
2019-04-19 08:37:43 -     INFO -  481 : APPSERVER service is in 'Stop' state
2019-04-19 08:37:43 -     INFO -  448 : Changing PRCS service state to 'Stop'
2019-04-19 08:42:35 -     INFO -  481 : PRCS service is in 'Stop' state
2019-04-19 08:42:35 -     INFO -  448 : Changing PIA service state to 'Stop'
2019-04-19 08:42:54 -     INFO -  481 : PIA service is in 'Stop' state
2019-04-19 08:42:54 -     INFO -  875 : Created input.json for BLOCK Volume Backup : BLOCK_VOLBKP_SMNCM_20190419_084254
2019-04-19 08:42:54 -     INFO -  876 : Creating BLOCK Volume Backup : BLOCK_VOLBKP_SMNCM_20190419_084254
2019-04-19 08:44:15 -     INFO -  897 : Created BLOCK volume backup 'BLOCK_VOLBKP_SMNCM_20190419_084254'
2019-04-19 08:44:15 -     INFO -  448 : Changing DB service state to 'Start'
2019-04-19 08:44:24 -     INFO -  481 : DB service is in 'Start' state
2019-04-19 08:44:24 -     INFO -  448 : Changing APPSERVER service state to 'Start'
2019-04-19 08:44:49 -     INFO -  481 : APPSERVER service is in 'Start' state
2019-04-19 08:44:49 -     INFO -  448 : Changing PRCS service state to 'Start'
2019-04-19 08:46:45 -     INFO -  481 : PRCS service is in 'Start' state
2019-04-19 08:46:45 -     INFO -  448 : Changing PIA service state to 'Start'
2019-04-19 08:46:46 -     INFO -  481 : PIA service is in 'Start' state
Creating Boot Volume Backup
Boot volume backups must be restored manually using OCI console. This backup can be used if the CM instance becomes unusable and inaccessible.
Note: When restoring a boot volume backup ensure to create the Cloud Manager instance with the same IP addresses as the original instance. The original instance must be terminated before creating a new instance. If unable to reuse the same IP address, then all references to old IP addresses in Cloud Manager application and domains must be manually updated to reflect the new IP address of the instance.
Warning! If the backup is not restored correctly, the Cloud Manager instance may not come up with the proper network configuration which could result in losing the ability to manage already provisioned environments.
To create a boot volume backup:
Run the utility with the backup option.
sh cm_backup_restore.sh -o backup -t BOOTOptionally you can provide a custom backup name using the -n argument..
sh cm_backup_restore.sh -o backup -n CUSTOM_NAME -t BOOTIn the above example the backup name is CUSTOM_NAME.
User will be prompted that the backup task will stop Database, Application Server, Process Scheduler and PIA services. Press y to continue.
User will be prompted to enter a passphrase for the private API signing key.
Enter the passphrase if it exists or press enter.
The backup process will:
Shut down the database and domains.
Create the backup.
Restart the database and domains.
Example:
[opc@smncm cm_backup_and_restore]$ sh cm_backup_restore.sh -o backup -t BOOT
Backup task will stop Database, Application Server, Process Scheduler and PIA services
Do you want to continue (y/n) ? y
Please Enter Private Key Pass Phrase :
2019-04-19 09:58:54 -     INFO -  598 : Cloud Manager Instance Backup Volume Id :ocid1.bootvolume.oc1.iad.abuwcljrhcuapoaveqp2yf2oof2pc6lsurxx4xu2fmjarjjrz4qyfkif3wpq
2019-04-19 09:58:54 -     INFO -  448 : Changing DB service state to 'Stop'
2019-04-19 09:59:14 -     INFO -  481 : DB service is in 'Stop' state
2019-04-19 09:59:14 -     INFO -  448 : Changing APPSERVER service state to 'Stop'
2019-04-19 09:59:30 -     INFO -  481 : APPSERVER service is in 'Stop' state
2019-04-19 09:59:30 -     INFO -  448 : Changing PRCS service state to 'Stop'
2019-04-19 10:04:33 -     INFO -  481 : PRCS service is in 'Stop' state
2019-04-19 10:04:33 -     INFO -  448 : Changing PIA service state to 'Stop'
2019-04-19 10:07:35 -     INFO -  481 : PIA service is in 'Stop' state
2019-04-19 10:07:35 -     INFO -  875 : Created input.json for BOOT Volume Backup : BOOT_VOLBKP_SMNCM_20190419_100735
2019-04-19 10:07:35 -     INFO -  876 : Creating BOOT Volume Backup : BOOT_VOLBKP_SMNCM_20190419_100735
2019-04-19 10:09:17 -     INFO -  897 : Created BOOT volume backup 'BOOT_VOLBKP_SMNCM_20190419_100735'
2019-04-19 10:09:17 -     INFO -  448 : Changing DB service state to 'Start'
2019-04-19 10:09:26 -     INFO -  481 : DB service is in 'Start' state
2019-04-19 10:09:26 -     INFO -  448 : Changing APPSERVER service state to 'Start'
2019-04-19 10:09:51 -     INFO -  481 : APPSERVER service is in 'Start' state
2019-04-19 10:09:51 -     INFO -  448 : Changing PRCS service state to 'Start'
2019-04-19 10:11:47 -     INFO -  481 : PRCS service is in 'Start' state
2019-04-19 10:11:47 -     INFO -  448 : Changing PIA service state to 'Start'
2019-04-19 10:11:47 -     INFO -  481 : PIA service is in 'Start' state
To list existing block and boot volume backups:
Run the utility with the list option:
sh cm_backup_restore.sh -o listUser will be prompted to enter a passphrase for the private API signing key.
Enter the passphrase if it exists or press enter.
The list of backups is displayed.
Example:
[opc@smncm cm_backup_and_restore]$ sh cm_backup_restore.sh -o list
Please Enter Private Key Pass Phrase :
	 BLOCK volume backup list :
		 * BLOCK_VOLBKP_SMNCM_20190410_110419
	 BOOT volume backup list :
		 No BOOT volume backups found
Both data volume and a set of files on boot volume must be replaced from a backup to restore Cloud Manager instance to a certain backup point.
First step is to restore the data volume. To restore a block (data) volume backup the user must provide a backup name. User can list the existing backups and then select the backup to restore.
To restore a block (data) volume backup:
While you are still on the latest version, before restoring the data volume, generate the list of IP addresses of all managed instances provisioned by Cloud Manager. This is required later in the restore process to synchronize the ‘/cm_psft_dpks/cloud’ directory to all managed nodes in case the files are not up-to-date. This step is required whenever restoring from a latest Cloud Manager version to an older version. For example, restoring back from Cloud Manager Image 10 to Cloud Manager Image 9.
SSH to Cloud Manager
Switch user to psadm2
$ sudo su – psadm2Change directory to PS_APP_HOME/cloud
$ cd /opt/oracle/psft/pt/ps_app_home/cloudGenerate the list of IP addresses into file /home/psadm2/managedenvironments.txt
$ get_managed_envs.sh $PS_CFG_HOMETake backup of /home/psadm2/managedenvironments.txt
$ cp /home/psadm2/managedenvironments.txt <backup_path>
Run the utility with the restore option.
sh cm_backup_restore.sh -o restore -n <backup_name>User will be warned with a message that backup automation will stop Database, Application Server, Process Scheduler and PIA services. Press y to continue.
User will be prompted to enter a passphrase for the private API signing key.
Enter the passphrase if it exists or press enter.
The restore process will:
Shut down the database and domains.
Restore from the identified volume backup .
Restart the database and domains.
Example:
[opc@smncm cm_backup_and_restore]$ sh cm_backup_restore.sh -o restore -n BLOCK_VOLBKP_SMNCM_20190419_084254
Restore task will stop Database, Application Server, Process Scheduler and PIA services
Do you want to continue (y/n) ? y
Please Enter Private Key Pass Phrase :
2019-04-19 09:14:20 -     INFO -  658 : Getting BLOCK volume backup 'BLOCK_VOLBKP_SMNCM_20190419_084254' details from OCI
2019-04-19 09:14:20 -     INFO -  666 : BLOCK volume backup 'BLOCK_VOLBKP_SMNCM_20190419_084254' Id : 'ocid1.volumebackup.oc1.iad.abuwcljryiuqzxut5ldxtb2hmaxgj5w65ykxukza6ztmz7odk323yiip3r7a'
2019-04-19 09:14:20 -     INFO -  824 : Creating storage volume 'StorageVol_smncm_19APRIL2019_0914' from Backup 'ocid1.volumebackup.oc1.iad.abuwcljryiuqzxut5ldxtb2hmaxgj5w65ykxukza6ztmz7odk323yiip3r7a'
2019-04-19 09:15:01 -     INFO -  853 : Created storage volume Name:'StorageVol_smncm_19APRIL2019_0914',
Id:'ocid1.volume.oc1.iad.abuwcljrf2hcy3ff5mxhbumnldvftljsp5yz66n73wzsxllreleohsqe2vcq'
2019-04-19 09:15:01 -     INFO -  598 : Cloud Manager Instance Backup Volume Id :ocid1.volume.oc1.iad.abuwcljr7k4bq4eqw3nfoyl7vxdsykzyrrthzgrco7jnwiyg5f6zgaghlmva
2019-04-19 09:15:01 -     INFO -  448 : Changing DB service state to 'Stop'
2019-04-19 09:15:22 -     INFO -  481 : DB service is in 'Stop' state
2019-04-19 09:15:22 -     INFO -  448 : Changing APPSERVER service state to 'Stop'
2019-04-19 09:15:34 -     INFO -  481 : APPSERVER service is in 'Stop' state
2019-04-19 09:15:34 -     INFO -  448 : Changing PRCS service state to 'Stop'
2019-04-19 09:20:41 -     INFO -  481 : PRCS service is in 'Stop' state
2019-04-19 09:20:41 -     INFO -  448 : Changing PIA service state to 'Stop'
2019-04-19 09:20:57 -     INFO -  481 : PIA service is in 'Stop' state
2019-04-19 09:20:57 -     INFO -  497 : Kill some of the running 'psadm' processes
2019-04-19 09:21:02 -     INFO -  530 : Unmounted block volume '/opt/oracle/psft'
2019-04-19 09:21:02 -     INFO -  688 : Running ISCSI command to logout of storage volume iqn.2015-12.com.oracleiaas:22afb62d-a893-4ab4-a8fe-6dd14053c61b
2019-04-19 09:21:02 -     INFO -  698 : Logged out of storage volume iqn.2015-12.com.oracleiaas:22afb62d-a893-4ab4-a8fe-6dd14053c61b
2019-04-19 09:21:02 -     INFO -  700 : Running ISCSI command to delete storage device iqn.2015-12.com.oracleiaas:22afb62d-a893-4ab4-a8fe-6dd14053c61b
2019-04-19 09:21:02 -     INFO -  709 : Deleted storage device iqn.2015-12.com.oracleiaas:22afb62d-a893-4ab4-a8fe-6dd14053c61b
2019-04-19 09:21:02 -     INFO -  793 : Initiated REST Call to Detach storage volume ocid1.volumeattachment.oc1.iad.abuwcljrfnxyjammza3scounohq7qzawelzslmqiaccvef7cm6w7m2wxjxuq
2019-04-19 09:21:23 -     INFO -  802 : Detached storage volume ocid1.volumeattachment.oc1.iad.abuwcljrfnxyjammza3scounohq7qzawelzslmqiaccvef7cm6w7m2wxjxuq
2019-04-19 09:21:23 -     INFO -  915 : Attaching storage volume 'ocid1.volume.oc1.iad.abuwcljrf2hcy3ff5mxhbumnldvftljsp5yz66n73wzsxllreleohsqe2vcq'
2019-04-19 09:21:23 -     INFO -  918 : Creating input.json for attaching block volume 'ocid1.volume.oc1.iad.abuwcljrf2hcy3ff5mxhbumnldvftljsp5yz66n73wzsxllreleohsqe2vcq'
2019-04-19 09:21:23 -     INFO -  920 : Created input.json for attaching block volume 'ocid1.volume.oc1.iad.abuwcljrf2hcy3ff5mxhbumnldvftljsp5yz66n73wzsxllreleohsqe2vcq'
2019-04-19 09:21:23 -     INFO -  928 : Initiated REST Call to attach storage volume ocid1.volume.oc1.iad.abuwcljrf2hcy3ff5mxhbumnldvftljsp5yz66n73wzsxllreleohsqe2vcq
2019-04-19 09:22:04 -     INFO -  935 : Attached storage volume 'ocid1.volume.oc1.iad.abuwcljrf2hcy3ff5mxhbumnldvftljsp5yz66n73wzsxllreleohsqe2vcq'
2019-04-19 09:22:04 -     INFO -  598 : Cloud Manager Instance Backup Volume Id :ocid1.volume.oc1.iad.abuwcljrf2hcy3ff5mxhbumnldvftljsp5yz66n73wzsxllreleohsqe2vcq
2019-04-19 09:22:04 -     INFO -  718 : Running ISCSI Attach Commands
2019-04-19 09:22:04 -     INFO -  733 : Running ISCSI command to add new node iqn.2015-12.com.oracleiaas:f6f08414-d96f-4fd2-a852-69c0208ca8b2
2019-04-19 09:22:04 -     INFO -  739 : Added new node iqn.2015-12.com.oracleiaas:f6f08414-d96f-4fd2-a852-69c0208ca8b2
2019-04-19 09:22:04 -     INFO -  741 : Running ISCSI command to start node on boot iqn.2015-12.com.oracleiaas:f6f08414-d96f-4fd2-a852-69c0208ca8b2
2019-04-19 09:22:04 -     INFO -  747 : Updated node iqn.2015-12.com.oracleiaas:f6f08414-d96f-4fd2-a852-69c0208ca8b2 settings to start on boot
2019-04-19 09:22:04 -     INFO -  749 : Running ISCSI command to login to node iqn.2015-12.com.oracleiaas:f6f08414-d96f-4fd2-a852-69c0208ca8b2
2019-04-19 09:22:04 -     INFO -  755 : Logged in to node iqn.2015-12.com.oracleiaas:f6f08414-d96f-4fd2-a852-69c0208ca8b2
2019-04-19 09:22:04 -     INFO -  543 : Mounted block volume '/opt/oracle/psft'
2019-04-19 09:22:13 -     INFO -  448 : Changing DB service state to 'Start'
2019-04-19 09:22:25 -     INFO -  481 : DB service is in 'Start' state
2019-04-19 09:22:25 -     INFO -  448 : Changing APPSERVER service state to 'Start'
2019-04-19 09:22:56 -     INFO -  481 : APPSERVER service is in 'Start' state
2019-04-19 09:22:56 -     INFO -  448 : Changing PRCS service state to 'Start'
2019-04-19 09:24:52 -     INFO -  481 : PRCS service is in 'Start' state
2019-04-19 09:24:52 -     INFO -  448 : Changing PIA service state to 'Start'
2019-04-19 09:24:52 -     INFO -  481 : PIA service is in 'Start' state
2019-04-19 09:24:52 -     INFO -  947 : Getting storage volume name for Id : 'ocid1.volume.oc1.iad.abuwcljr7k4bq4eqw3nfoyl7vxdsykzyrrthzgrco7jnwiyg5f6zgaghlmva'
2019-04-19 09:24:52 -     INFO -  957 : Storage volume name for Id 'ocid1.volume.oc1.iad.abuwcljr7k4bq4eqw3nfoyl7vxdsykzyrrthzgrco7jnwiyg5f6zgaghlmva' is 'StorageVol_smncm_18APR2019_1044'
2019-04-19 09:24:52 -     INFO - 1061 : Please remove detached volume 'StorageVol_smncm_18APR2019_1044' from OCI manually
Manually restore boot volume files from the backup /opt/oracle/psft/dpks/cm_boot_vol_files.tar.gz
Next restore files on boot volume. To restore, run the following set of commands and set appropriate ownership on restored files.
SSH to Cloud Manager instance
Switch user to root.
$ sudo bashUncompress and extract boot volume files backup that were saved as /opt/oracle/psft/dpks/cm_boot_vol_files.tar.gz to /tmp/CMbkup
$ mkdir /tmp/CMbkup
$ cd /tmp/CMbkup
$ tar -xvf /opt/oracle/psft/dpks/cm_boot_vol_files.tar.gz
Restore PS_CFG_HOME files. The PS_CFG_HOME path varies if the PeopleTools version before backup was different. Ensure to use the right path.
$ cp -r  /tmp/CMbkup/home/psadm2/psft/pt/* /home/psadm2/psft/pt/
$ chown -R psadm2:oinstall /home/psadm2/psft/pt/
$ chmod 755 -R /home/psadm2/psft/pt/
Copy profile files for users psadm1, psadm2, psadm3, oracle2 and esadm1.
$ cp /tmp/CMbkup/etc/profile /etc/profile
$ cp /tmp/CMbkup/etc/bashrc /etc/bashrc
$ chown root:root /etc/profile /etc/bashrc
$ chmod 644 /etc/profile /etc/bashrc

$ cp /tmp/CMbkup/home/psadm1/.bashrc /home/psadm1/.bashrc
$ chown psadm1:oinstall /home/psadm1/.bashrc
$ chmod 644 /home/psadm1/.bashrc

$ cp /tmp/CMbkup/home/psadm2/.bashrc /home/psadm2/.bashrc
$ chown psadm2:oinstall /home/psadm2/.bashrc
$ chmod 644 /home/psadm2/.bashrc

$ cp /tmp/CMbkup/home/psadm3/.bashrc /home/psadm3/.bashrc
$ chown psadm3:appinst /home/psadm3/.bashrc
$ chmod 644 /home/psadm3/.bashrc

$ cp /tmp/CMbkup/home/oracle2/.bashrc /home/oracle2/.bashrc
$ chown oracle2:oinstall /home/oracle2/.bashrc
$ chmod 644 /home/oracle2/.bashrc

$ cp /tmp/CMbkup/home/esadm1/.bashrc /home/esadm1/.bashrc
$ chown esadm1:oinstall /home/esadm1/.bashrc
$ chmod 644 /home/esadm1/.bashrc
Copy init scripts.
$ cp /tmp/CMbkup/usr/lib/systemd/system/psft-db-<DB_NAME>.service /usr/lib/systemd/system/
$ cp /tmp/CMbkup/usr/lib/systemd/system/psft-appserver-APPDOM.service /usr/lib/systemd/system/
$ cp /tmp/CMbkup/usr/lib/systemd/system/psft-prcs-PRCSDOM.service /usr/lib/systemd/system/
$ cp /tmp/CMbkup/usr/lib/systemd/system/psft-pia-peoplesoft.service /usr/lib/systemd/system/
$ chown root:root /usr/lib/systemd/system/psft-db-<DB_NAME>.service /usr/lib/systemd/system/psft-appserver-APPDOM.service /usr/lib/systemd/system/psft-prcs-PRCSDOM.service /usr/lib/systemd/system/psft-pia-peoplesoft.service
$ chmod 755 /usr/lib/systemd/system/psft-db-<DB_NAME>.service /usr/lib/systemd/system/psft-appserver-APPDOM.service /usr/lib/systemd/system/psft-prcs-PRCSDOM.service /usr/lib/systemd/system/psft-pia-peoplesoft.service
Sync files to FS cloud directory.
$ mv /cm_psft_dpks/cloud /cm_psft_dpks/cloud_upgbkup
$ cp -r /opt/oracle/psft/pt/ps_app_home/cloud /cm_psft_dpks
$ chown -R root:root /cm_psft_dpks/cloud
$ chmod 755 -R /cm_psft_dpks/cloud
Verify the permission and ownership of files using below command.
$ ls -l /home/psadm1/.bashrc /home/psadm2/.bashrc /home/psadm3/.bashrc /home/oracle2/.bashrc /home/esadm1/.bashrc /etc/profile /usr/lib/systemd/system/psft-db-<DB_NAME>.service /usr/lib/systemd/system/psft-appserver-APPDOM.service /usr/lib/systemd/system/psft-prcs-PRCSDOM.service /usr/lib/systemd/system/psft-pia-peoplesoft.service
-rw-r--r--. 1 root    root     3182 May  2 05:43 /etc/bashrc
-rwxr-xr-x. 1 root    root     1908 Apr 29 15:30 /usr/lib/systemd/system/psft-appserver-APPDOM.service
-rwxr-xr-x. 1 root    root     6891 Apr 29 15:24 /usr/lib/systemd/system/psft-db-<DB_NAME>.service
-rwxr-xr-x. 1 root    root     1773 Apr 29 15:36 /usr/lib/systemd/system/psft-pia-peoplesoft.service
-rwxr-xr-x. 1 root    root     1900 Apr 29 15:33 /usr/lib/systemd/system/psft-prcs-PRCSDOM.service
-rw-r--r--. 1 root    root     2354 May  2 05:43 /etc/profile
-rw-r--r--. 1 esadm1  oinstall  974 Apr 29 15:12 /home/esadm1/.bashrc
-rw-r--r--. 1 oracle2 oinstall  370 Apr 29 15:12 /home/oracle2/.bashrc
-rw-r--r--. 1 psadm1  oinstall  878 Apr 29 15:12 /home/psadm1/.bashrc
-rw-r--r--. 1 psadm2  oinstall 1097 Apr 29 15:12 /home/psadm2/.bashrc
-rw-r--r--. 1 psadm3  appinst   929 Apr 29 15:12 /home/psadm3/.bashrc
Start Cloud Manager using below commands or use the psadmin utility.
$ sudo systemctl start psft-db-<DBName>.service
$ sudo systemctl start psft-appserver-APPDOM.service
$ sudo systemctl start psft-prcs-PRCSDOM.service
$ sudo systemctl start psft-pia-peoplesoft.service
Restore the /cm_psft_dpks/cloud folder to all managed instances. This step is required if restoring from a latest Cloud Manager version to an older version. For example, restoring back to Cloud Manager Image 8 from Cloud Manager Image 9.
Restoring to Linux instances
SSH into Cloud Manager.
Switch user to psadm2.
$ sudo su – psadm2Securely copy the cloud directory from Cloud Manager to a managed node.
$ scp –i /home/psadm2/psft/data/cloud/ocihome/keys/cm_adm_pvt_key –r /cm_psft_dpks/cloud/ opc@< Instance1 IPADDRESS>:/home/opc/cloudWhere <Instance1 IPADDRESS> is the first item in each row having unix as second field in backed up file /home/psadm2/managedenvironments.txt.
Repeat the above copy step for all IP addresses tagged as unix in the file managedenvironments.txt.
Restoring to Windows instances
RDP into any Windows instance in the same VCN as the Cloud Manager.
From the above Windows machine, RDP into each Windows instance listed in the backed up file managedenvironments.txt. The password is also captured in the same file.
Access fileserver machine by opening the share \\<file_server_IP>\u01\app\oracle\product.
Copy cloud folder from fileserver into D:\cloud.
Important! Delete the managedenvironments.txt file after completing the cloud folder restores on all nodes.
To delete a block volume backup, the user must provide the backup name. User can list the existing backups then select the backup name to delete.
To delete a block (data) volume backup:
Run the utility with the restore option.
sh cm_backup_restore.sh -o delete -n <backup_name>User will be prompted to enter a passphrase for the private API signing key.
Enter the passphrase if it exists or press enter.
The backup volume will be deleted.
Example:
[opc@smncm cm_backup_and_restore]$ sh cm_backup_restore.sh -o delete -n BLOCK_VOLBKP_SMNCM_20190410_110419
Please Enter Private Key Pass Phrase :
2019-04-19 10:16:02 -     INFO -  658 : Getting BLOCK volume backup 'BLOCK_VOLBKP_SMNCM_20190410_110419' details from OCI
2019-04-19 10:16:02 -     INFO -  666 : BLOCK volume backup 'BLOCK_VOLBKP_SMNCM_20190410_110419' Id : 'ocid1.volumebackup.oc1.iad.abuwcljre6zjpqrmk6ceqim3vu5jnmwt5zw4zb5vostgq55umw2bij5tt7cq'
2019-04-19 10:16:02 -     INFO - 1146 : Deleting volume backup : BLOCK_VOLBKP_SMNCM_20190410_110419
2019-04-19 10:16:02 -     INFO - 1157 : Deleted BLOCK volume backup 'BLOCK_VOLBKP_SMNCM_20190410_110419'