Roadmap: Installing Siebel CRM for a New Deployment
Use this roadmap to guide you in performing the installation and configuration tasks for deploying Siebel CRM, where there is no existing Siebel CRM installation and no existing Siebel database.
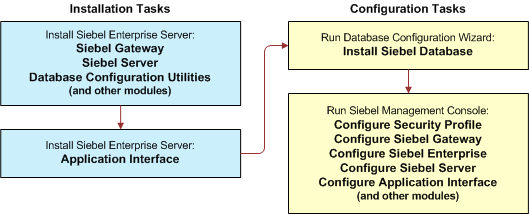
The following figure presents a simplified view of the installation and configuration tasks for Siebel CRM server modules for a new deployment, which are as follows:
-
Installation Tasks. Install Siebel Enterprise Server and the following components: Siebel Gateway, Siebel Server, Database Configuration Utilities (and other modules), Siebel Application Interface.
-
Configuration Tasks. Run the Database configuration Wizard and install Siebel Database. Run Siebel Management Console and configure the following: Security Profile, Siebel Gateway, Siebel Enterprise, Siebel Server, Siebel Application Interface (and other modules).
Unless you use another authentication method, a Siebel database must exist before you can configure the Siebel CRM modules, in order to provide an authentication framework for the configuration tasks. (Database Configuration Utilities is no longer a selectable option for new installations. Instead, you install New Database Repository with the first Siebel Server.)
The installation process for Siebel CRM for a new deployment requires multiple tasks that you perform in the following general sequence:
-
Before performing installation and configuration tasks, review all documented requirements.
-
Create the network image for the current Siebel CRM release.
-
Install Siebel CRM. You can select the following Siebel CRM modules to install:
-
Siebel Enterprise Components (includes Siebel Server, Siebel Gateway, Siebel Application Interface, and other components)
-
New Database Repository (requires installing Siebel Enterprise Components)
-
Ancestor Database Repository (requires installing Siebel Enterprise Components)
-
Siebel Web Client
-
Siebel Tools
See Siebel CRM Download and Installation. In particular, see Installing Siebel CRM in a New Installation.
-
-
Choose the following configuration options, depending on your installation selections:
-
Application Interface Container Configuration
-
Enterprise Container Configuration
-
Siebel Web Client Configuration (Mobile Web Client or Developer Web Client)
For these configuration options, you specify authentication information and port numbers that will be used by your Siebel CRM deployment. The port numbers must be unique on each installation computer or operating system instance. You must perform these tasks before you do Siebel Management Console configuration tasks.
-
-
(Optional) Install Siebel Enterprise Components on additional nodes, such as if you will use Siebel Gateway clustering.
-
Verify the installation of Siebel CRM modules.
-
Configure the RDBMS.
-
Install the Siebel database.
This task installs a Siebel database for Siebel CRM. This database contains schema changes, Siebel Repositories, and seed data for Siebel CRM functionality through the current release.
-
Activate the license keys.
-
Run the Siebel Management Console and configure your Siebel deployment:
-
Configure a security profile.
-
Configure the Siebel Gateway. (Configure the primary Siebel Gateway, for a cluster environment.)
-
(Optional) Configure the Siebel Gateway cluster.
-
Configure the Siebel Enterprise.
-
Configure the Siebel Server.
-
Configure the Siebel Application Interface.
-
Perform any other configuration tasks that you require for your deployment.
-
-
Perform additional postinstallation tasks.
-
(Optional) Install additional Siebel CRM modules. For example:
-
Desktop Integration Siebel Agent (DISA)
-
Siebel Search software
-
Siebel Test Execution
-
Siebel Approval Manager
-
-
(Optional) Install and configure additional instances of Siebel Gateway, Siebel Server, or Siebel Application Interface if they are required for your deployment, then verify each installation.
-
Perform any remaining postinstallation tasks. For example, install any required third-party products.
See the Certifications tab on My Oracle Support.
Related Topics
Installation-Related Changes in Siebel CRM
Roadmap: Installing Siebel CRM in an Upgrade Case (Existing Database Requiring Full Upgrade)
Related Books
Siebel CRM Update Guide and Release Notes on My Oracle Support