Example: Adding a Promotion Line Item
This example shows the expected output when you apply a promotion to a customizable product that is based on the Promotion Automatch argument value, which can be set to either Default Cardinality or Min Max Cardinality. In this example:
A customizable product named CP1 is defined and a promotion named Promo1 is defined as shown in the following figure.
CP1 is then customized as shown in the second figure in this topic.
The expected output when you apply a promotion (Promo1) to a customizable product (CP1) that is based on the Promotion Automatch argument value is shown in the third figure in this topic.
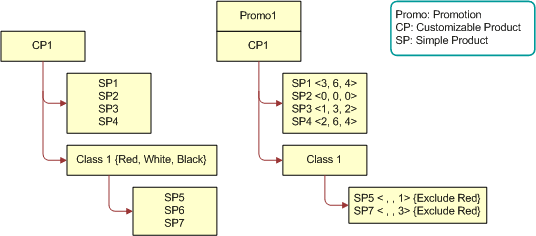
The first figure in this topic shows a product named CP1 with the following structure: CP1 has four simple product relationships defined (SP1, SP2, SP3, SP4) and a Product Class named Class 1. A further three simple product relationships (SP5, SP6, SP7) are defined and associated with Class 1. Class 1 is associated with an attribute that has the values {Red, White, Black}.
The first figure in this topic shows a promotion named Promo1, where CP1 has the following structure: CP1 has four simple product relationships defined (SP1, SP2, SP3, SP4) and a Product Class named Class 1. A further two simple product relationships (SP5, SP7) are defined and associated with Class 1. For SP1, Min is set to 3, Max is set to 6, and Default is set to 4. For SP2, Min is set to 0, Max is set to 0, and Default is set to 0. For SP3, Min is set to 1, Max is set to 3, and Default is set to 2. For SP4, Min is set to 2, Max is set to 6, and Default is set to 4. For SP5, Default is set to 1, and the attribute value Red is excluded for this relationship. For SP7, Default is set to 3, and the attribute value Red is excluded for this relationship.
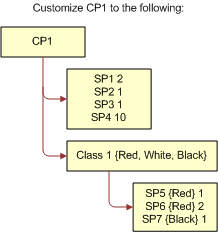
The second figure in this topic shows the customized CP1 with the following structure: CP1 has four simple product relationships defined (SP1, SP2, SP3, SP4) and a Product Class named Class 1. A further three simple product relationships (SP5, SP6, SP7) are defined and associated with Class 1. Class 1 is associated with an attribute with the values {Red, White, Black}. SP1 has a default quantity of 2, SP2 has a default quantity of 1, SP3 has a default quantity of 1, and SP4 has a default quantity of 10. SP5 has a default quantity of 1 and the attribute value Red. SP6 has a default quantity of 2 and the attribute value Red. SP7 has a default quantity of 1 and the attribute Black.
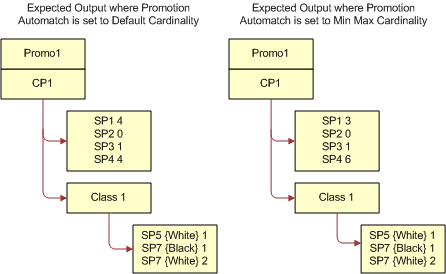
The third figure in this topic shows the expected output when Promotion Automatch is set to Default Cardinality, which is as follows: SP1 has a default quantity of 4, SP2 has a default quantity of 0, SP3 has a default quantity of 1, and SP4 has a default quantity of 4. SP5 has a default quantity of 1 and the attribute value White. SP7 has a default quantity of 1 and the attribute value Black. SP7 has a default quantity of 2 and the attribute value White.
The third figure in this topic shows the expected output when Promotion Automatch is set to Min Max Cardinality, which is as follows: SP1 has a default quantity of 3, SP2 has a default quantity of 0, SP3 has a default quantity of 1, and SP4 has a default quantity of 6. SP5 has a default quantity of 1 and the attribute value White. SP7 has a default quantity of 1 and the attribute value Black. SP7 has a default quantity of 1 and the attribute value White.
To add a promotion line item to a customizable product that is based on the Promotion Automatch argument value
Create the product structure for CP1 and Promo1 as shown the first figure in this topic.
Add CP1 to a quote or an order line item, and then customize CP1 as shown in the second figure in this topic.
Choose Promo1 for CP1 using the promotion picker.
The third figure in this topic shows the expected output when Promotion Automatch is set to Default Cardinality, and when Promotion Automatch is set to Min Max Cardinality.
For more information about how Siebel CRM behaves depending on the Promotion Automatch argument value, see the first table in this topic.