Setting Up Siebel Coherence Cache Client
You need to configure the Coherence client in Siebel to connect to and use the Coherence cache service.
This involves creating the appropriate cache client configuration files, defining the cache name, and ensuring that the client can discover and communicate with the Coherence cluster.
Creating the Coherence Cache Client Profile
Just as you created profiles for each of your Coherence nodes, you must create a client profile for your Siebel server which will be a client of the cache. This profile instructs the Siebel server how to find and use the Coherence cache. The profiles are not deployed as you did with the Cache Server Profiles. They are, when submitted, written to Zookeeper. The values you have entered are stored in Zookeeper and read by the Siebel Server when the server starts. In a future release, we will enable deploying the Cache Client Profile from the Siebel Management Console.
The Siebel connects to the Coherence service using the Coherence Proxy Client which comes with the Siebel build starting with version 25.6, which in turn connects to the Proxy Service running on the Coherence Server. The Coherence Server hosts only two services — the Proxy Service and the Cache Service. The Proxy Service routes client requests to the Cache Service running in the cluster for operations such as get, put, and remove.
The Proxy Client running in the Siebel Server uses the Enterprise Coherence Client Profile to locate the proxy services, cache name, and the addresses/ports of the Coherence Server nodes in the cluster to access and perform cache operations. Hence, the Enterprise Coherence Client Profile specifies a service name, cache name, Addresses and Port.
Out of the box, the proxy service name is ExtendTcpProxyService and the cache name is siebelcache. The addresses use the loopback addresses and ports because the connection is secured via SSH.
The SSH Configuration section handles the SSH operations needed to create tunnels between the Siebel server and each Coherence server node. We use public key–based authentication for SSH. This requires copying the public key from the SSH client to the SSH server along with a few additional setup steps.
When Enable SSH is checked and the SSH Server Configuration is made in the SMC under the Enterprise Cache Client Profile section, starting the Siebel service triggers the following tasks on SSH Client and SSH Servers:
-
Generates key files using the Elliptic Curve Digital Signature Algorithm (ECDSA) algorithm and creates the public key file id_ecdsa.pub in the SSH client machine under C:\Users<username>.ssh
-
Copies the public key file and creates the administrators_authorized_keys file in SSH Server.
-
Appends the public key contents from
id_ecdsa.pub to
                            C:\ProgramData\ssh\administrators_authorized_keys
in SSH Server. -
Any public keys placed in the file administrators_authorized_keys are trusted for further logins in SSH Server.
-
When a new node joins, it repeats steps 2 to 4 during a Siebel re-start.
Unlike Cache Server Profiles, cache client profiles are not deployed directly through the tab. When a Cache client profile is submitted, its values are written to Zookeeper, where they are stored. During Siebel Server startup, these stored values are then written into the coherence-extend-config.xml file, which the Siebel Server reads at initialization.
To create and deploy an Enterprise Cache Client profile
- Sign in to the SMC for your Siebel Server.
- Create a new Enterprise Cache Client profile.
- Enter the following values:
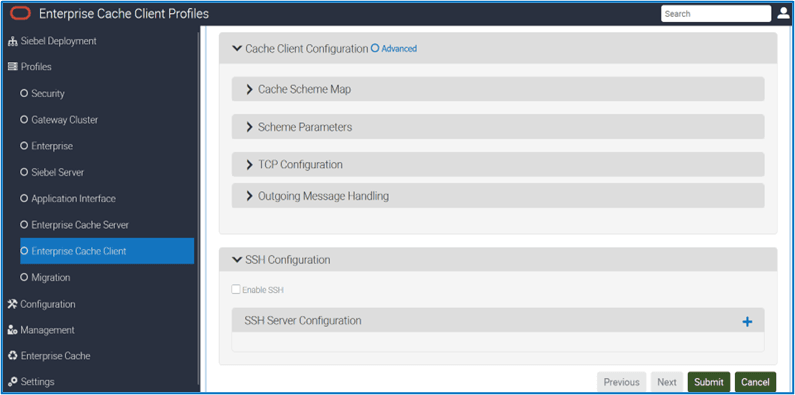
Cache Client Configuration > Cache Scheme Map
| Profile Field |
Suggested Value |
Description |
|---|---|---|
|
Cache Name |
siebelcache |
This value must match the value used in the Cache Name field in your Enterprise Cache Server Profiles. By default, All the Siebel component is configured to use the cache name “siebelcache”. Siebel recommends same for both Cache Server Profile and Cache Client Profile. |
|
Scheme Name |
remote |
This makes it clear that this is intended to point to a remote machine. Whatever value you pick, it must be re-used when we define this scheme in Scheme Parameters section |
Cache Client Configuration > Scheme Parameters
|
Profile Field |
Suggested Value |
Description |
|---|---|---|
|
Scheme Name |
remote |
This makes it clear that this is intended to point to a remote machine. This must match the value chosen in the previous section. |
|
Service Name |
ExtendTcpProxyService |
Default: ClientExtendTcpProxyService – This is the service that Siebel CRM will use to communicate to Coherence. |
Cache Client Configuration > TCP Configuration
|
Profile Field |
Suggested Value |
Description |
|---|---|---|
|
Cache Server Host |
127.0.0.1 |
This represents the loopback address used for the SSH tunnel—which is always 127.0.0.1. Don't change this Value for any nodes |
|
Port |
7077 |
This is the port number on which Siebel listens via the SSH tunnel. Siebel recommends using a unique port for each node when creating SSH connections—typically in the 707x range; for example 7077 for Node 1, 7078 for Node 2, and so on. |
Cache Client Configuration > Outgoing Message Handling
|
Profile Field |
Suggested Value |
Description |
|---|---|---|
|
Heartbeat Interval |
30s |
Default: 30s - Specifies the interval between ping requests. A ping request is used to ensure the integrity of a connection. Don't change this value. |
|
Heartbeat Timeout |
15s |
Default: 15s - Specifies the maximum amount of time to wait for a response to a ping request before declaring the underlying connection unusable. Don't change this value. |
|
Request Timeout |
30s |
Default: 30s - Specifies the maximum amount of time to wait for a response message before declaring the underlying connection unusable. Don't change this value. |
SSH Configuration
|
Profile Field |
Suggested Value |
Description |
|---|---|---|
|
Enable SSH |
Check this checkbox |
Enables SSH tunneling. |
|
Cache Server Host Name Port |
Coherence Node:GatewayPort |
Specify the name and Gateway port of one of your Coherence nodes. You need to do this for each node. This tells Siebel CRM how to find the Coherence cache machines. |
|
SSH Local Port |
The port which this Siebel server is using for SSH traffic |
This is the port number on which Siebel listens through the SSH tunnel. This should be the same as the port in the TCP Configuration. You can use any available port for the connection. Siebel recommends using ports in the 707x range—for example, 7077 for Node 1, 7078 for Node 2, and so on. |
|
SSH Remote Port |
The port which this Coherence Server is using for SSH traffic |
When you set up your Coherence nodes you specified a port that the nodes use. Enter that port value here. |
From the Siebel server, you must create one SSH tunnel per Coherence node. Each tunnel needs its own unique local port on the Siebel server (e.g., 7070, 7071, 7072). Therefore, the SSH Local Port must be different in each SSH configuration created for a Coherence node to establish its tunnel.
If you reuse the same SSH local port for more than one tunnel, ports can collide and Siebel cannot reliably route traffic to different Coherence nodes. For example, if the first-connected node fails, Siebel cannot reach the remaining Coherence nodes at startup, resulting in a complete cache outage. The port is how Siebel distinguishes different Coherence Nodes and selects the correct tunnel to reach right destination when using SSH local port forwarding.
If you have three Coherence nodes, for example, create three SSH configuration sections in the SMC, each with a different SSH Local Port—for example, 7070, 7071, and 7072.
Example mapping with different Siebel Server local SSH ports mapping to three Coherence nodes where they have each used the same SSH port on their separate machines.
| Tunnel # | Local (Siebel Server) Port | Remote SSH Port (Coherence)Node |
|---|---|---|
|
1 |
localhost:7070 |
CoherenceNode1:7077 |
|
2 |
localhost:7071 |
CoherenceNode2:7077 |
|
3 |
localhost:7072 |
CoherenceNode2:7077 |
Advanced Options in Coherence Client Profile
Rather than filling out every field individually in this profile in the SMC, you can configure the Coherence client if you have expertise with Coherence—simply define the XML and copy-paste it in Advanced Options. This gives you a fast, reliable way to define all your Enterprise Cache Client Profiles the same way if you have multiple Siebel Servers. When you finally submit your profile (whether you used the Advanced Options or configured all the fields manually), the SMC will write the Coherence client configuration settings to zookeeper. When the Siebel server starts, it reads the parameters from Zookeeper and writes the data to the file at <Siebel Installation Directory>\ses\siebsrvr\ADMIN\coherence-extend-config.xml.
- Repeat the TCP Configuration and SSH configuration steps for every node you defined so the Siebel server can communicate with all your Coherence nodes.
- Submit the profile.
- Restart the Siebel server.
After restarting the Siebel service, an SSH tunnel is established between Siebel and
the Coherence Server. You can verify this by checking the
Details tab in Task Manager, where you'll see
ssh.exe running.
If you have multiple Coherence Server nodes, you will define an SSH Server Configuration section for each Coherence node. Clicking the + icon adds a new section. When you restart your Siebel Server and follow the procedure below, you will see a process for each of those sections you defined; a different SSH process for each Coherence node.
The following example shows only one process.
Windows:
ssh.exe -i C:\Users\<UserID>\.ssh\id_ecdsa -C -N -c aes128-ctr -L
                    127.0.0.1:7078:127.0.0.1:7077 <userid>@<MachineName> -o
                    StrictHostKeyChecking=no
Linux:
ps -ef|grep ssh
ssh -C -N -c aes128-ctr -L 127.0.0.1:7077:127.0.0.1:7077 <MachineName> -o
                    StrictHostKeyChecking=no
Also, the OM log shows a successful connection to the Coherence cache named
<CacheName>. The following similar log entries also indicate
that the cache is connected successfully. The errors indicate that a particular
key-value pair wasn't found in the cache, but this information is only possible
because the cache is connected.
UCacheLog UCacheErrorLog 1 00000002683d20e8:0 2025-06-01 22:40:06 7884:
                    [UCACHE] Error encountered in fetching key '|Runtime Metadata Version
                    Info|System Activity Object|0' - Key does not exist.
UCacheLog UCacheErrorLog 1 00000002683d20e8:0 2025-06-01 22:40:07 7884:
                    [UCACHE] Error encountered in fetching key '|Access Control Employee|System
                    Activity Object|0' - Key does not exist.
UCacheLog UCacheErrorLog 1 00000002683d20e8:0 2025-06-01 22:40:07 7884:
                    [UCACHE] Error encountered in fetching key '|Access Control Party Reporting
                    Relationship|System Activity Object|0' - Key does not exist.